Batch Builder
In the version 2 we have developed a batch builder to help you to create, Data Tables, Data Batches, Print Label Pages the key of
these features is to help you to create custom signs number on print page using a template design, Arrowat Label Creator, do it automatically, doing it so,
any data from any software that provides JSON formatted file can be loaded.
In this documentation we explain.
- How to create product sign and export to templates
- How to use batch builder
- How to create print pages
- How to create data tables
- How to create batch products or items information from data tables
- Printing Labels
This document covers Batch Builder from start to finish step by step.
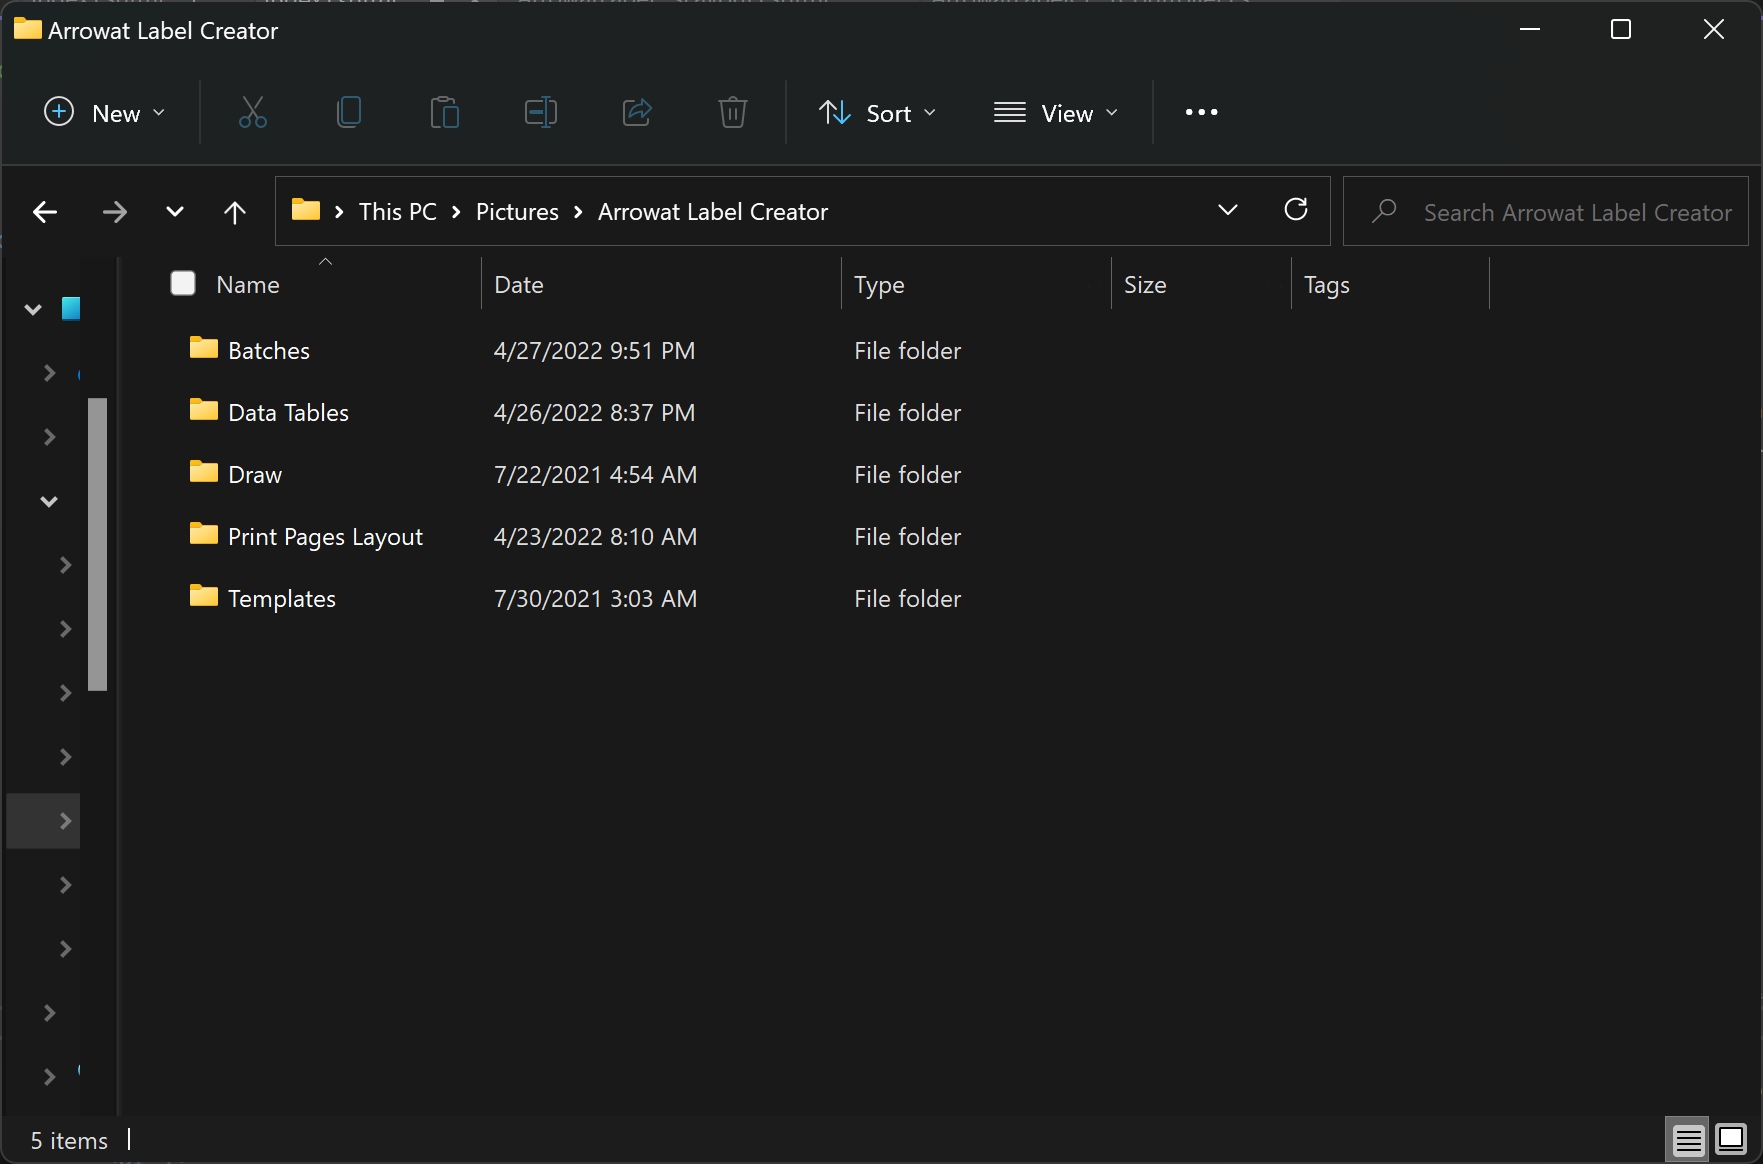
You can download the files created on this guide from GitHub https://github.com/Arrowat/Arrowat-Label-Creator an then copy the files on their folders located on the Pictures folder Arrowat Label Creator.
If don't have Arrowat Label Creator app installed, you can install it from Microsoft Store go to https://www.microsoft.com/store/apps/9NQBZLSLG6BP
Creating product sign and export to templates
We are going to create a product sign that contains Product Id, Product Brand, Product Description, Product Quantity, Product Price, Product Size, Currency Symbol.
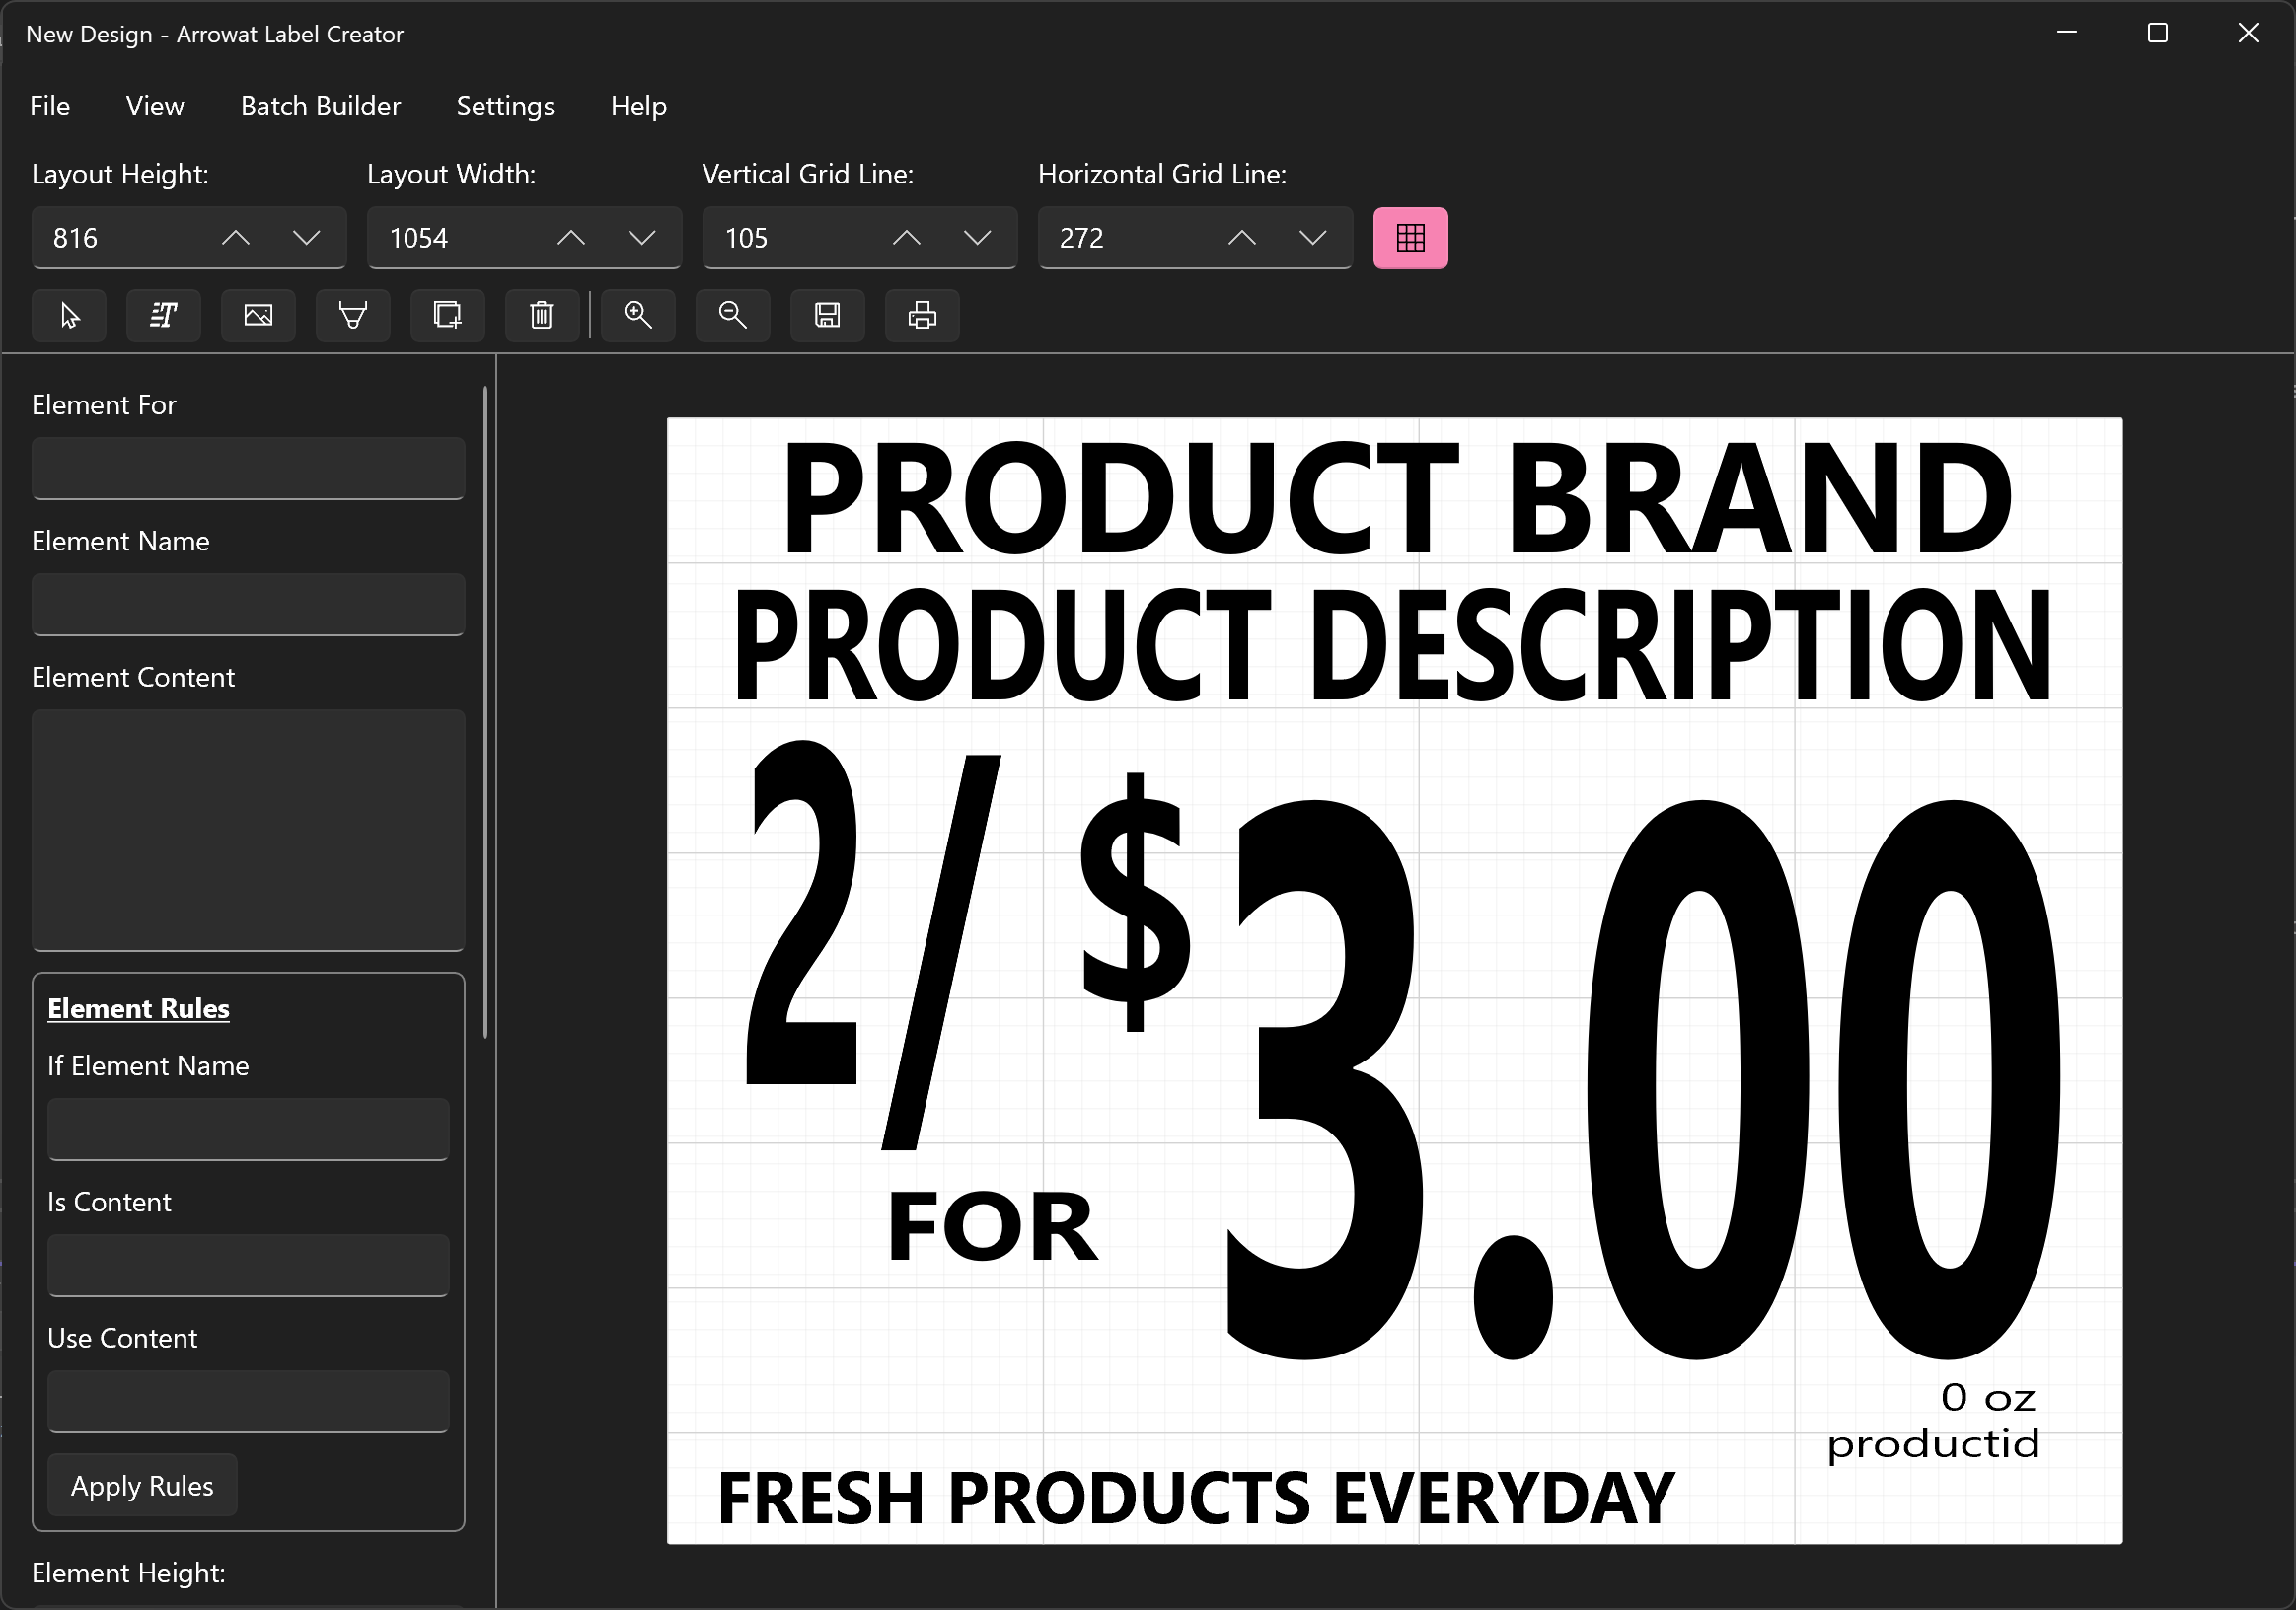
Our final design will looks like the following image.
-
Open Arrowat Label Creator
If you don't have Arrowat Label Creator you can install it from Microsoft Store, go to https://www.microsoft.com/store/apps/9NQBZLSLG6BP
-
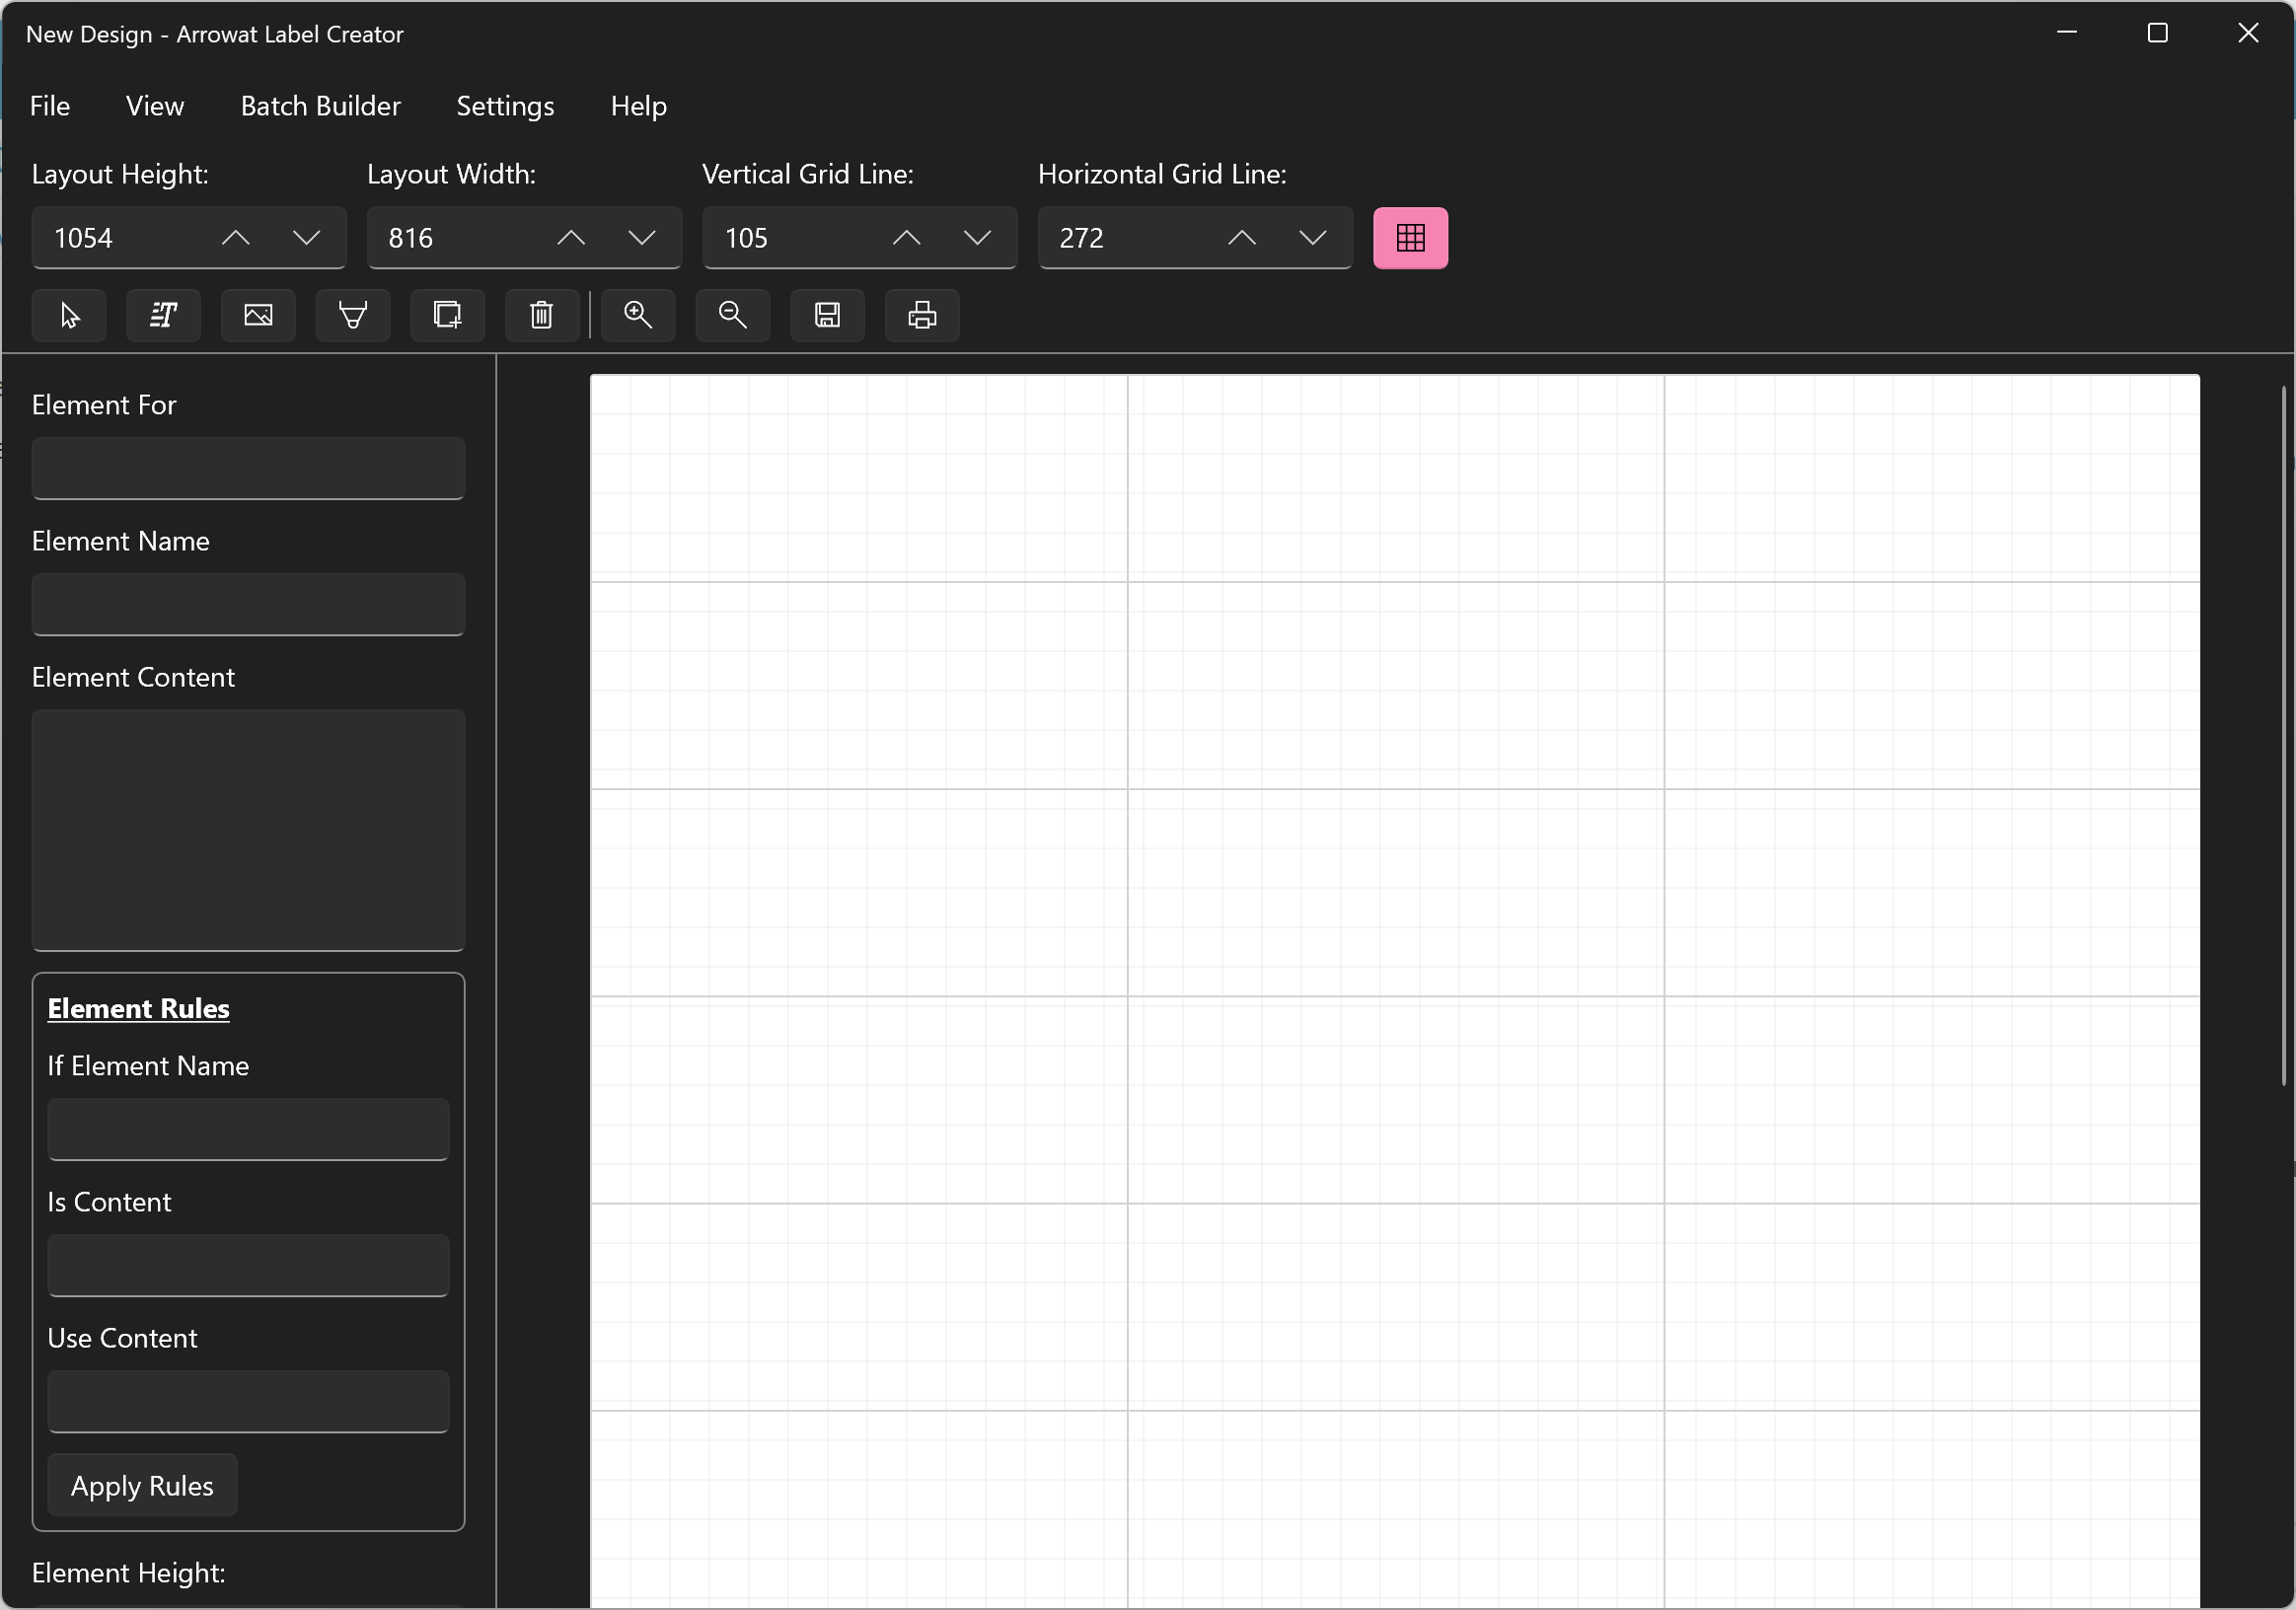
Change Layout Height to 816 and Layout Width to 1054

-
From the top bar click the Text Element button, the text element will be added to the design page

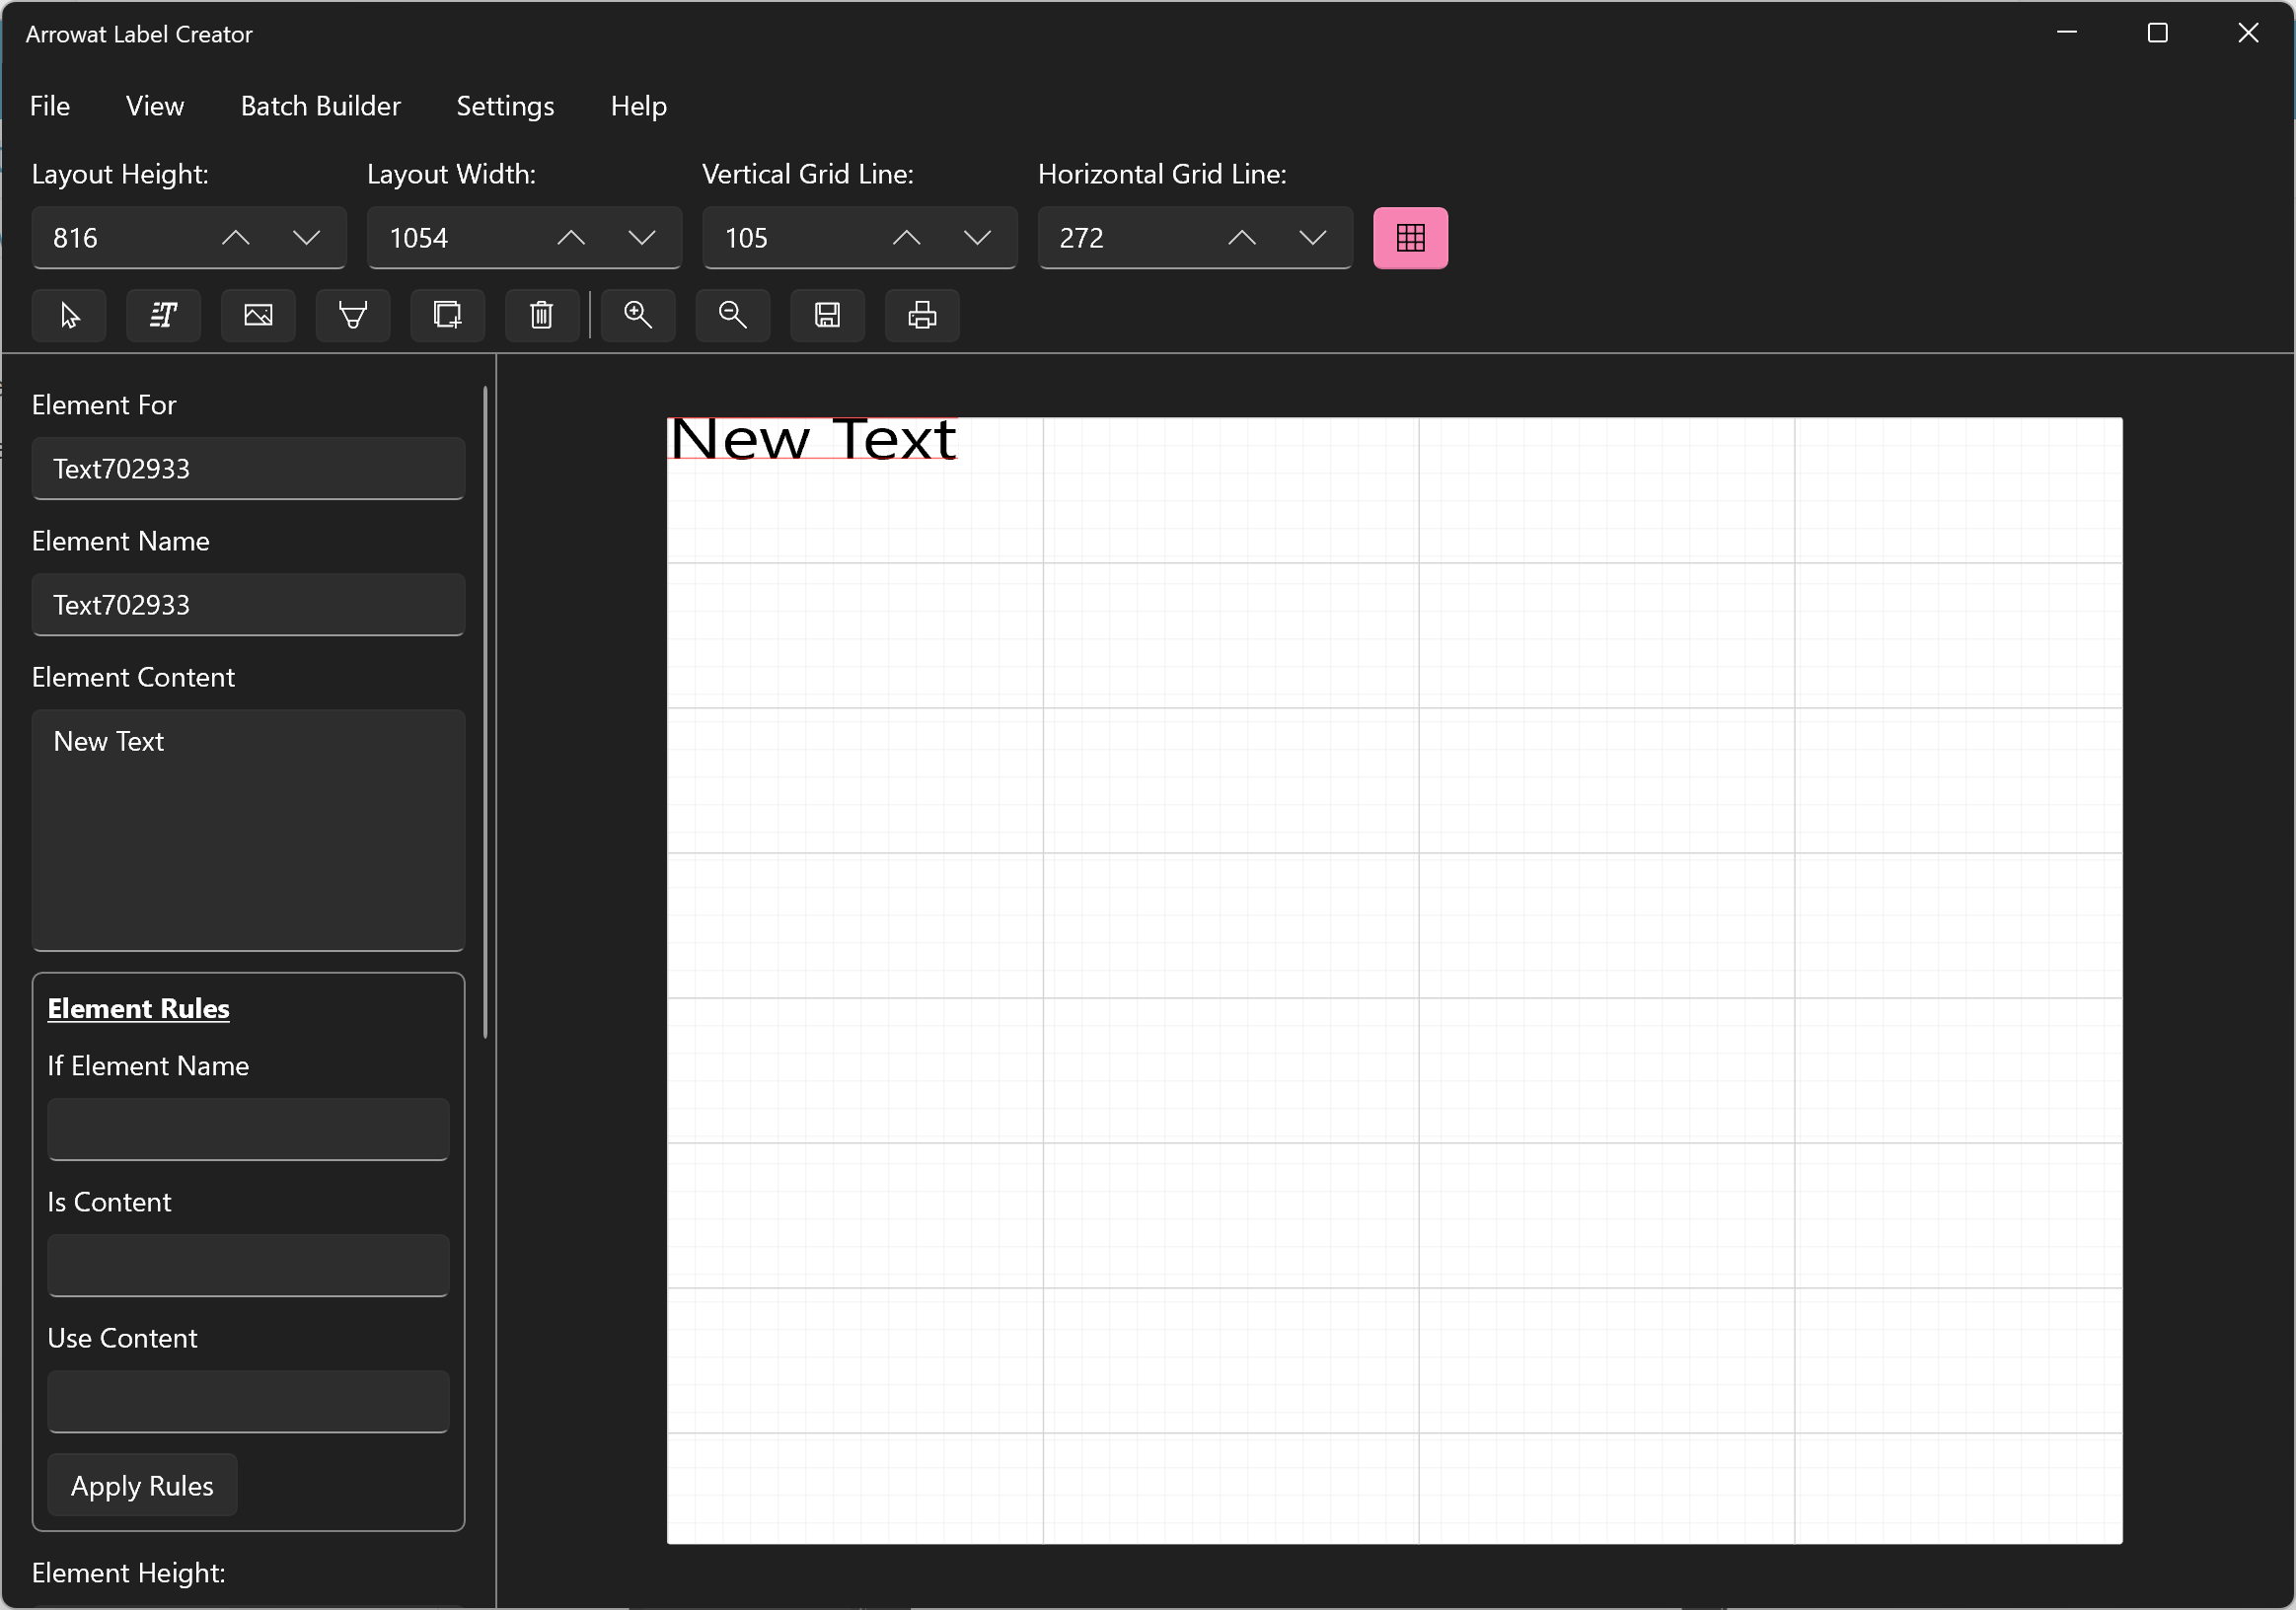
- Click on the Text Element and with the left button of the mouse keep it pressed and move the text element to center of the page.
-
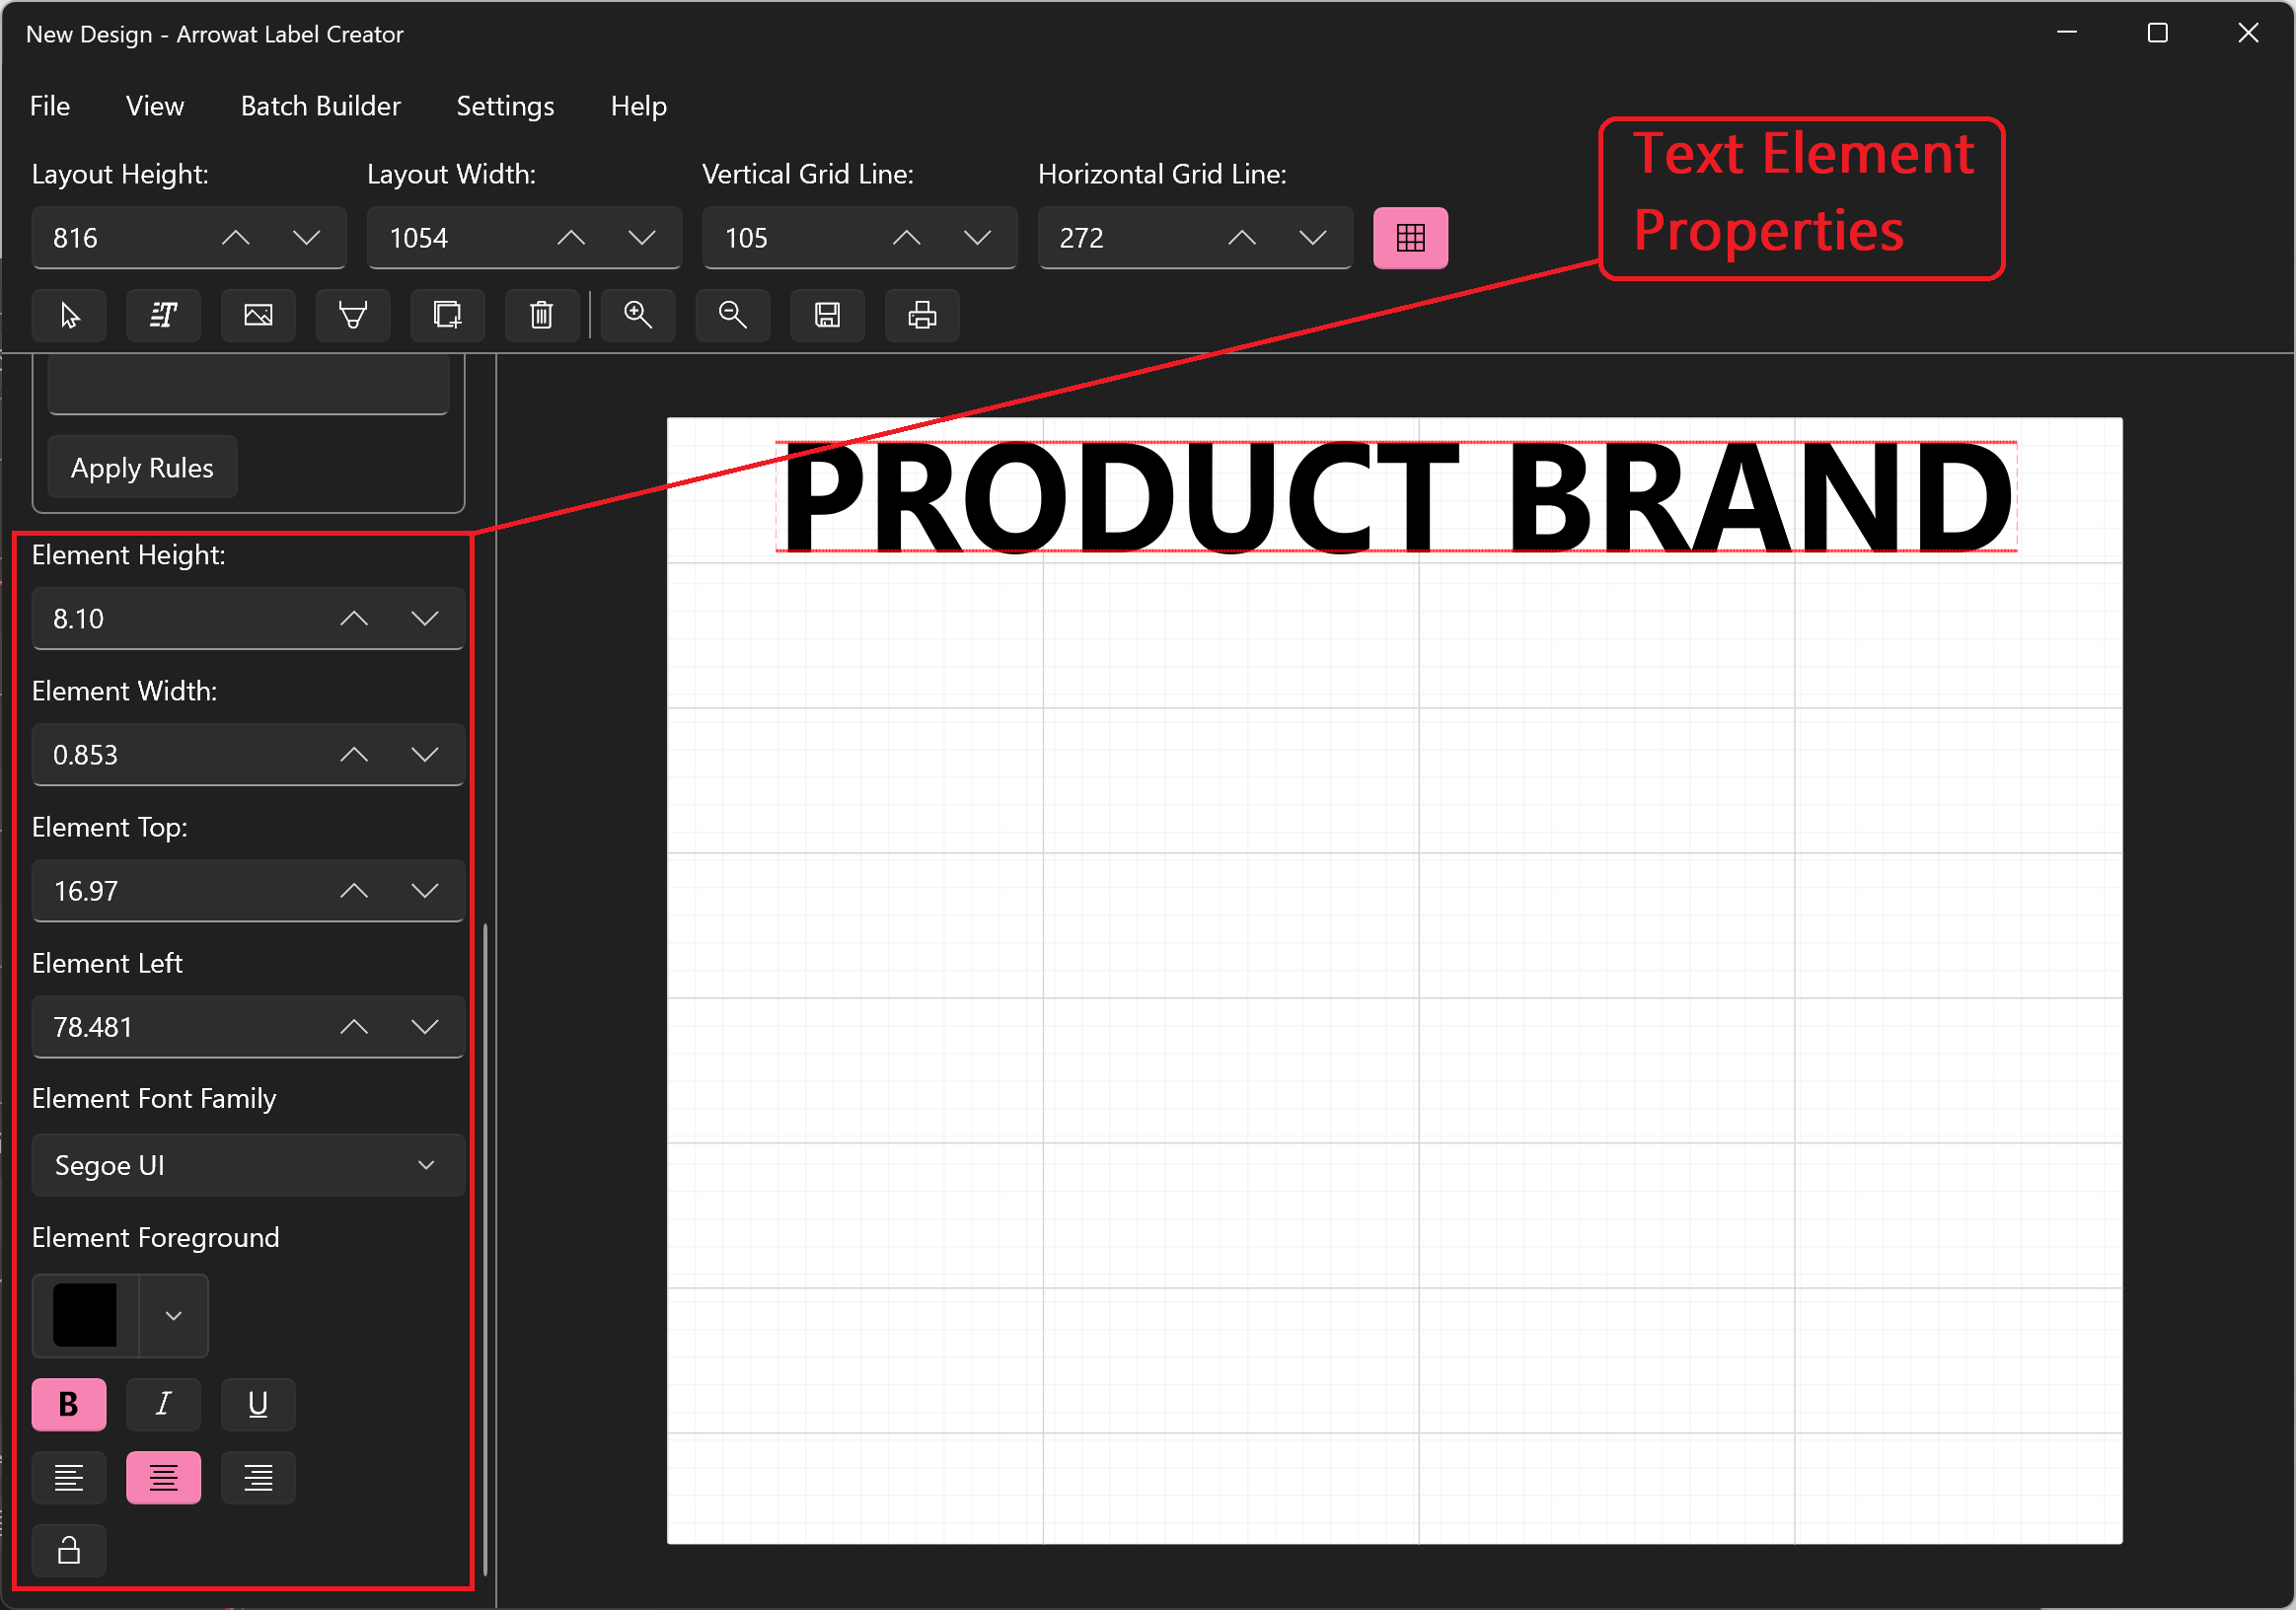
With the Text Element selected change the following properties.
PRODUCT BRAND TEXT ELEMENT
- Element For: ProductBrand
- Element Content: PRODUCT BRAND
- Element Height: 8.10
- Element Width: 0.853
- Element Top: 16.97
- Element Left: 78.481
- Element Font Family: Segoe UI
- Element Foreground: Black
- Element Font Weight: Bold
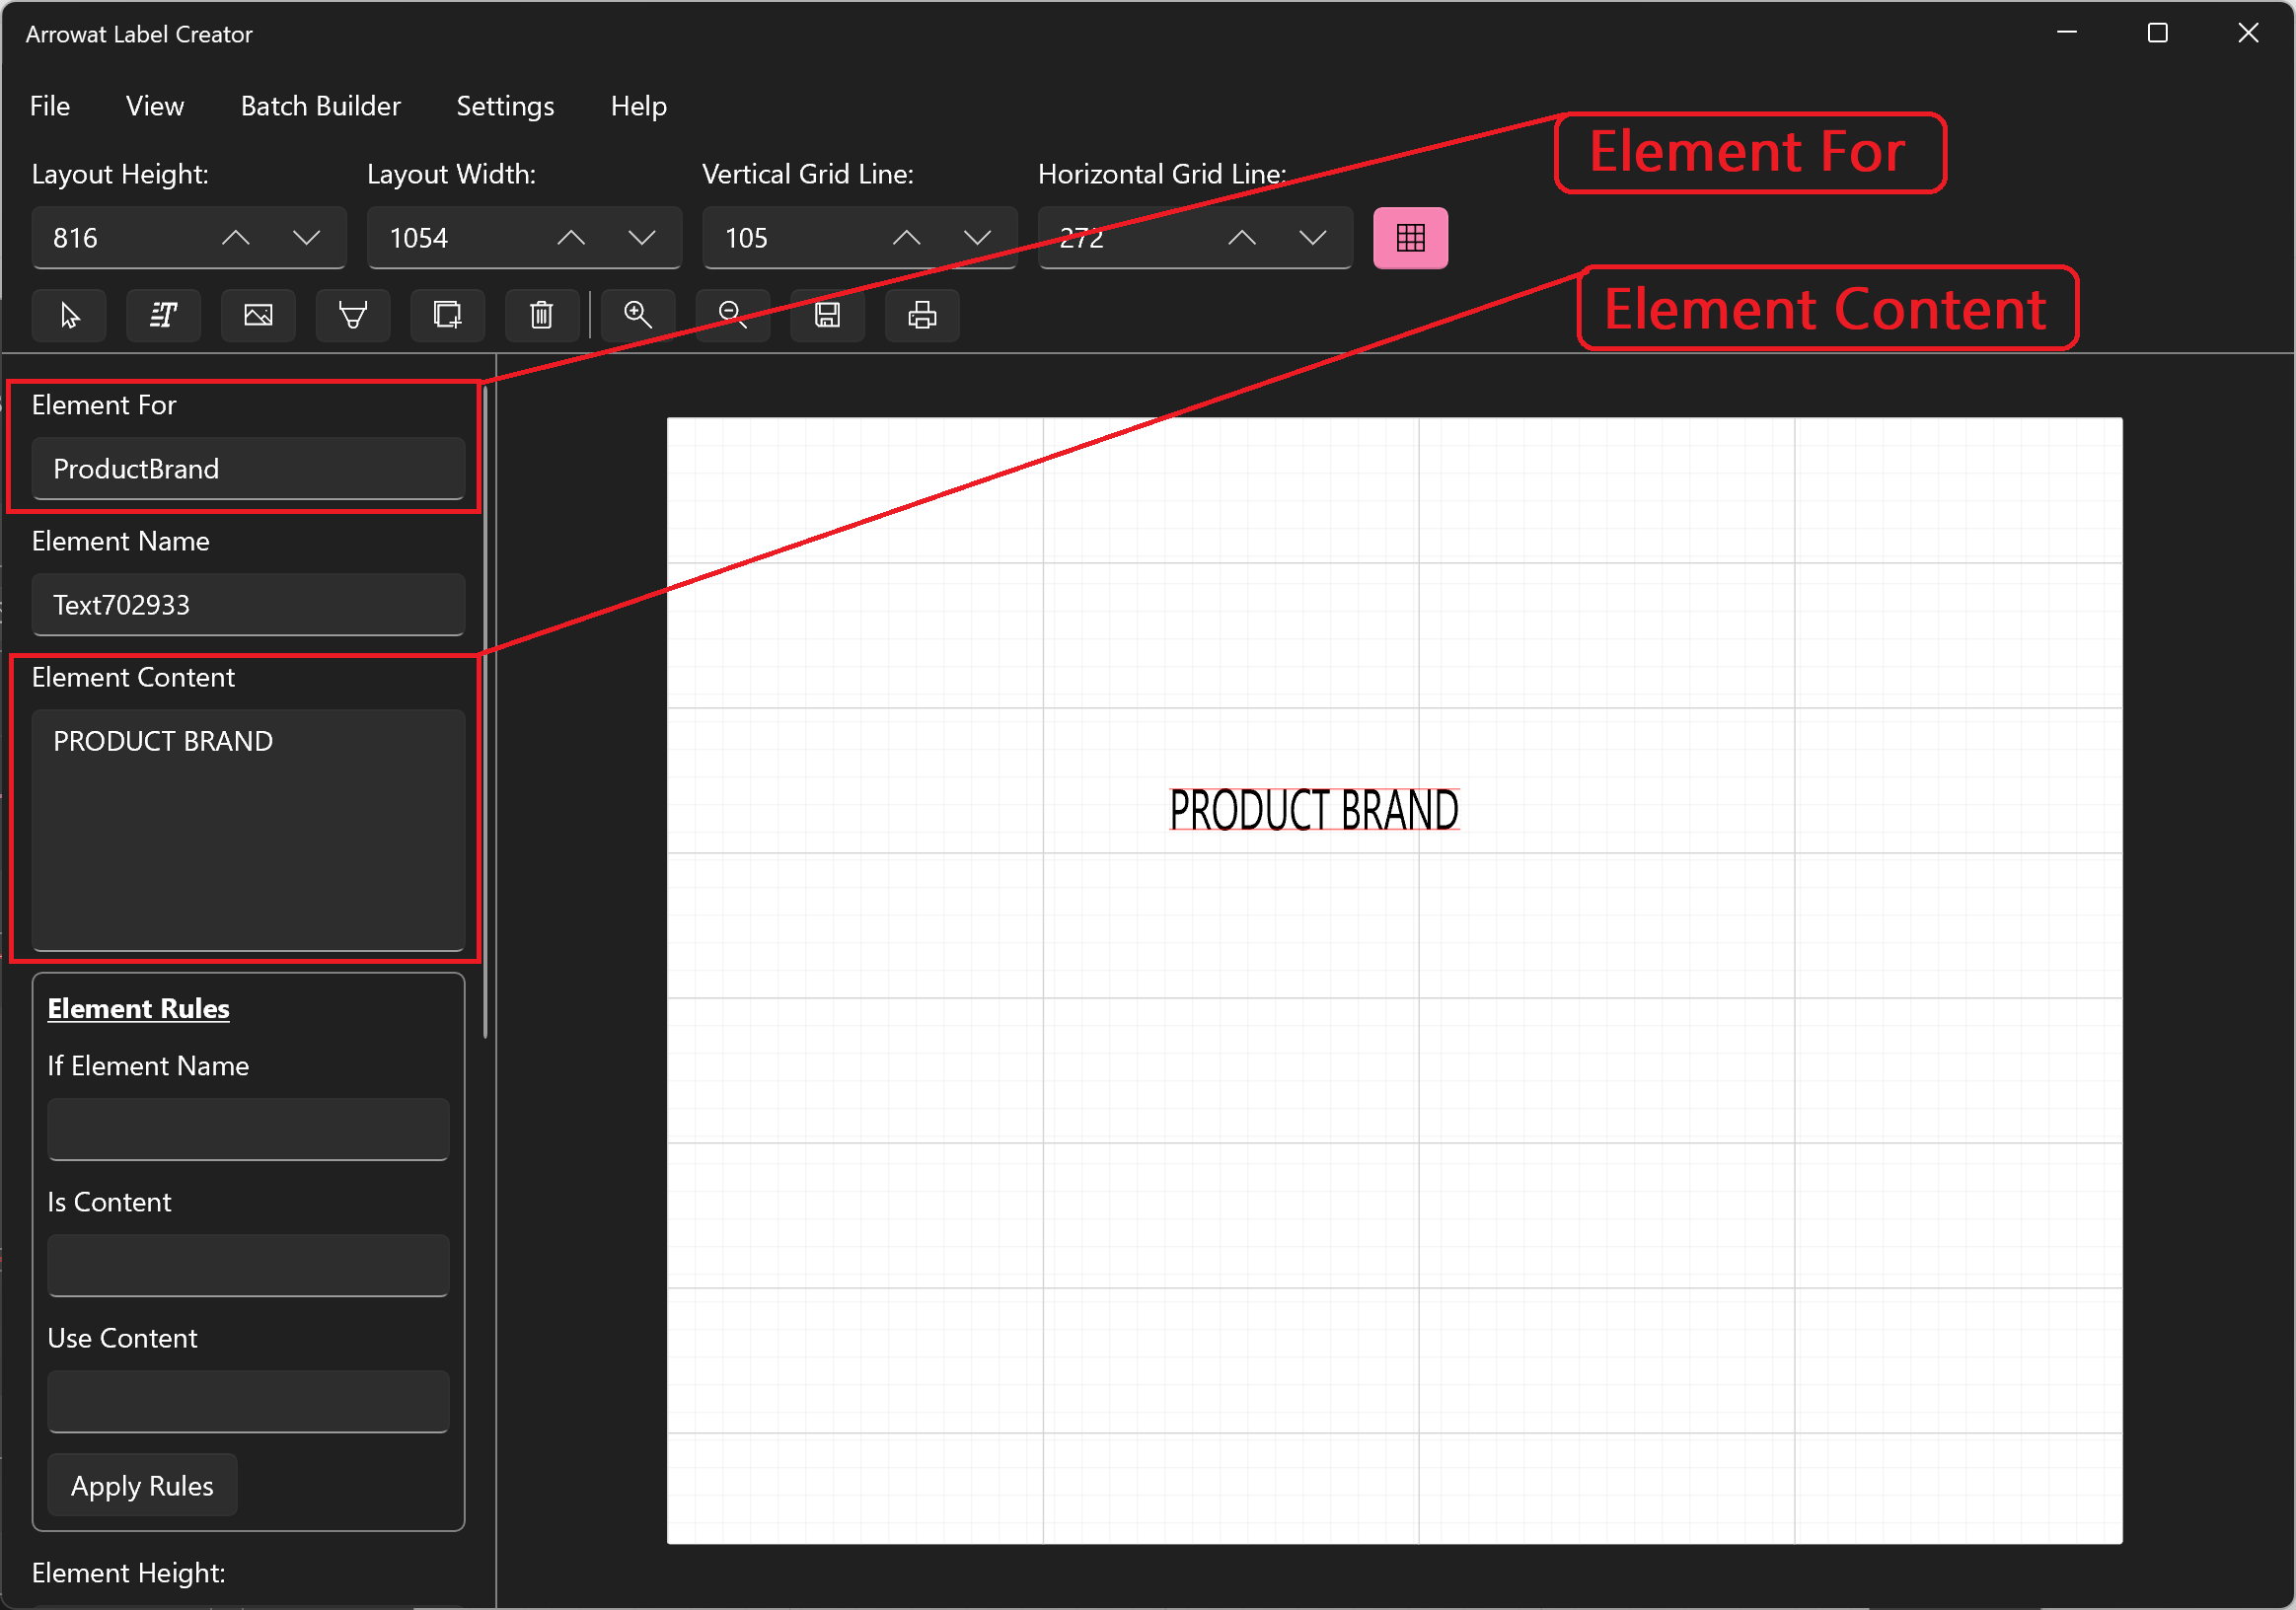
From the top bar click the Pointer Element to unselect the Text Element

Repeat the above steps and add the following Text Elements
PRODUCT DESCRIPTION TEXT ELEMENT
- Element For: ProductDescription
- Element Content: PRODUCT DESCRIPTION
- Element Height: 8.10
- Element Width: 0.914
- Element Top: 123.531
- Element Left: 44.20
- Element Font Family: Segoe UI
- Element Foreground: Black
- Element Font Weight: Bold
PRODUCT QUANTITY TEXT ELEMENT
- Element For: ProductQuantity
- Element Content: 2
- Element Height: 25.00
- Element Width: 0.098
- Element Top: 232.971
- Element Left: 48.106
- Element Font Family: Segoe UI
- Element Foreground: Black
- Element Font Weight: Bold
Apply the following Element Rules
-
If Element Name: Text605149
We are refering to ProductQuantity Element Name. - Is Content: 1
-
Use Content: Leave it Empty.
We need to hide it element when the ProductQuantity value is 1.
Explanation:
If Element Name: refers to Text Element name you want to compare with the current Text Element you are applying rules.
Is Content: two parameters are added separated by comma (,) the first parameter is the content of the Text Element you are referencing on If Element Name, the second paramter is the content of the current Text Element you are applying rules.
Use Content: if Is Content rule is met then the current Text Element you are applying rules will change it content to the value you added in Use Content.
PRODUCT QUANTITY SEPARATOR TEXT ELEMENT
- Element For: Do not change the value, it is not required
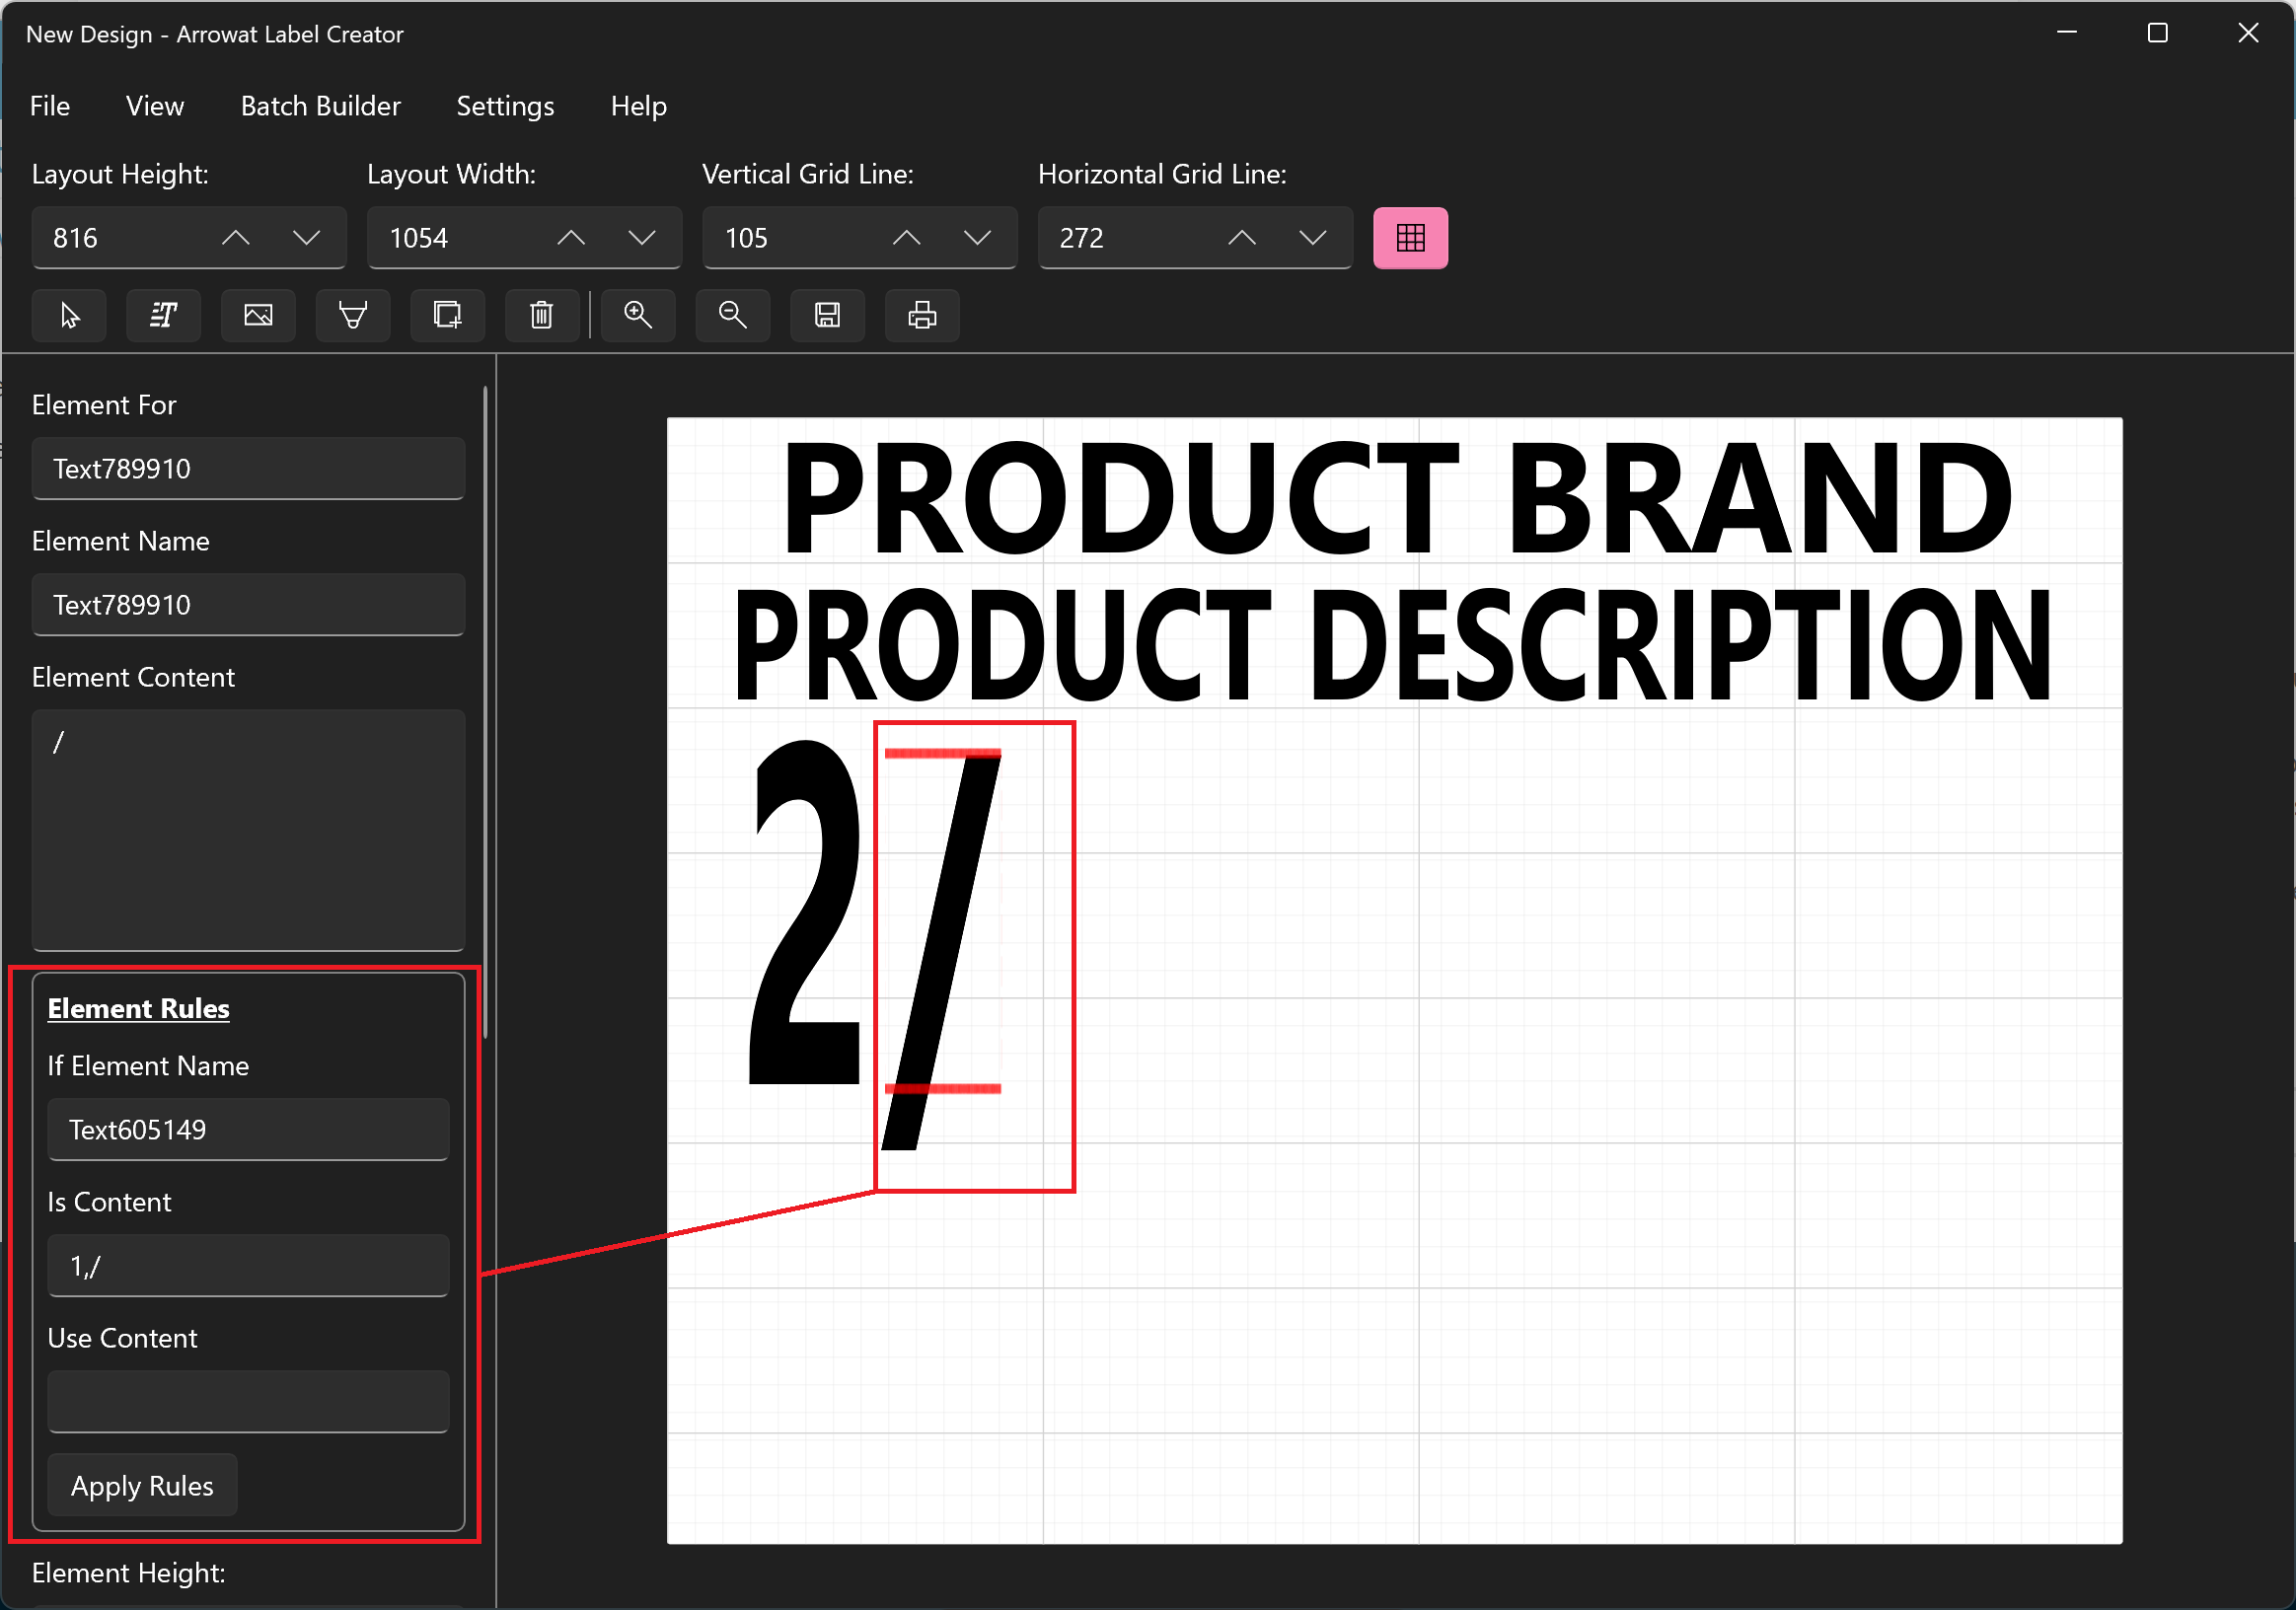
- Element Content: /
- Element Height: 25.03
- Element Width: 0.08
- Element Top: 239.648
- Element Left: 157.545
- Element Font Family: Segoe UI
- Element Foreground: Black
- Element Font Weight: Bold
Apply the following Element Rules
-
If Element Name: Text605149
We are refering to ProductQuantity Element Name. - Is Content: 1,/
-
Use Content: Leave it Empty.
We need to hide it element when the ProductQuantity value is 1.
Explanation:
If Element Name: refers to Text Element name you want to compare with the current Text Element you are applying rules.
Is Content: two parameters are added separated by comma (,) the first parameter is the content of the Text Element you are referencing on If Element Name, the second paramter is the content of the current Text Element you are applying rules.
Use Content: if Is Content rule is met then the current Text Element you are applying rules will change it content to the value you added in Use Content.
PRODUCT QUANTITY SEPARATOR FOR TEXT ELEMENT
- Element For: Do not change the value, it is not required
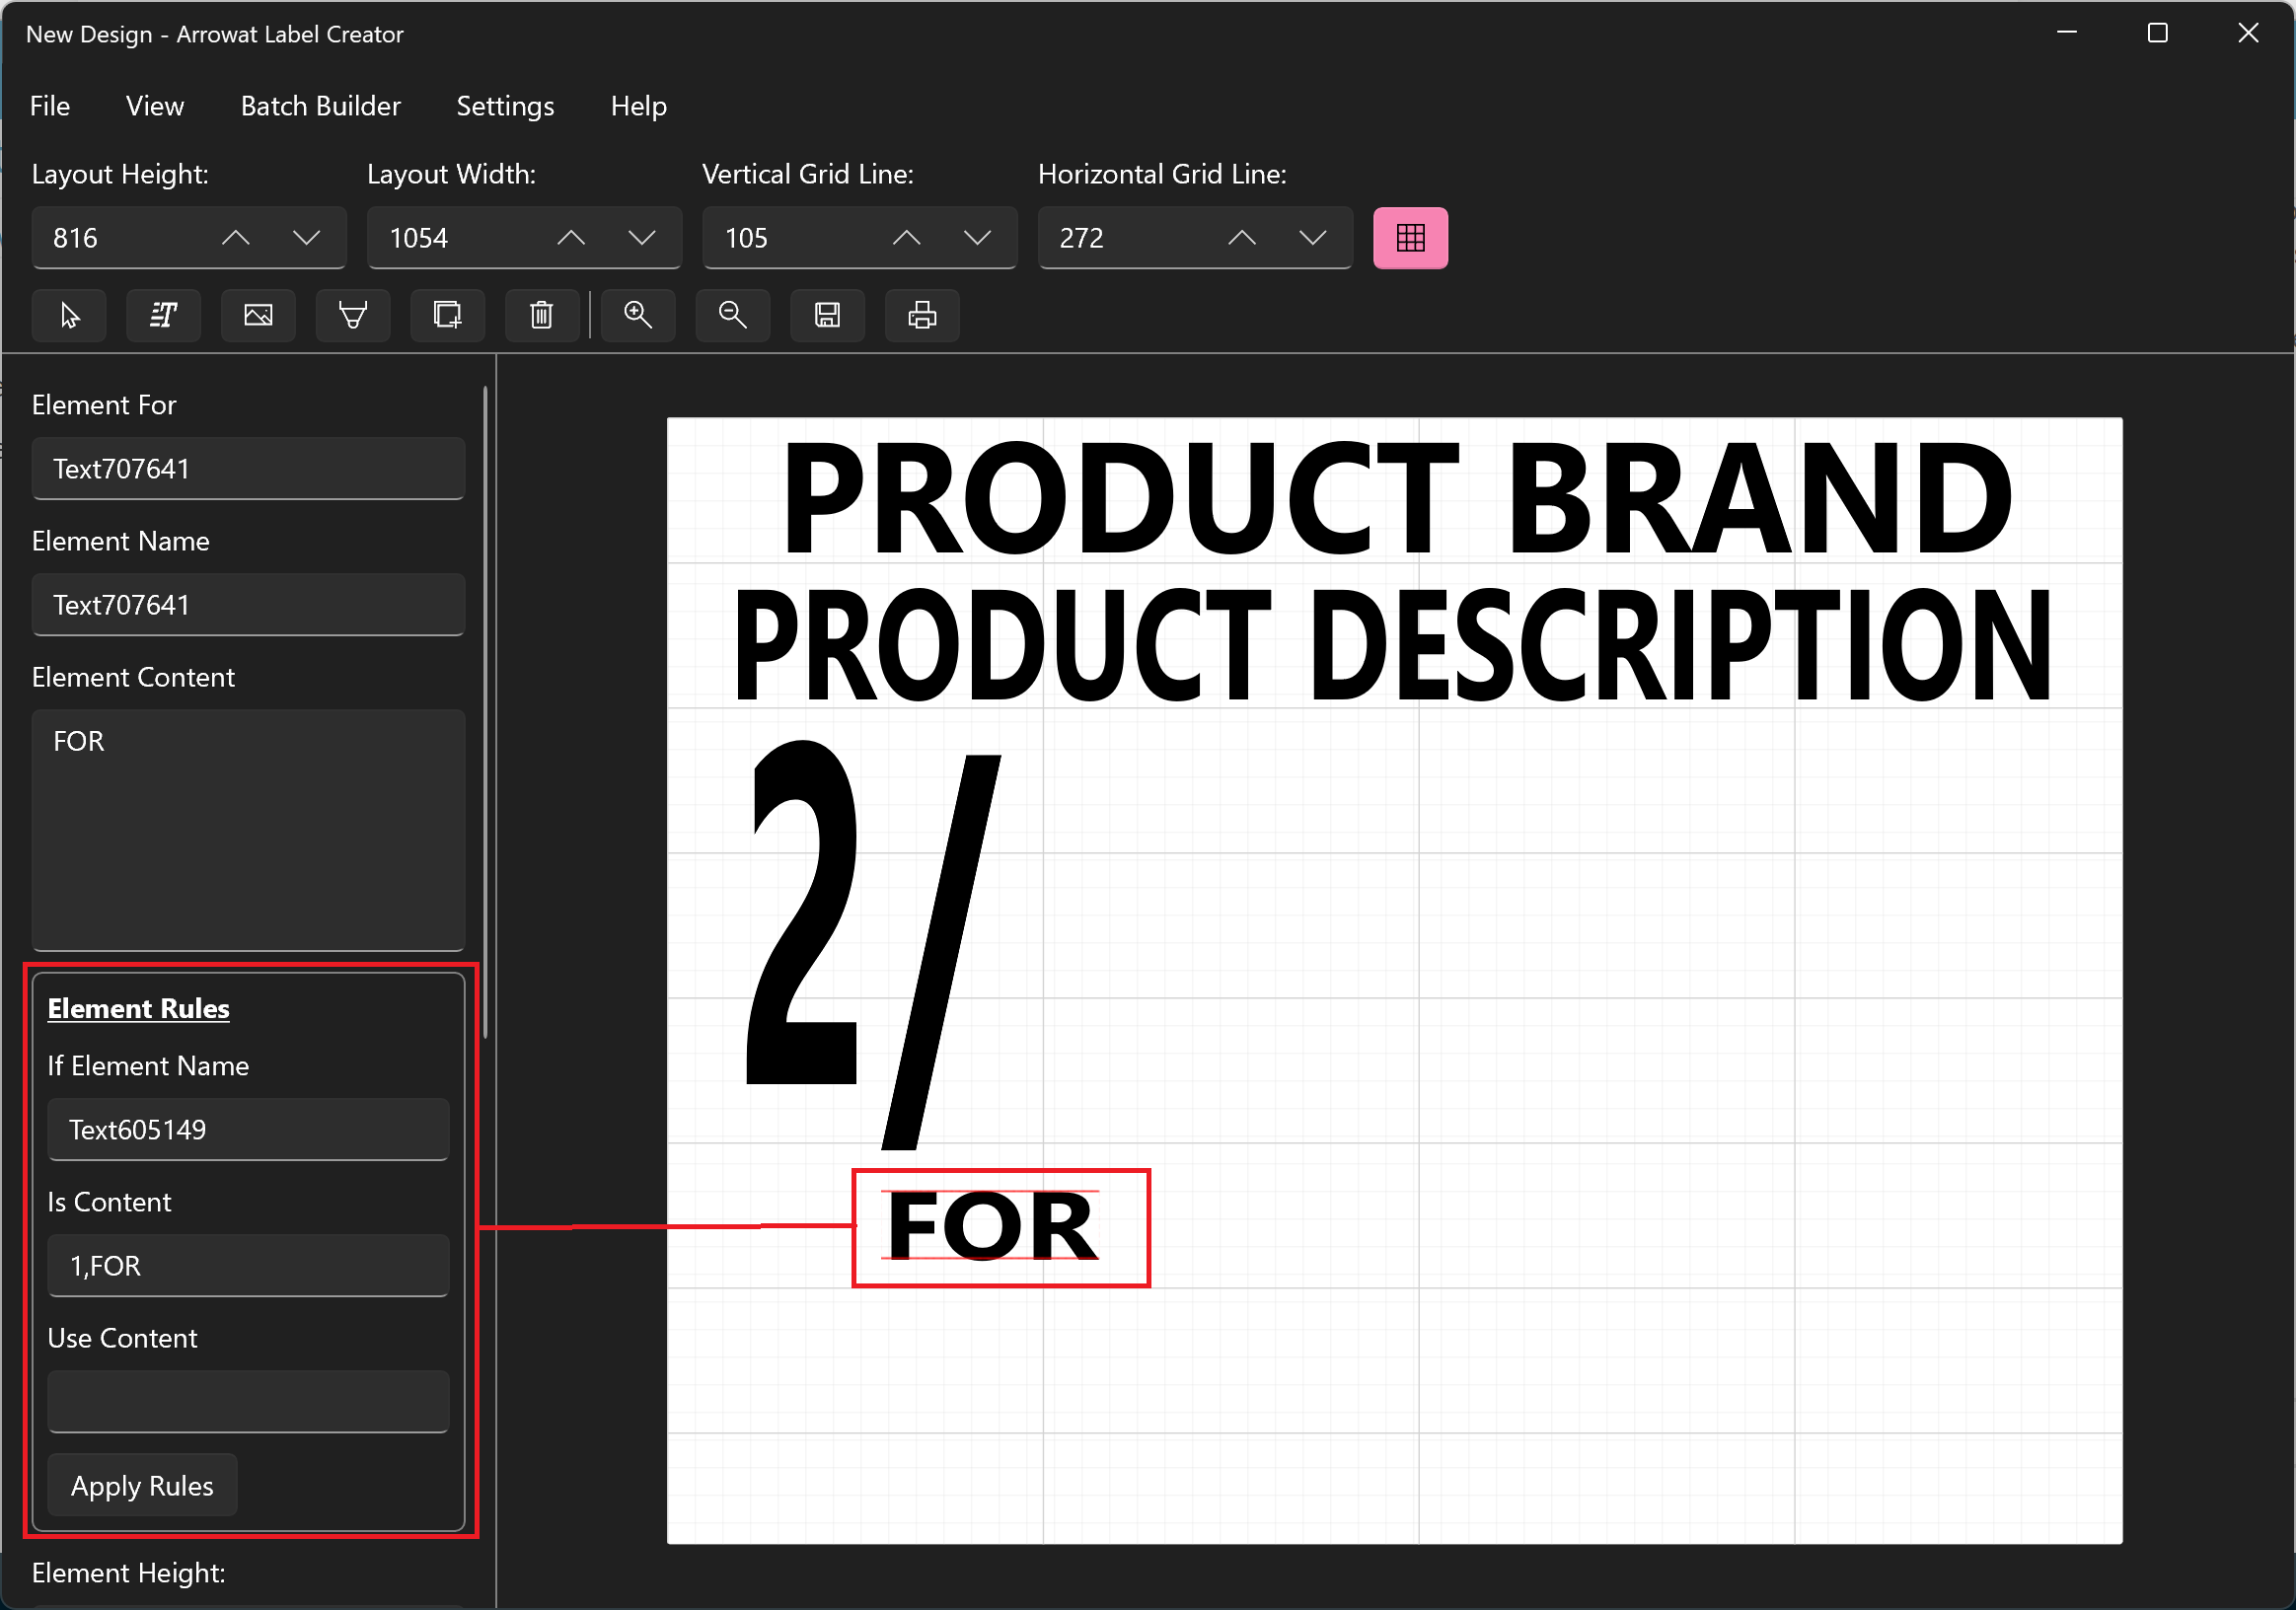
- Element Content: FOR
- Element Height: 5.00
- Element Width: 0.15
- Element Top: 559.652
- Element Left: 154.774
- Element Font Family: Segoe UI
- Element Foreground: Black
- Element Font Weight: Bold
Apply the following Element Rules
-
If Element Name: Text605149
We are refering to ProductQuantity Element Name. - Is Content: 1,FOR
-
Use Content: Leave it Empty.
We need to hide it element when the ProductQuantity value is 1.
Explanation:
If Element Name: refers to Text Element name you want to compare with the current Text Element you are applying rules.
Is Content: two parameters are added separated by comma (,) the first parameter is the content of the Text Element you are referencing on If Element Name, the second paramter is the content of the current Text Element you are applying rules.
Use Content: if Is Content rule is met then the current Text Element you are applying rules will change it content to the value you added in Use Content.
CURRENCY SYMBOL TEXT ELEMENT
- Element For: CurrencySymbol
- Element Content: $
- Element Height: 15.00
- Element Width: 0.097
- Element Top: 273.538
- Element Left: 286.975
- Element Font Family: Segoe UI
- Element Foreground: Black
- Element Font Weight: Bold
PRODUCT PRICE TEXT ELEMENT
- Element For: ProductPrice
- Element Content: 3.00
- Element Height: 40.00
- Element Width: 0.60
- Element Top: 275.764
- Element Left: 387.553
- Element Font Family: Segoe UI
- Element Foreground: Black
- Element Font Weight: Bold
PRODUCT SIZE TEXT ELEMENT
- Element For: ProductSize
- Element Content: 0 oz
- Element Height: 2.00
- Element Width: 0.066
- Element Top: 699.411
- Element Left: 922.129
- Element Font Family: Segoe UI
- Element Foreground: Black
- Element Font Weight: Normal
PRODUCT ID TEXT ELEMENT
- Element For: ProductId
- Element Content: productid
- Element Height: 2.00
- Element Width: 0.149
- Element Top: 732.995
- Element Left: 838.547
- Element Font Family: Segoe UI
- Element Foreground: Black
- Element Font Weight: Normal
EXTRA TEXT ELEMENT
- Element For: Do not change the value, it is not required
- Element Content: FRESH PRODUCTS EVERYDAY
- Element Height: 3.79
- Element Width: 0.66
- Element Top: 763.015
- Element Left: 34.955
- Element Font Family: Segoe UI
- Element Foreground: Black
- Element Font Weight: Bold
The final template design should looks like the following image

Once you have created the design, save or export it to templates.
- Click File
- Click Export To Template
- Enter the template name, for this template we will use My Label Design
- Click Save
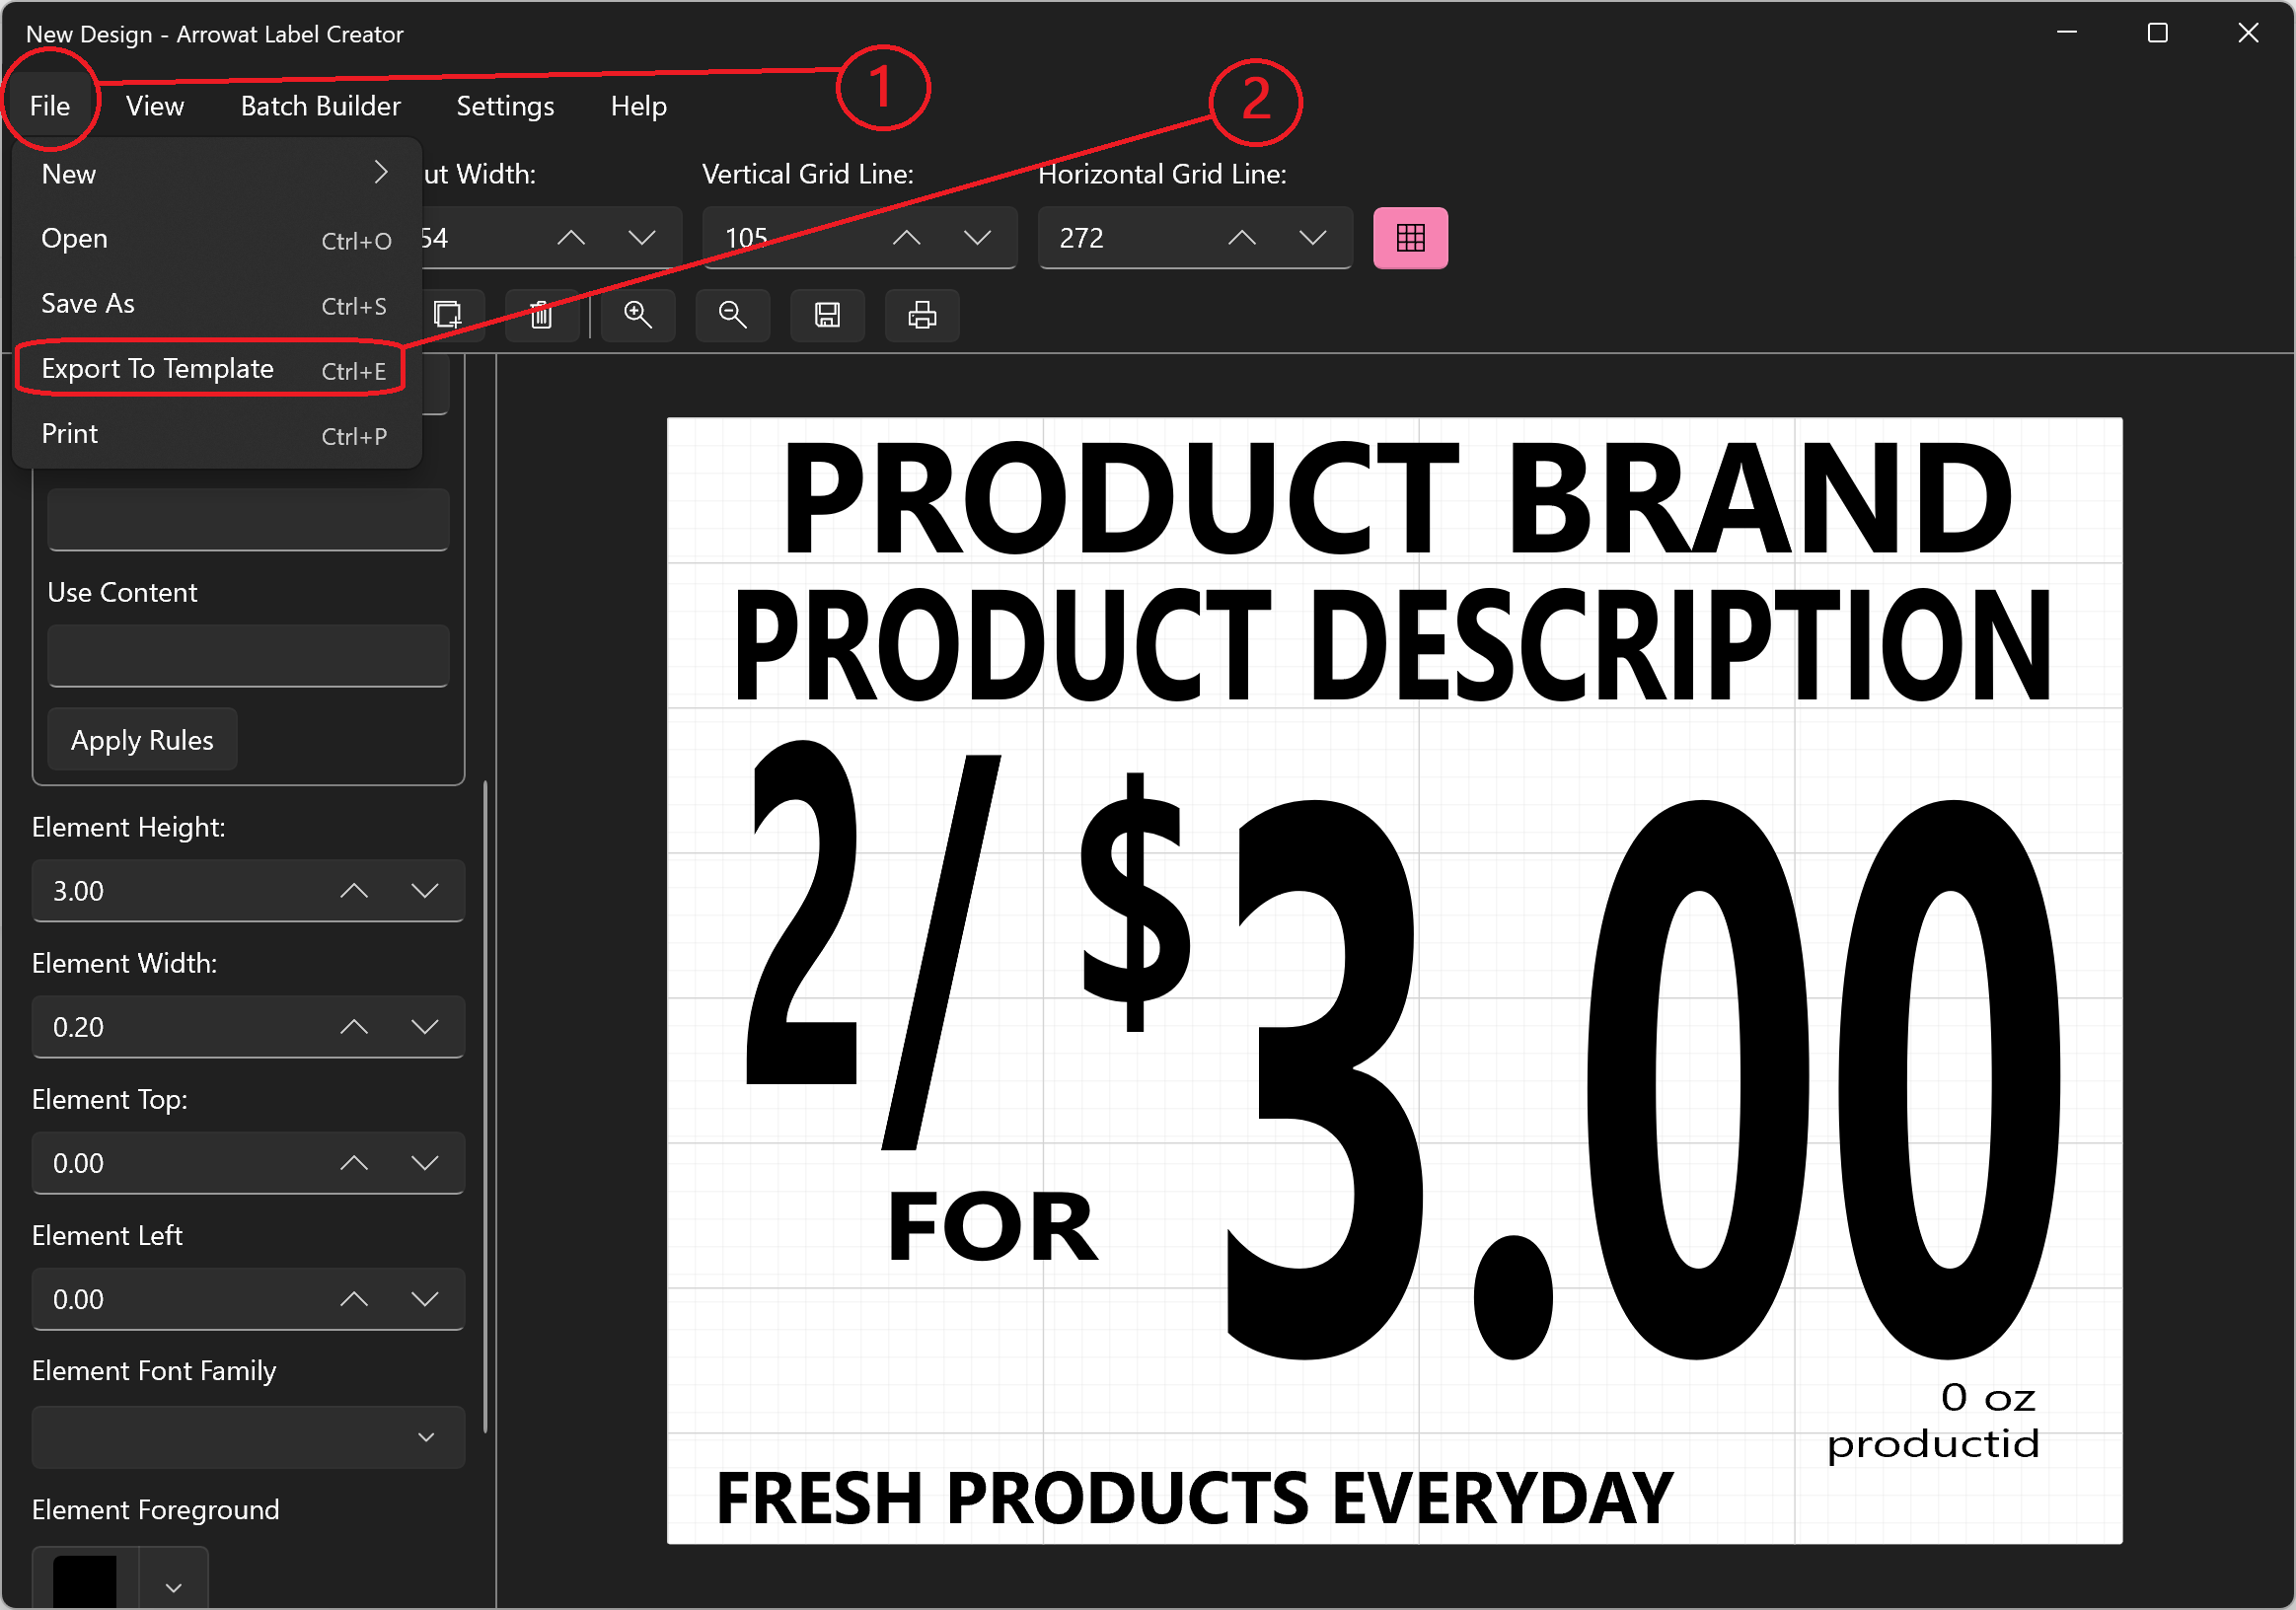
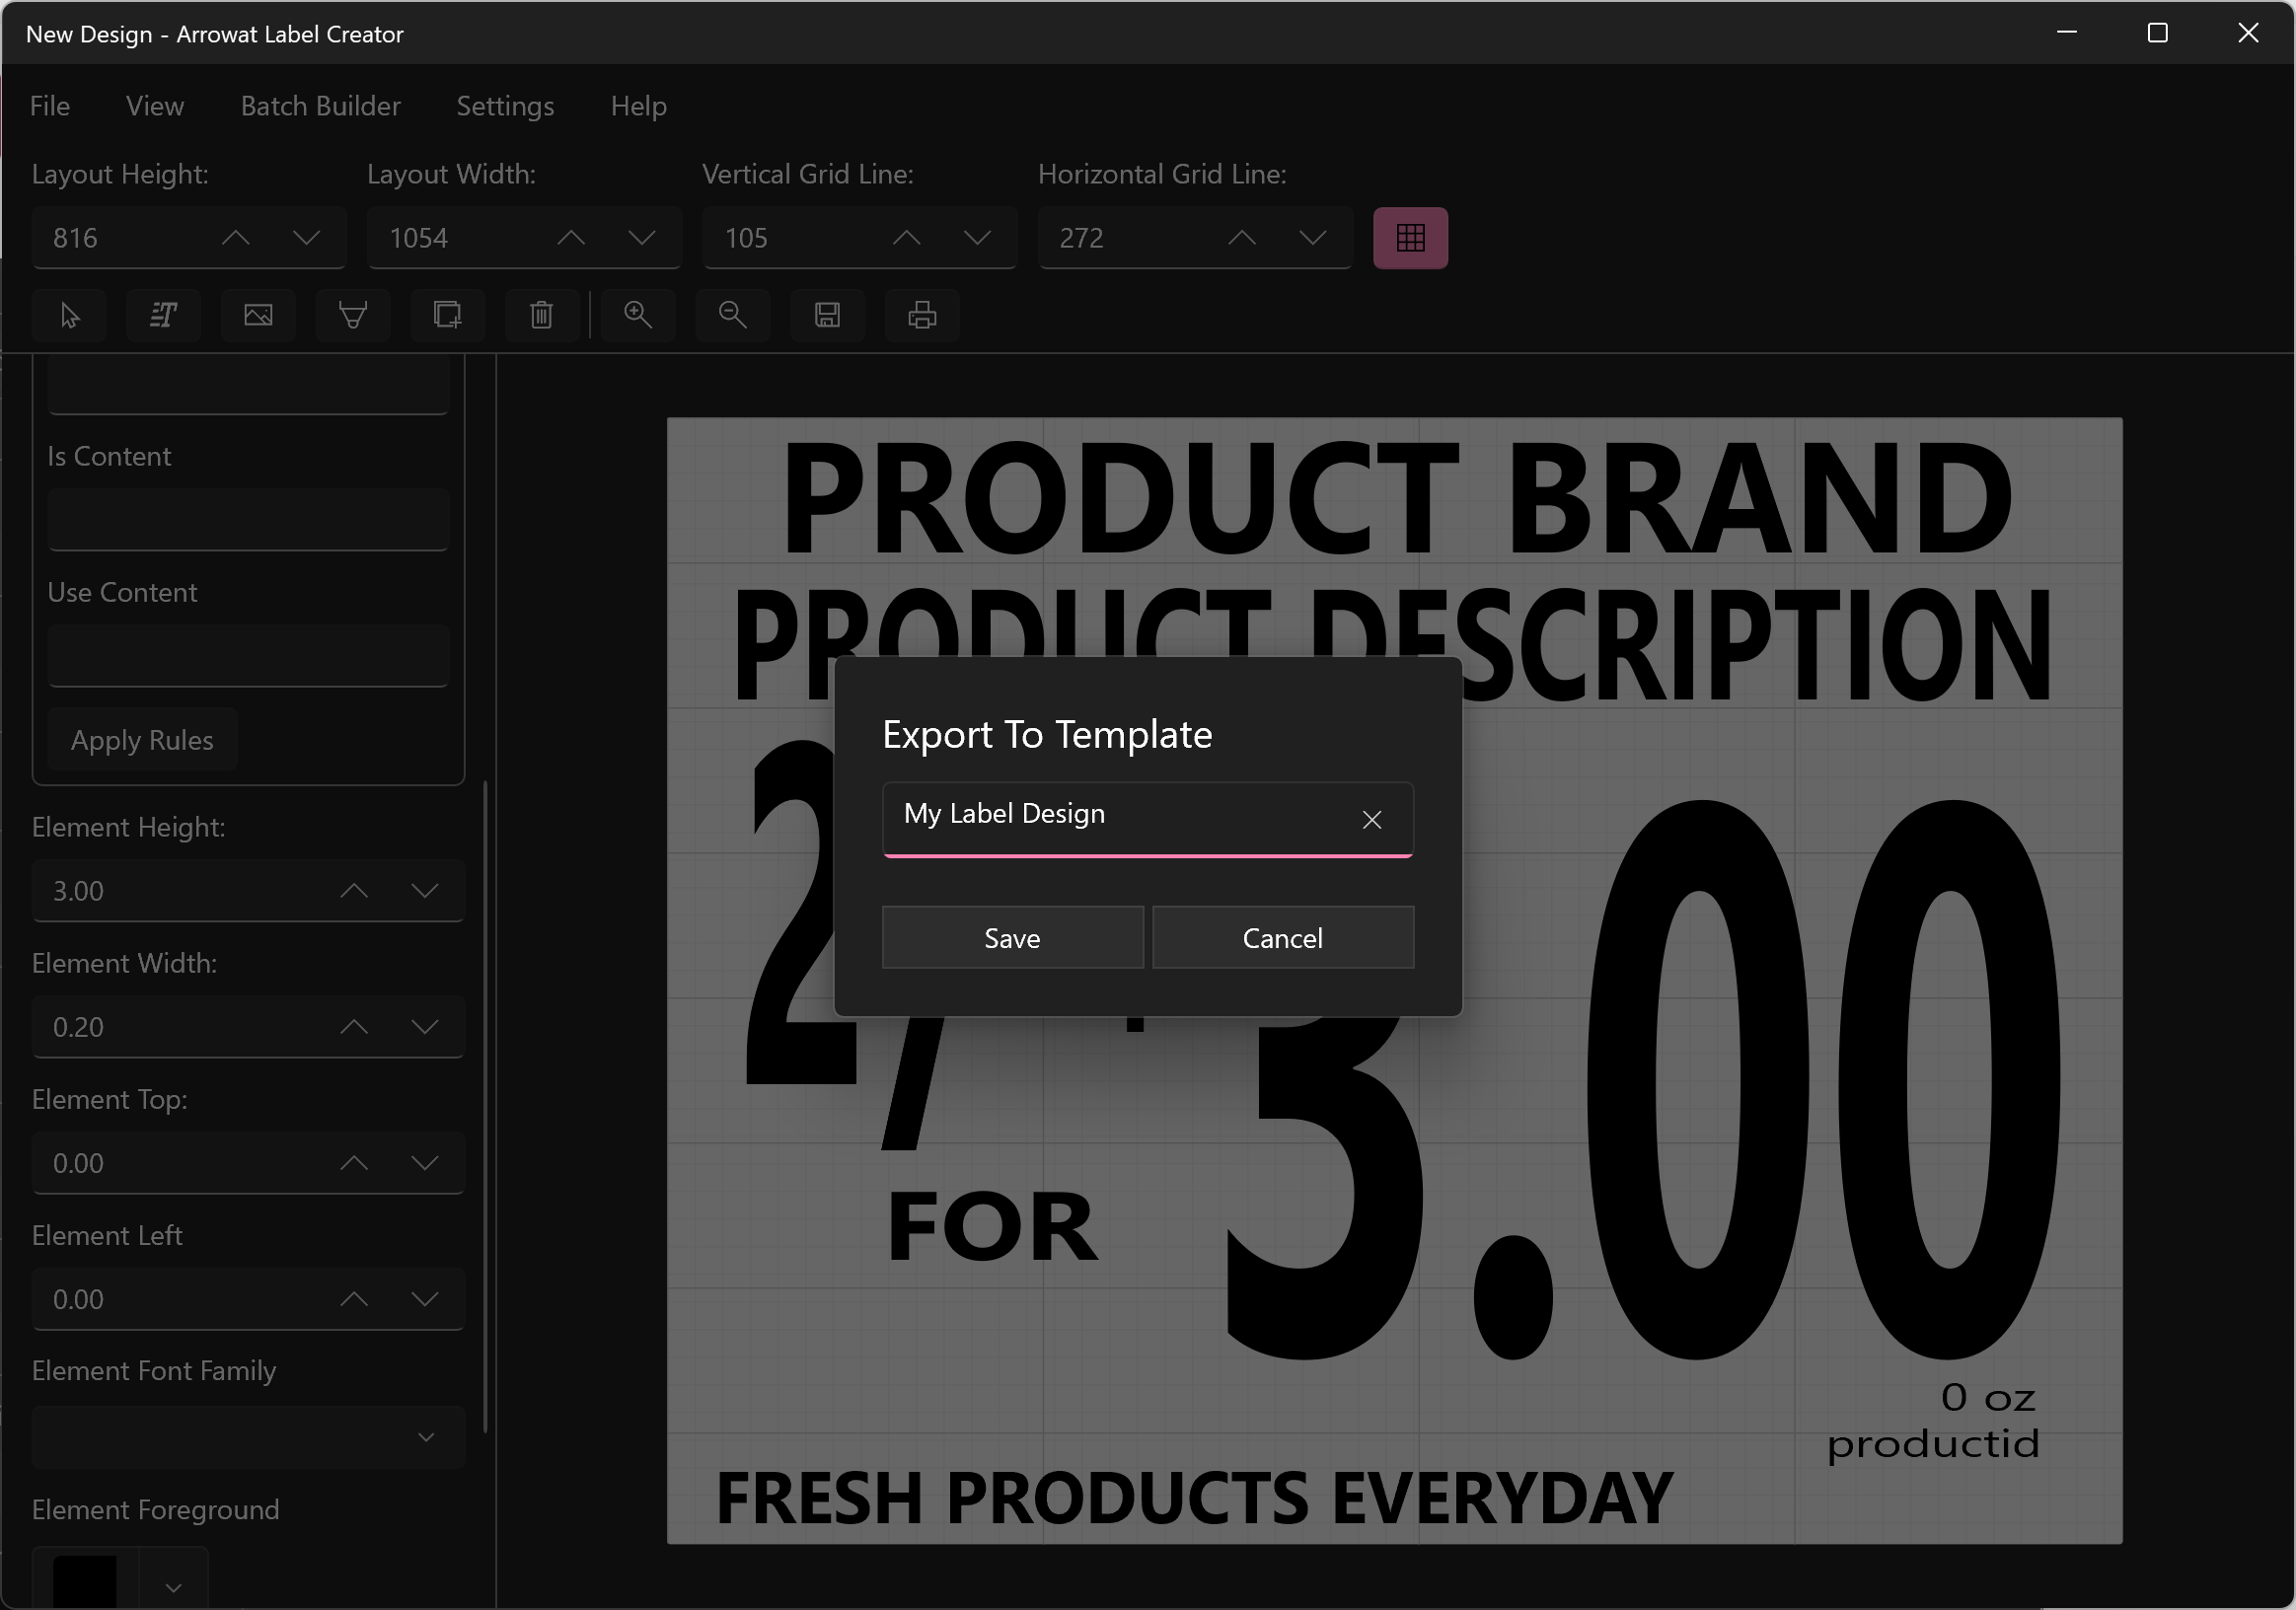
We have finished our template that we will use to create labels from data that we add to data table. We are now ready to start using Batch Builder.
Using batch builder
Batch Builder is an application feature we have developed into Arrowat Label Creator app it helps you to create Print Pages, Data Tables, Batches Data Tables, It also helps you to load data from other apps or software exported in JSON data format. in this tutorial we explain how to work and use Batch Builder.
-
Open Arrowat Label Creator
If you have closed Arrowat Label Creator Open it. -
From Menu Click Batch Builder
Batch Builder will be open
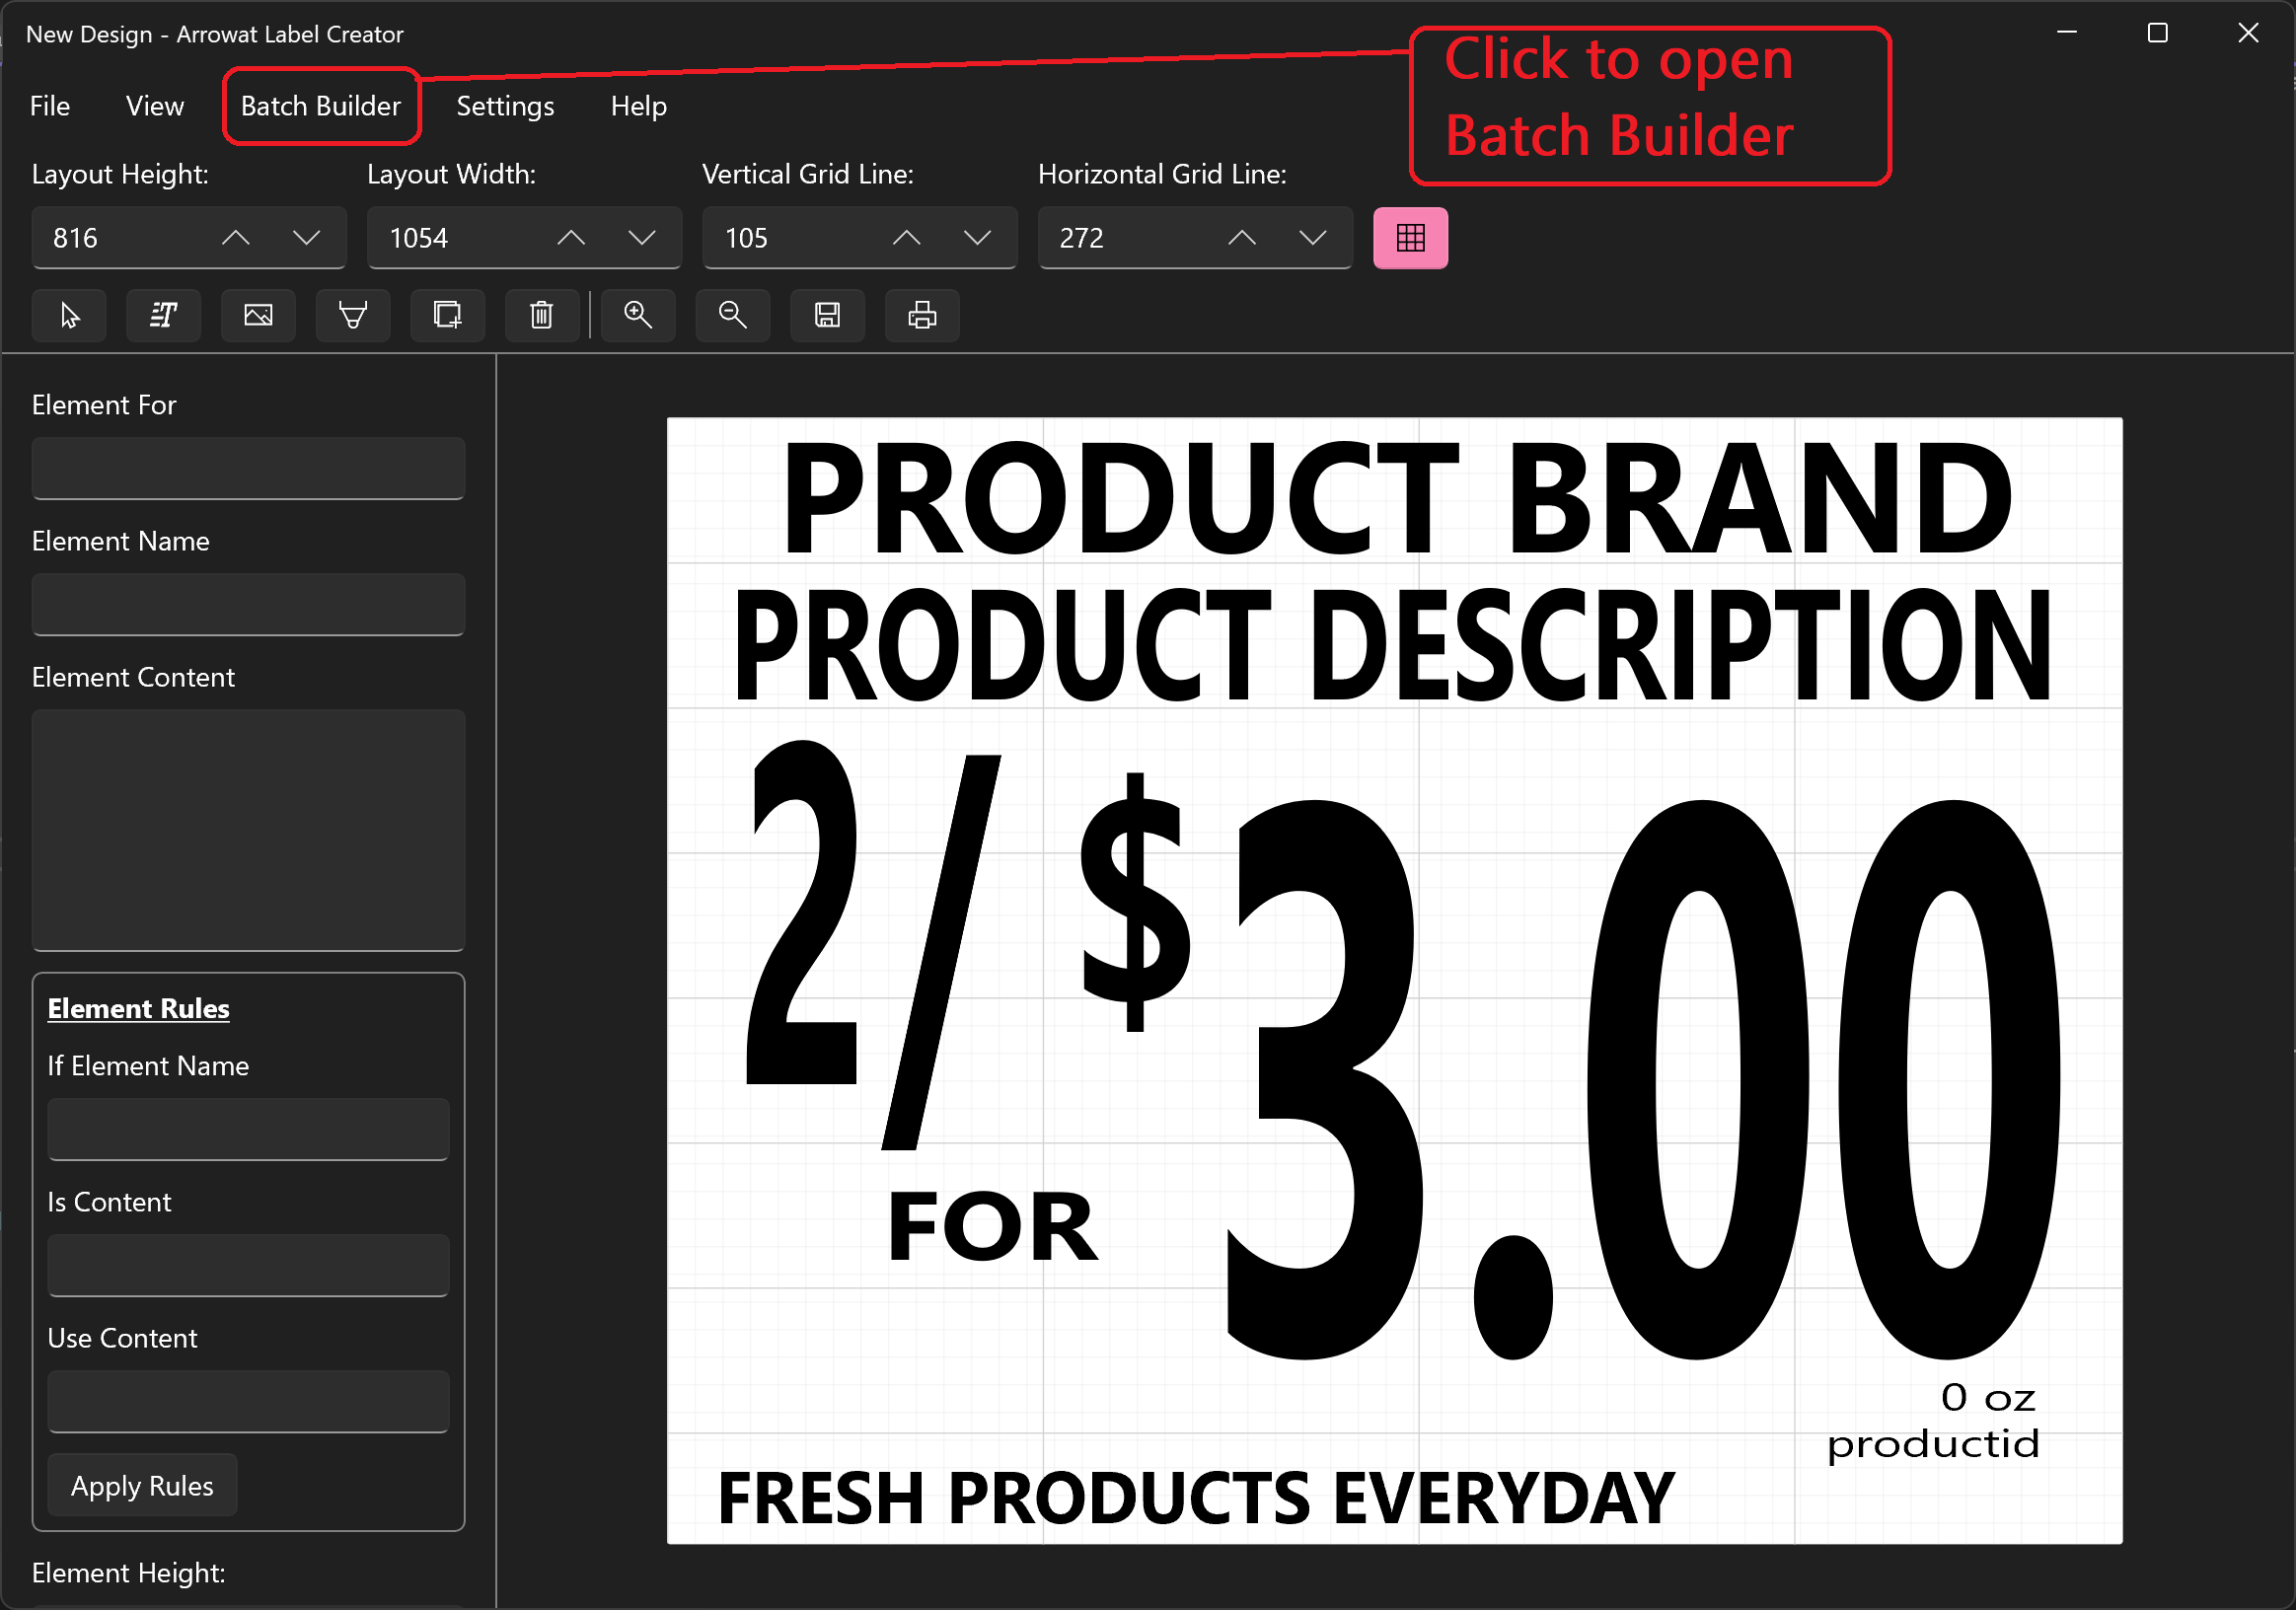
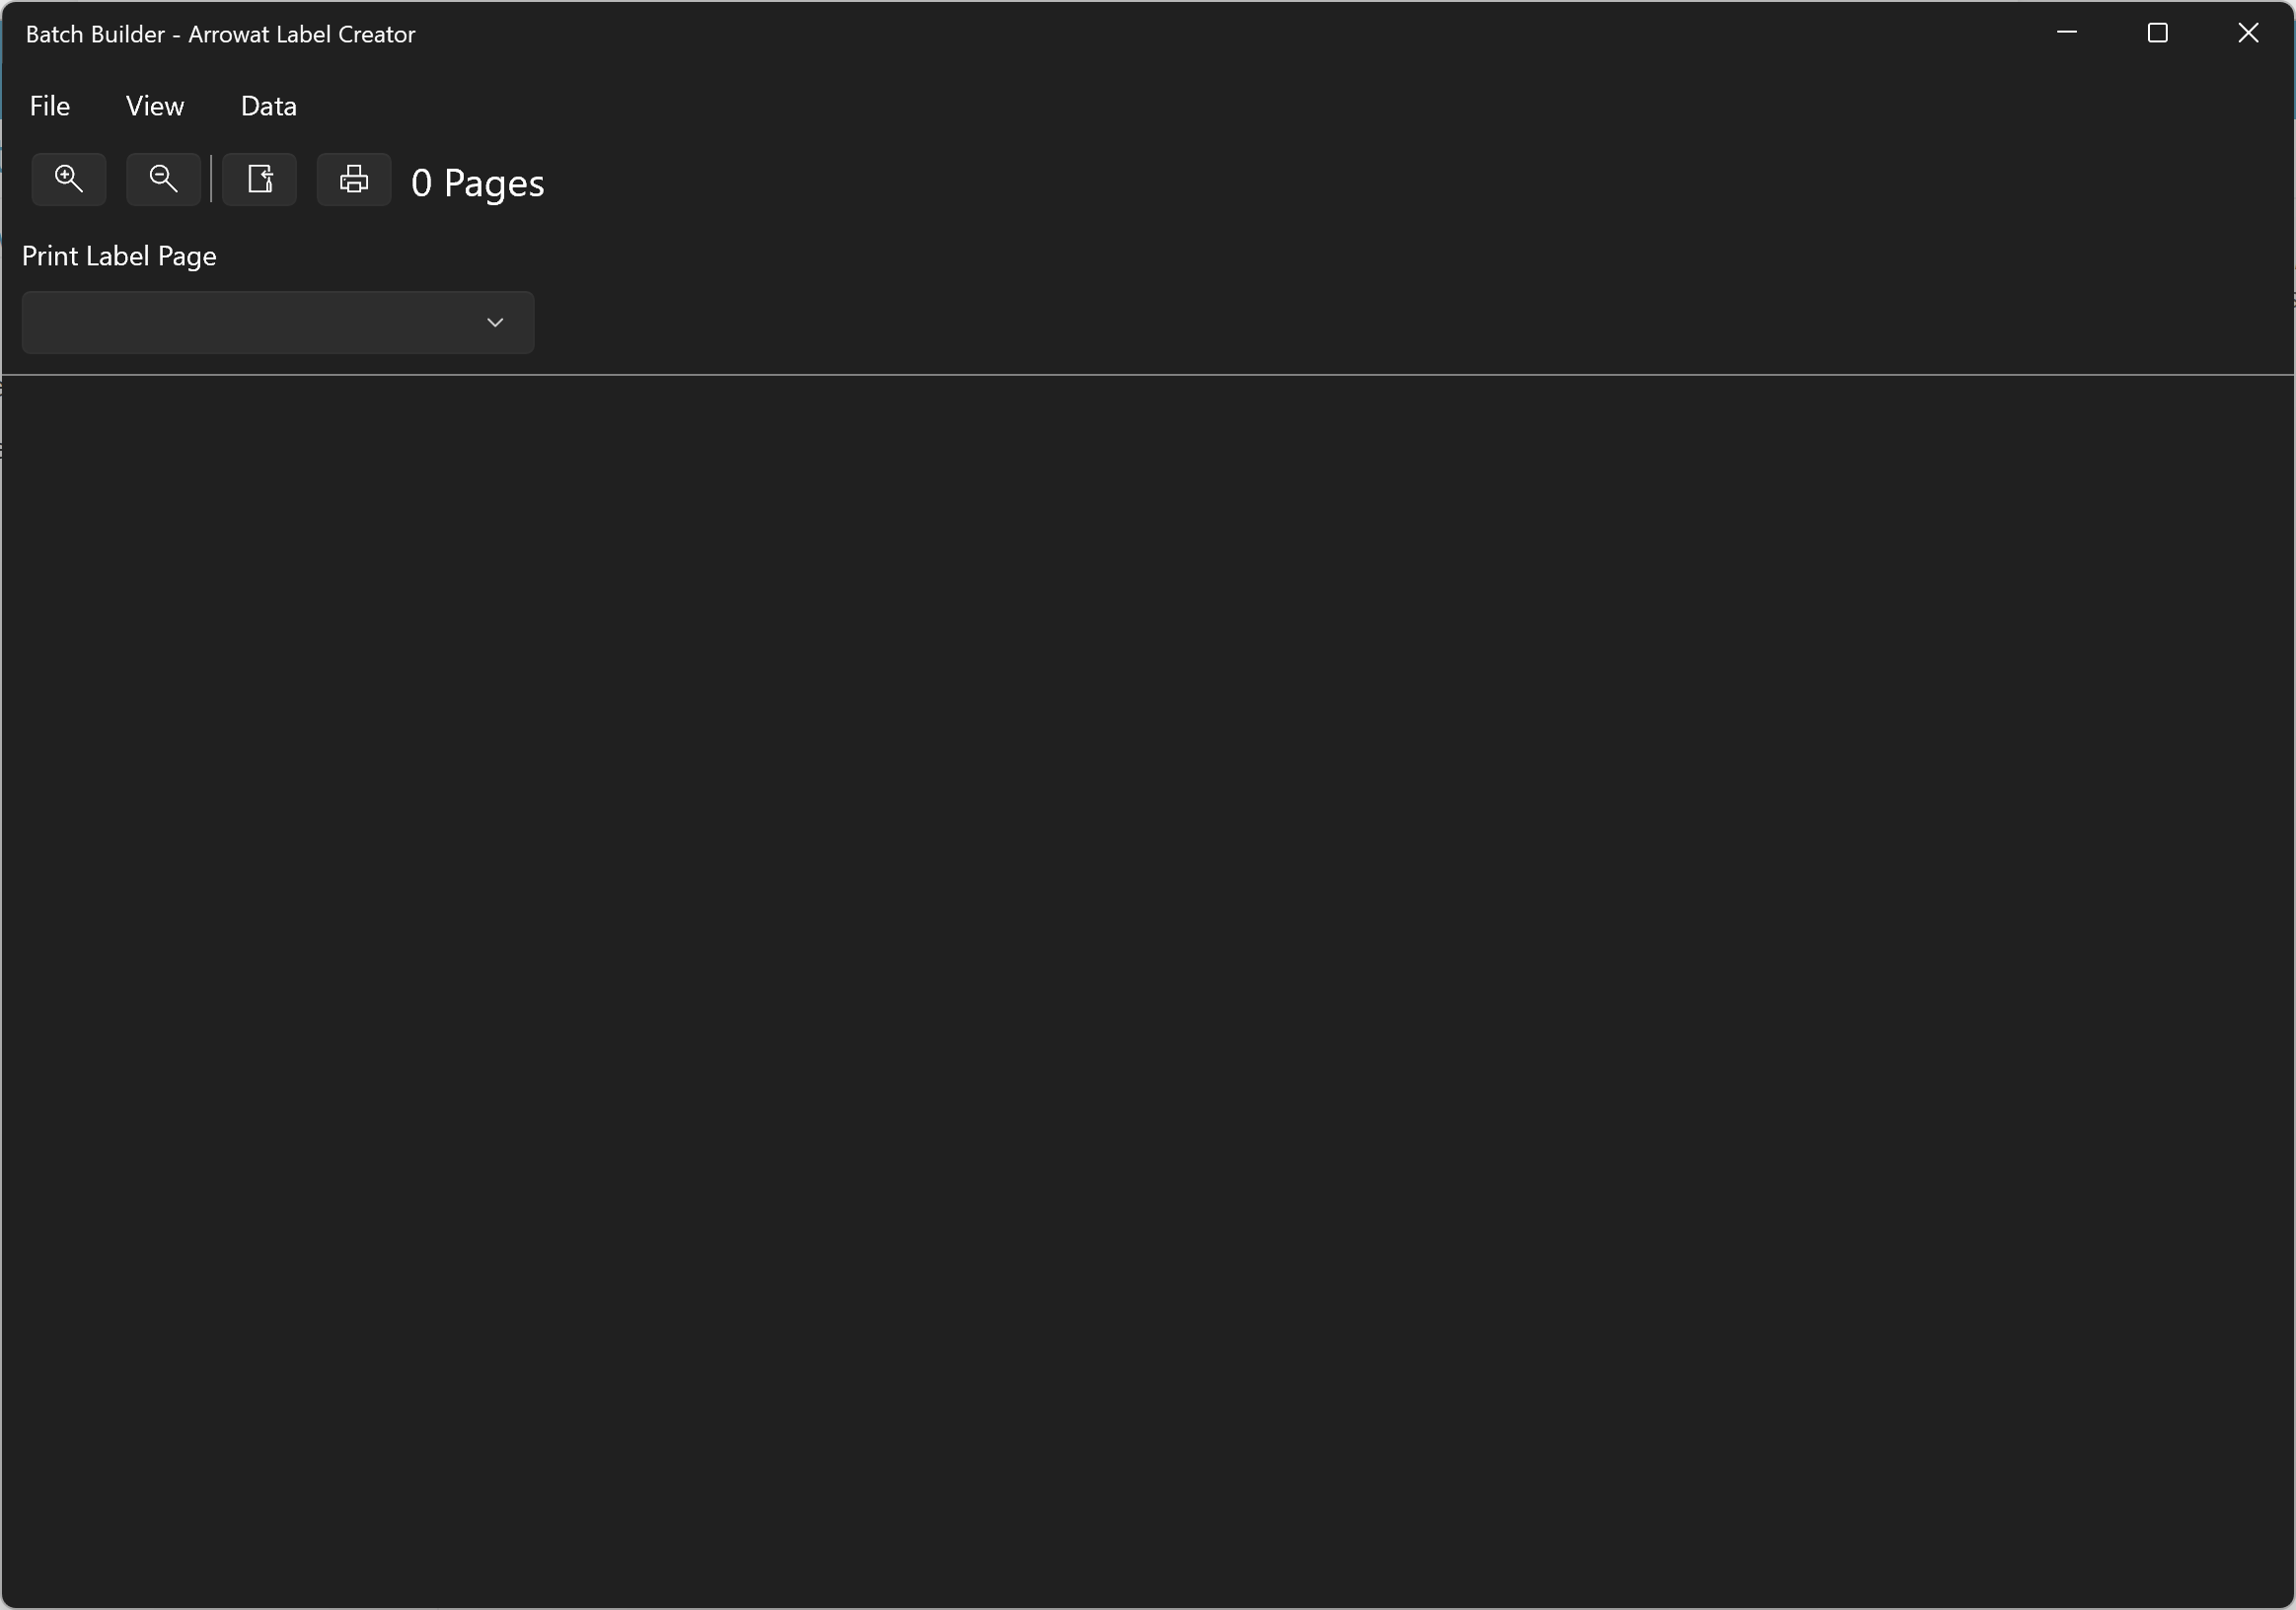
In the next section we will create a print label page.
Creating print label pages
Print Label Pages are the containers of label numbers you want to print and can be customized by properties, in this section we will create a print page and we will use the template design we created in the previous section Creating product sign and export to templates
-
Open Batch Builder

-
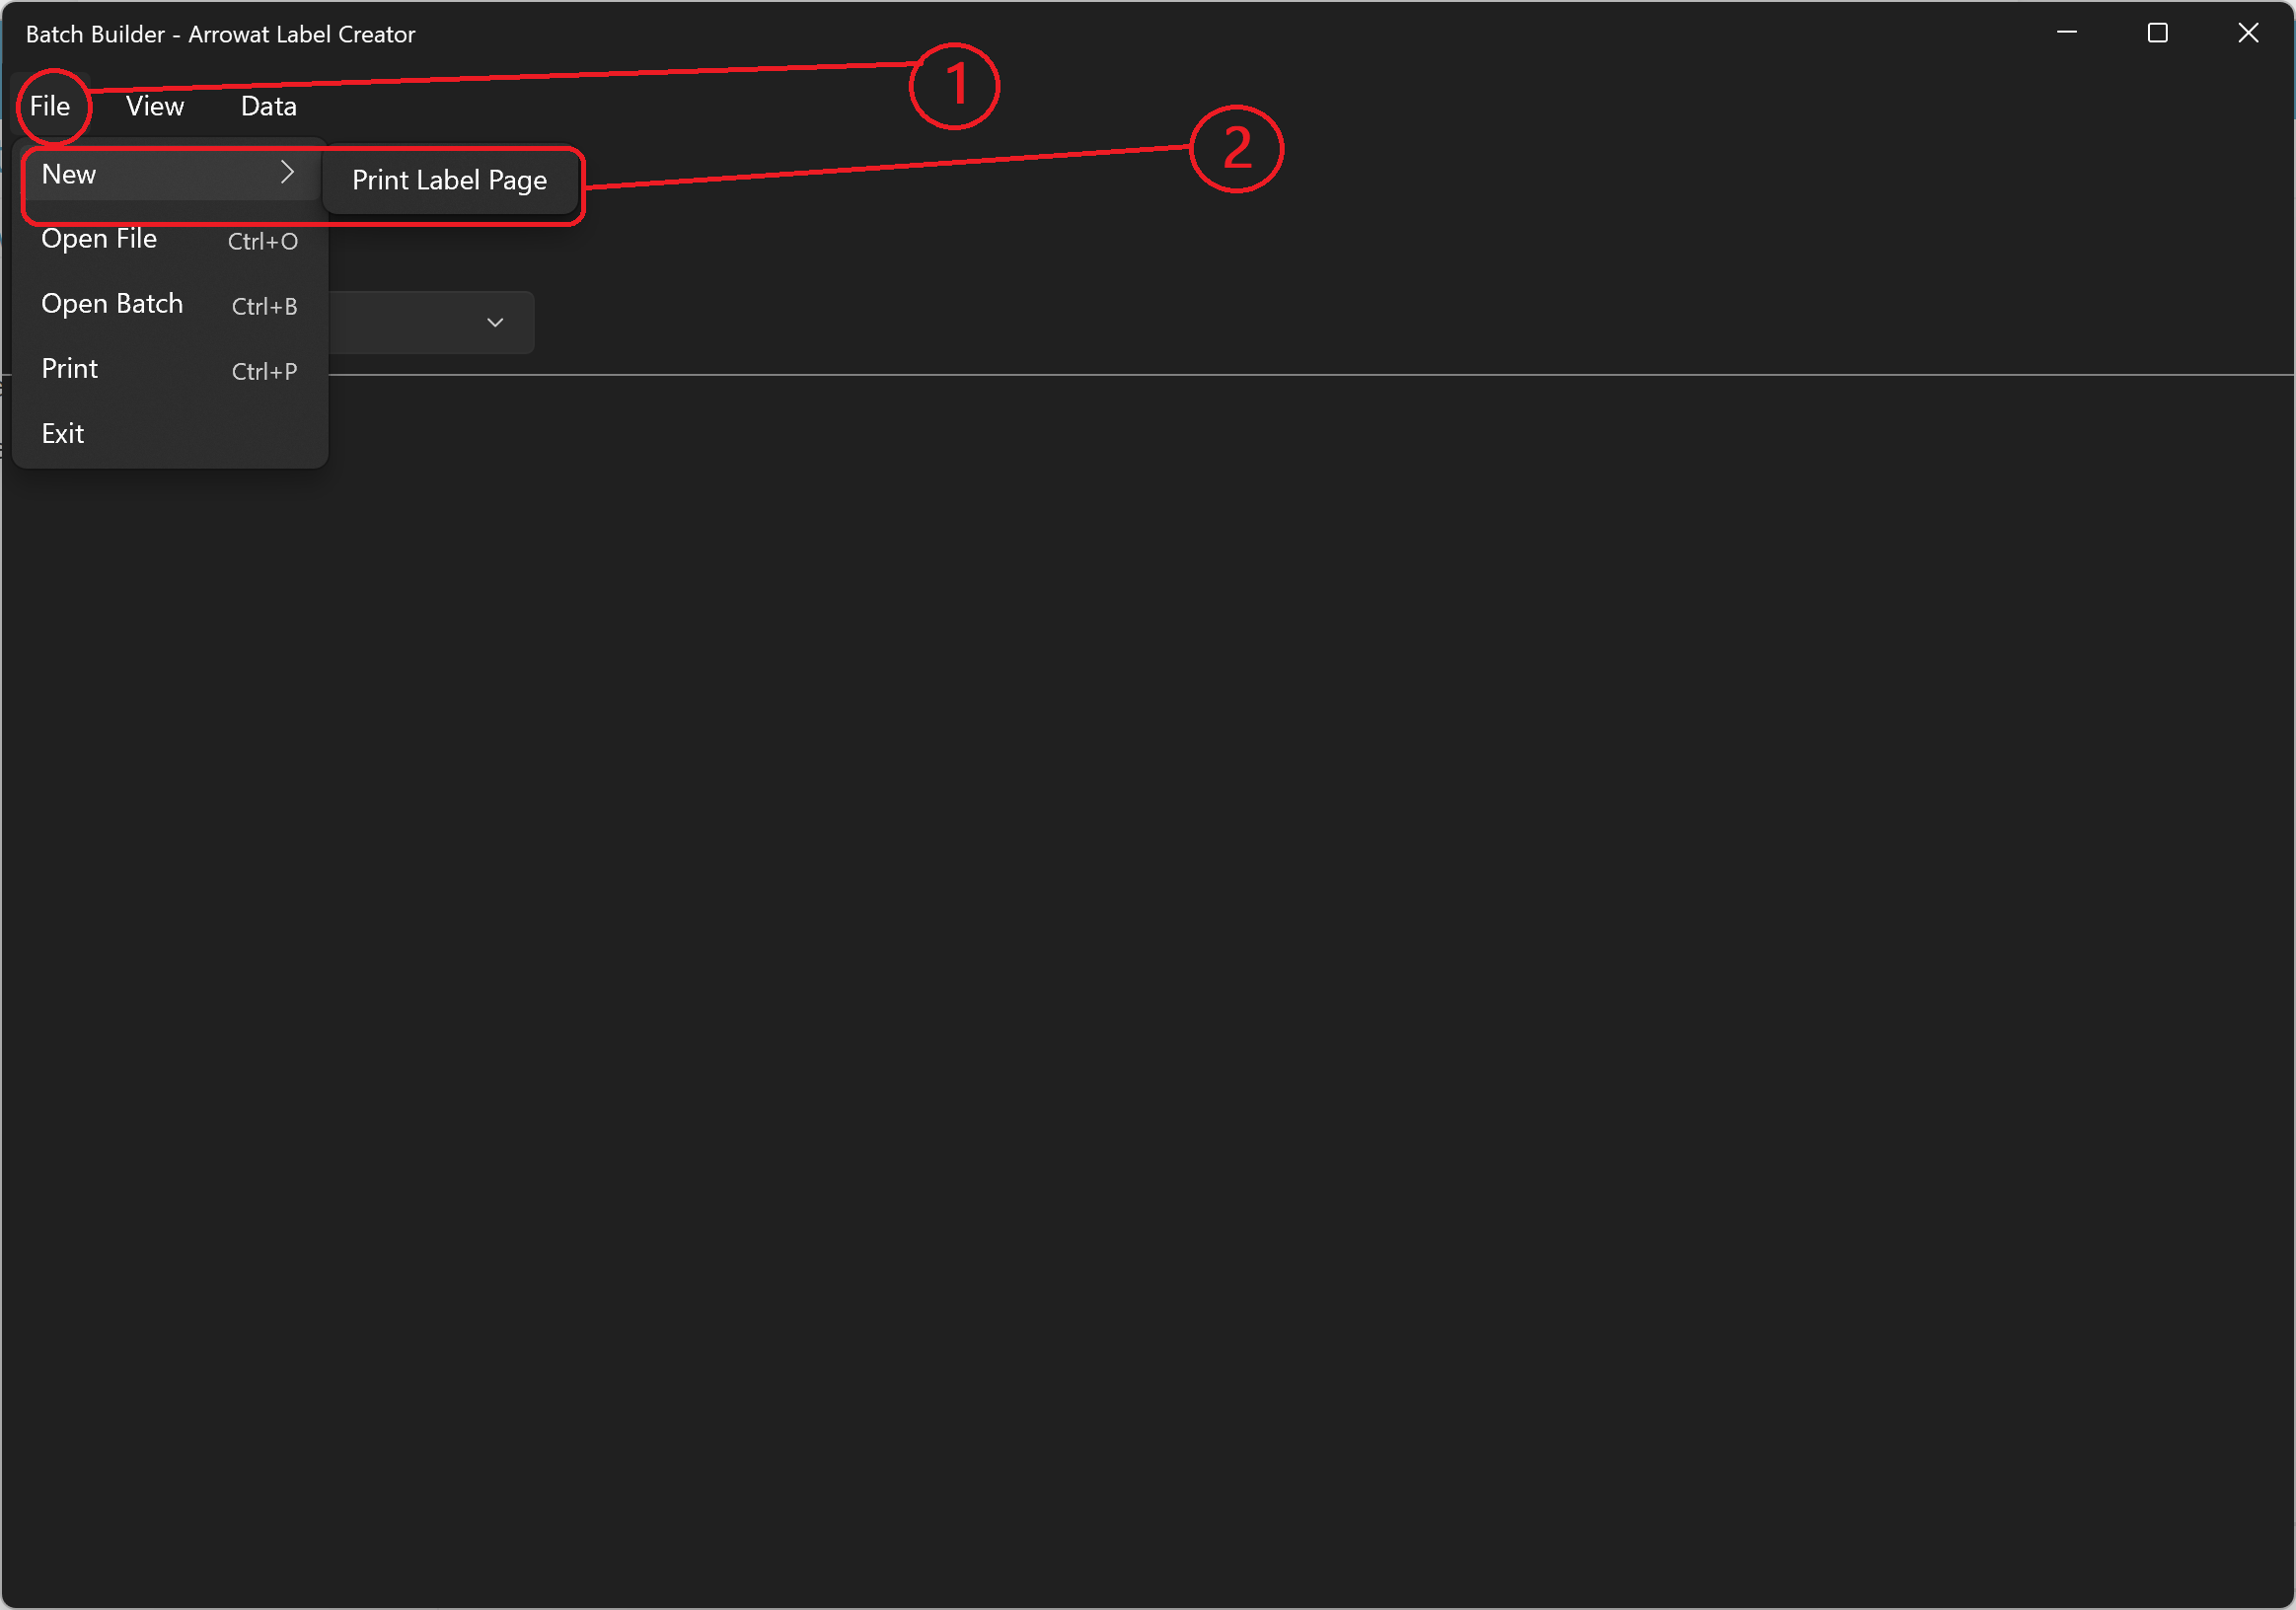
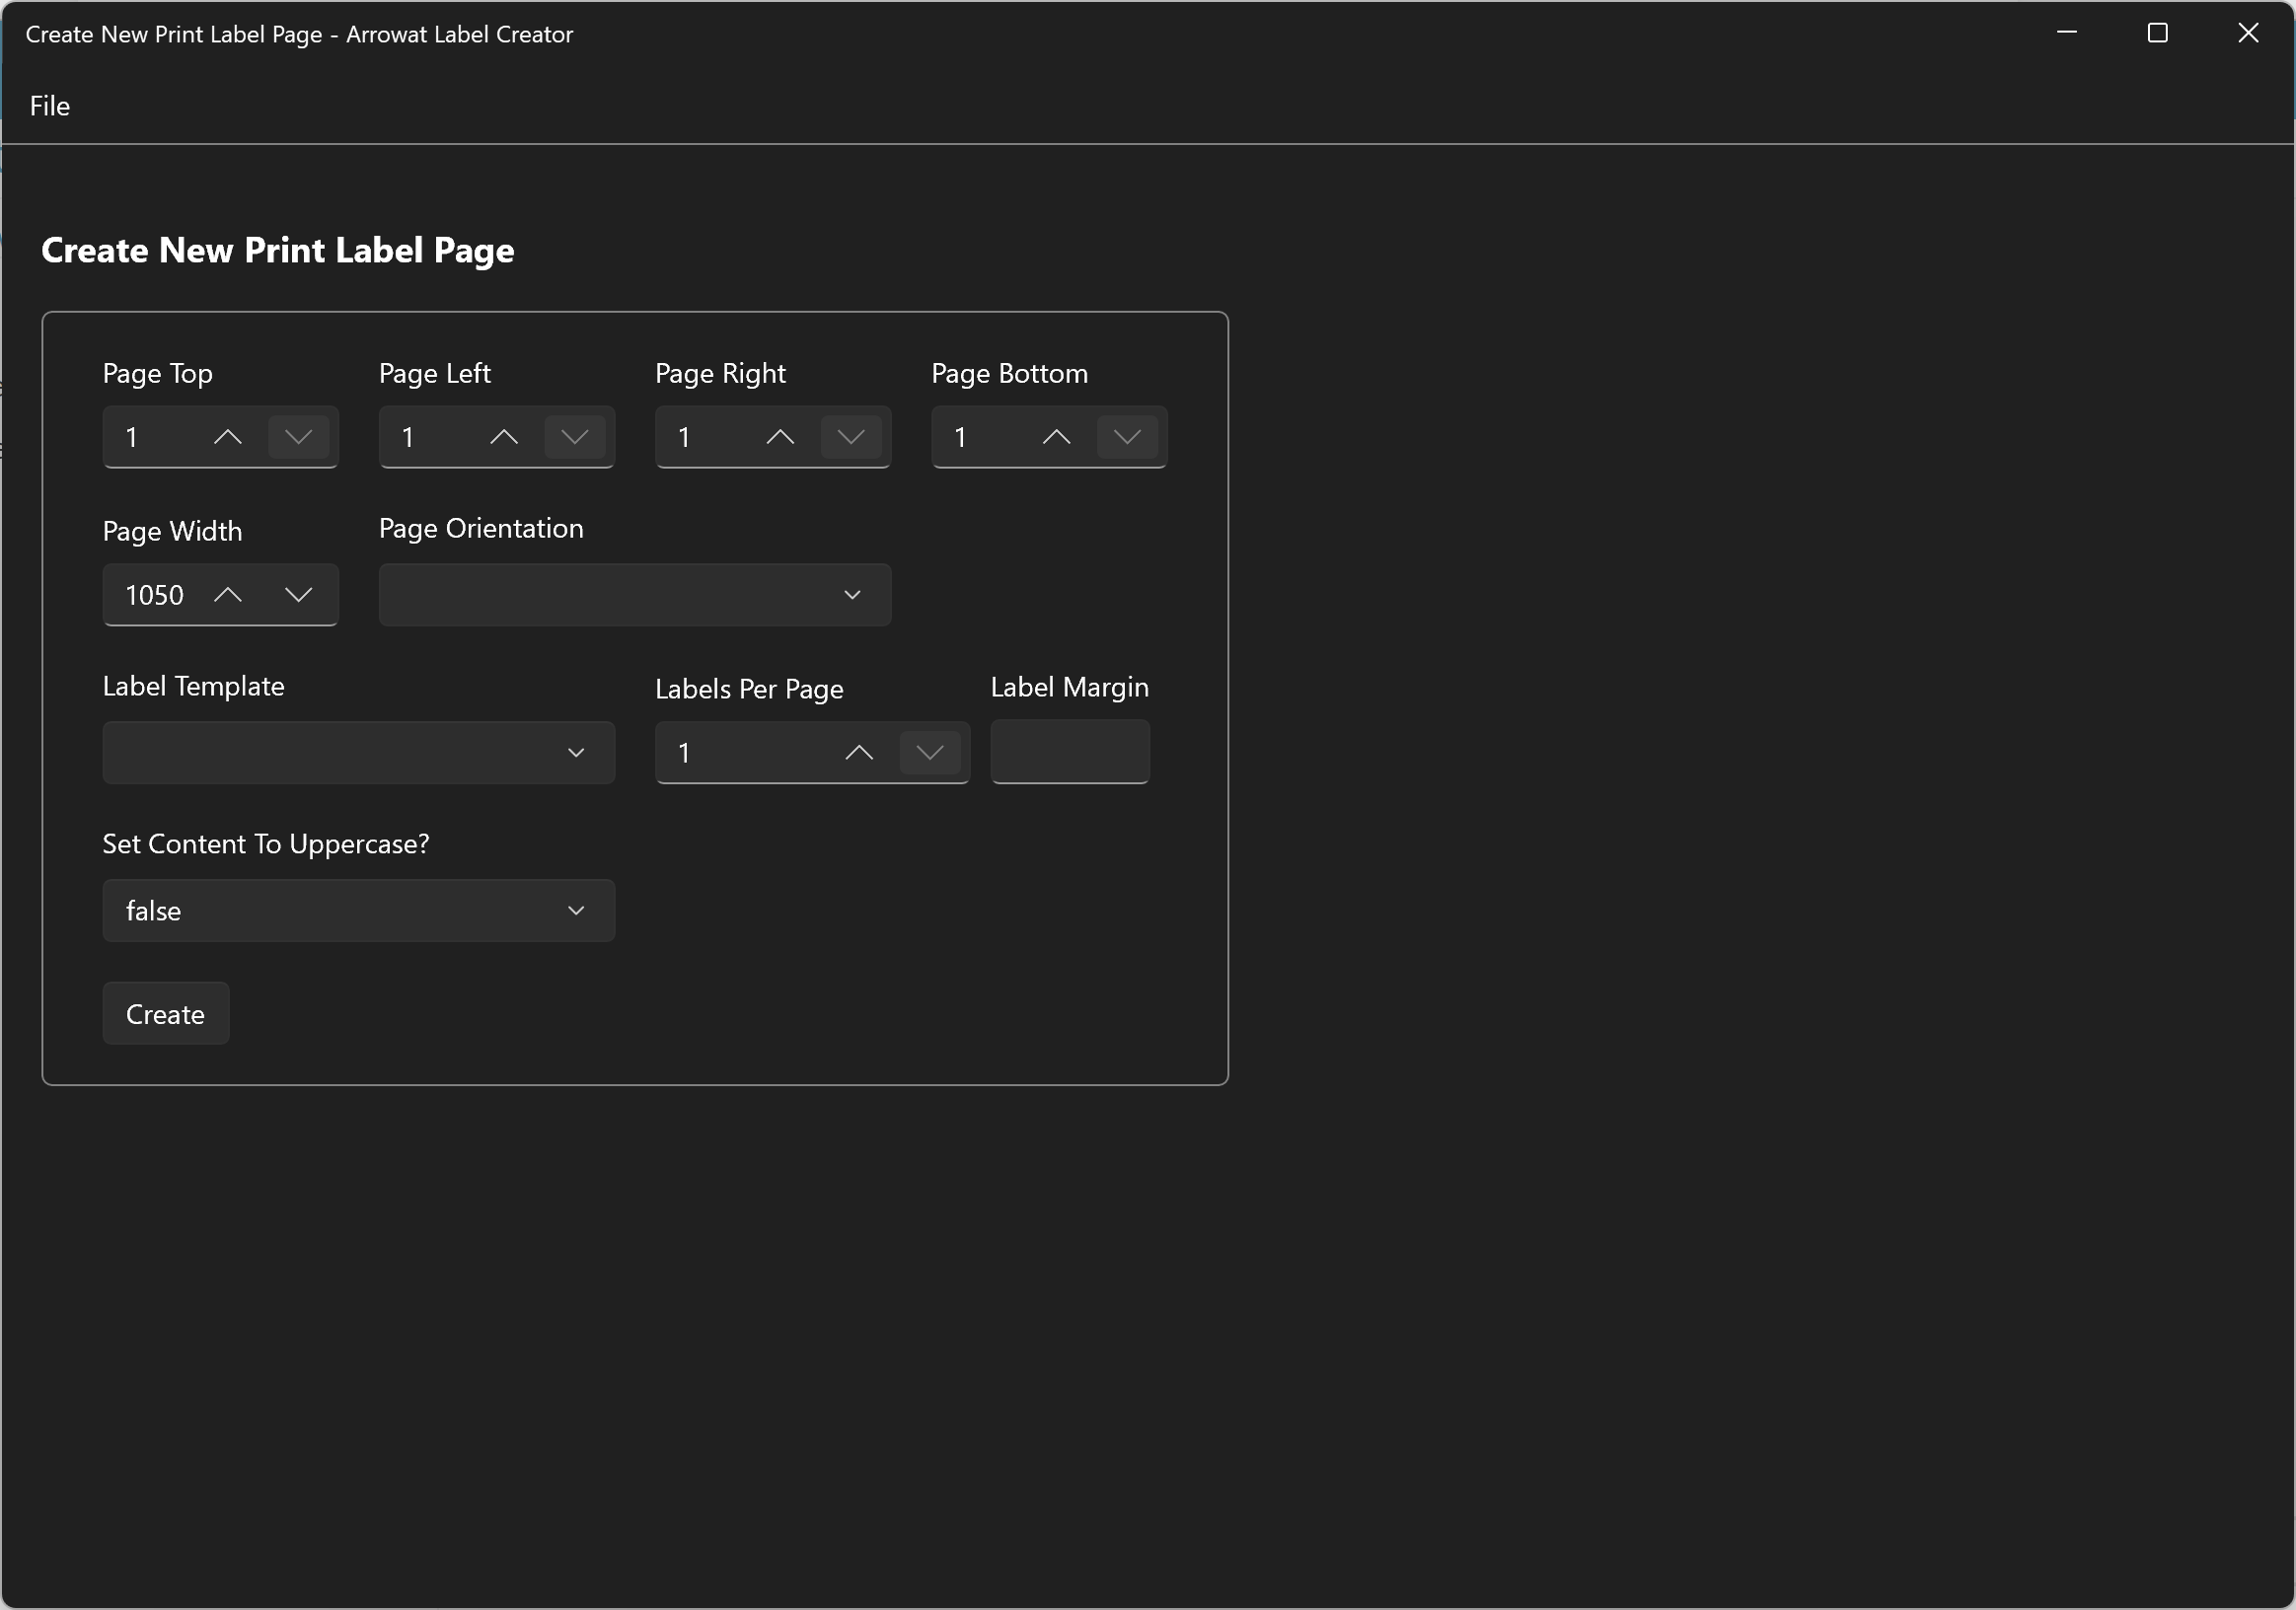
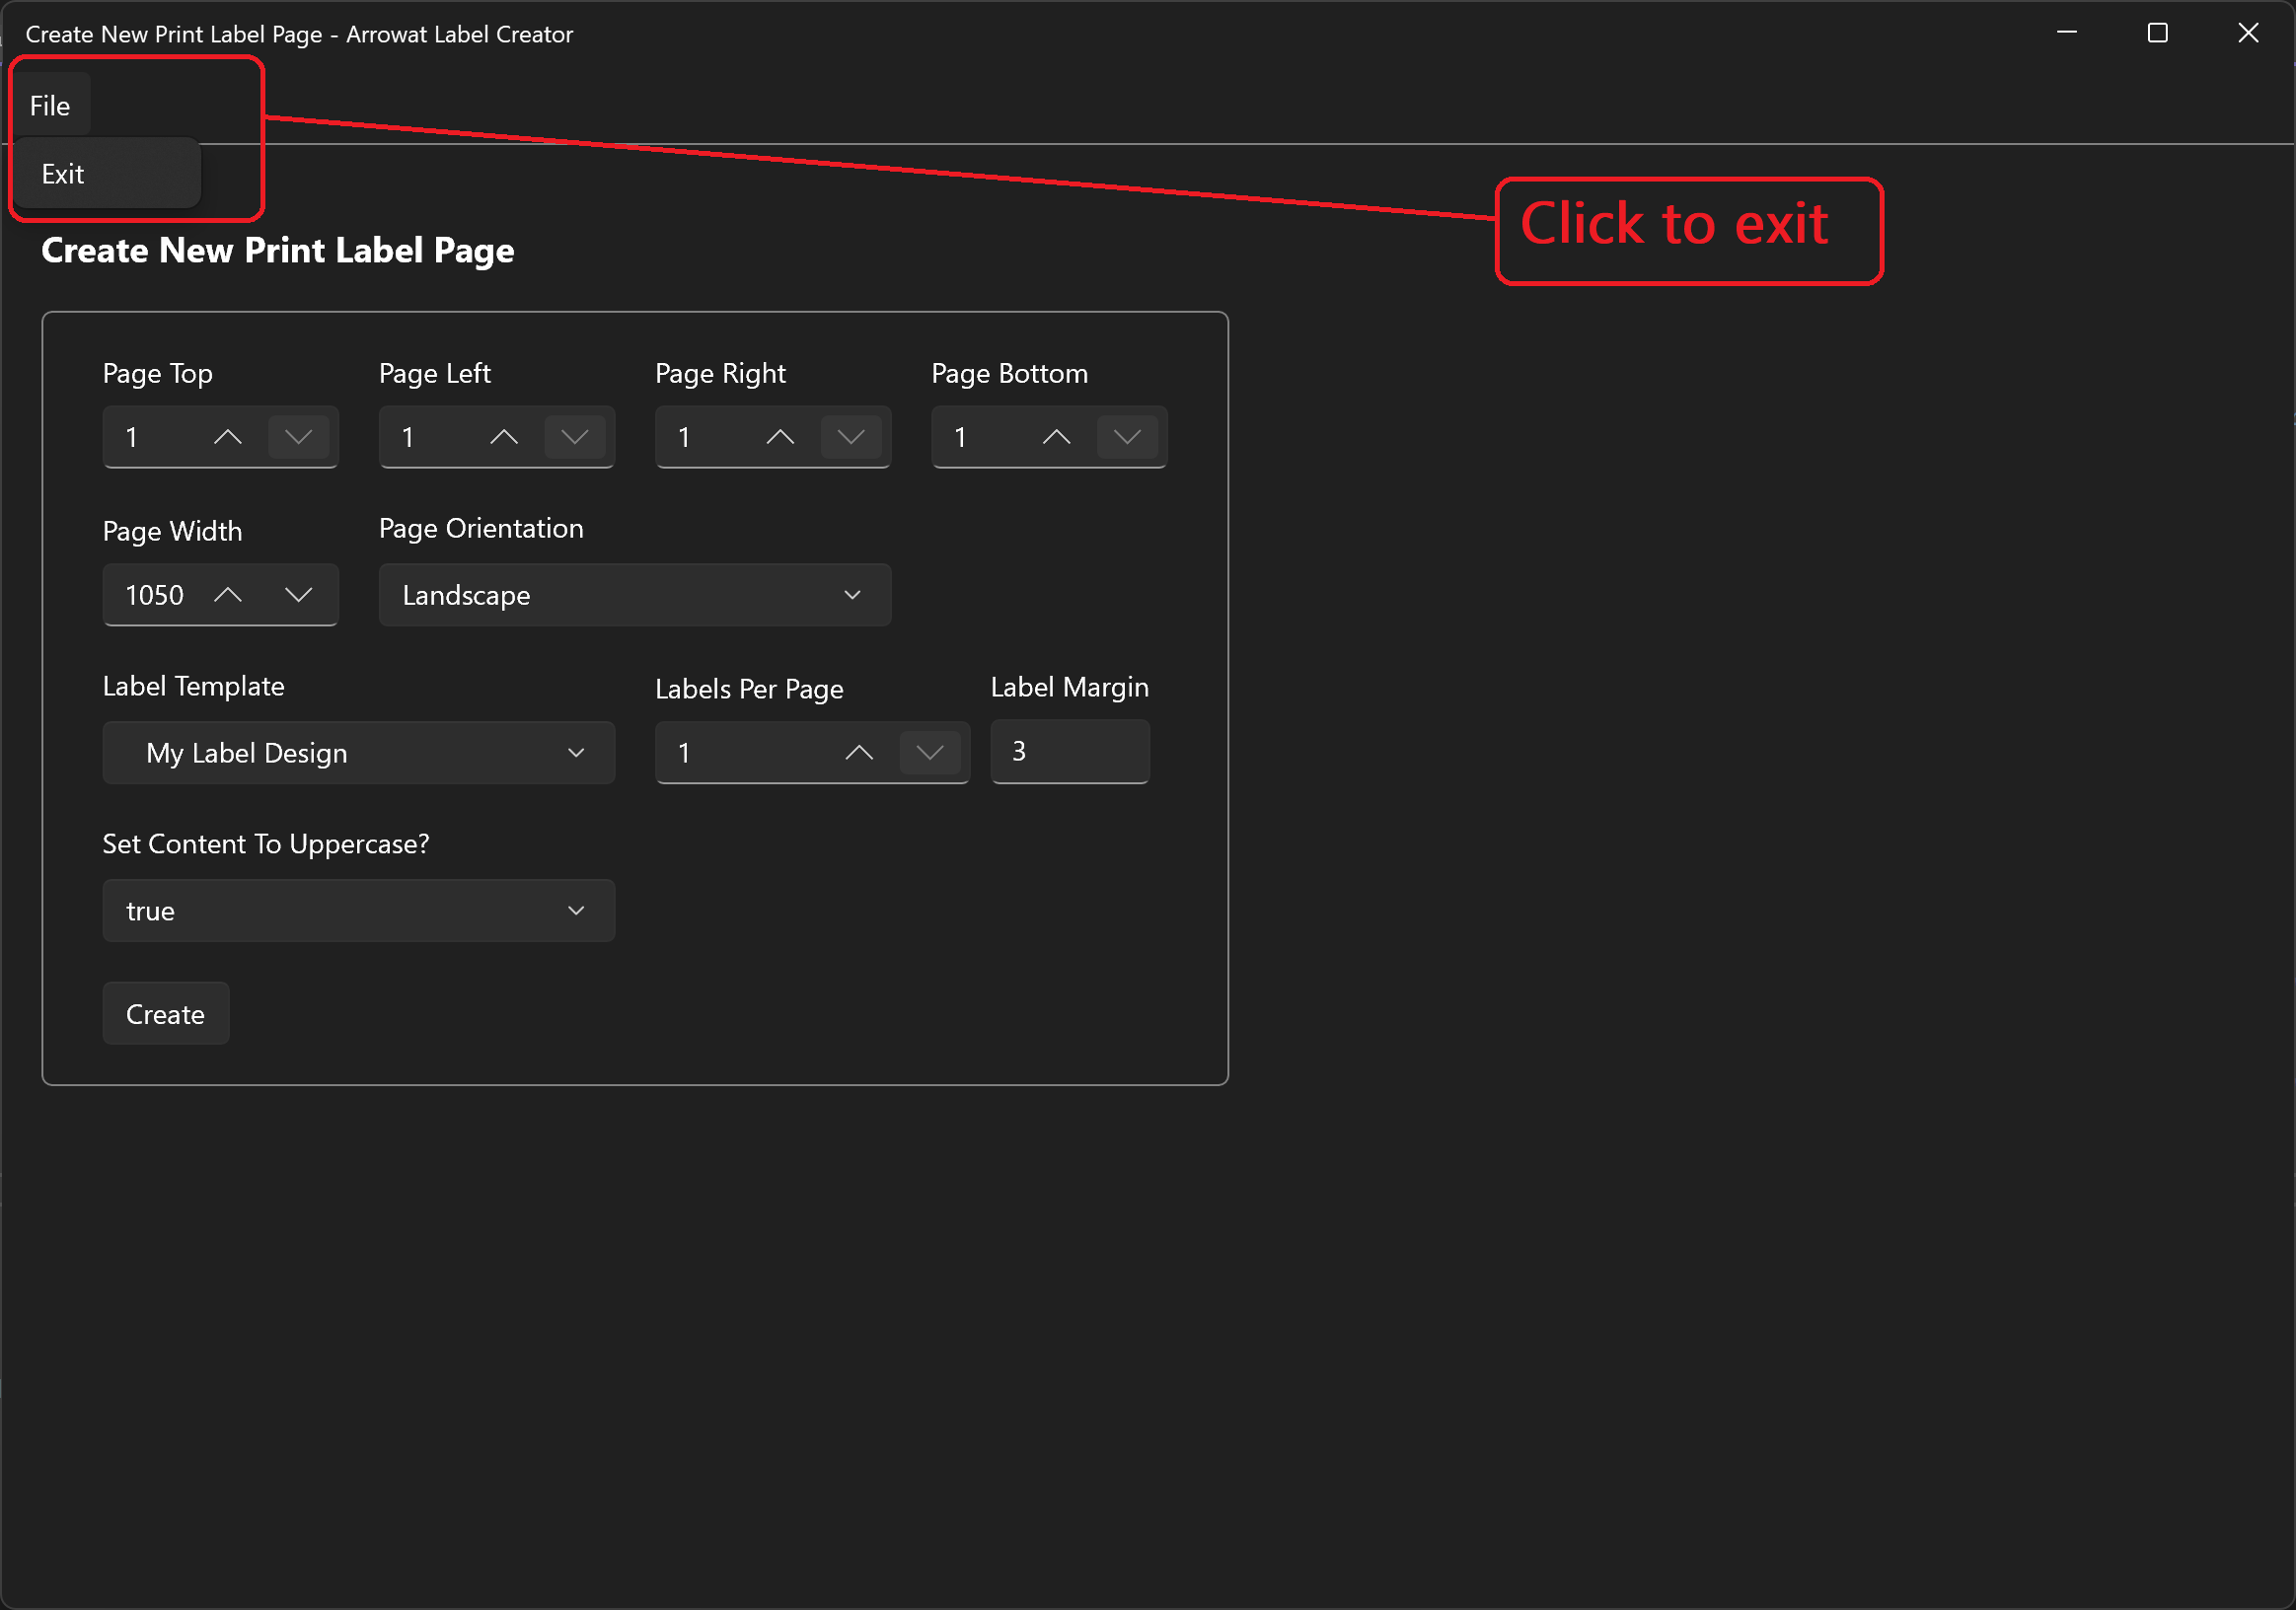
Click File > New > Print Label Page the Print Label Page will be open.
-
Page Top:
The margin top of the page where labels will be printed. -
Page Left:
The margin left of the page where labels will be printed. -
Page Right:
The margin right of the page where labels will be printed. -
Page Bottom:
The margin Bottom of the page where labels will be printed. -
Page Width:
The width of the page, this should be match the page size of the desired width like Letter, Legal, etc. -
Page Orientation:
The orientation of the page. -
Label Template:
The label template that the page will be used to format and add labels to the page using it design style. -
Labels Per Page:
The number of the labels you want to add per page. -
Label Margin:
The margin of each label on the page. -
Set Content To Uppercase?:
This allows to set all labels to uppercase, true for uppercase, false uses as is.
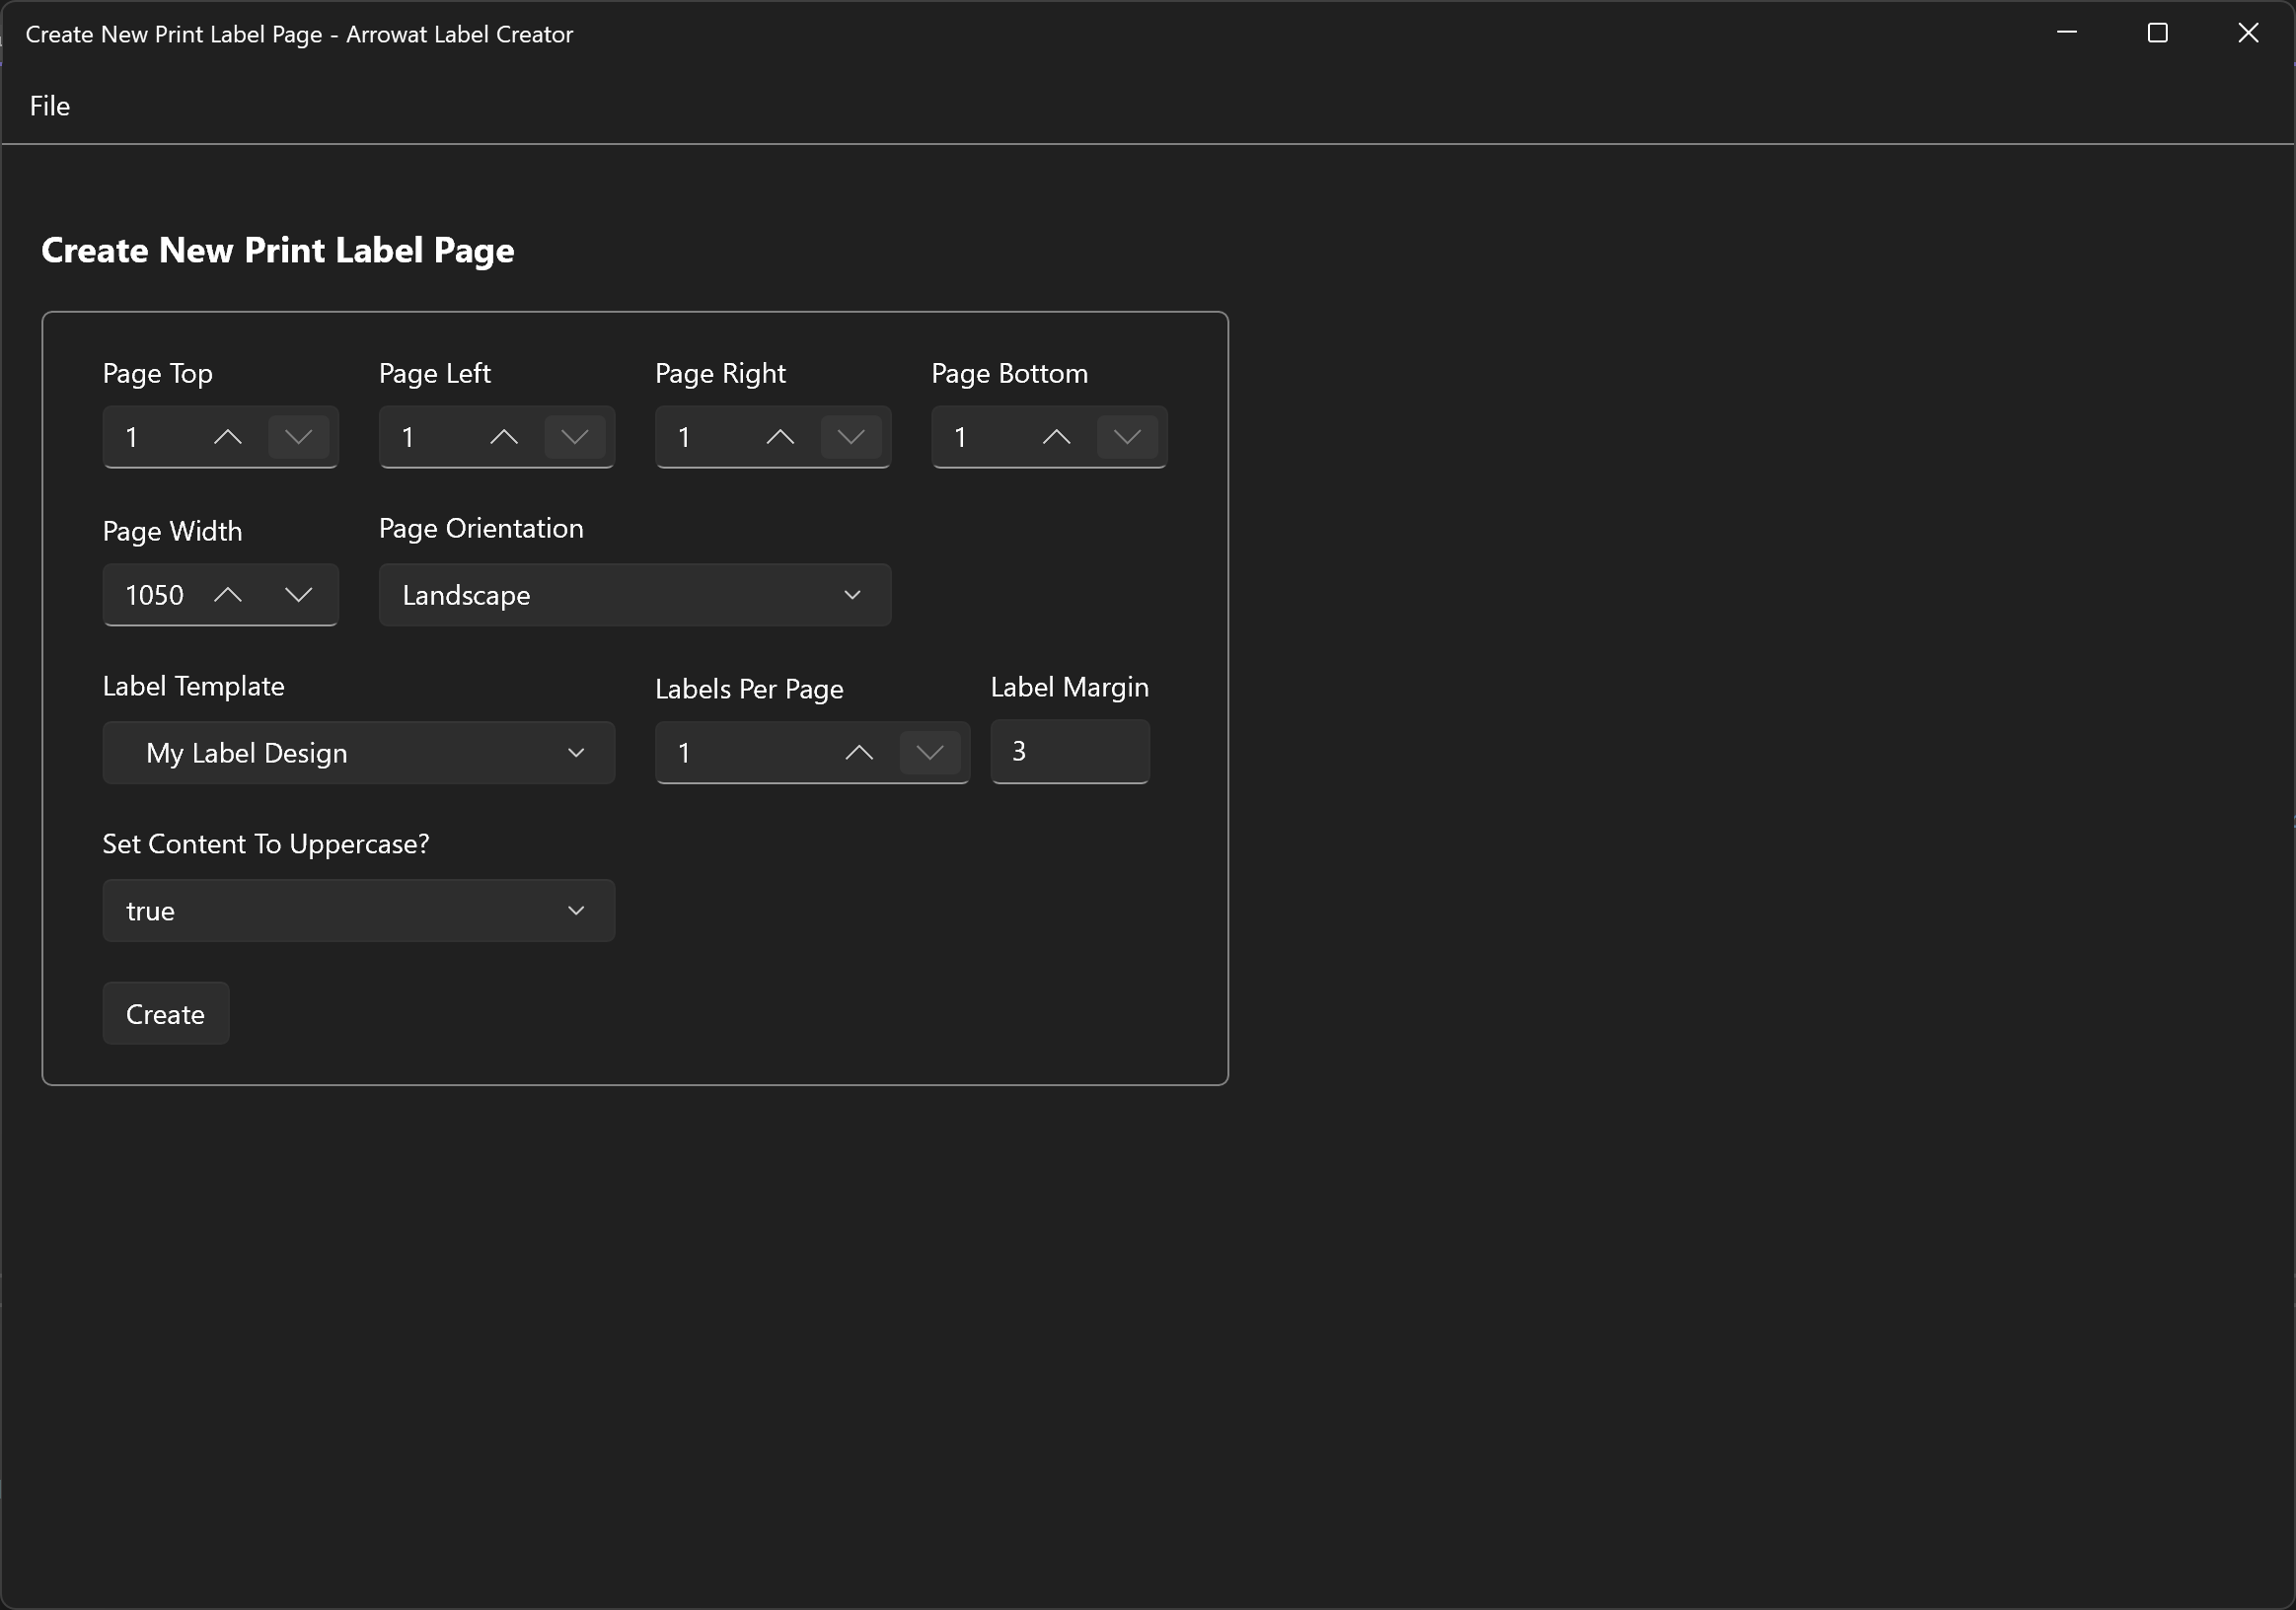
Change the following values
- Page Top: 1
- Page Left: 1
- Page Right: 1
- Page Bottom: 1
- Page Width: 1050
- Page Orientation: Landscape
- Label Template: Select the template My Label Design we created it on Creating product sign and export to templates
- Labels Per Page: 1
- Label Margin: 3
- Set Content To Uppercase?: true
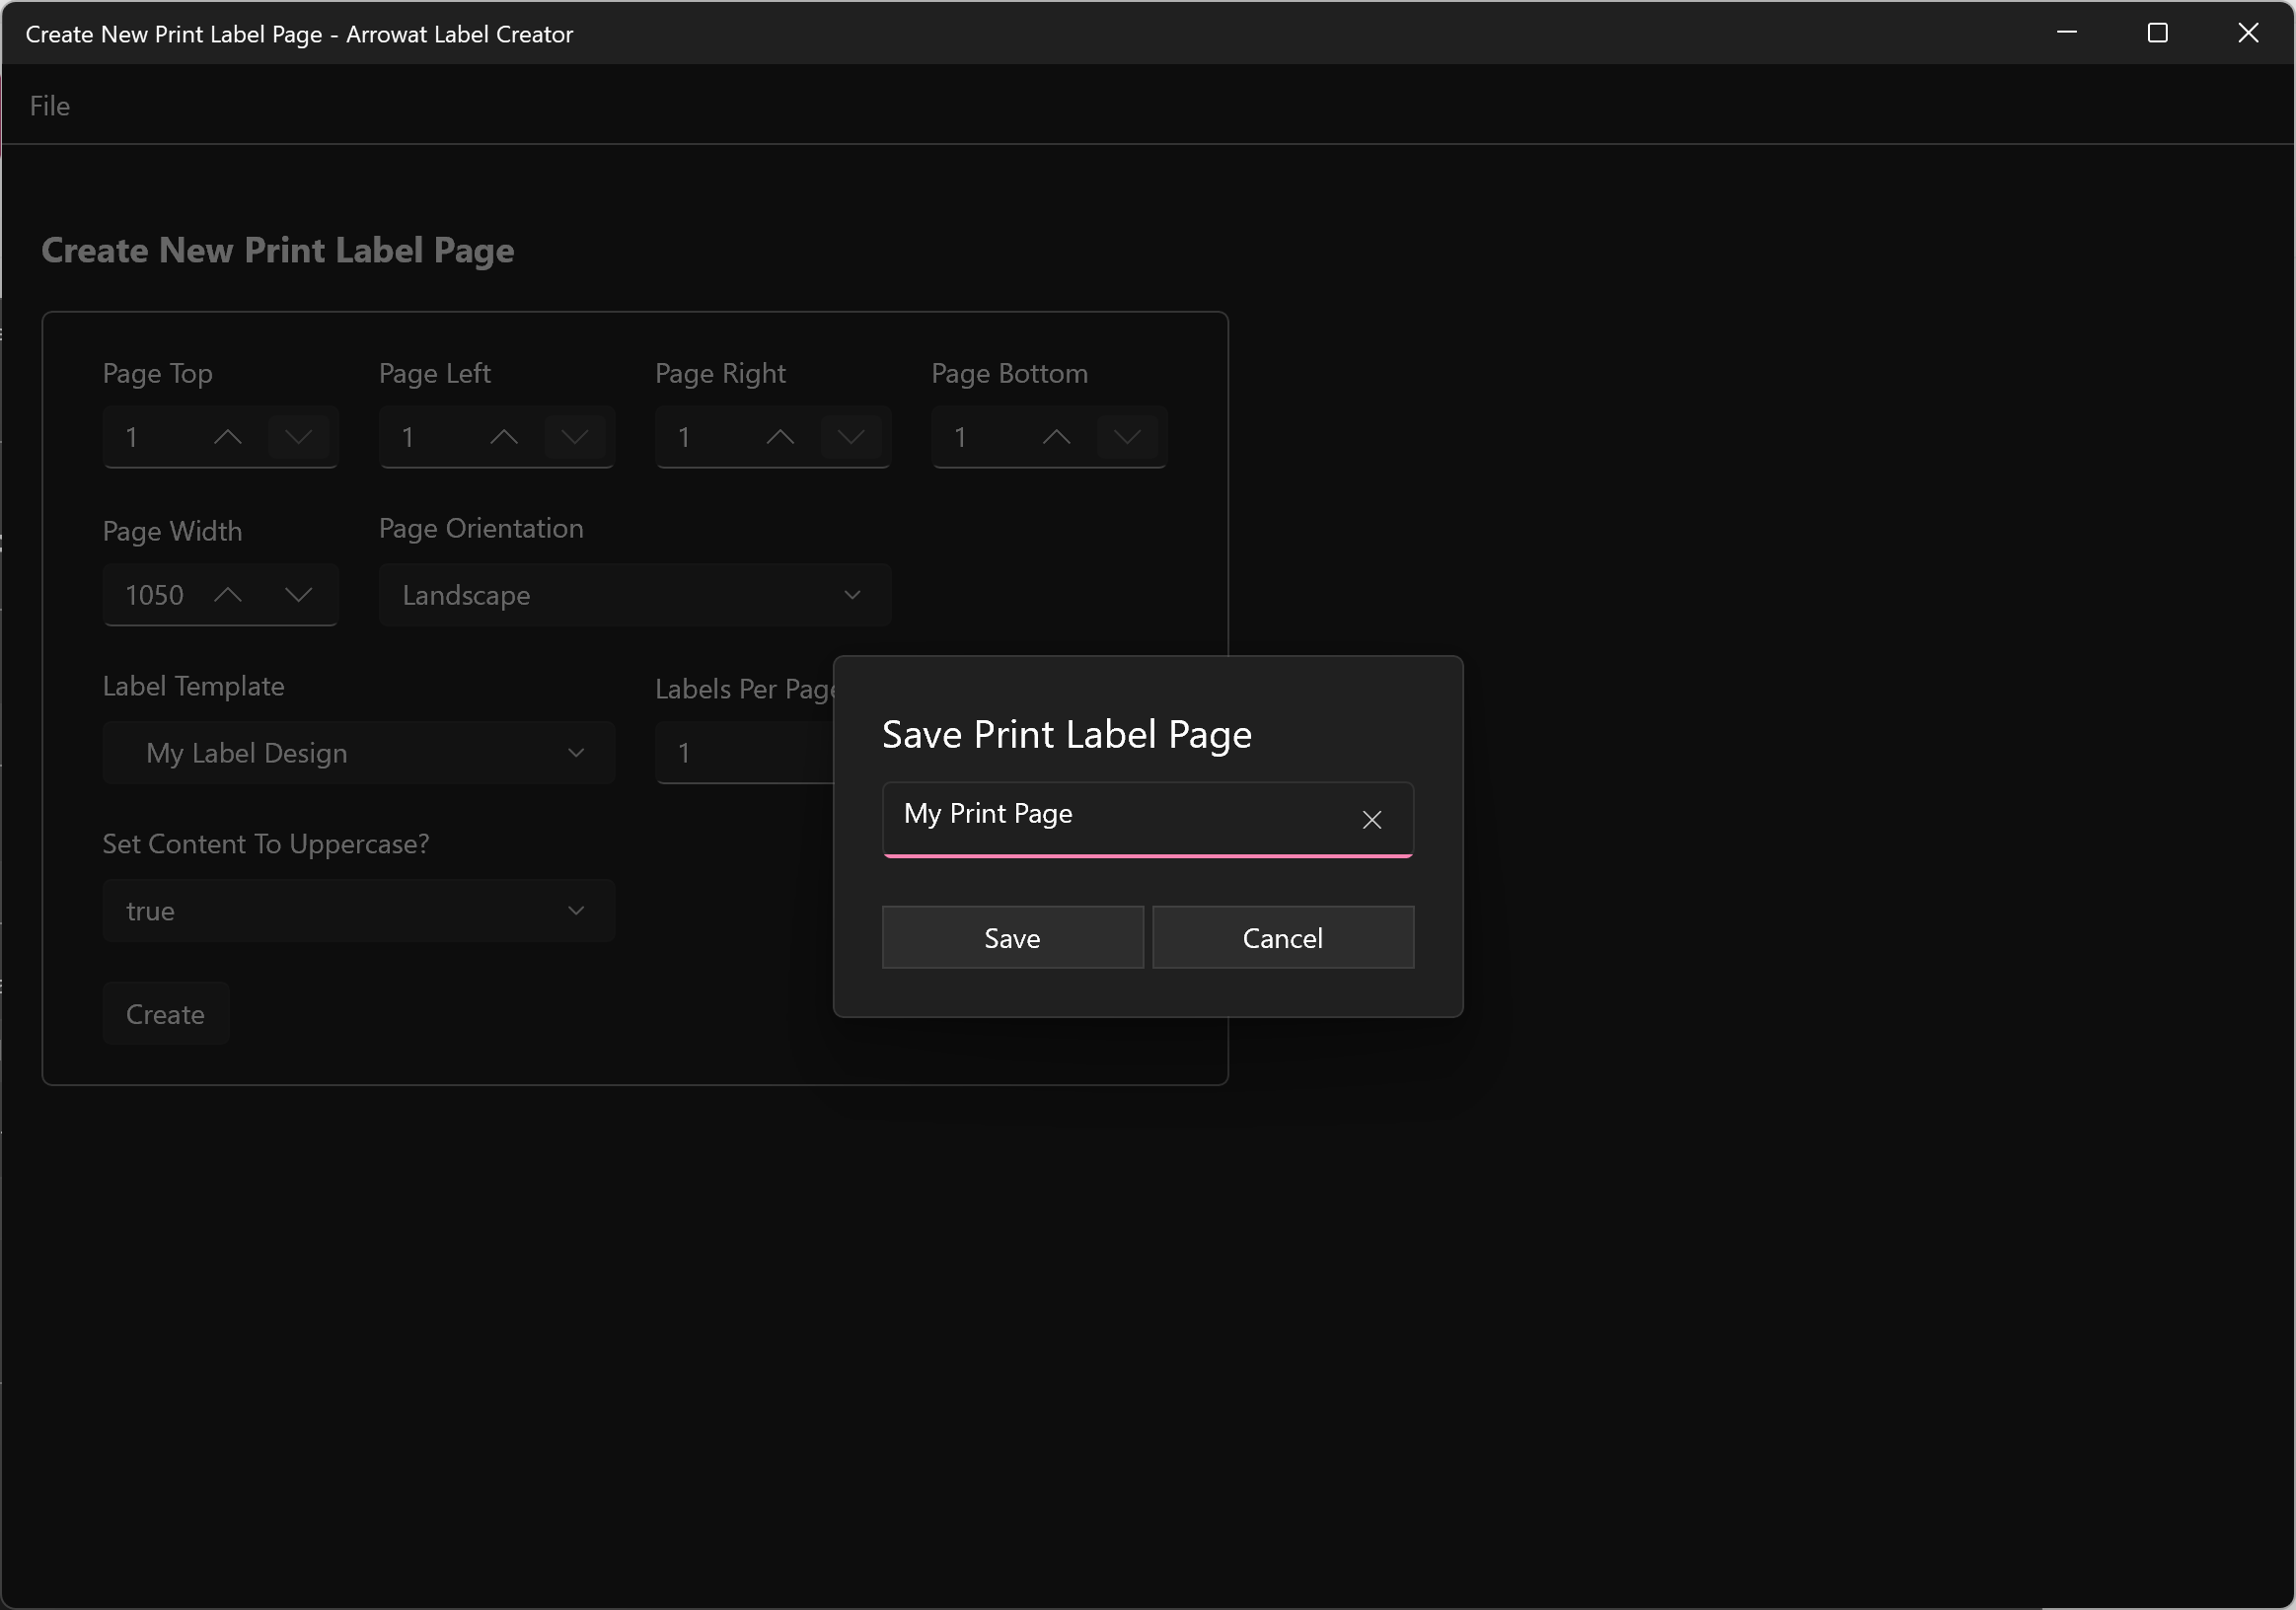
Click Create button and save it with the name My Print Page
From menu click File > Exit to go back to Batch Builder.
-
Page Top:
Creating data tables
Data tables are the data properties used for batch creation, this allows you to create many data tables as you want with any properties you need.
Generally speaking think about it as a database tables, these tables are created in JSON format file, we have been working hard to enable this option
on Arrowat Label Creator, this integration enables to you to create tables for products, stickers, labels easy and fast.
When you create a data table you are able to add property fields with the name you want, since these tables are intended to use with Label design, the
property name must match the Element For on the Label Template we created on Creating product sign and export to templates.
Each property creates it own text box field when using it on batch creation.
-
Open Batch Builder

-
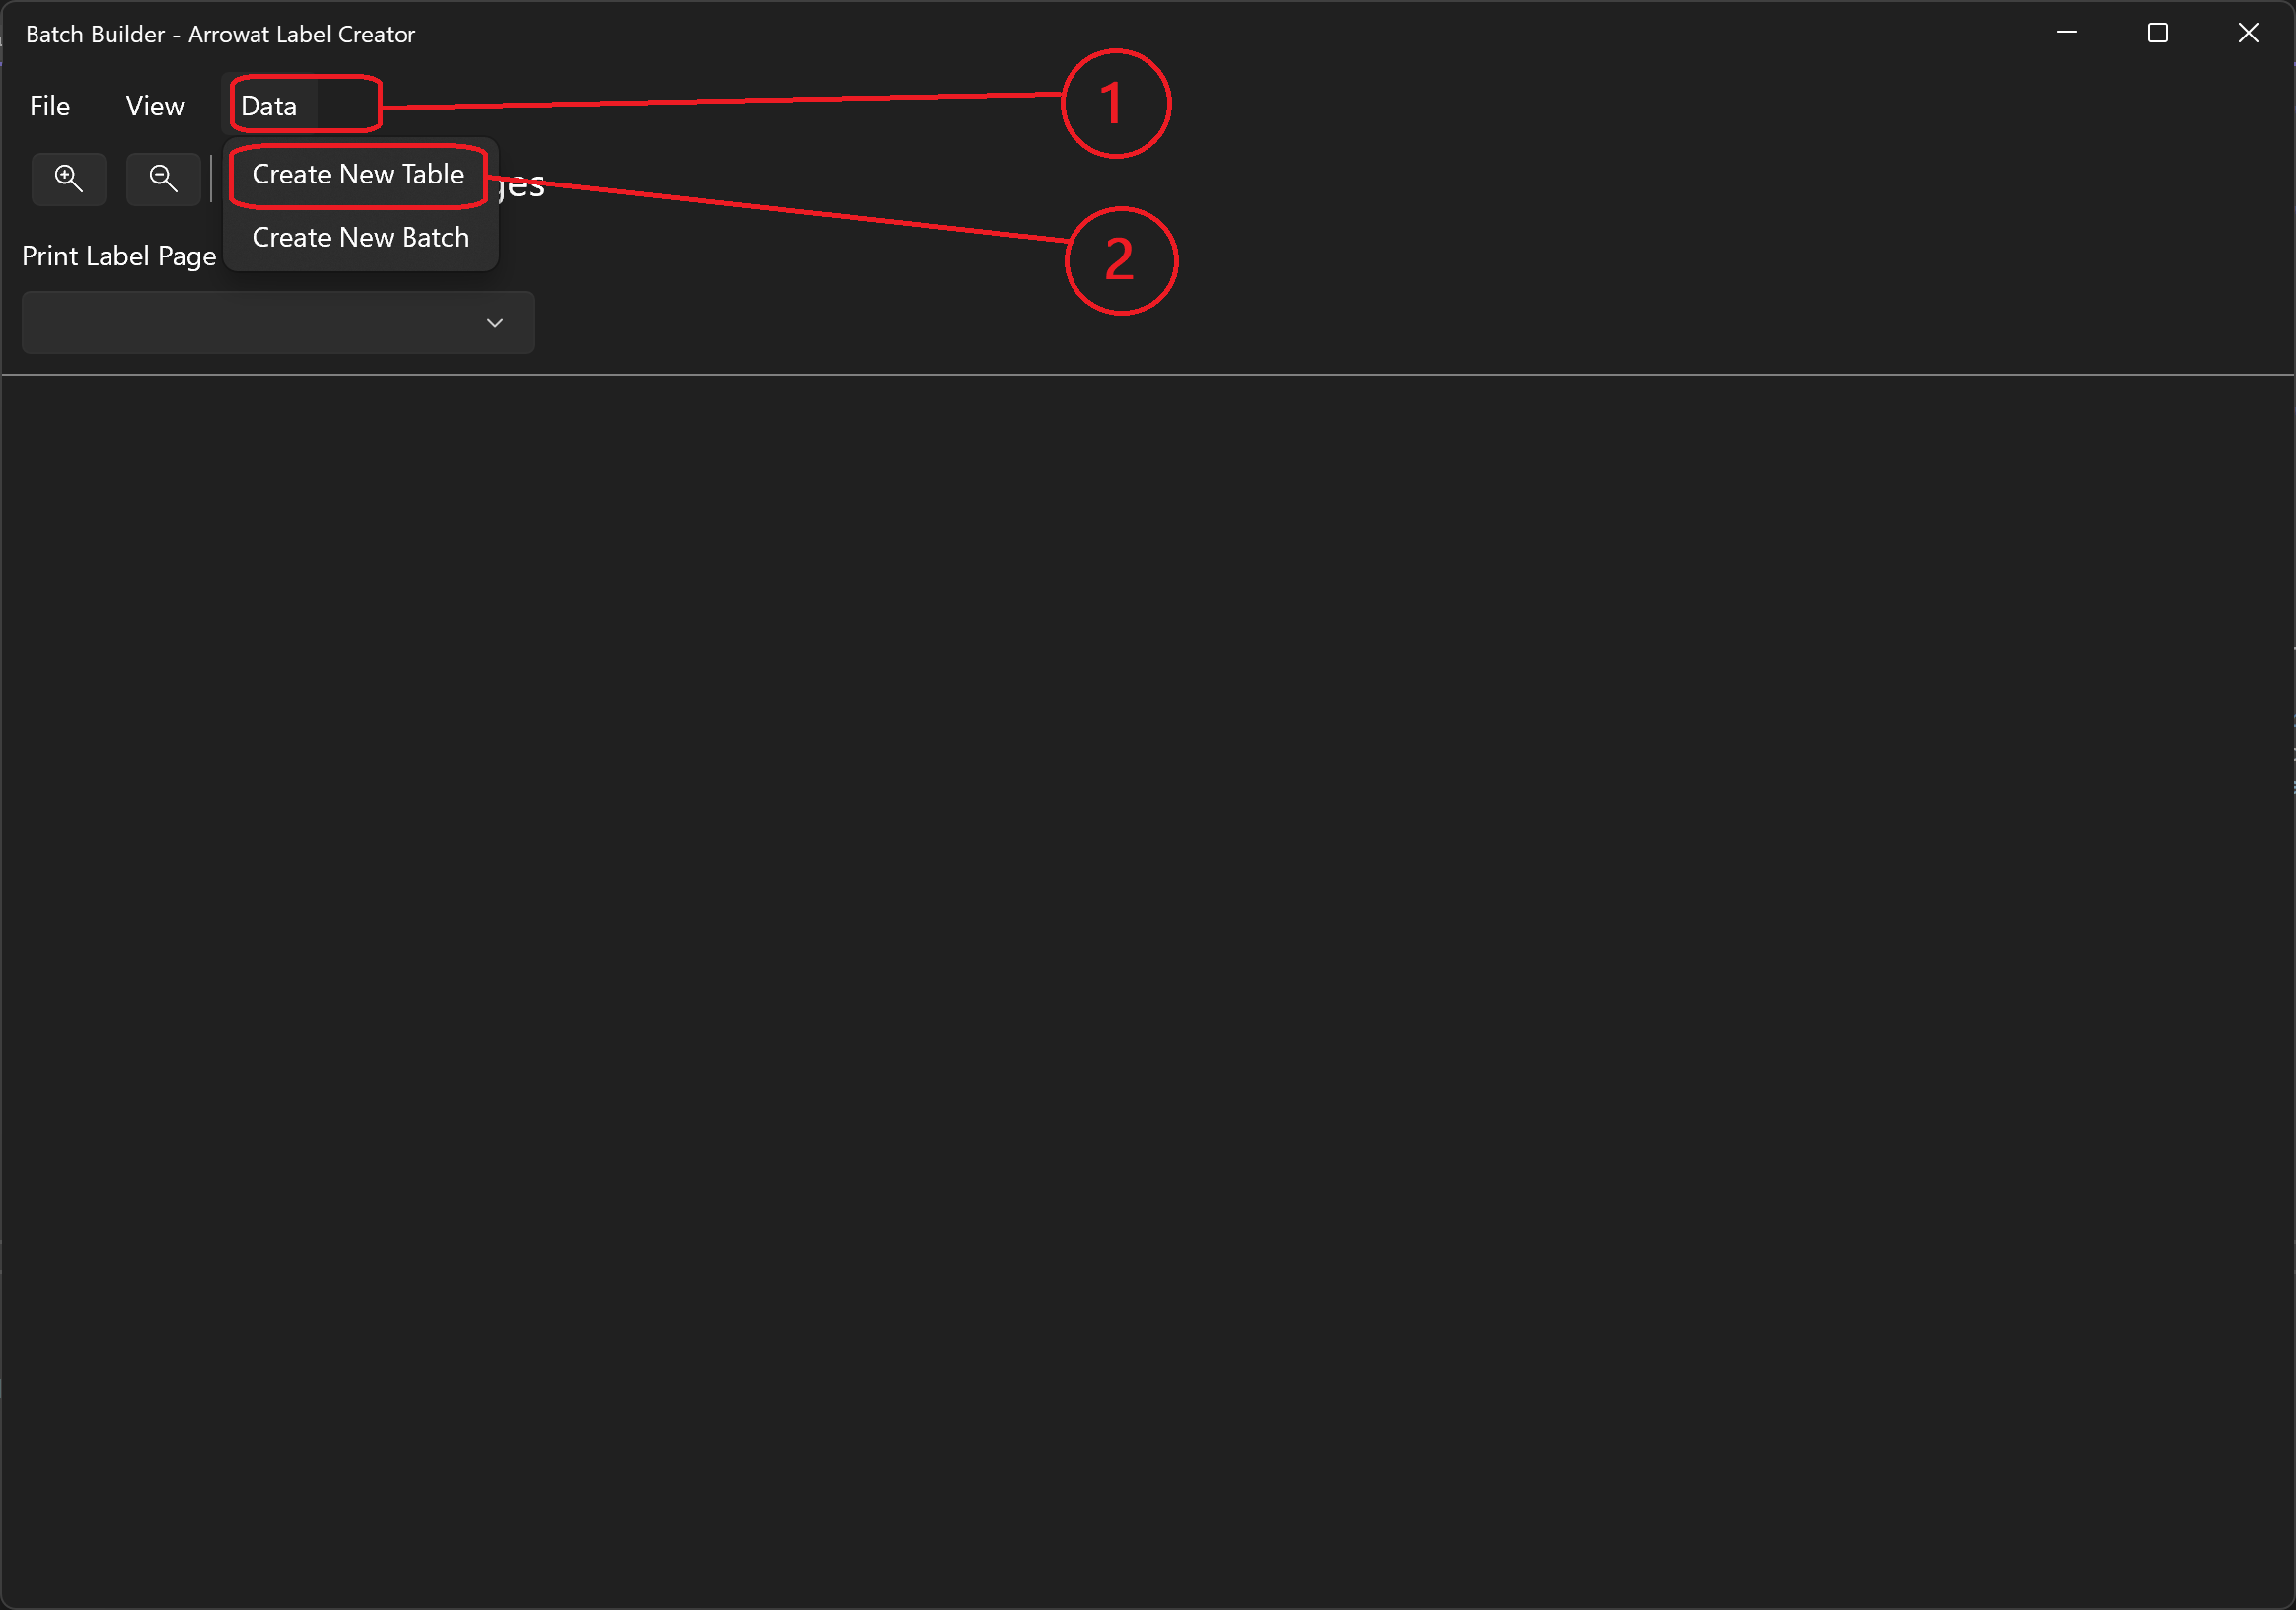
Click Data > Create New Table
-
The Create New Table page will be open
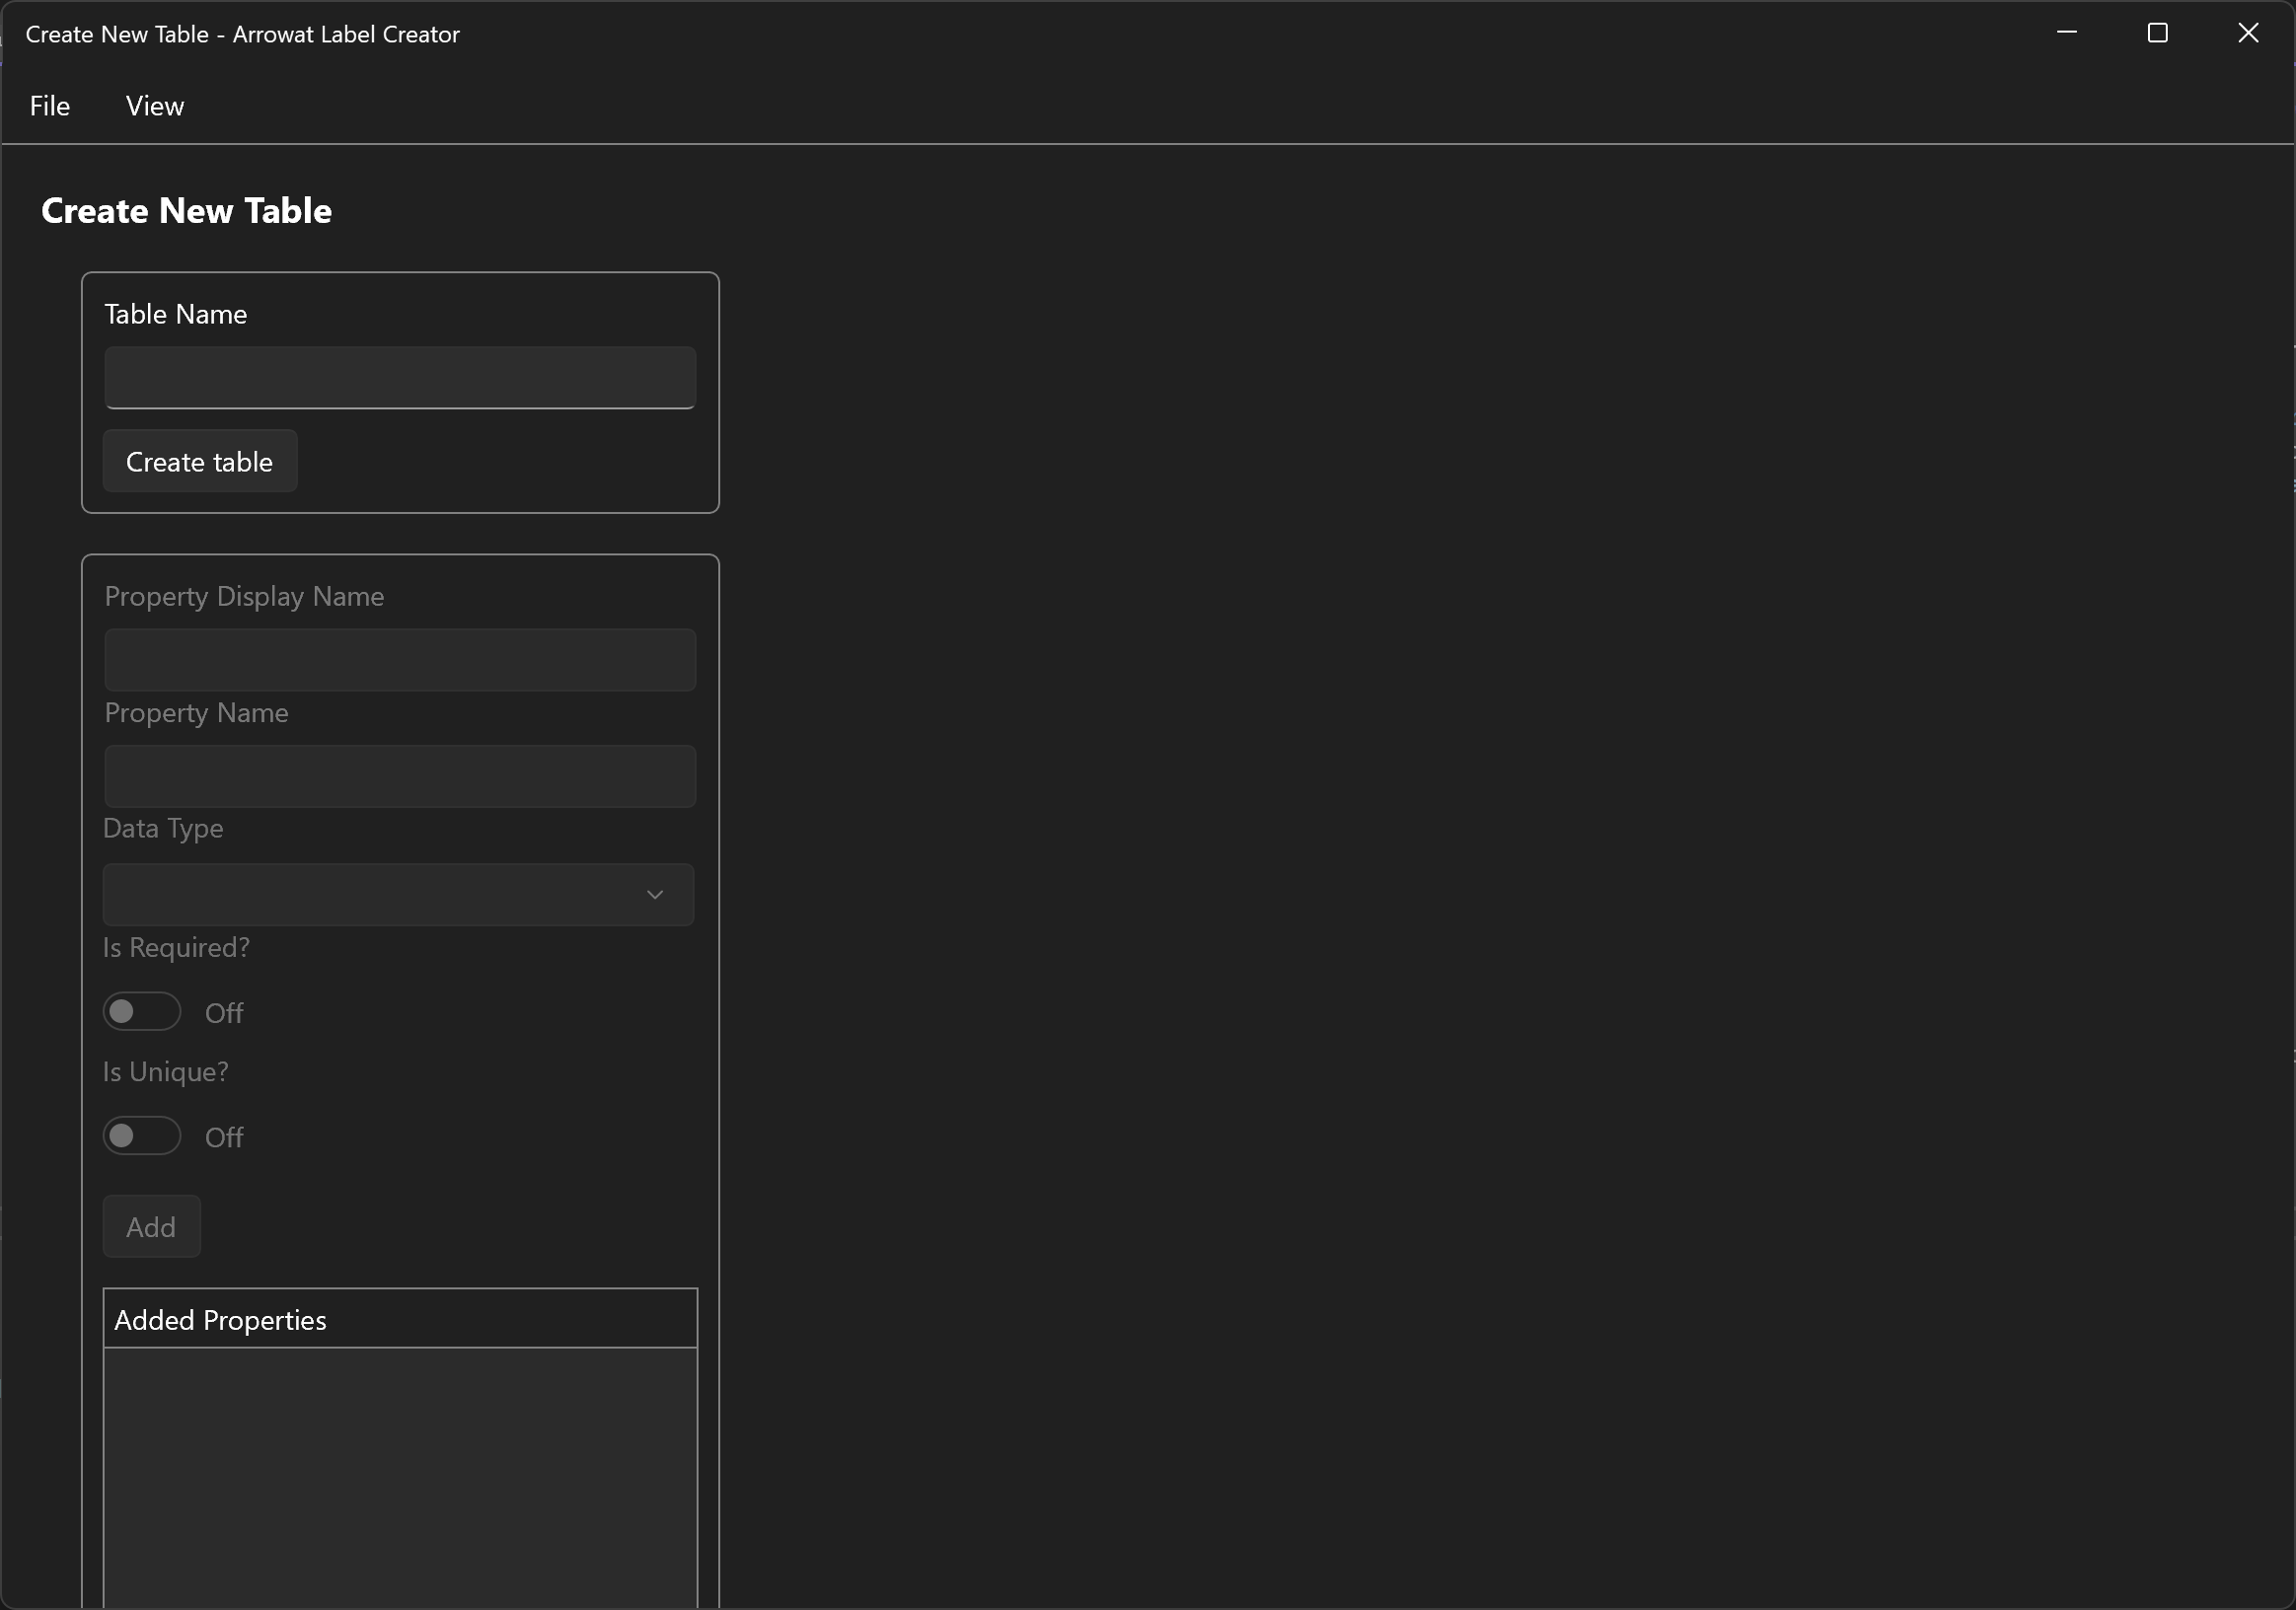
- Table Name: The name of the table file.
- Create Table button: Creates the table file.
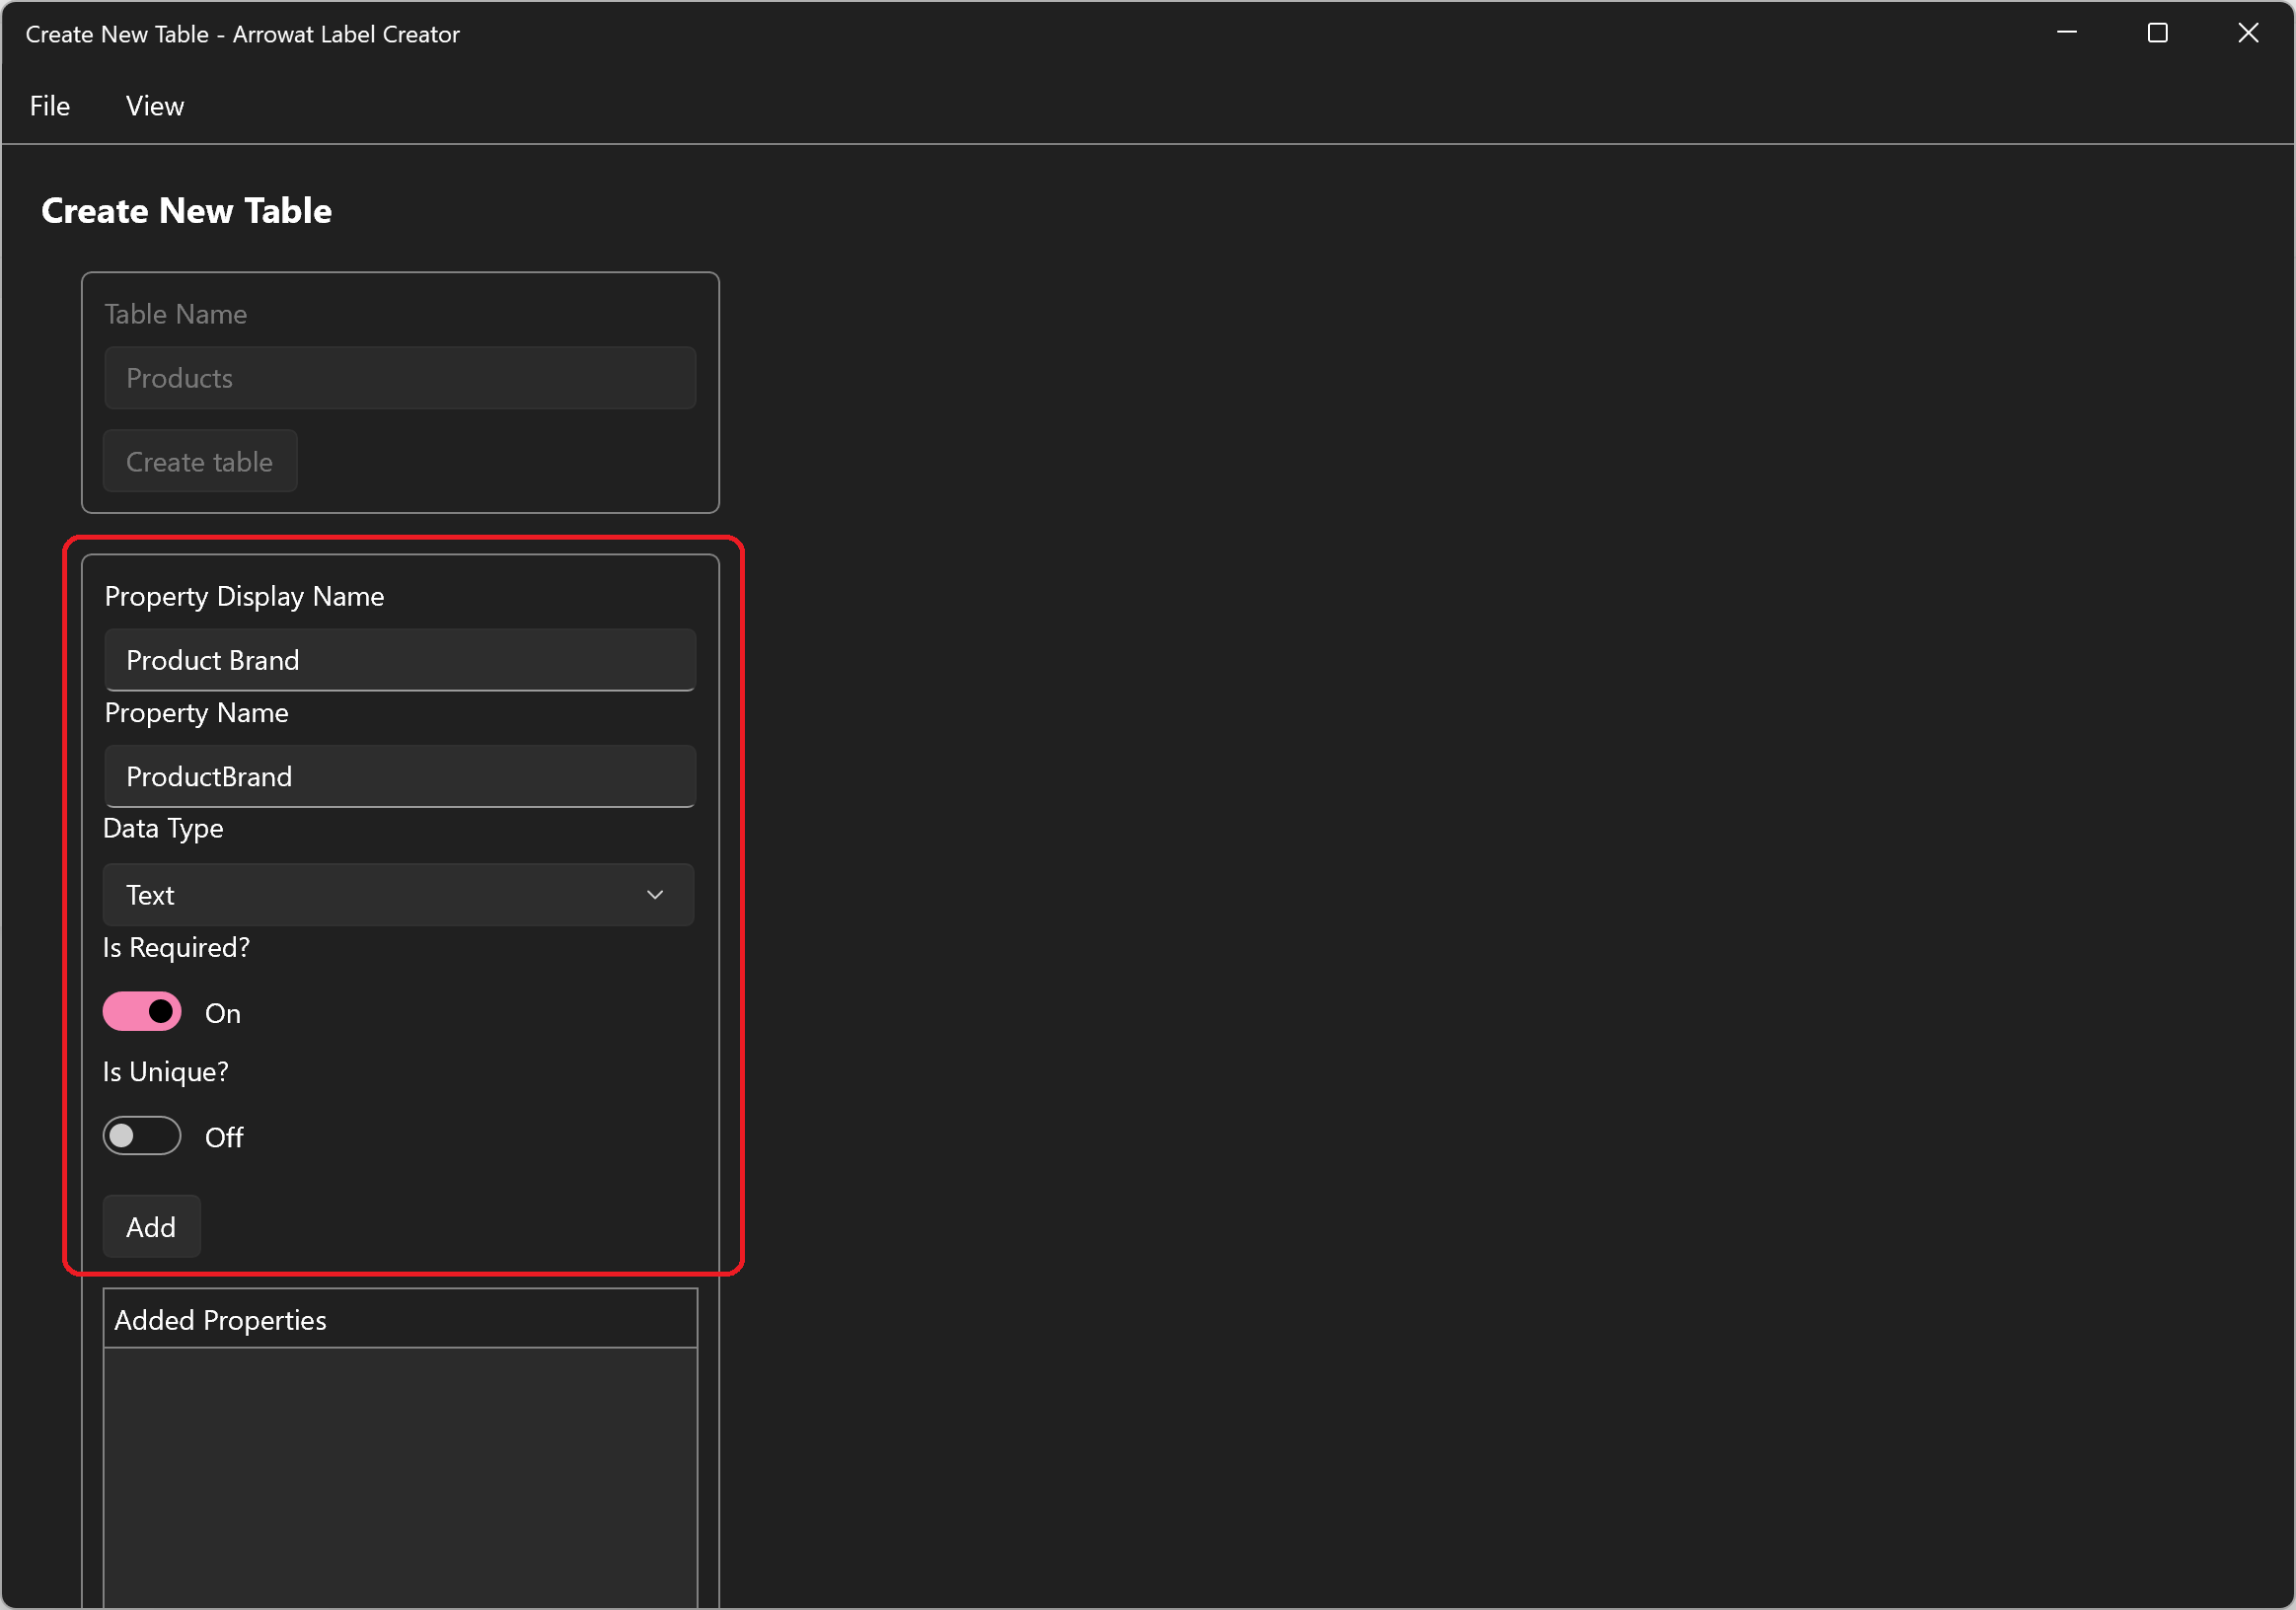
- Property Display Name: The display name of the property to show when creating batch data.
- Property Name: The property name that is related to ElementFor on the Label Template.
- Data Type: The data type the property will accept.
- Is Required?: If the property data is required, the user needs to add data to this property.
- Is Unique?: This data must be unique, no other data should be added twice.
- Add button: Adds the data property to file and show them on Added Properties list.
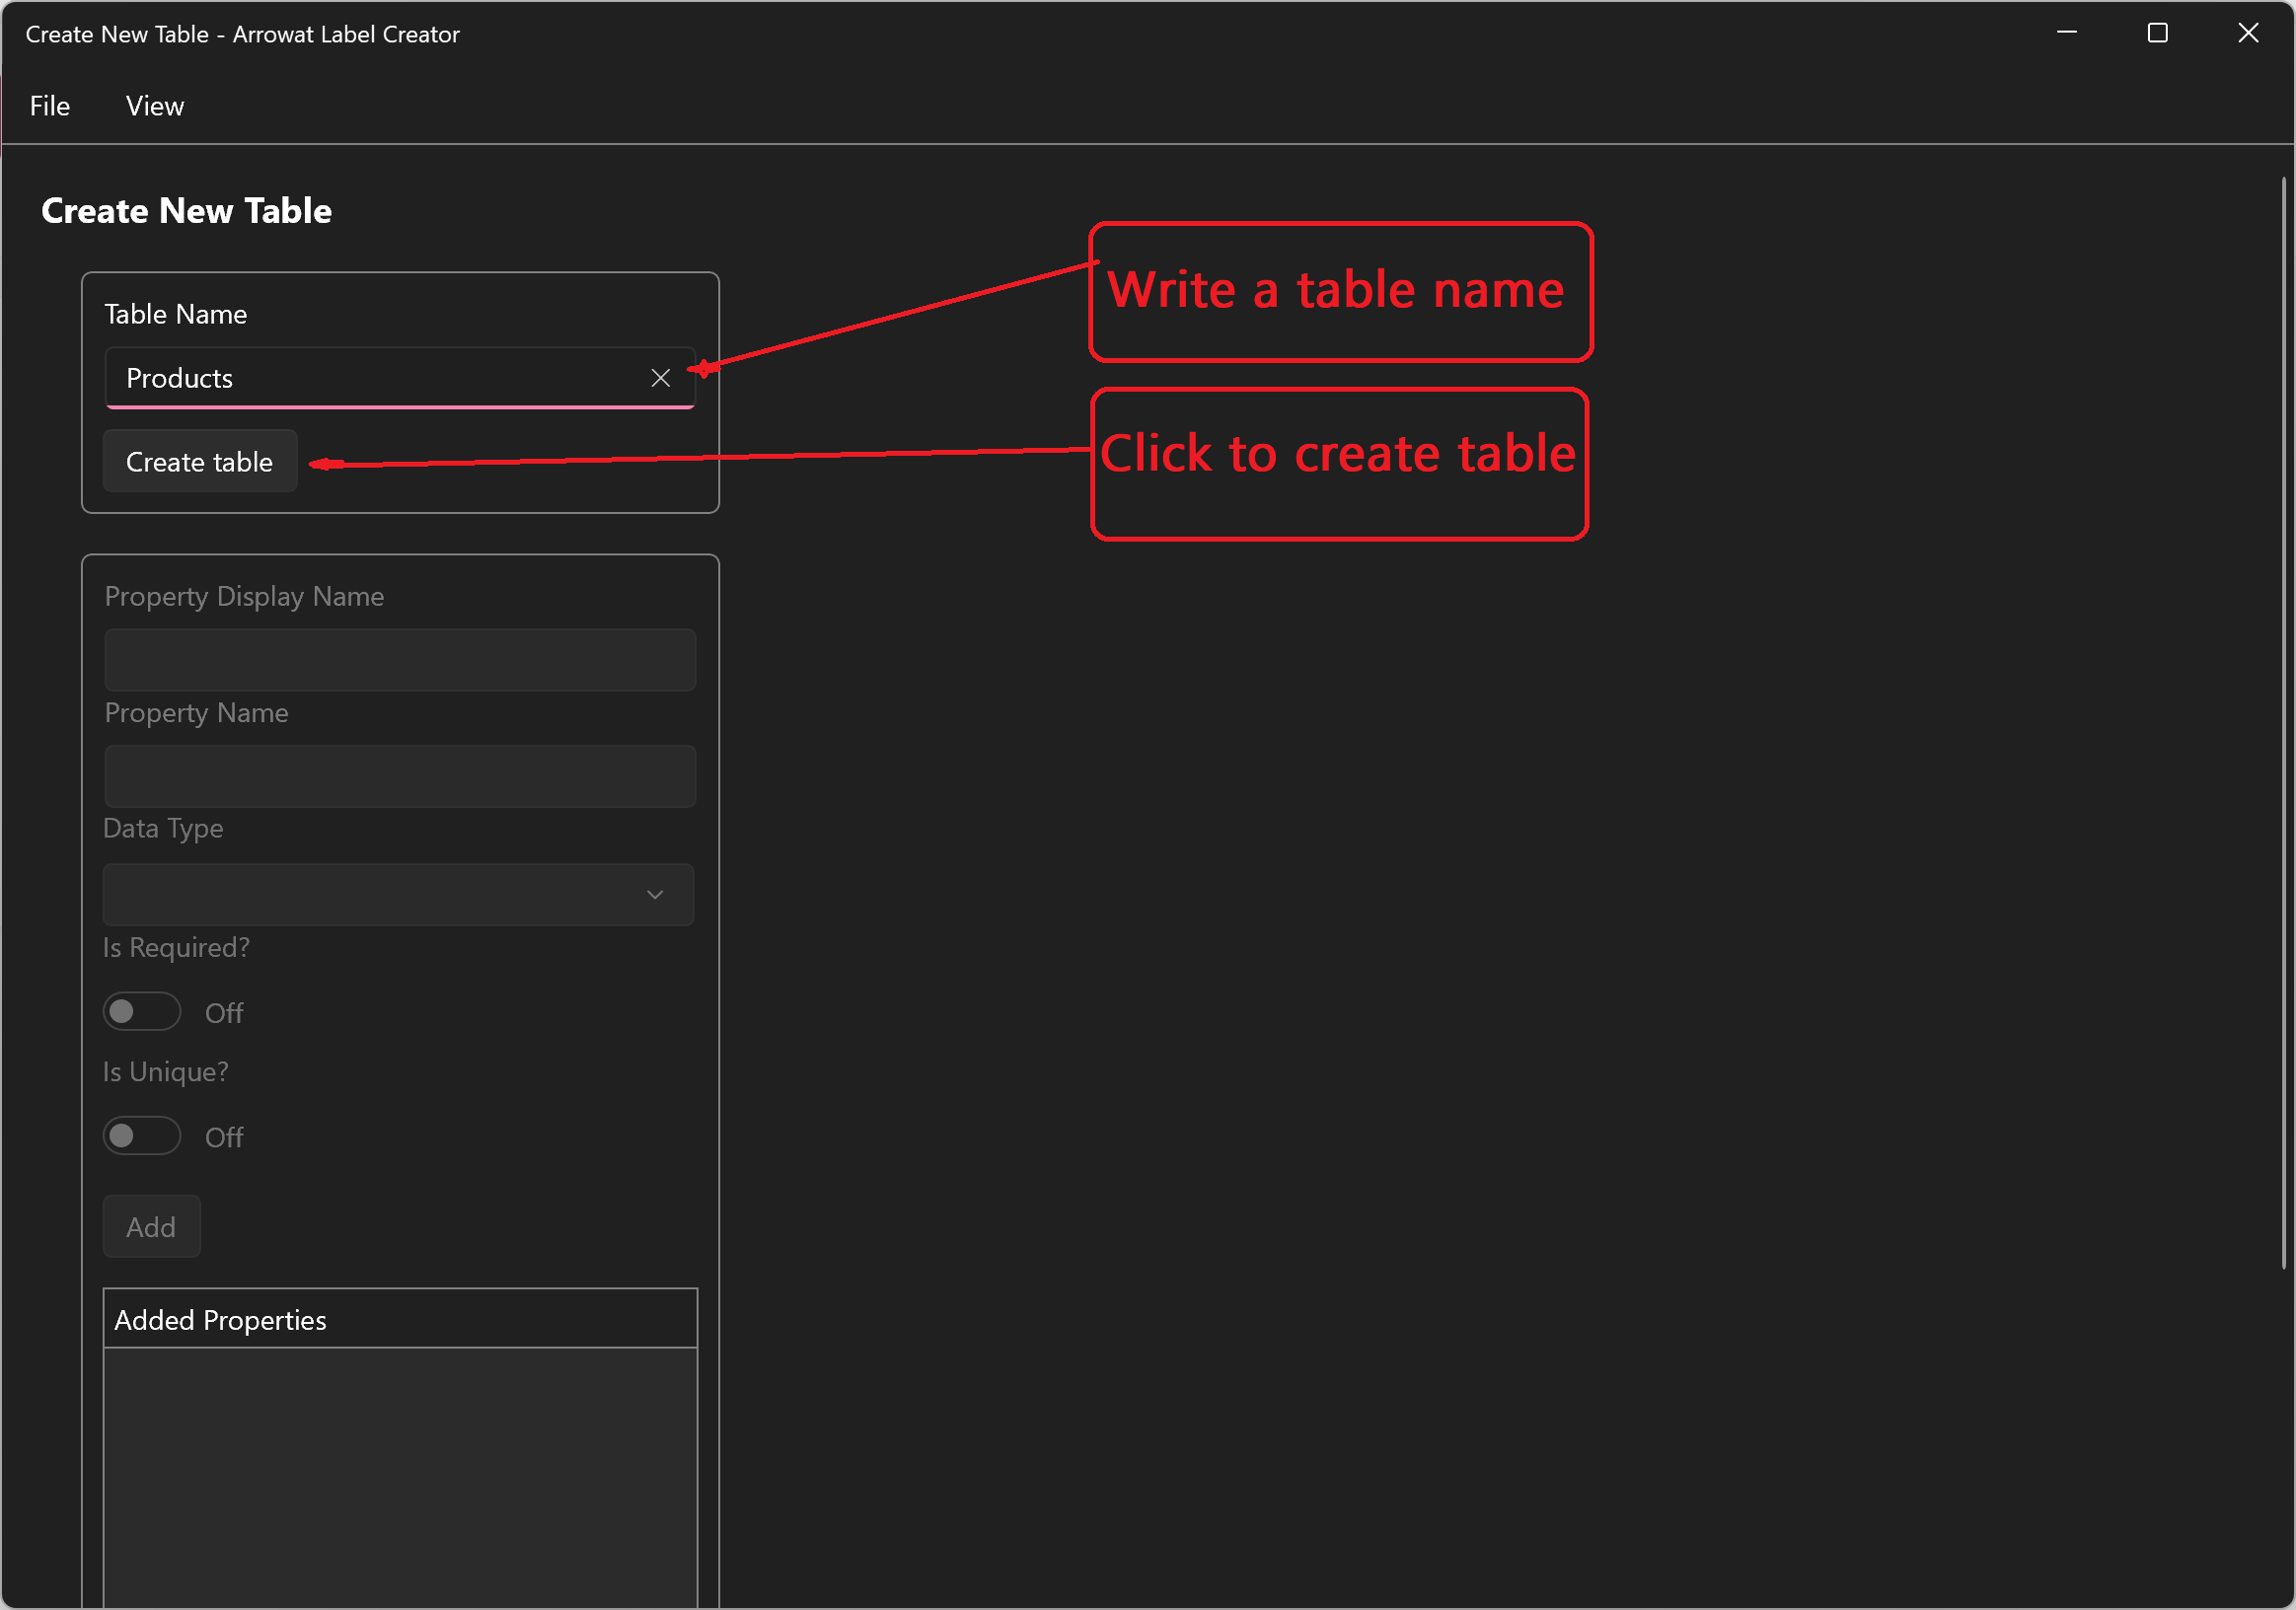
- Write Table Name: Products
-
Click Create button
-
Add The following Property data
PRODUCT BRAND PROPERTY
- Property Display Name: Product Brand
- Property Name: ProductBrand
- Data Type: Text
- Is Required?: Yes (turn on)
- Is Unique?: No (turn off)
Following the step above, add the next properties
PRODUCT DESCRIPTION PROPERTY
- Property Display Name: Product Description
- Property Name: ProductDescription
- Data Type: Text
- Is Required?: Yes (turn on)
- Is Unique?: No (turn off)
PRODUCT QUANTITY PROPERTY
- Property Display Name: Product Quantity
- Property Name: ProductQuantity
- Data Type: Text
- Is Required?: Yes (turn on)
- Is Unique?: No (turn off)
CURRENCY SYMBOL PROPERTY
- Property Display Name: Currency Symbol
- Property Name: CurrencySymbol
- Data Type: Text
- Is Required?: Yes (turn on)
- Is Unique?: No (turn off)
PRODUCT PRICE PROPERTY
- Property Display Name: Product Price
- Property Name: ProductPrice
- Data Type: Text
- Is Required?: Yes (turn on)
- Is Unique?: No (turn off)
PRODUCT SIZE PROPERTY
- Property Display Name: Product Size
- Property Name: ProductSize
- Data Type: Text
- Is Required?: Yes (turn on)
- Is Unique?: No (turn off)
PRODUCT ID PROPERTY
- Property Display Name: Product Id
- Property Name: ProductId
- Data Type: Text
- Is Required?: Yes (turn on)
- Is Unique?: Yes (turn on)
-
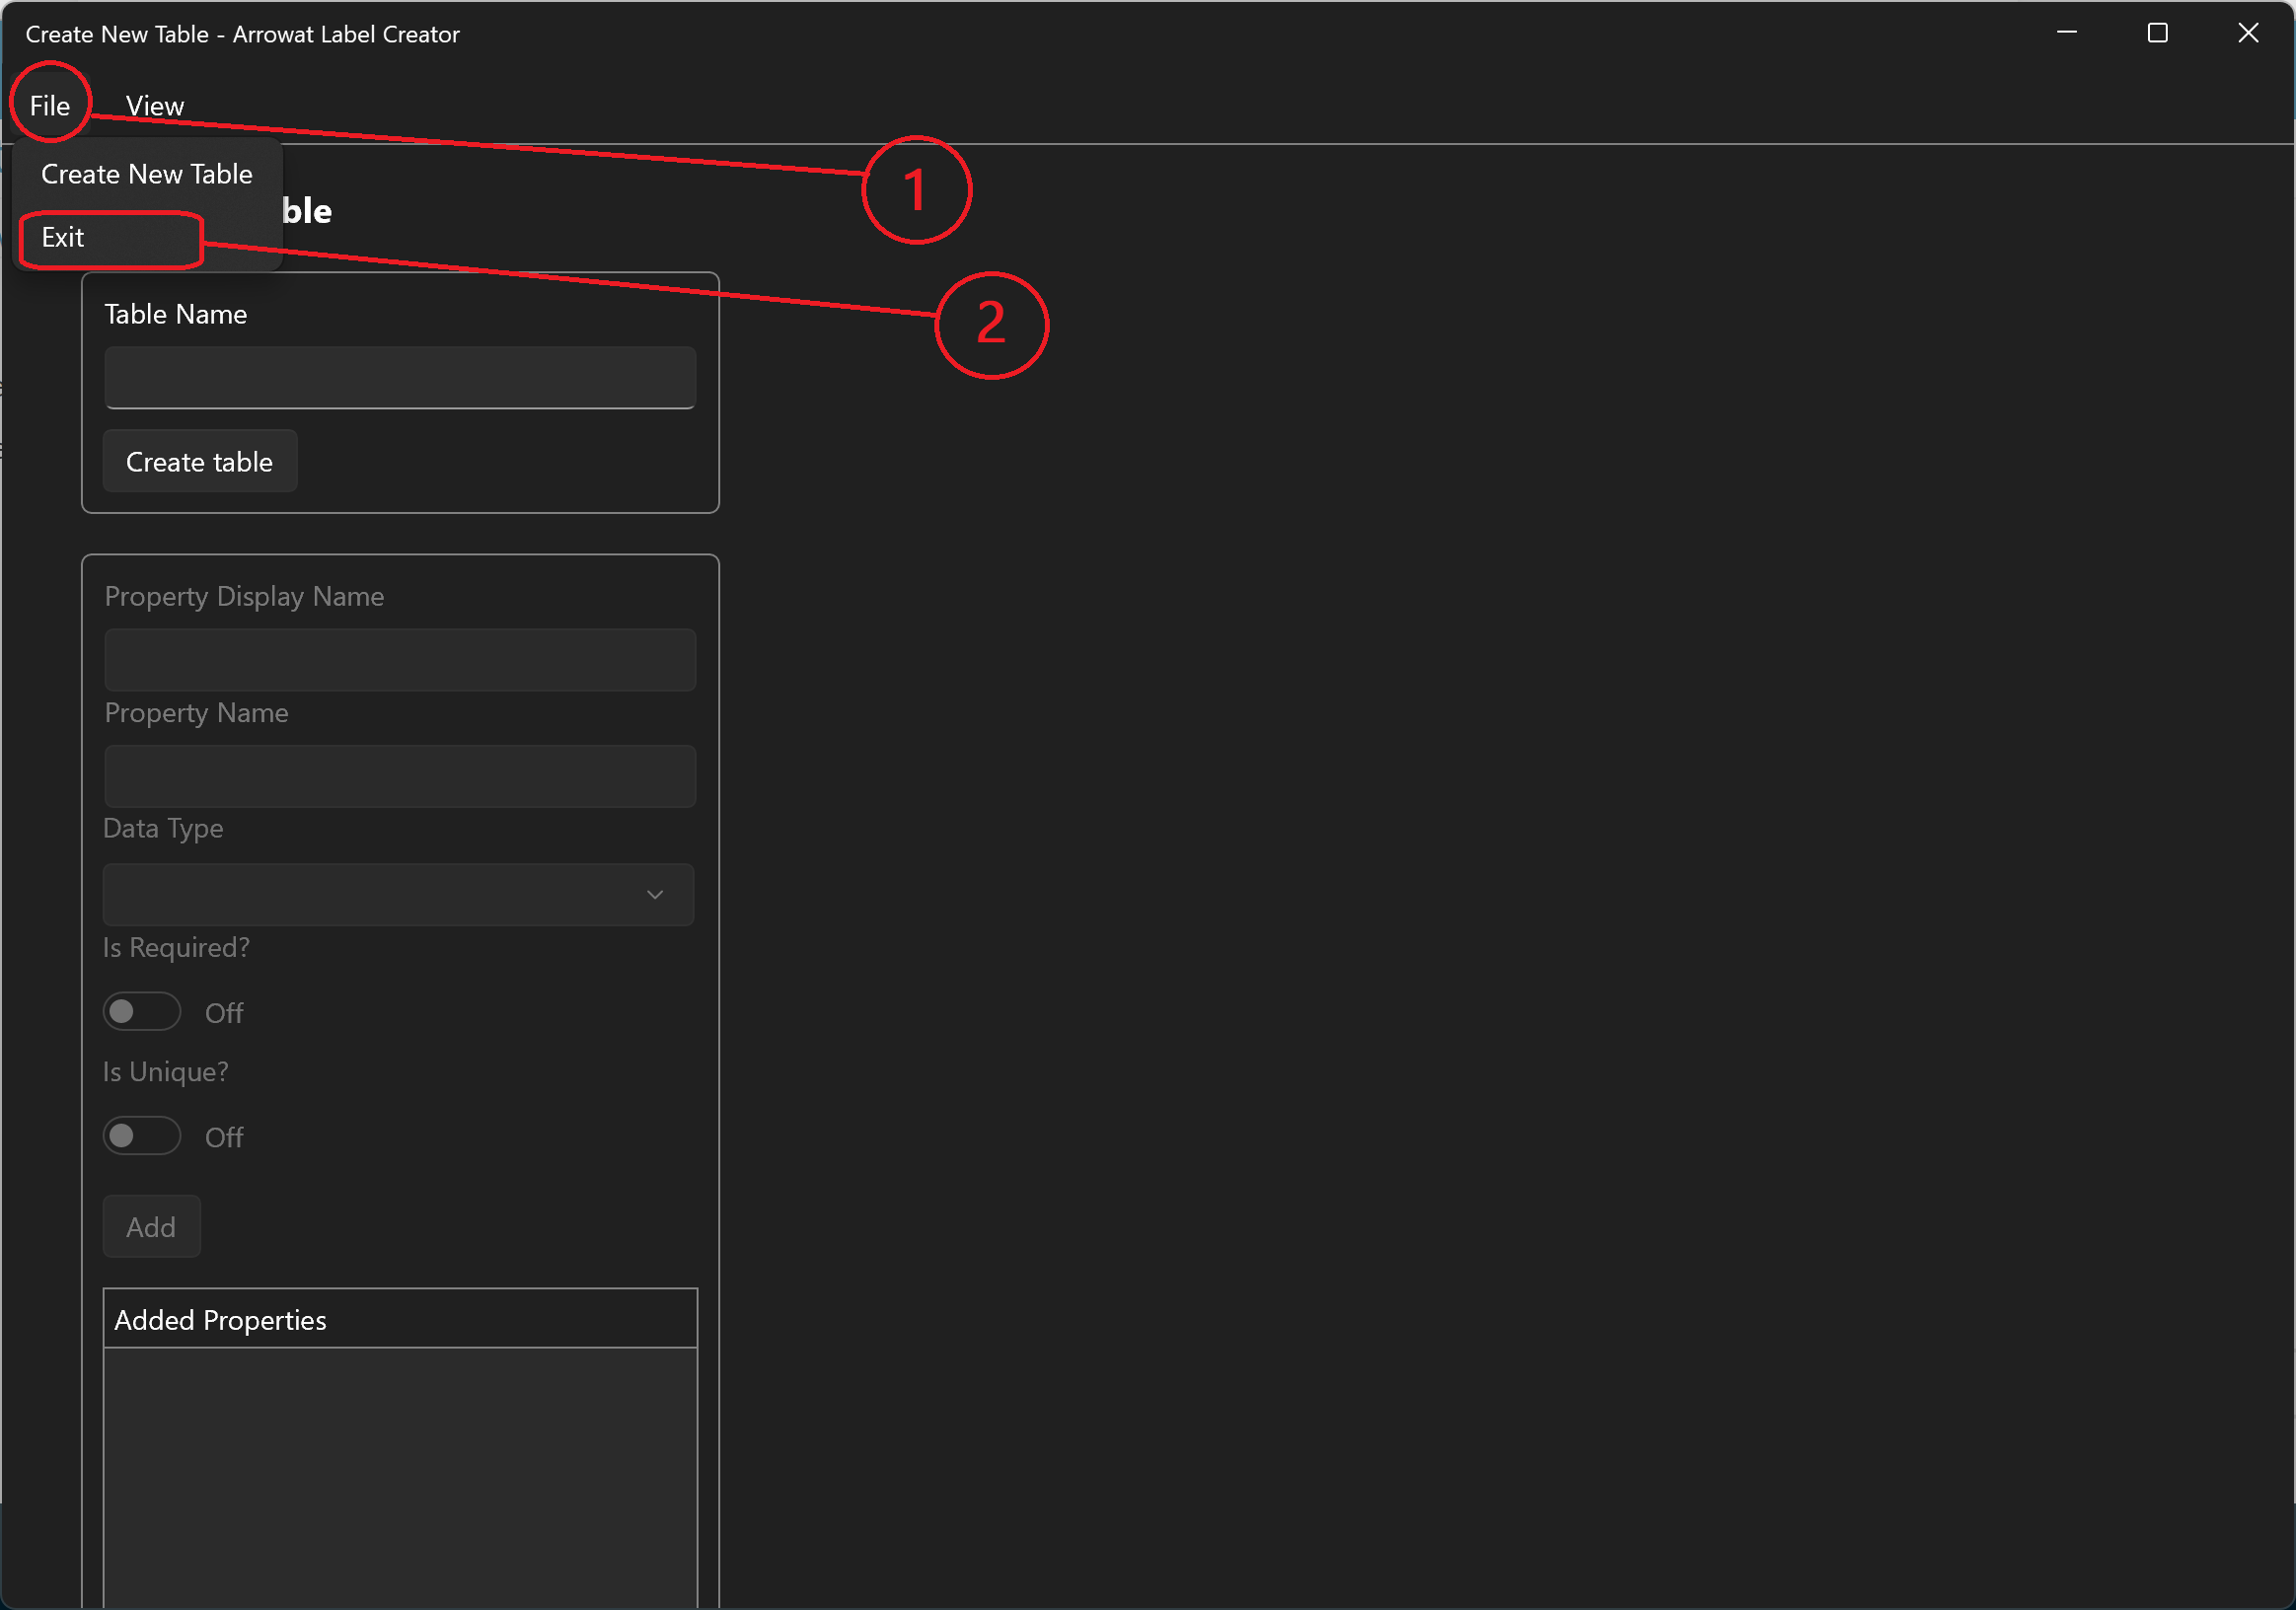
Click File > Exit to go back to Batch Builder
Creating Batches
Batches are the data content where data properties from a data table are used to store data. In this section we will create a data batch using the properties we added on Creating data tables section.
-
Open Batch Builder

-
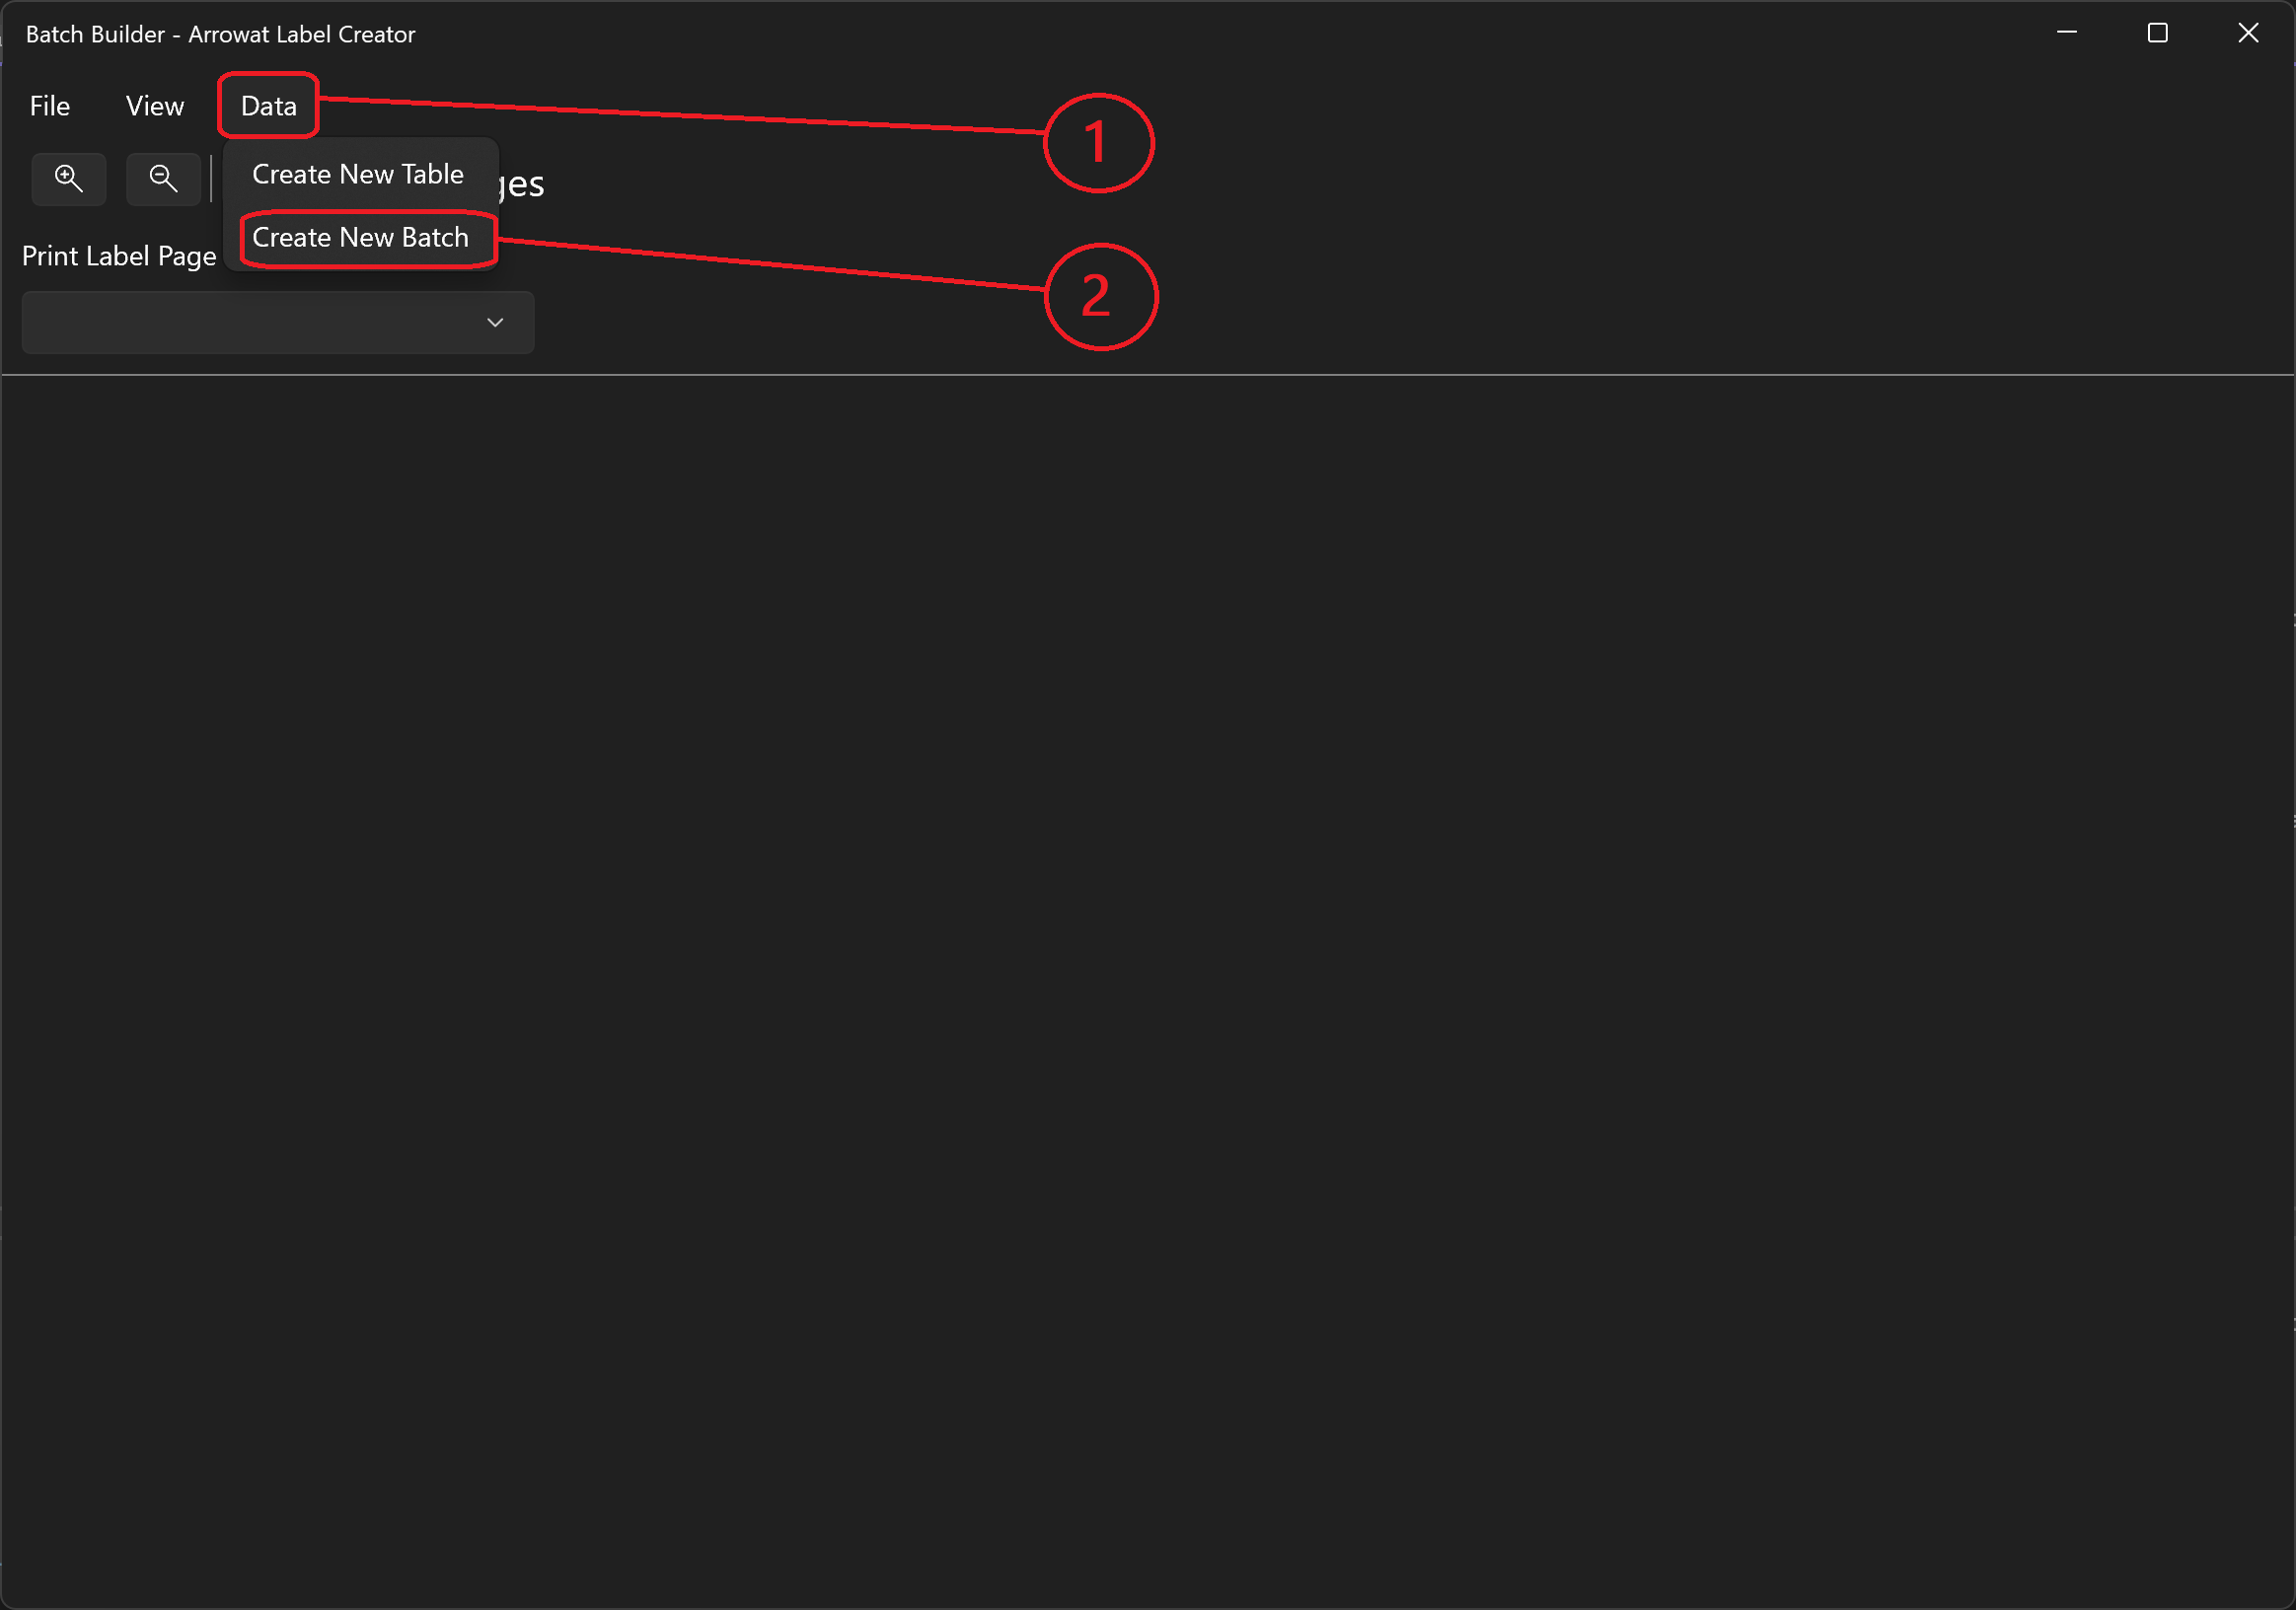
Click Data > Create New Batch
-
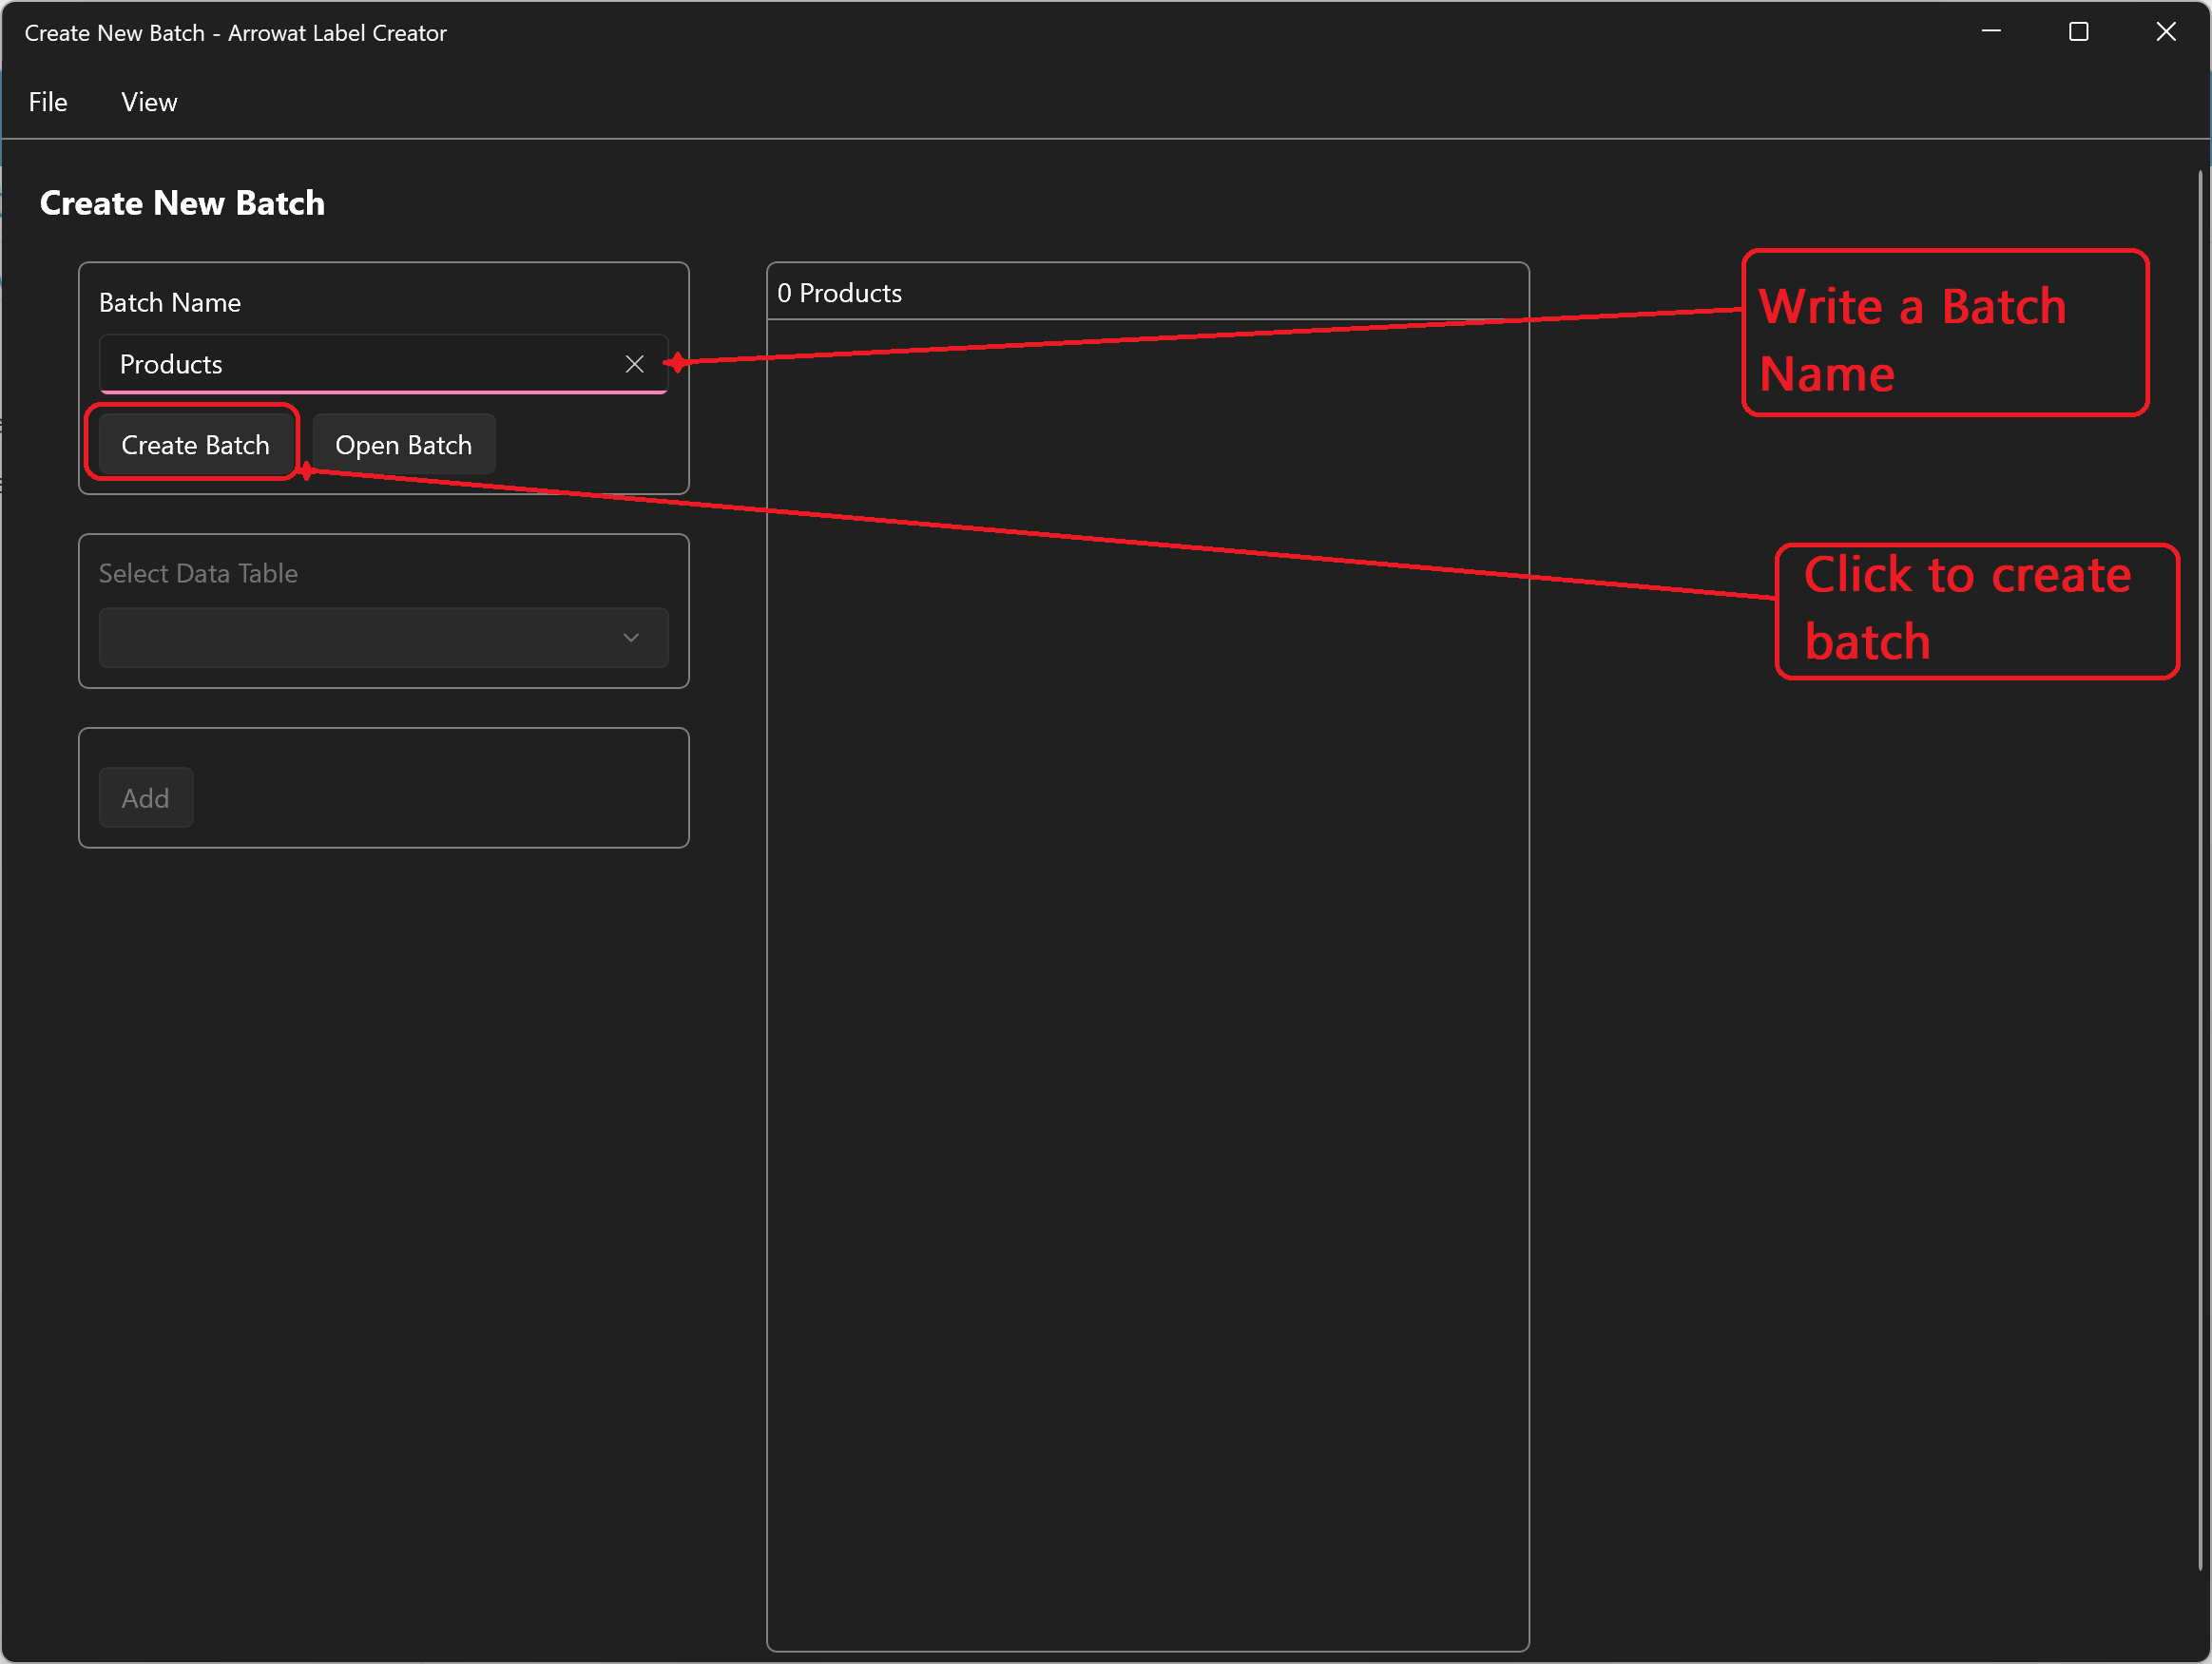
The Create New Batch page will be open
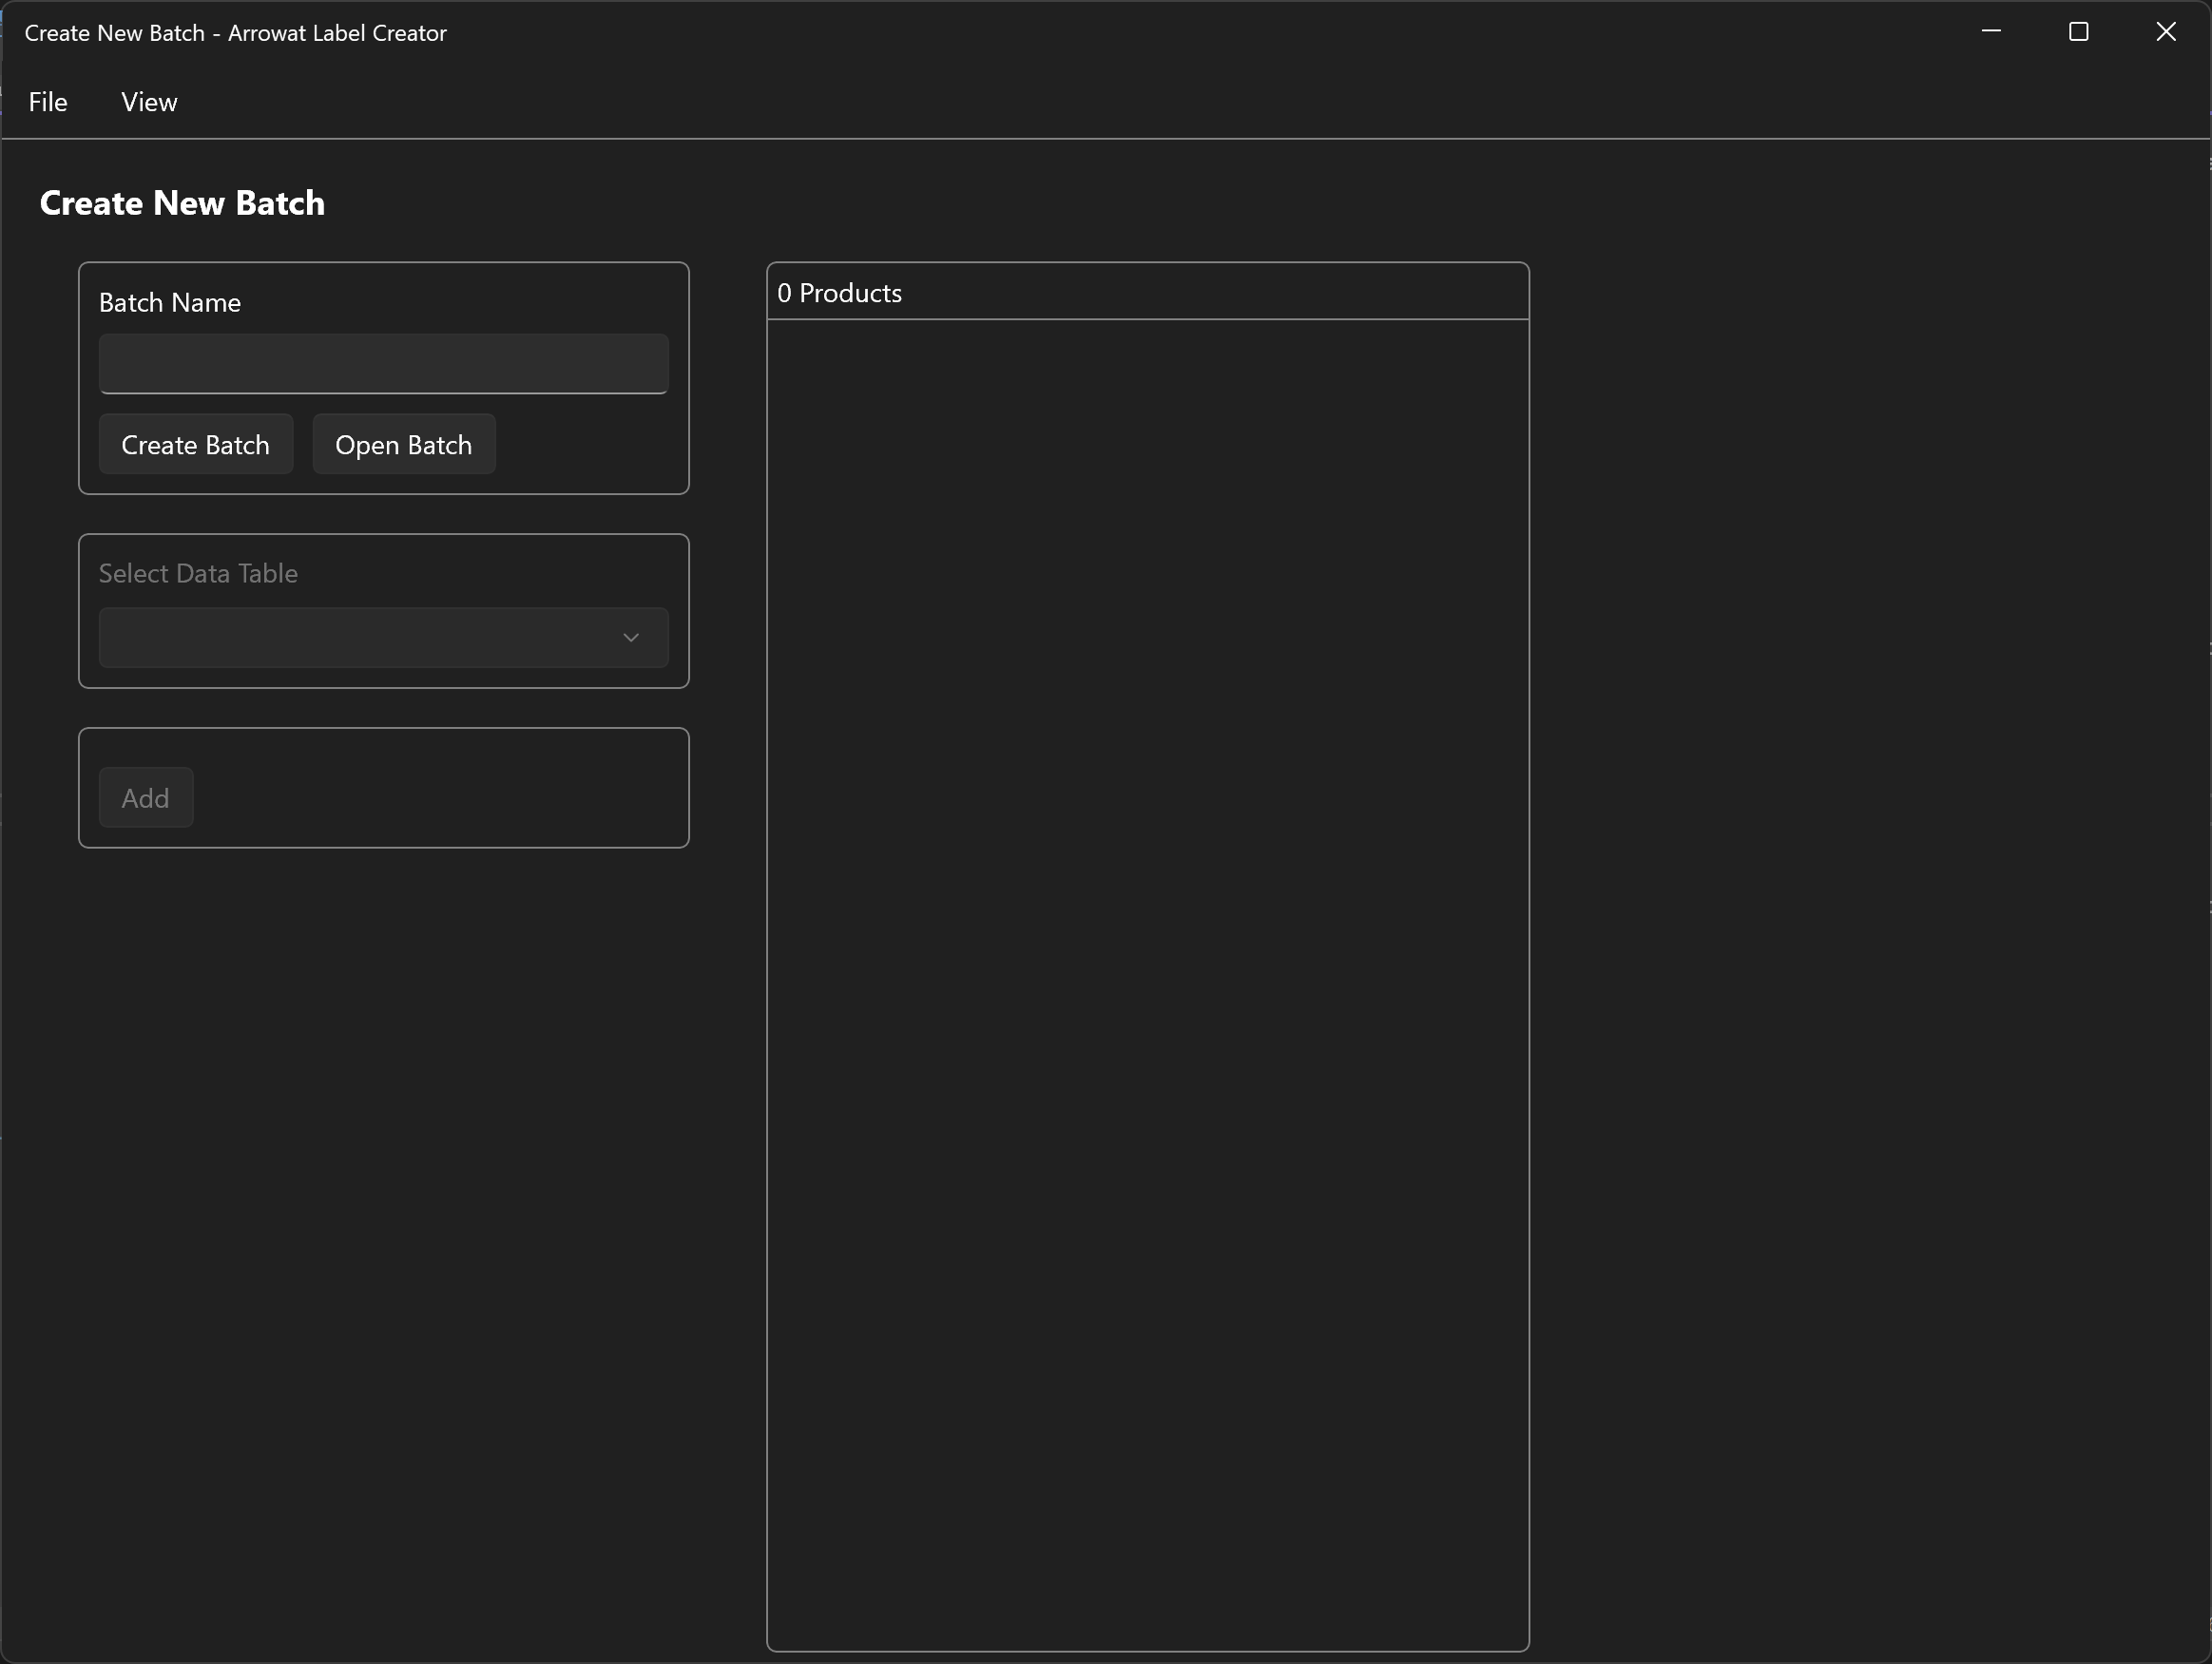
- Write Batch Name: Products
-
Click Create Batch
-
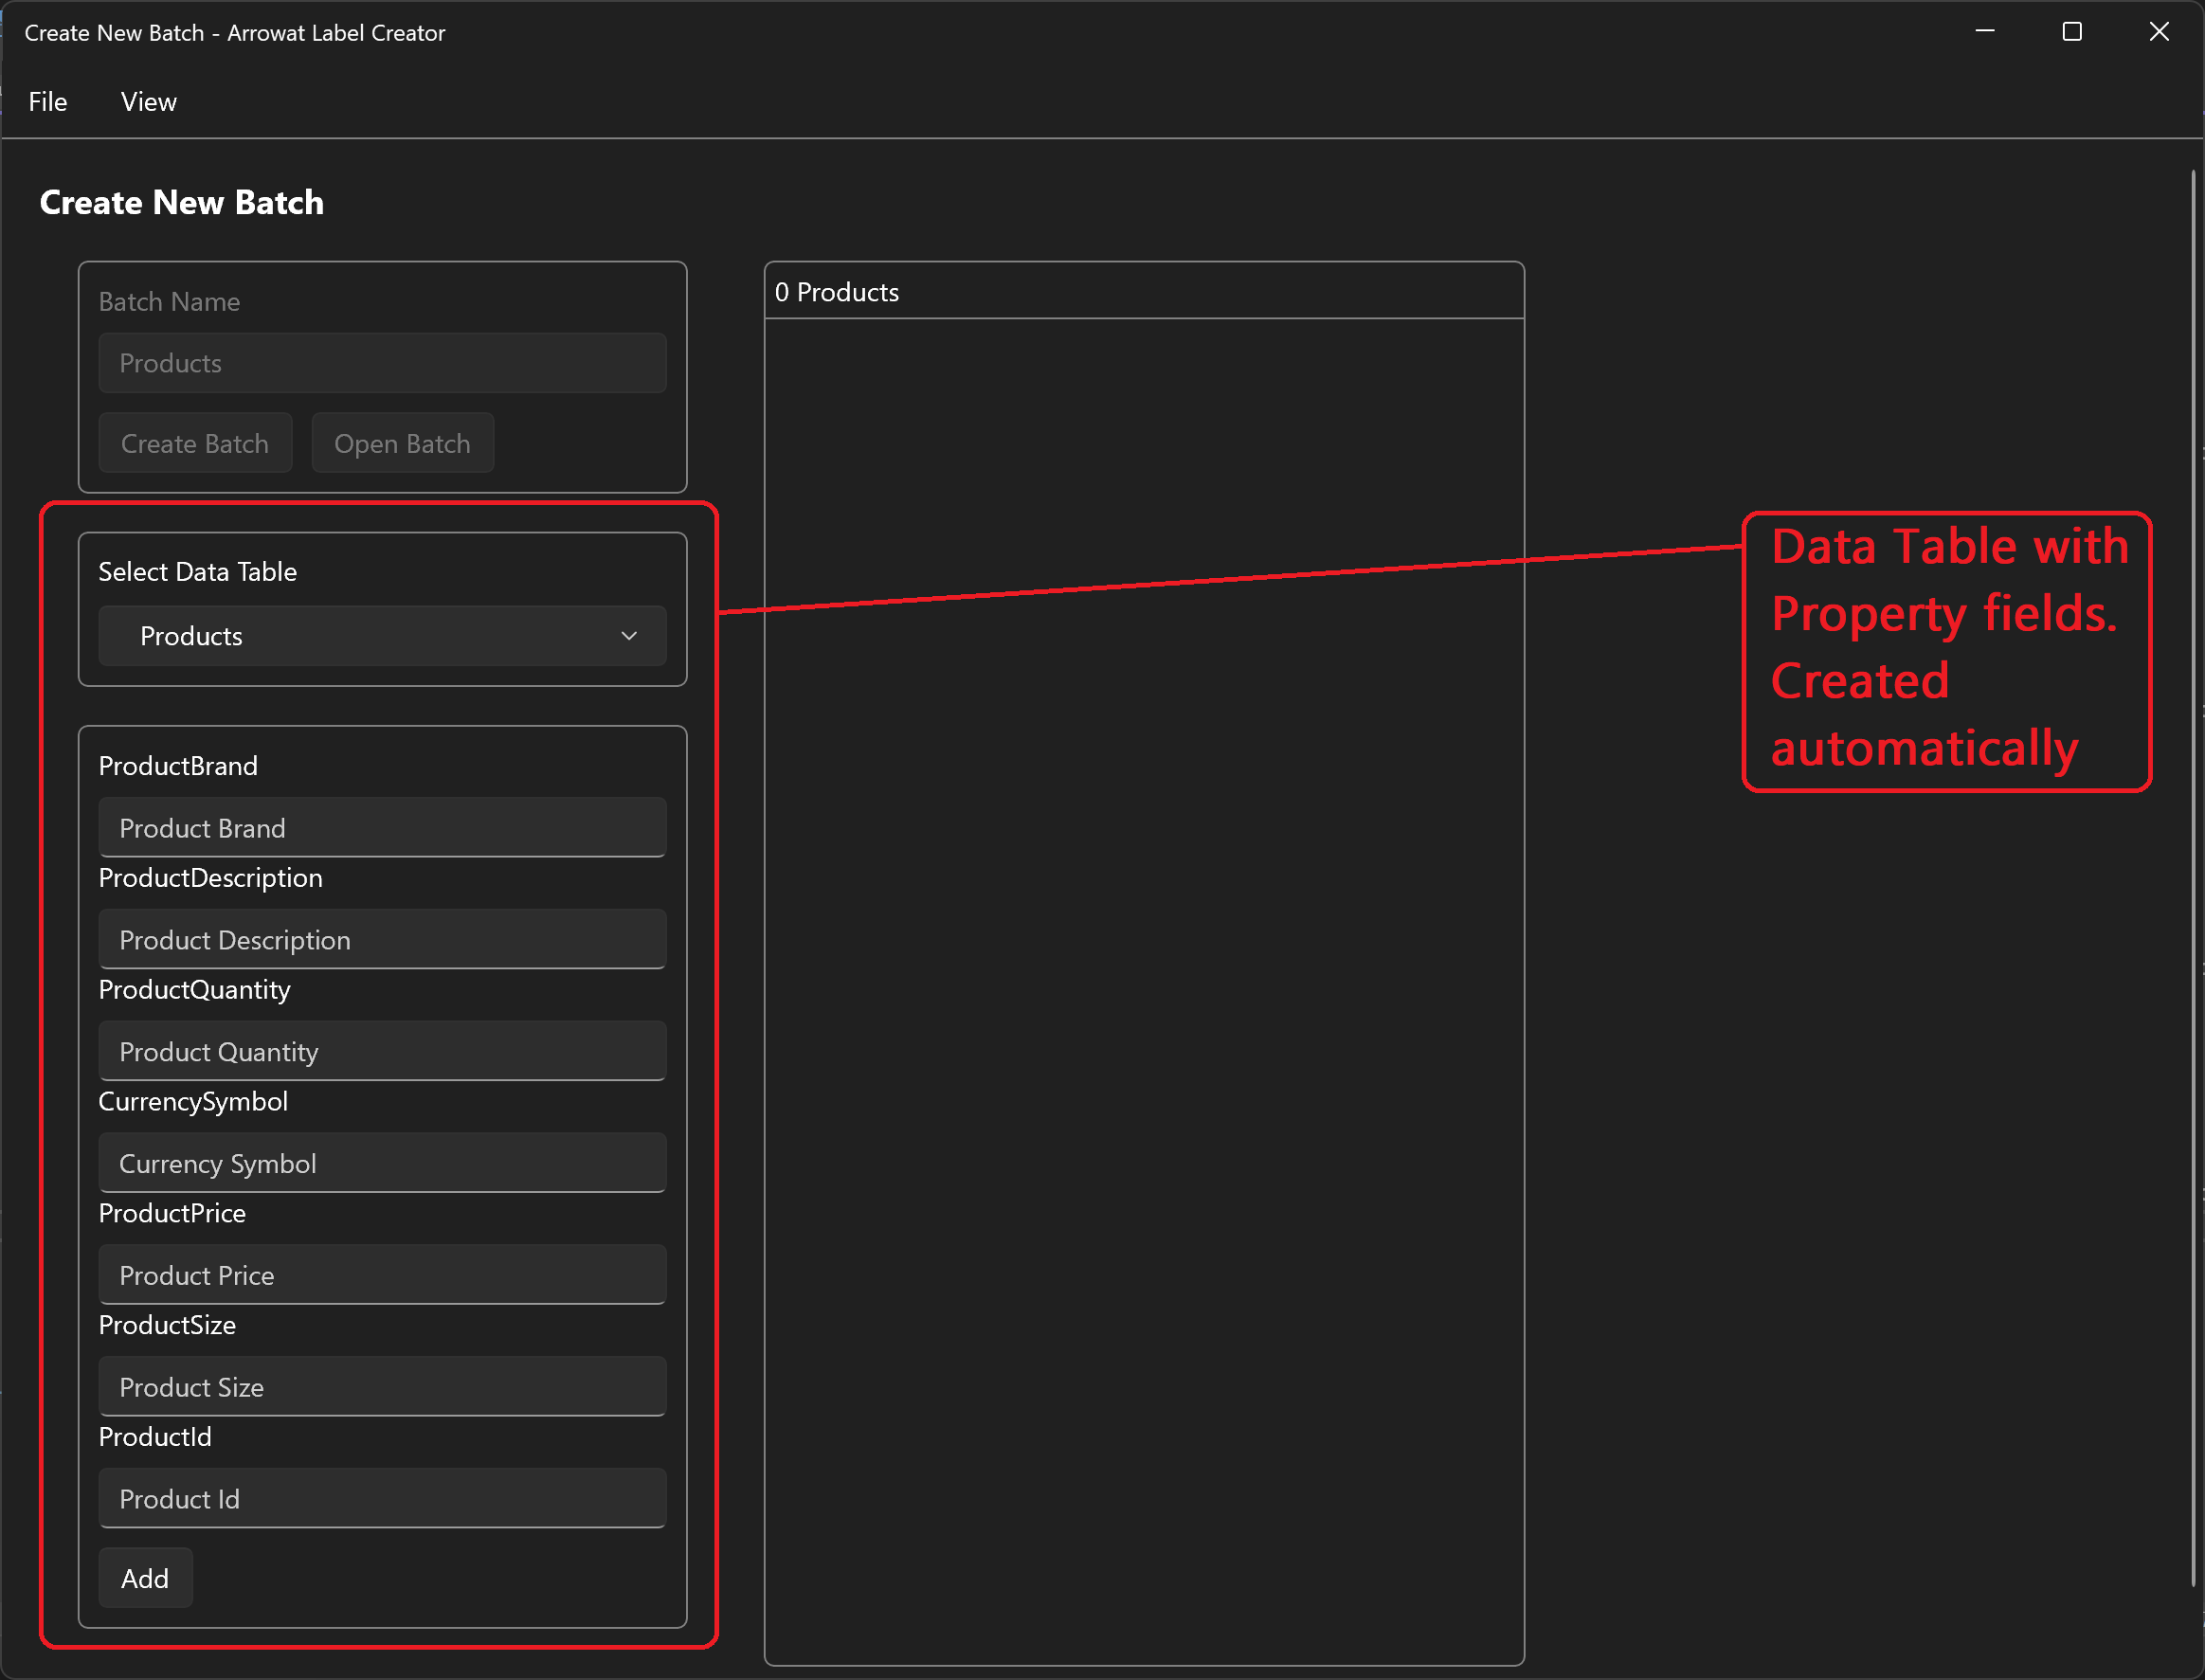
Select Data Table: Products
This is the table we created on Creating data tables section. Once you select the data table text fields will be created for each property from the table selected.
-
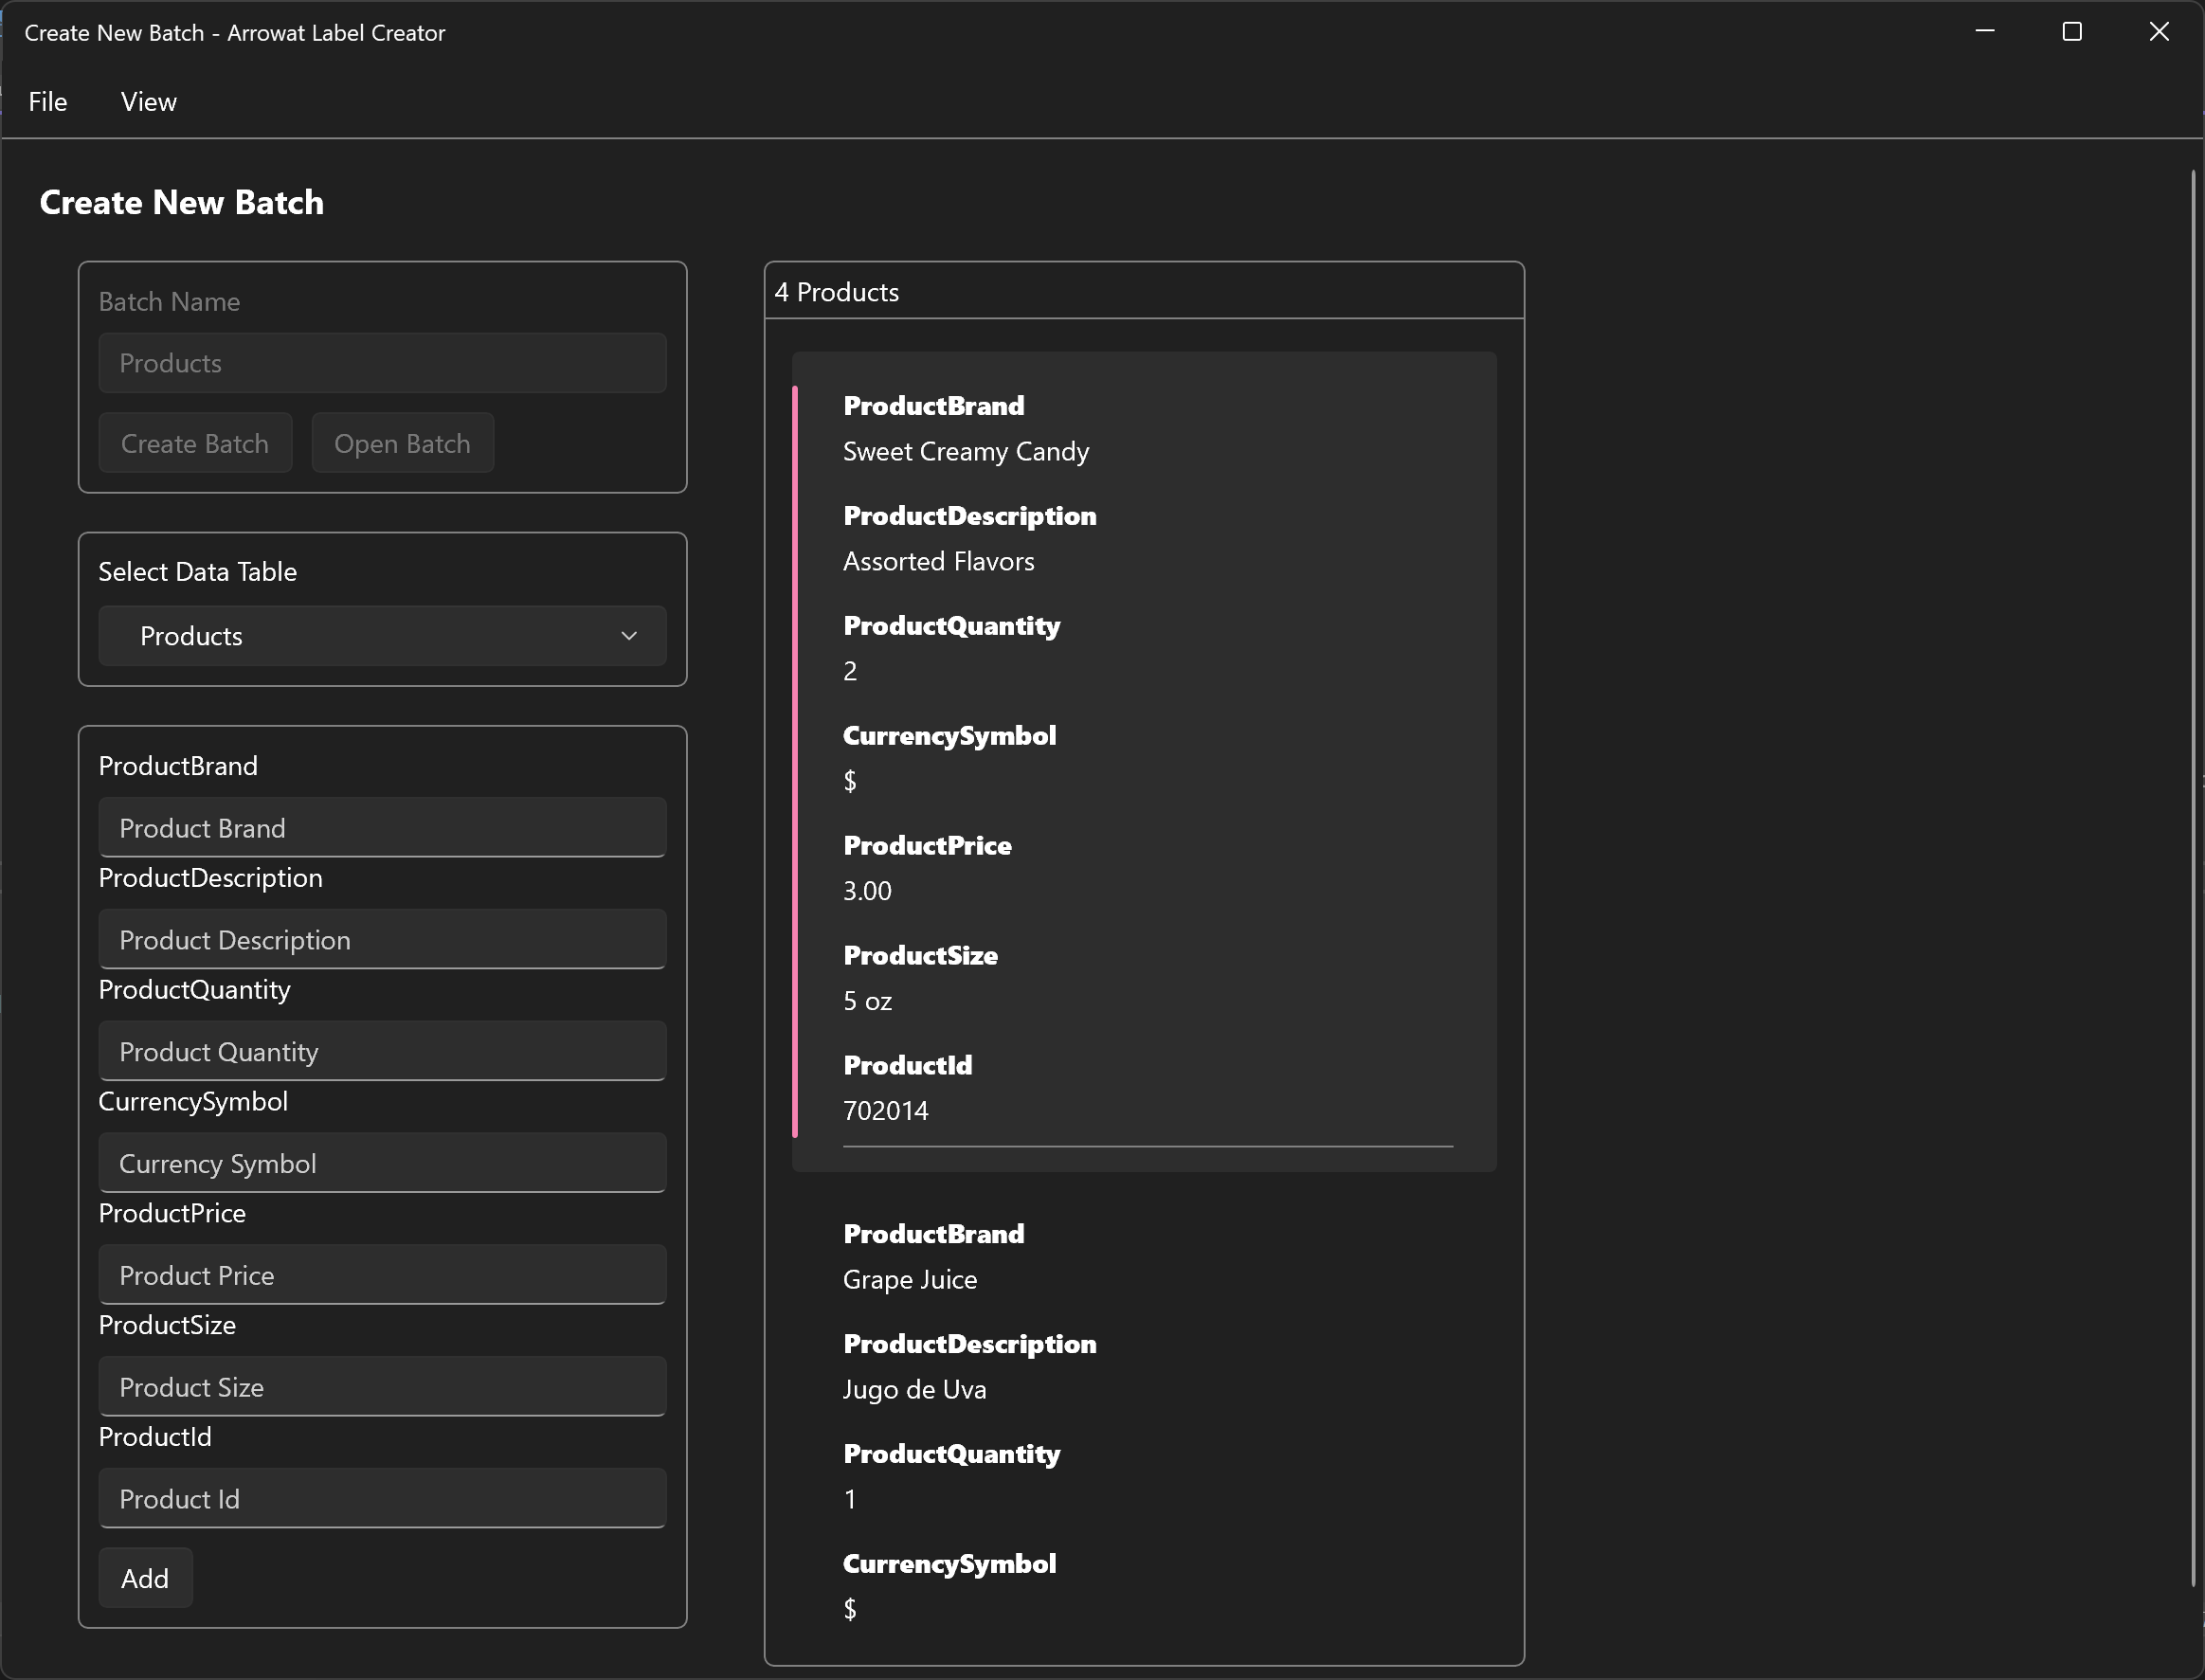
Add the following products
PRODUCT 1
- ProductBrand: Sweet Creamy Candy
- ProductDescription: Assorted Flavors
- ProductQuantity: 2
- CurrencySymbol: $
- ProductPrice: 3.00
- ProductSize: 5 oz
- ProductId: 702014
PRODUCT 2
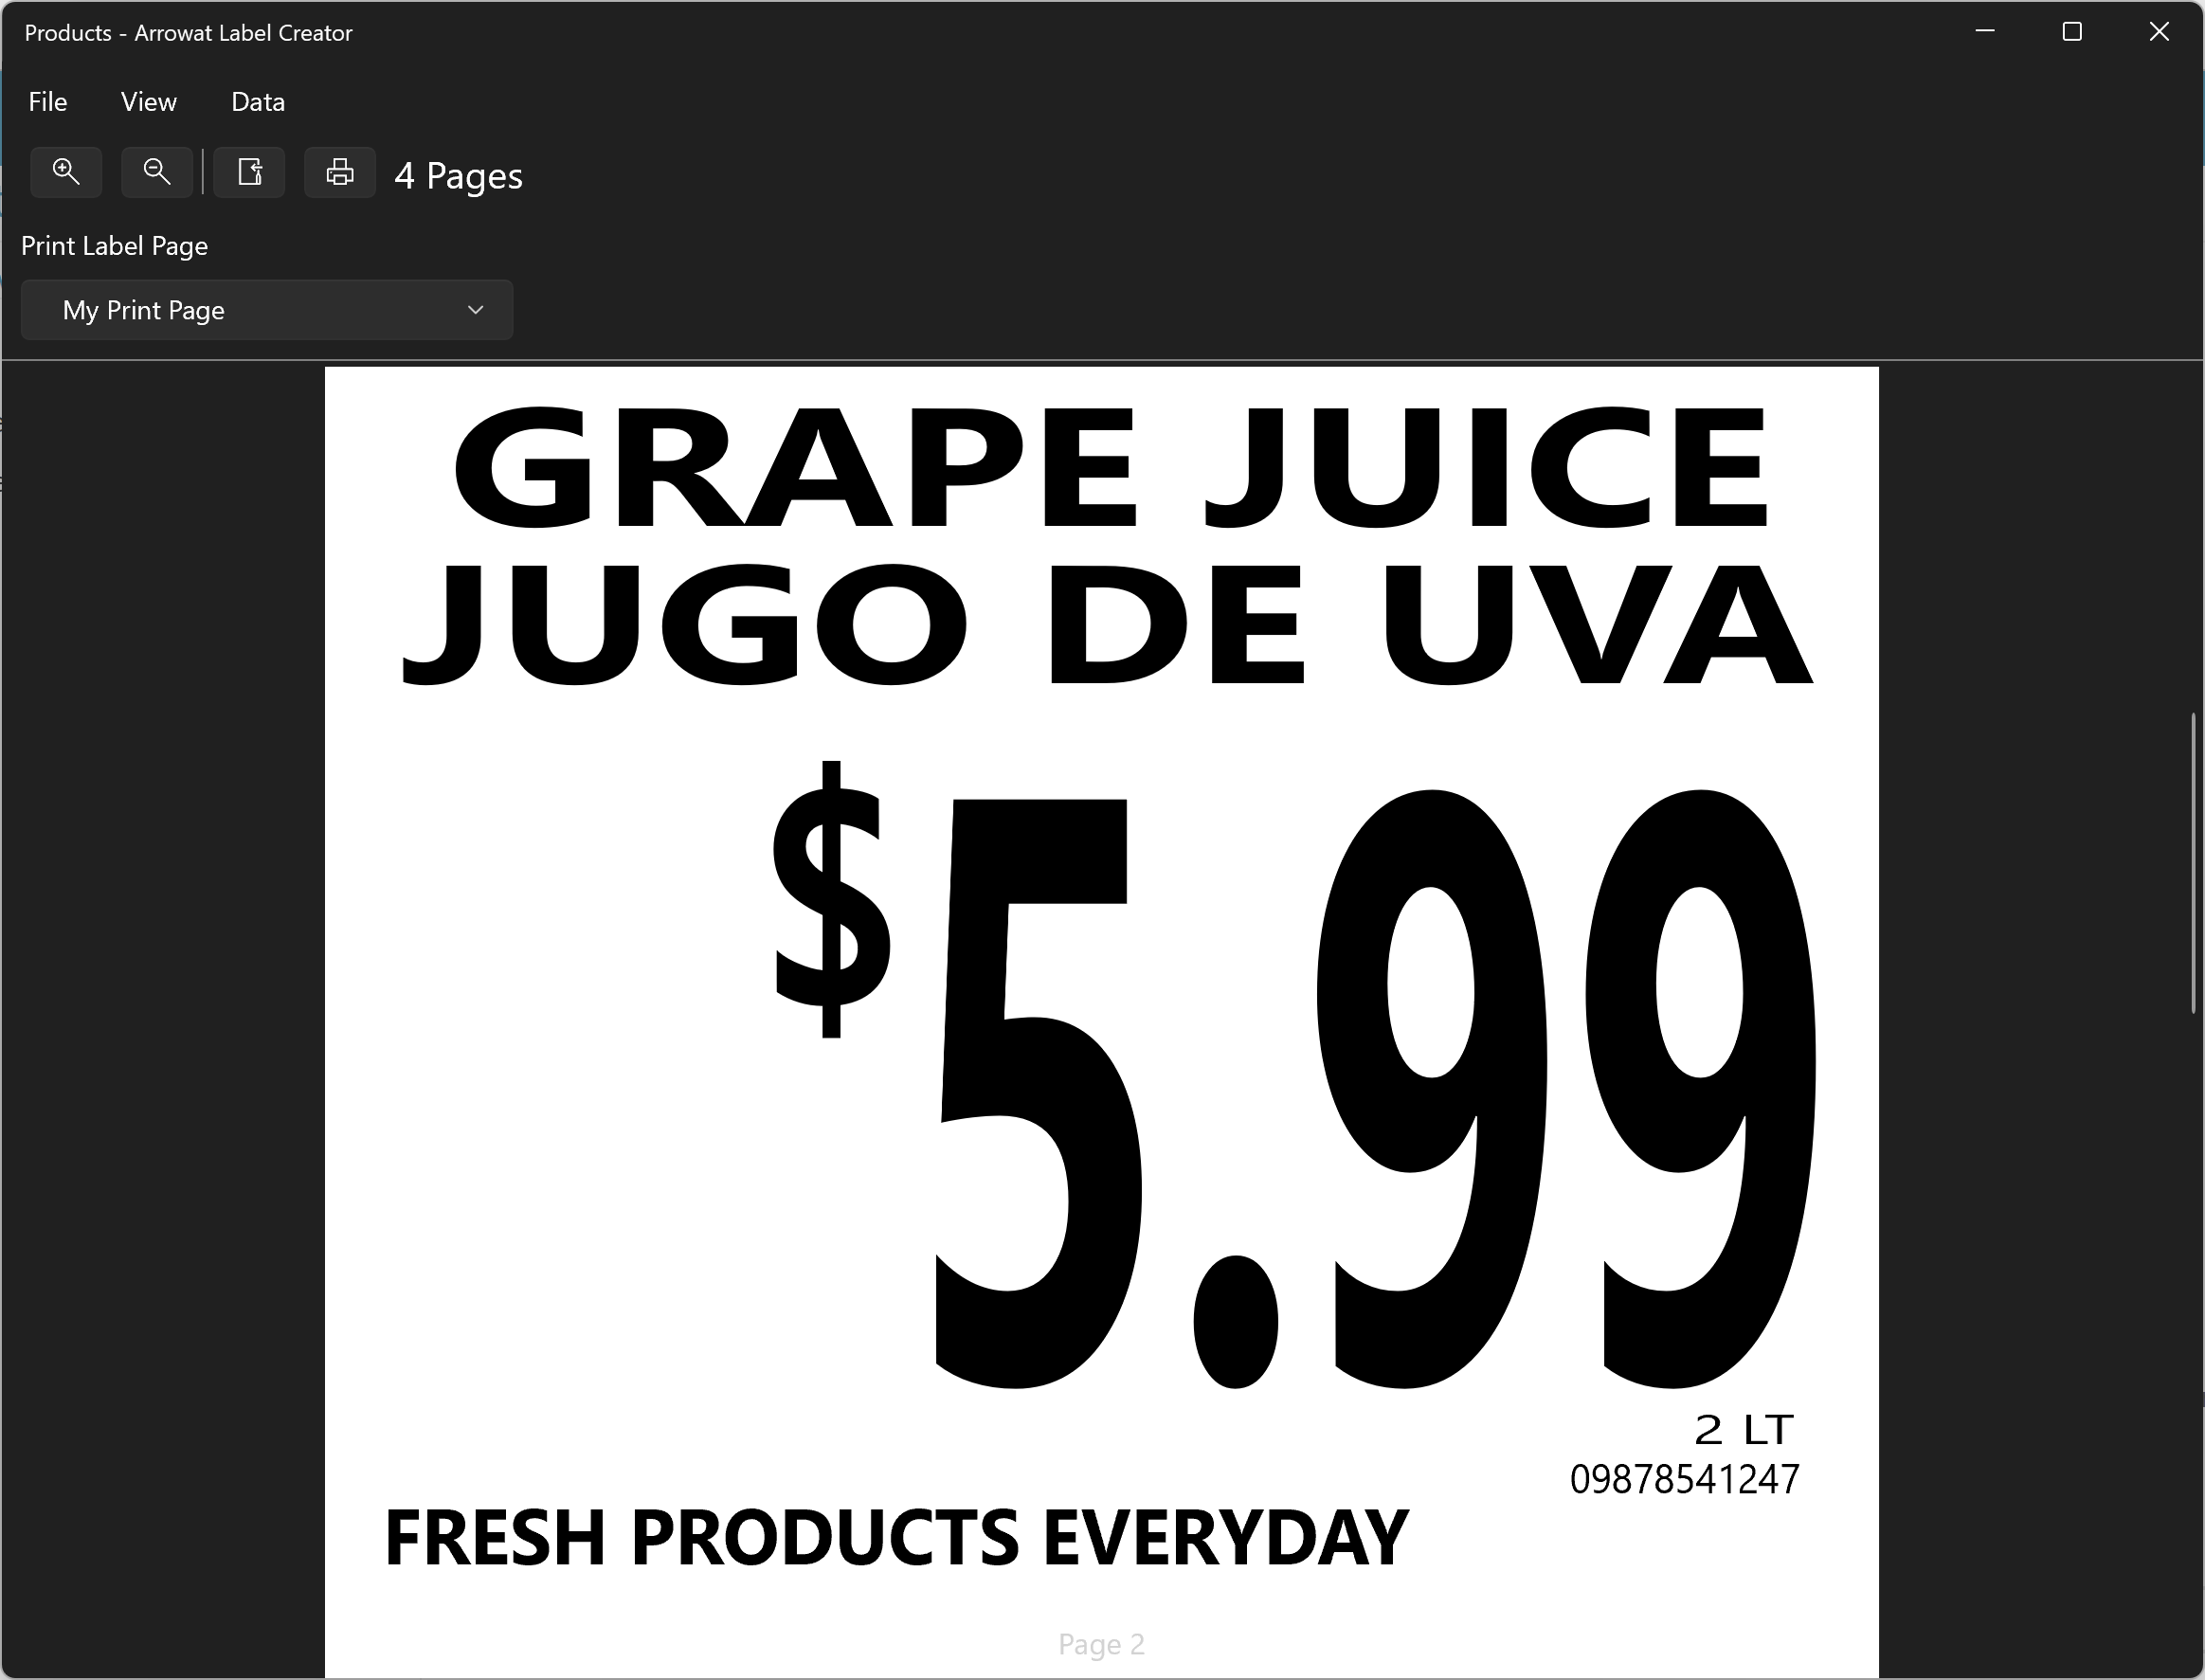
- ProductBrand: Grape Juice
- ProductDescription: Jugo de Uva
- ProductQuantity: 1
- CurrencySymbol: $
- ProductPrice: 5.99
- ProductSize: 2 lt
- ProductId: 09878541247
PRODUCT 3
- ProductBrand: Meat Salad
- ProductDescription: Assorted Selections
- ProductQuantity: 1
- CurrencySymbol: $
- ProductPrice: 7.99
- ProductSize: 24 oz
- ProductId: 12456784001
PRODUCT 4
- ProductBrand: Sweet Chili Tacos
- ProductDescription: Tacos Con Chile Dulce
- ProductQuantity: 4
- CurrencySymbol: $
- ProductPrice: 10.00
- ProductSize: Large
- ProductId: 1424
-
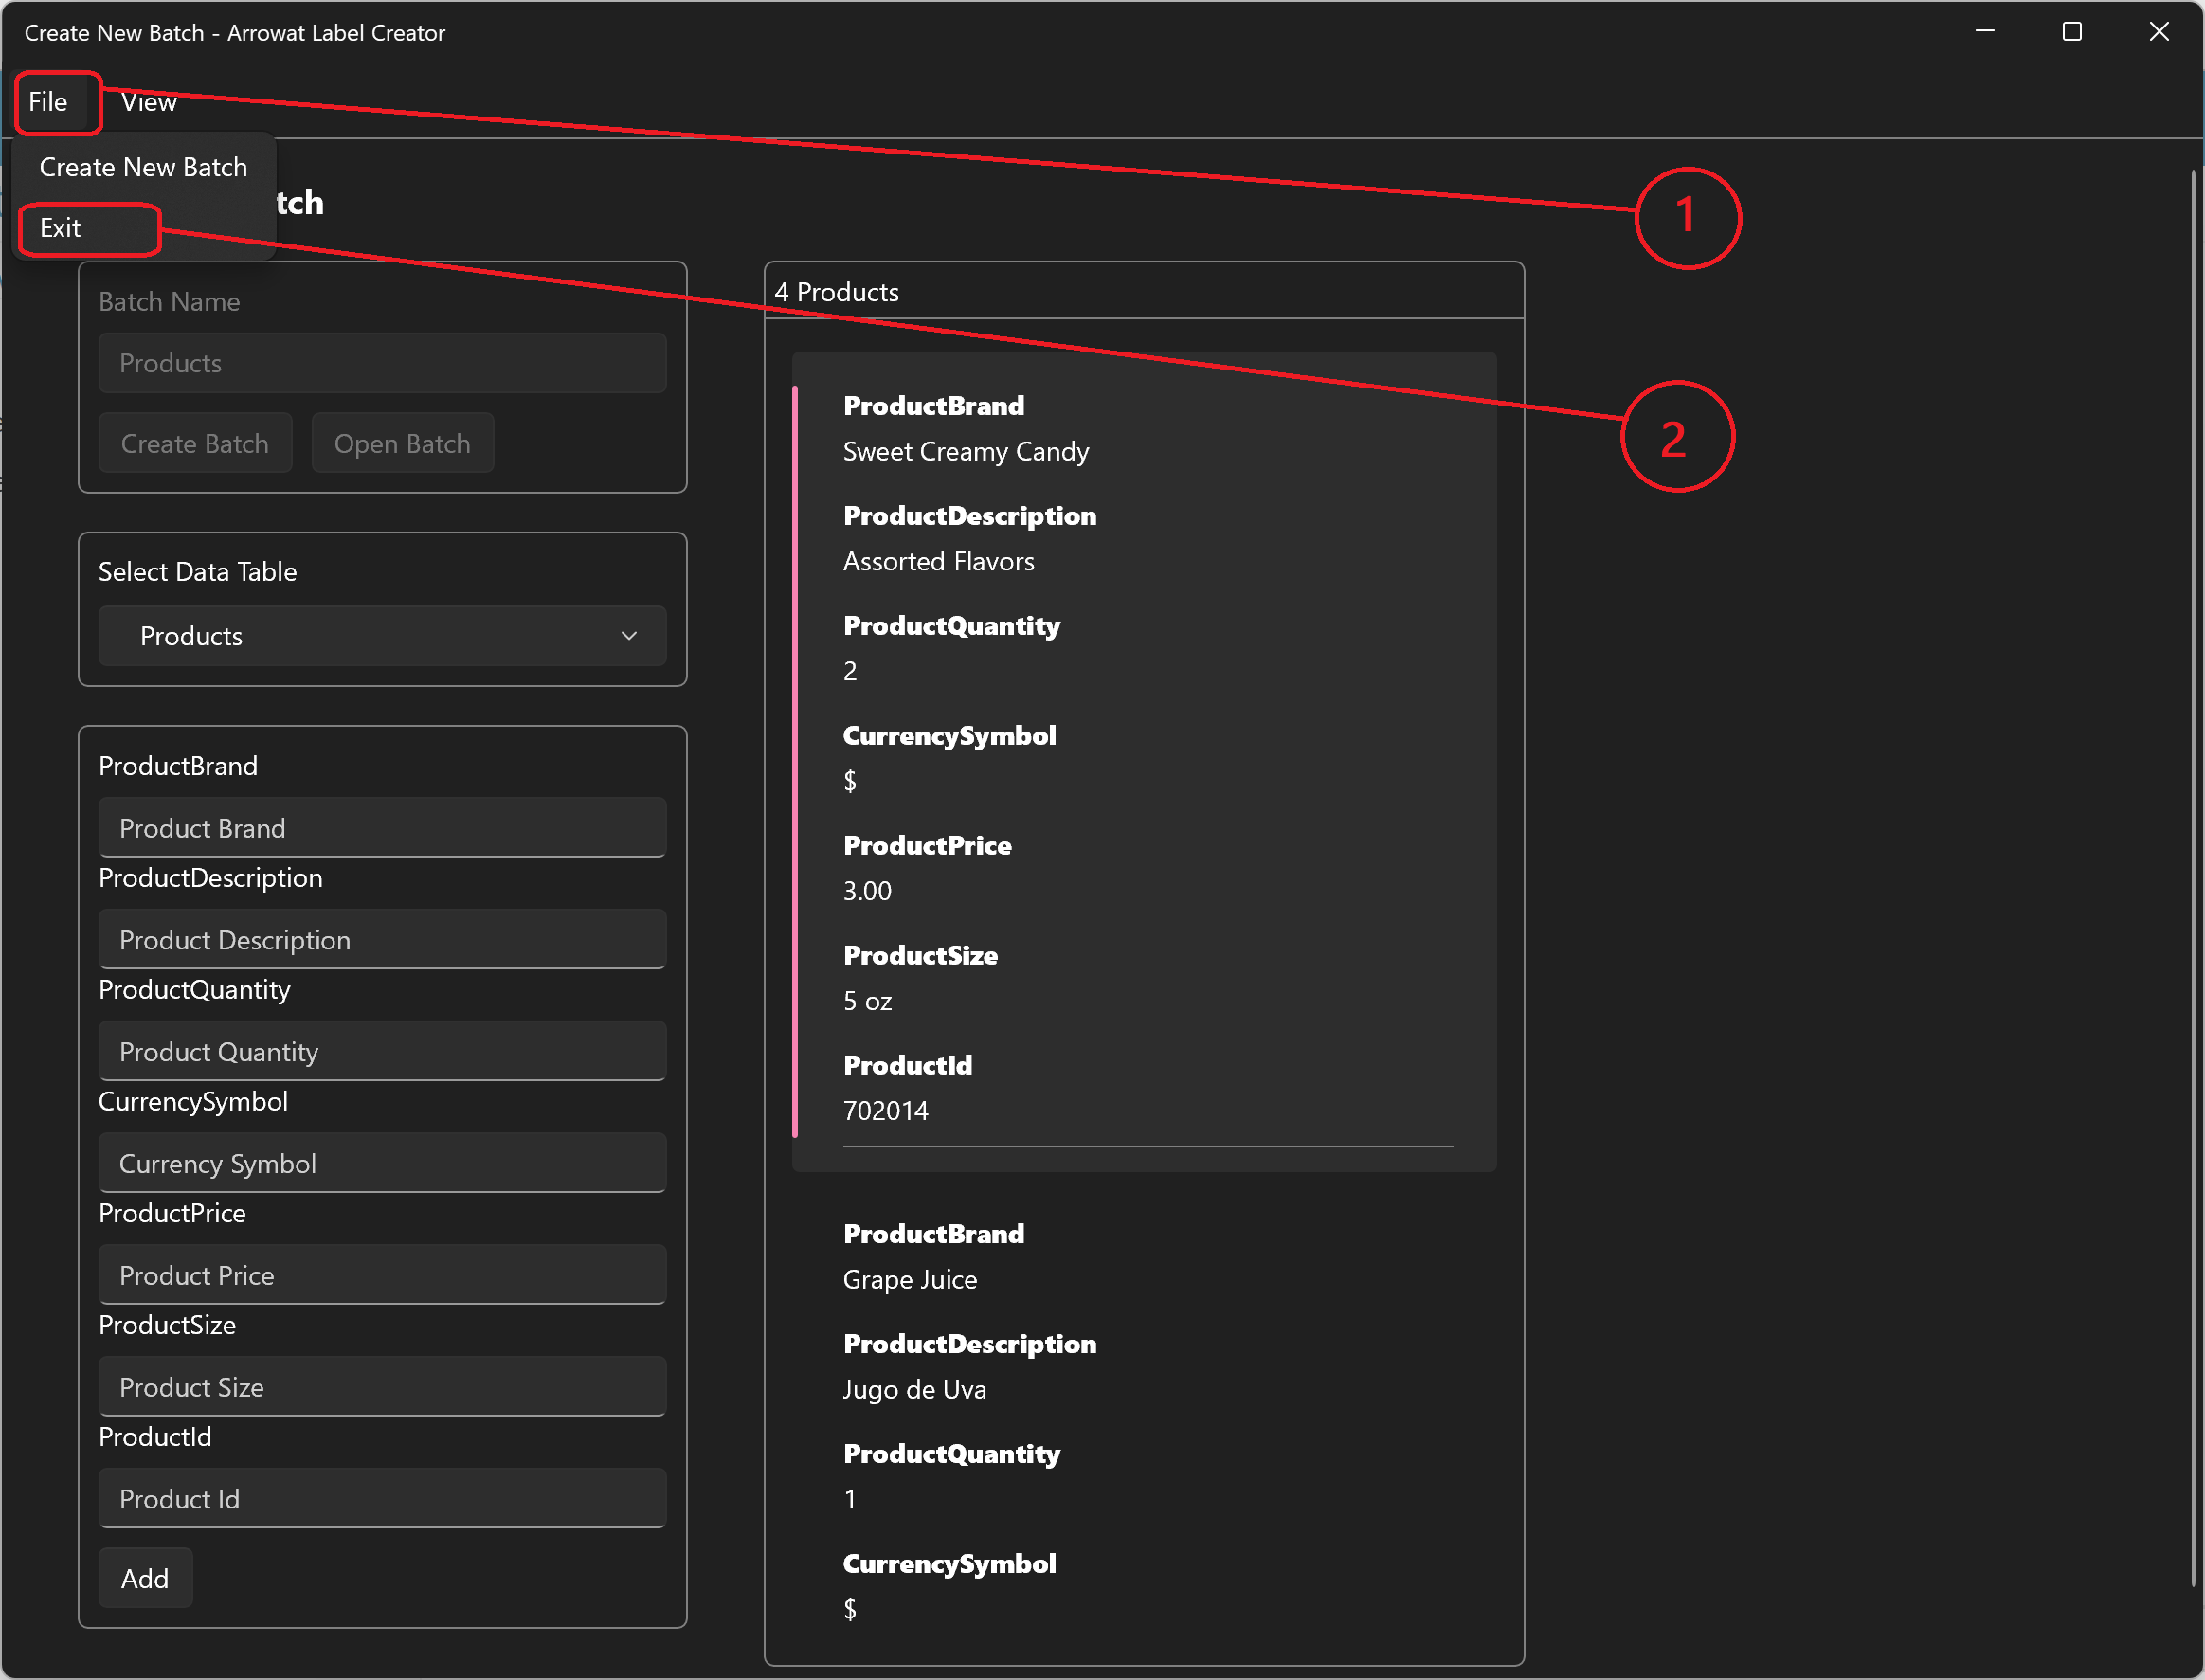
Click File > Exit to go back to Batch Builder
Printing Labels
Once you have done all the above steps you can now print the labels.
-
Open Batch Builder

-
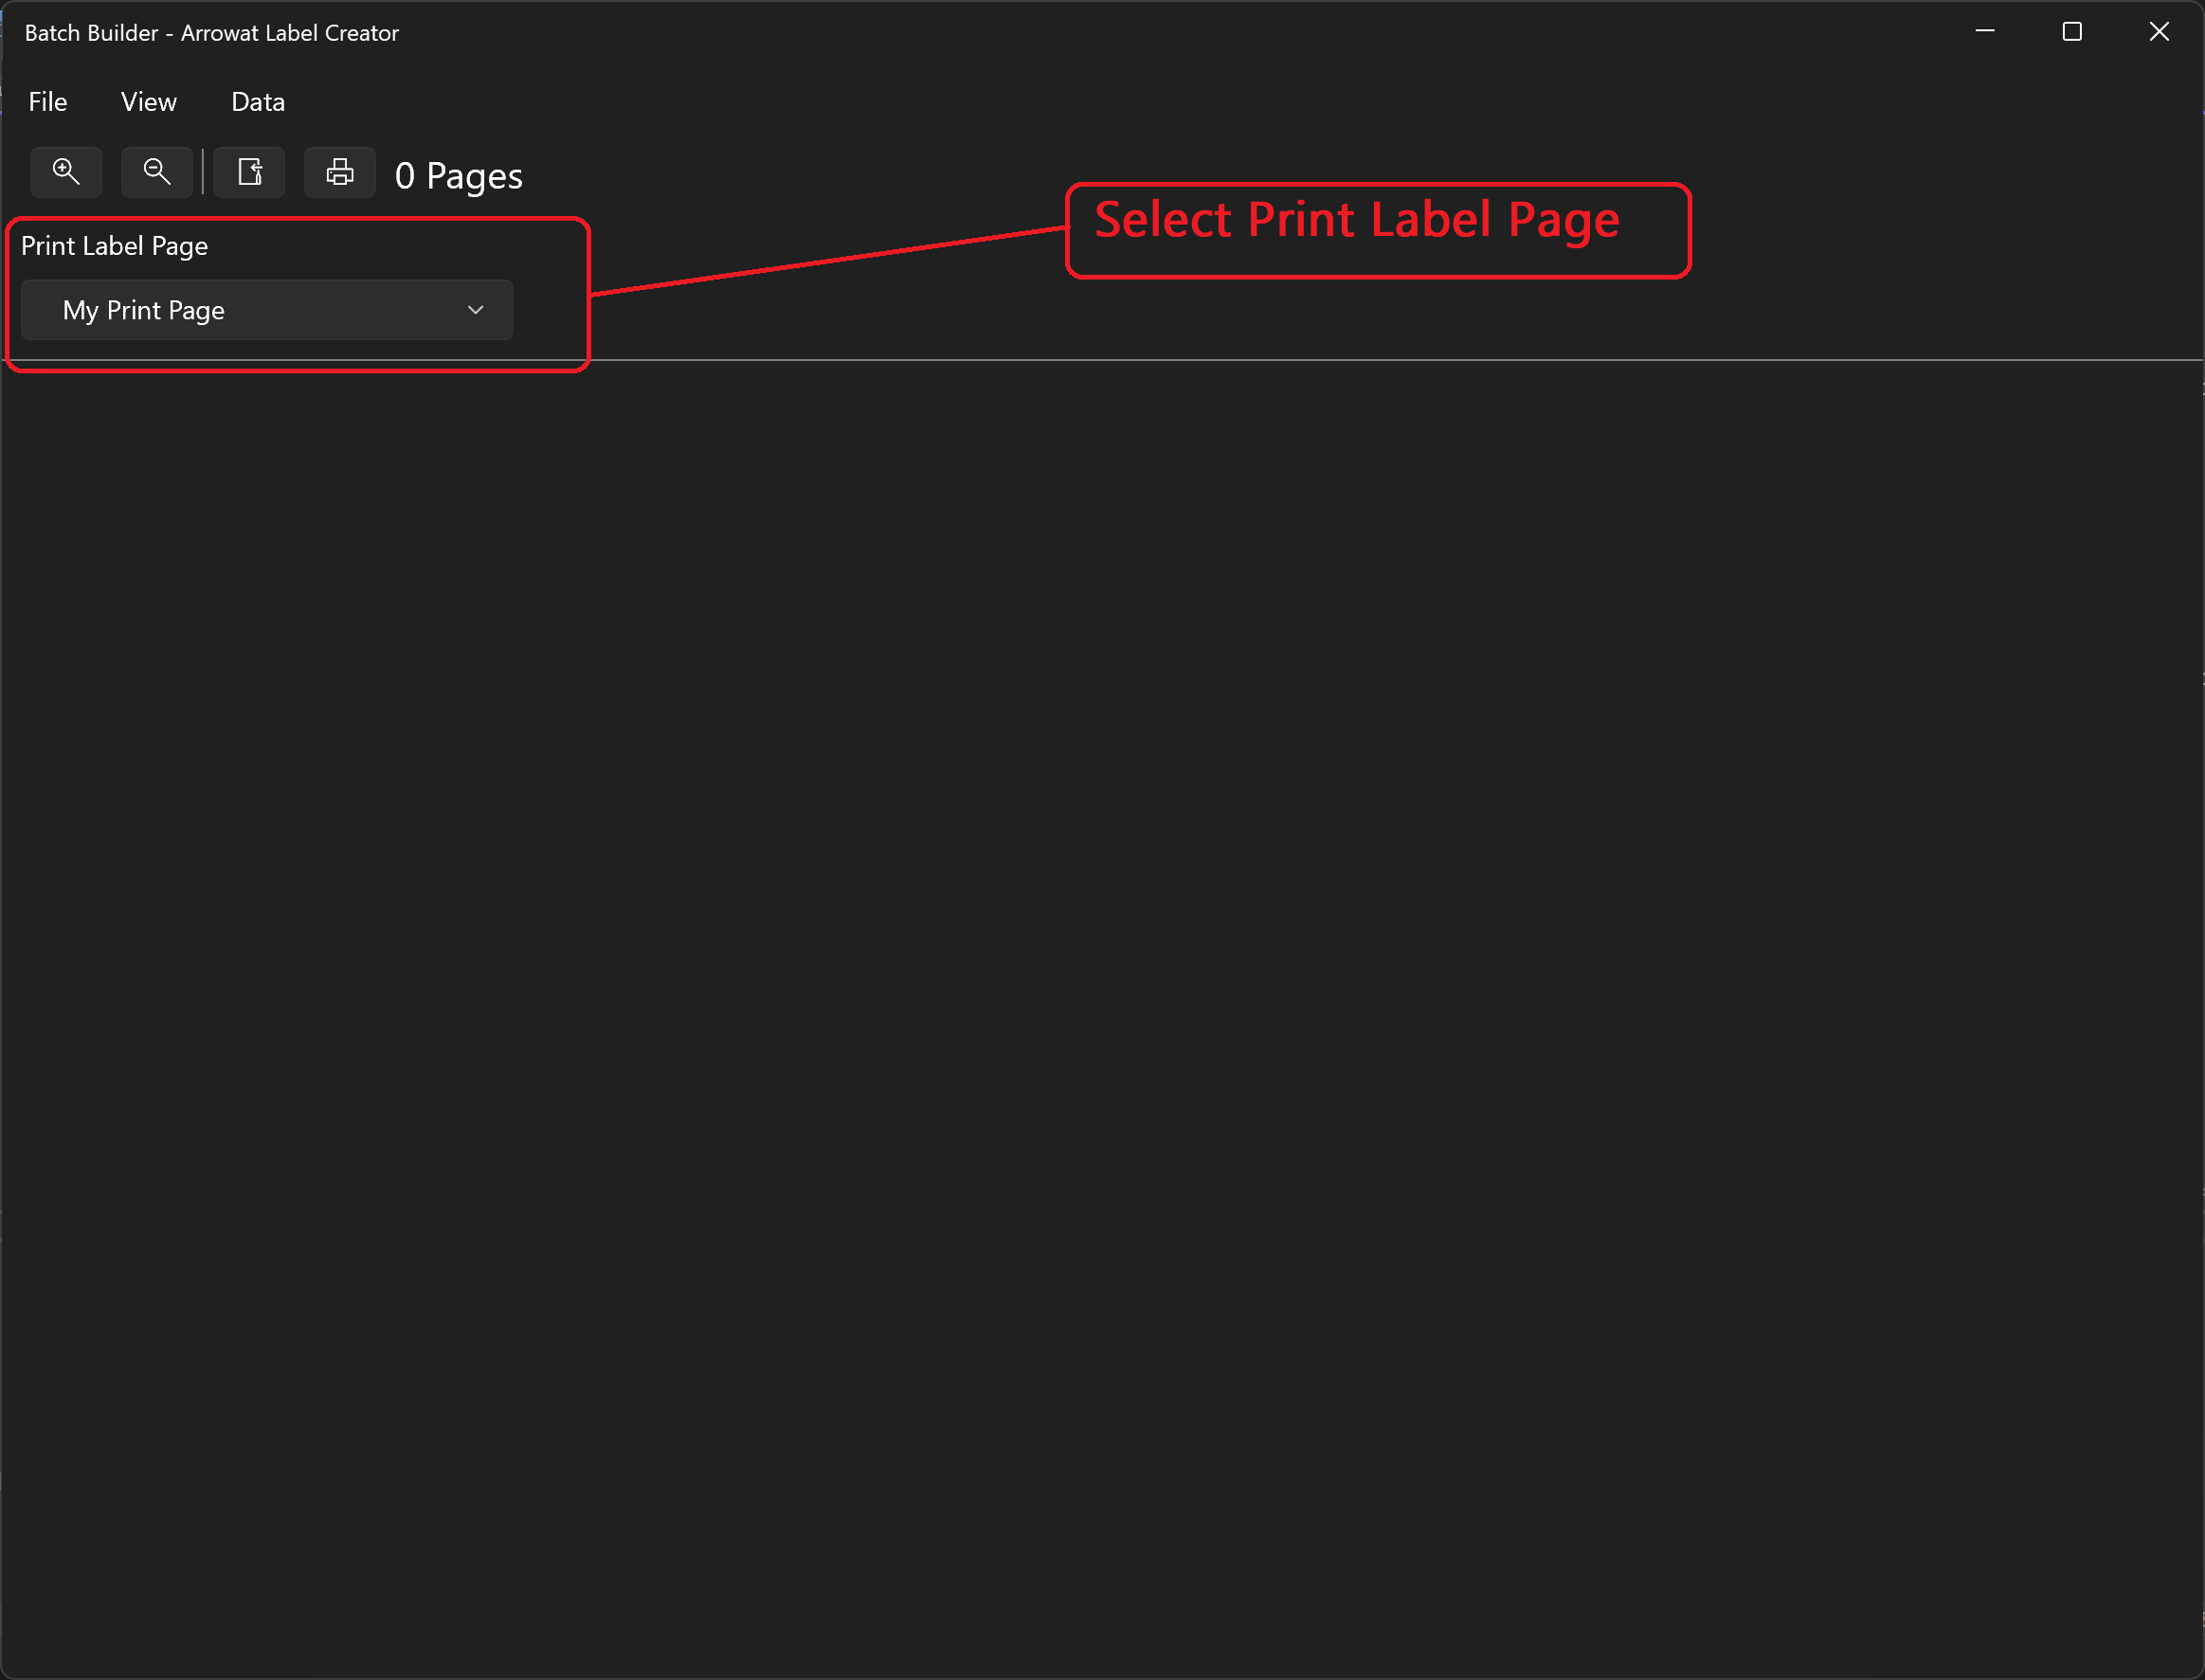
Select Print Label Page: My Print Page this is the Print Label Page
we created on Creating print label pages section.
-
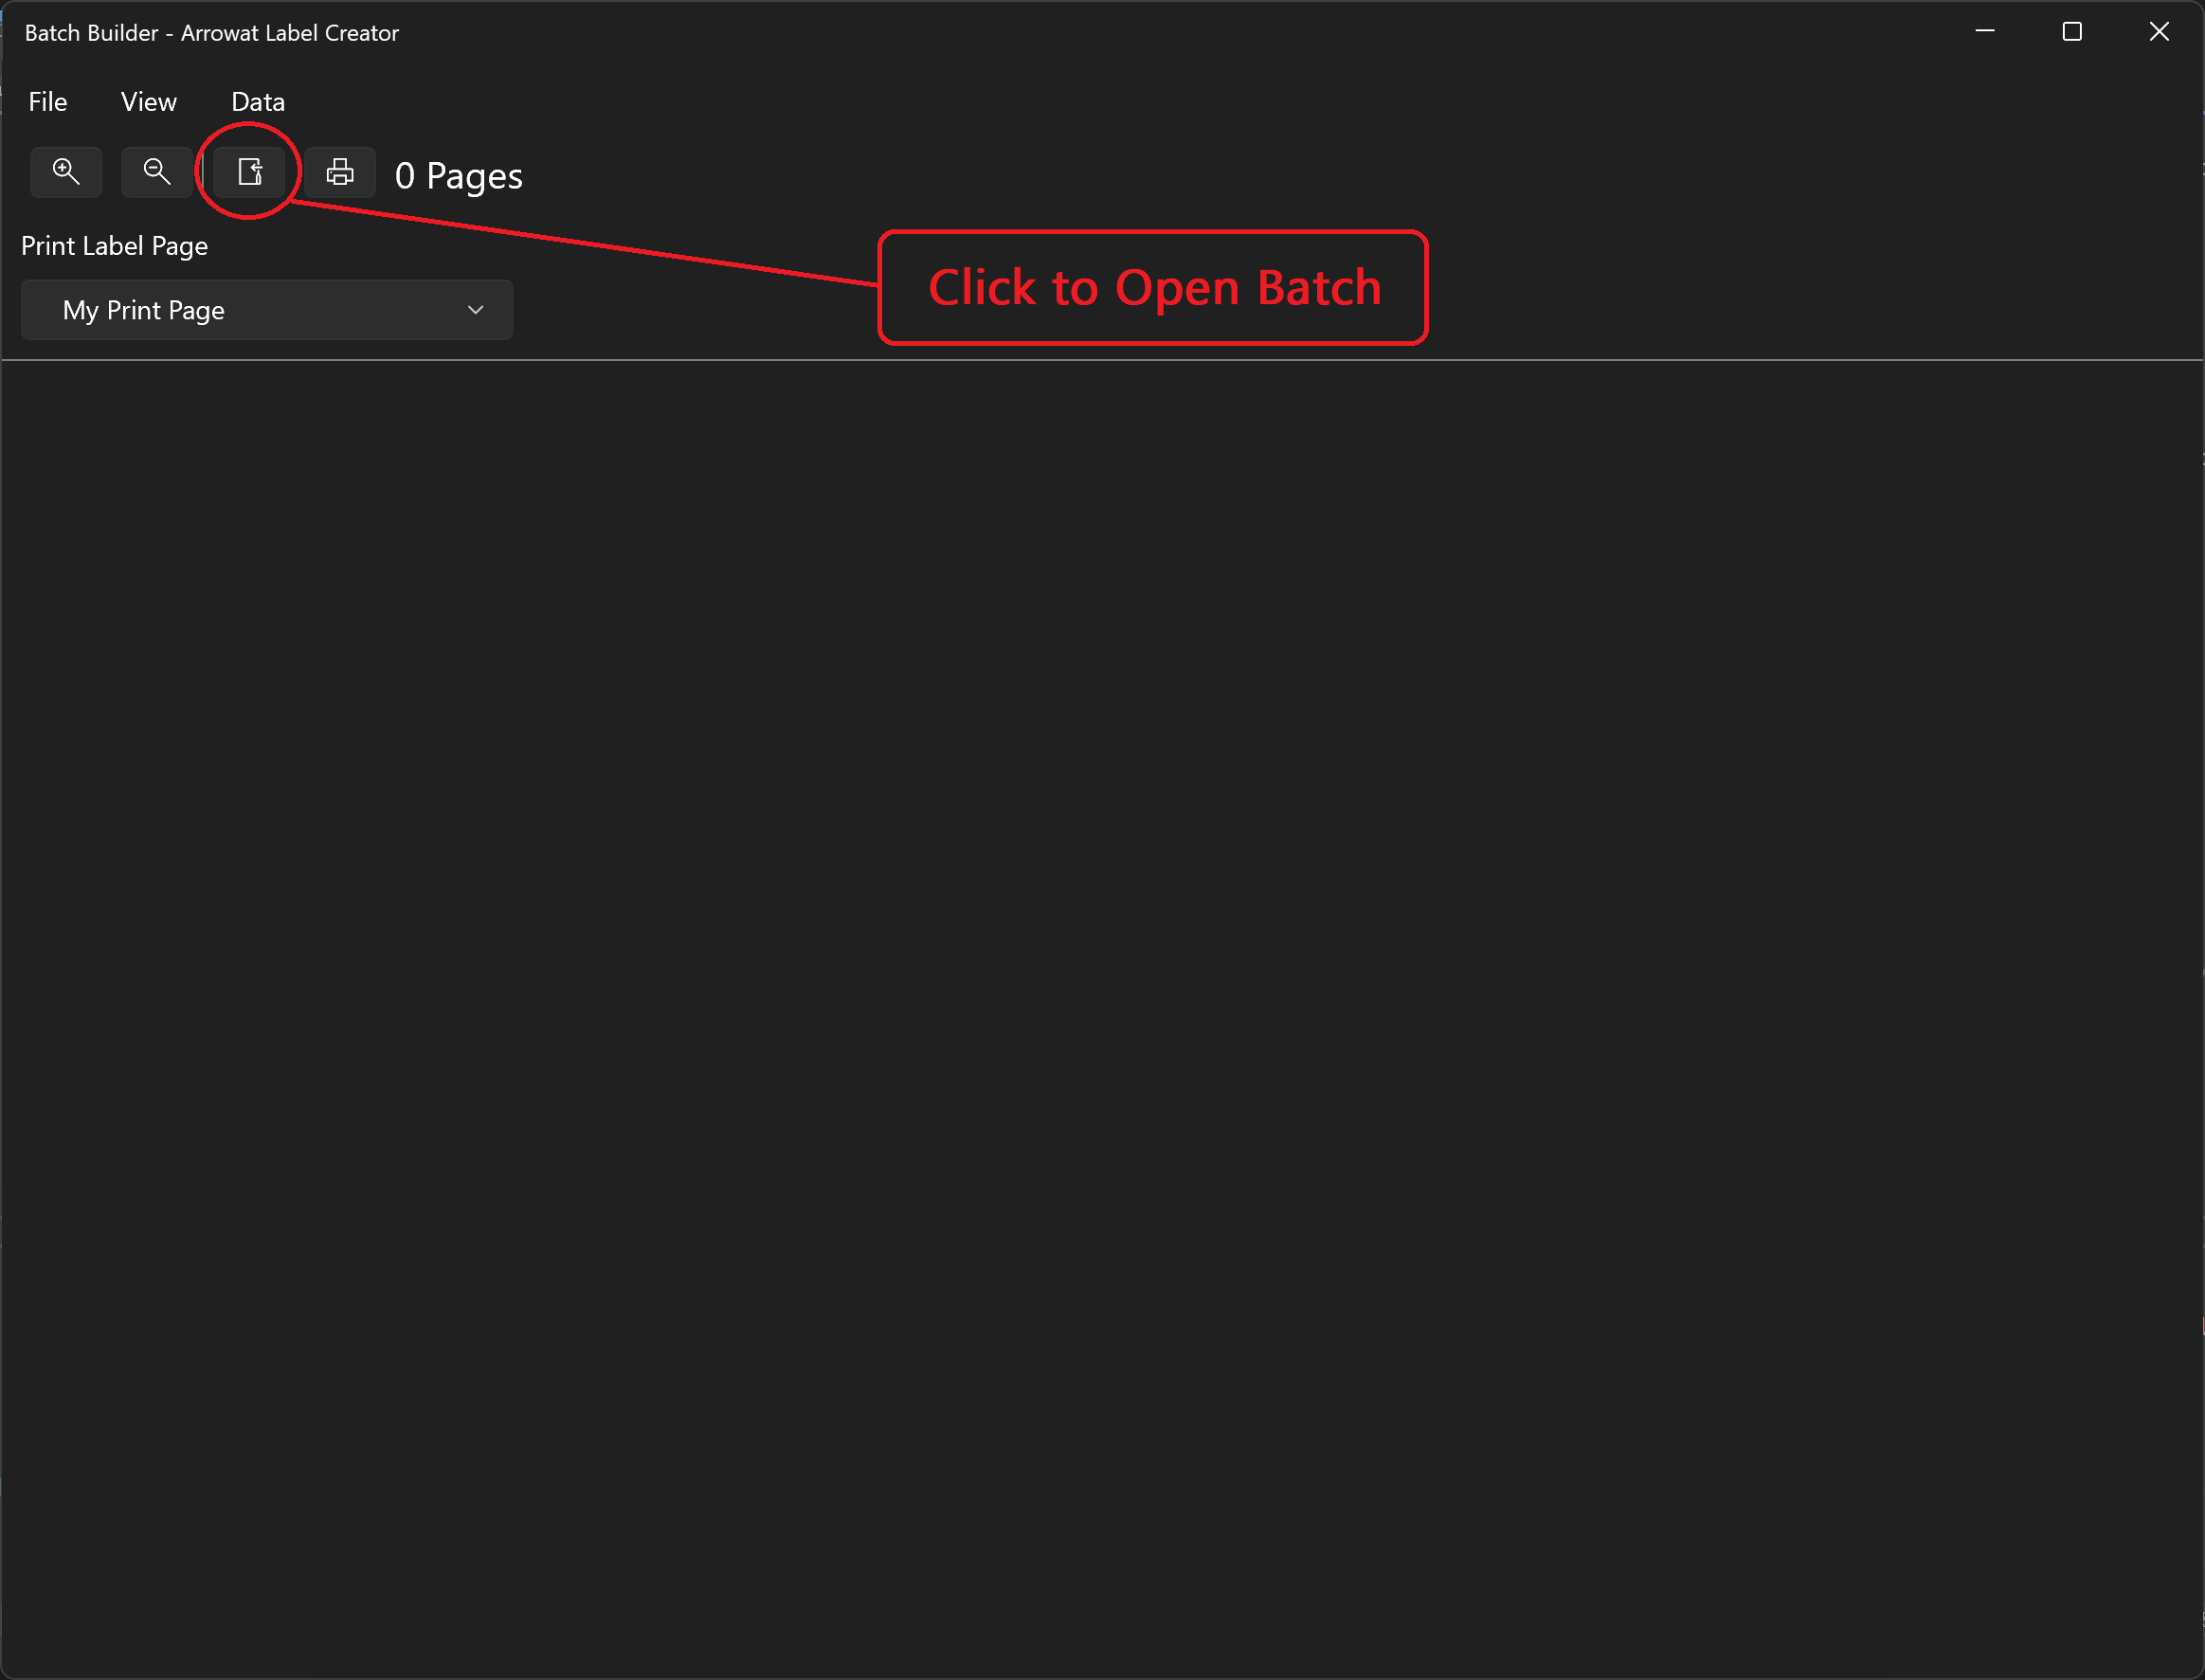
Click Open Batch Button
-
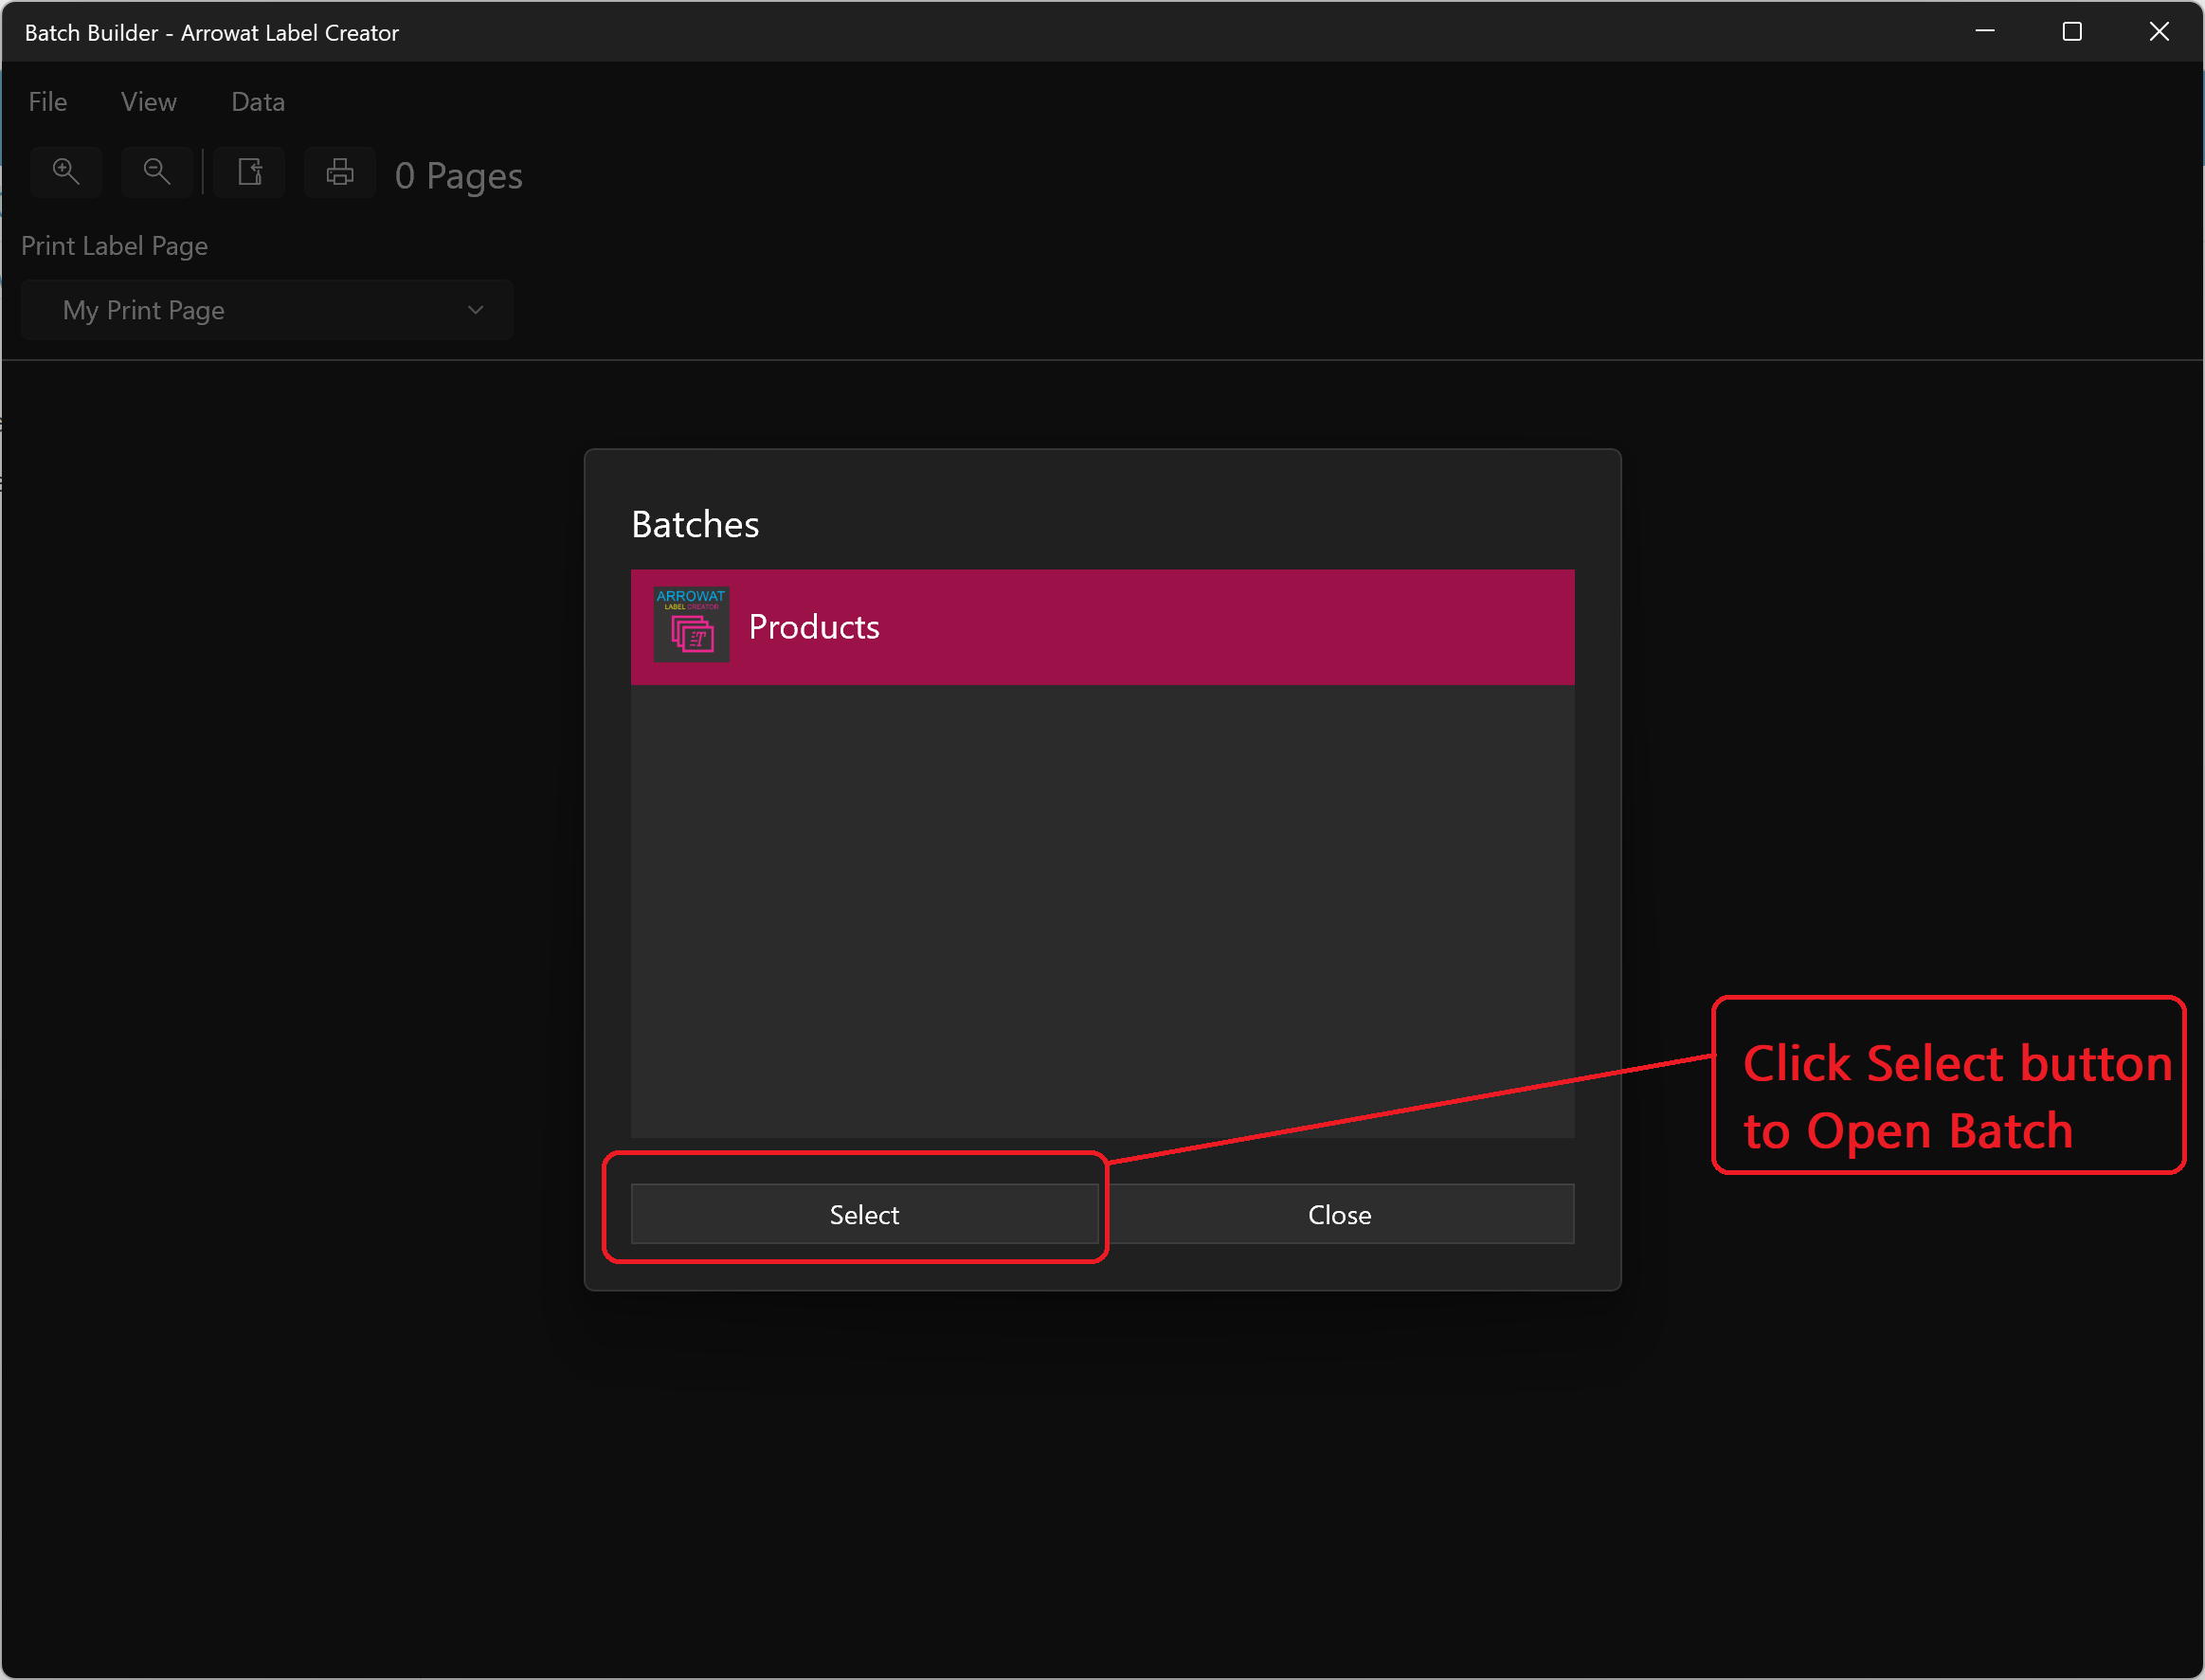
Select Products Batch from list and click Select button, Arrowat Label Creator will start designing your lables.
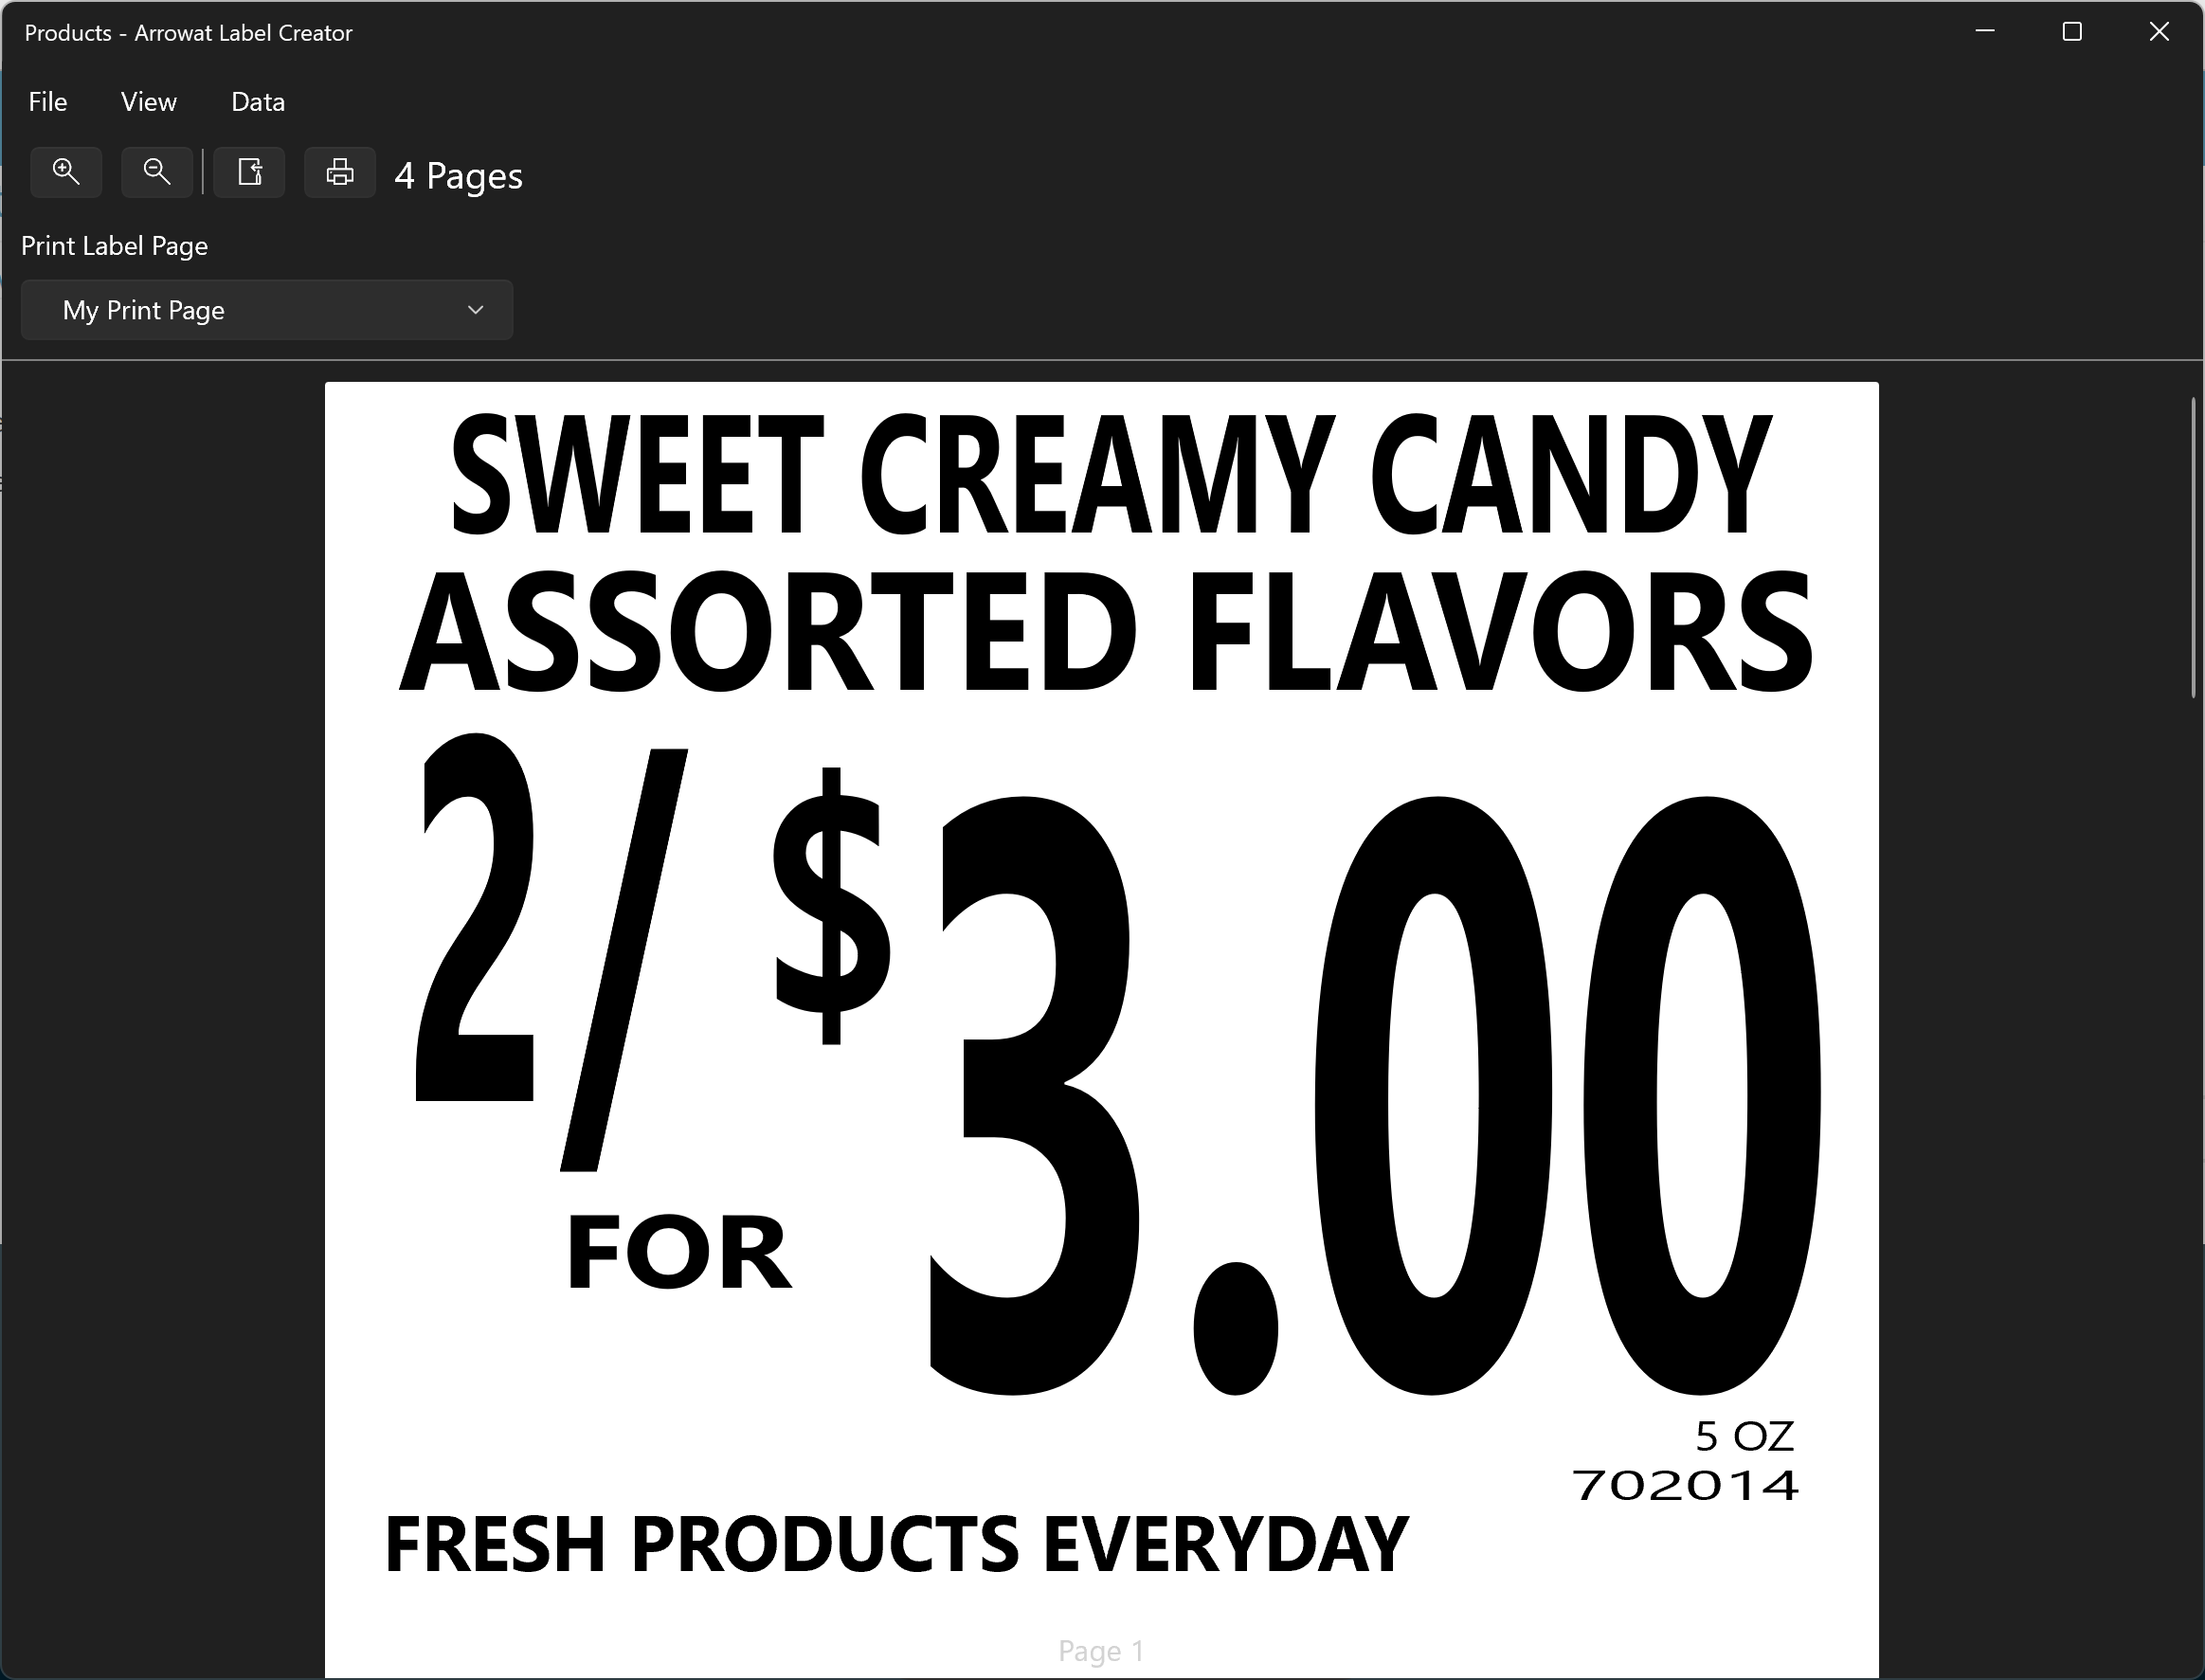
Arrowat Label Creator is a great software tool for designing and printing labels, shipping tags, stickers, etc. We are on it, art and dedication. Thanks for reading.
If you have any question you can Contact us any time.