Search POS Devices
Arrowat POS System Quick Guide
This document explains how to configure Arrowat POS System and how to install the devices you may want to use, also we explain how to use the application. the following concepts are explained here.
- Installing Arrowat POS System From Microsoft Store
- Adding Operators And Operators Roles
- Change Language/Region Data Format
- Tax/Fee Templates
- Adding Departments
- Adding Products
- Adding Product Offers
- Configuring Store/Machine
- Creating POS Receipt
Arrowat POS System is a complete Point Of Sales Software application that has been developed at the top of Windows 10, the software works on any Windows 10 device, you may use a laptop, a desktop pc or tablet however to use some of devices like Barcode Scanner, POS Printer and Cash Drawer you may need the Windows 10 device support usb ports to connect the POS devices. We will explain and show the devices we have been tested on Arrowat POS System in the section Working With Barcode Scanners, POS Printers and Cash Drawer.
Installing Arrowat POS System from Microsoft Store
The first thing we need to do is install Arrowat POS System, to install the app go to https://www.microsoft.com/store/apps/9MZ9XCKB0PR2, You can install Arrowat POS System trial version and use it for 30 days free before buying it.
Adding Operators And Operators Roles
Having operators access avoid unwanted users to have access to the data information on the app, Arrowat POS System provides 3 types of operator access for people who operates the app on your company
-
Operator Full Acess Level
Has full access to the system and can be login to POS and manage data on the system -
Operator Medium Acess Level
Can Manage the POS performs task on the POS Register. but cannot loging to manage data on the system. -
Operator Basic Access Level
Can manage the POS register as cashier only, cannot perform tasks like cange data or update data, admin is required to approve data update like void products, price override.
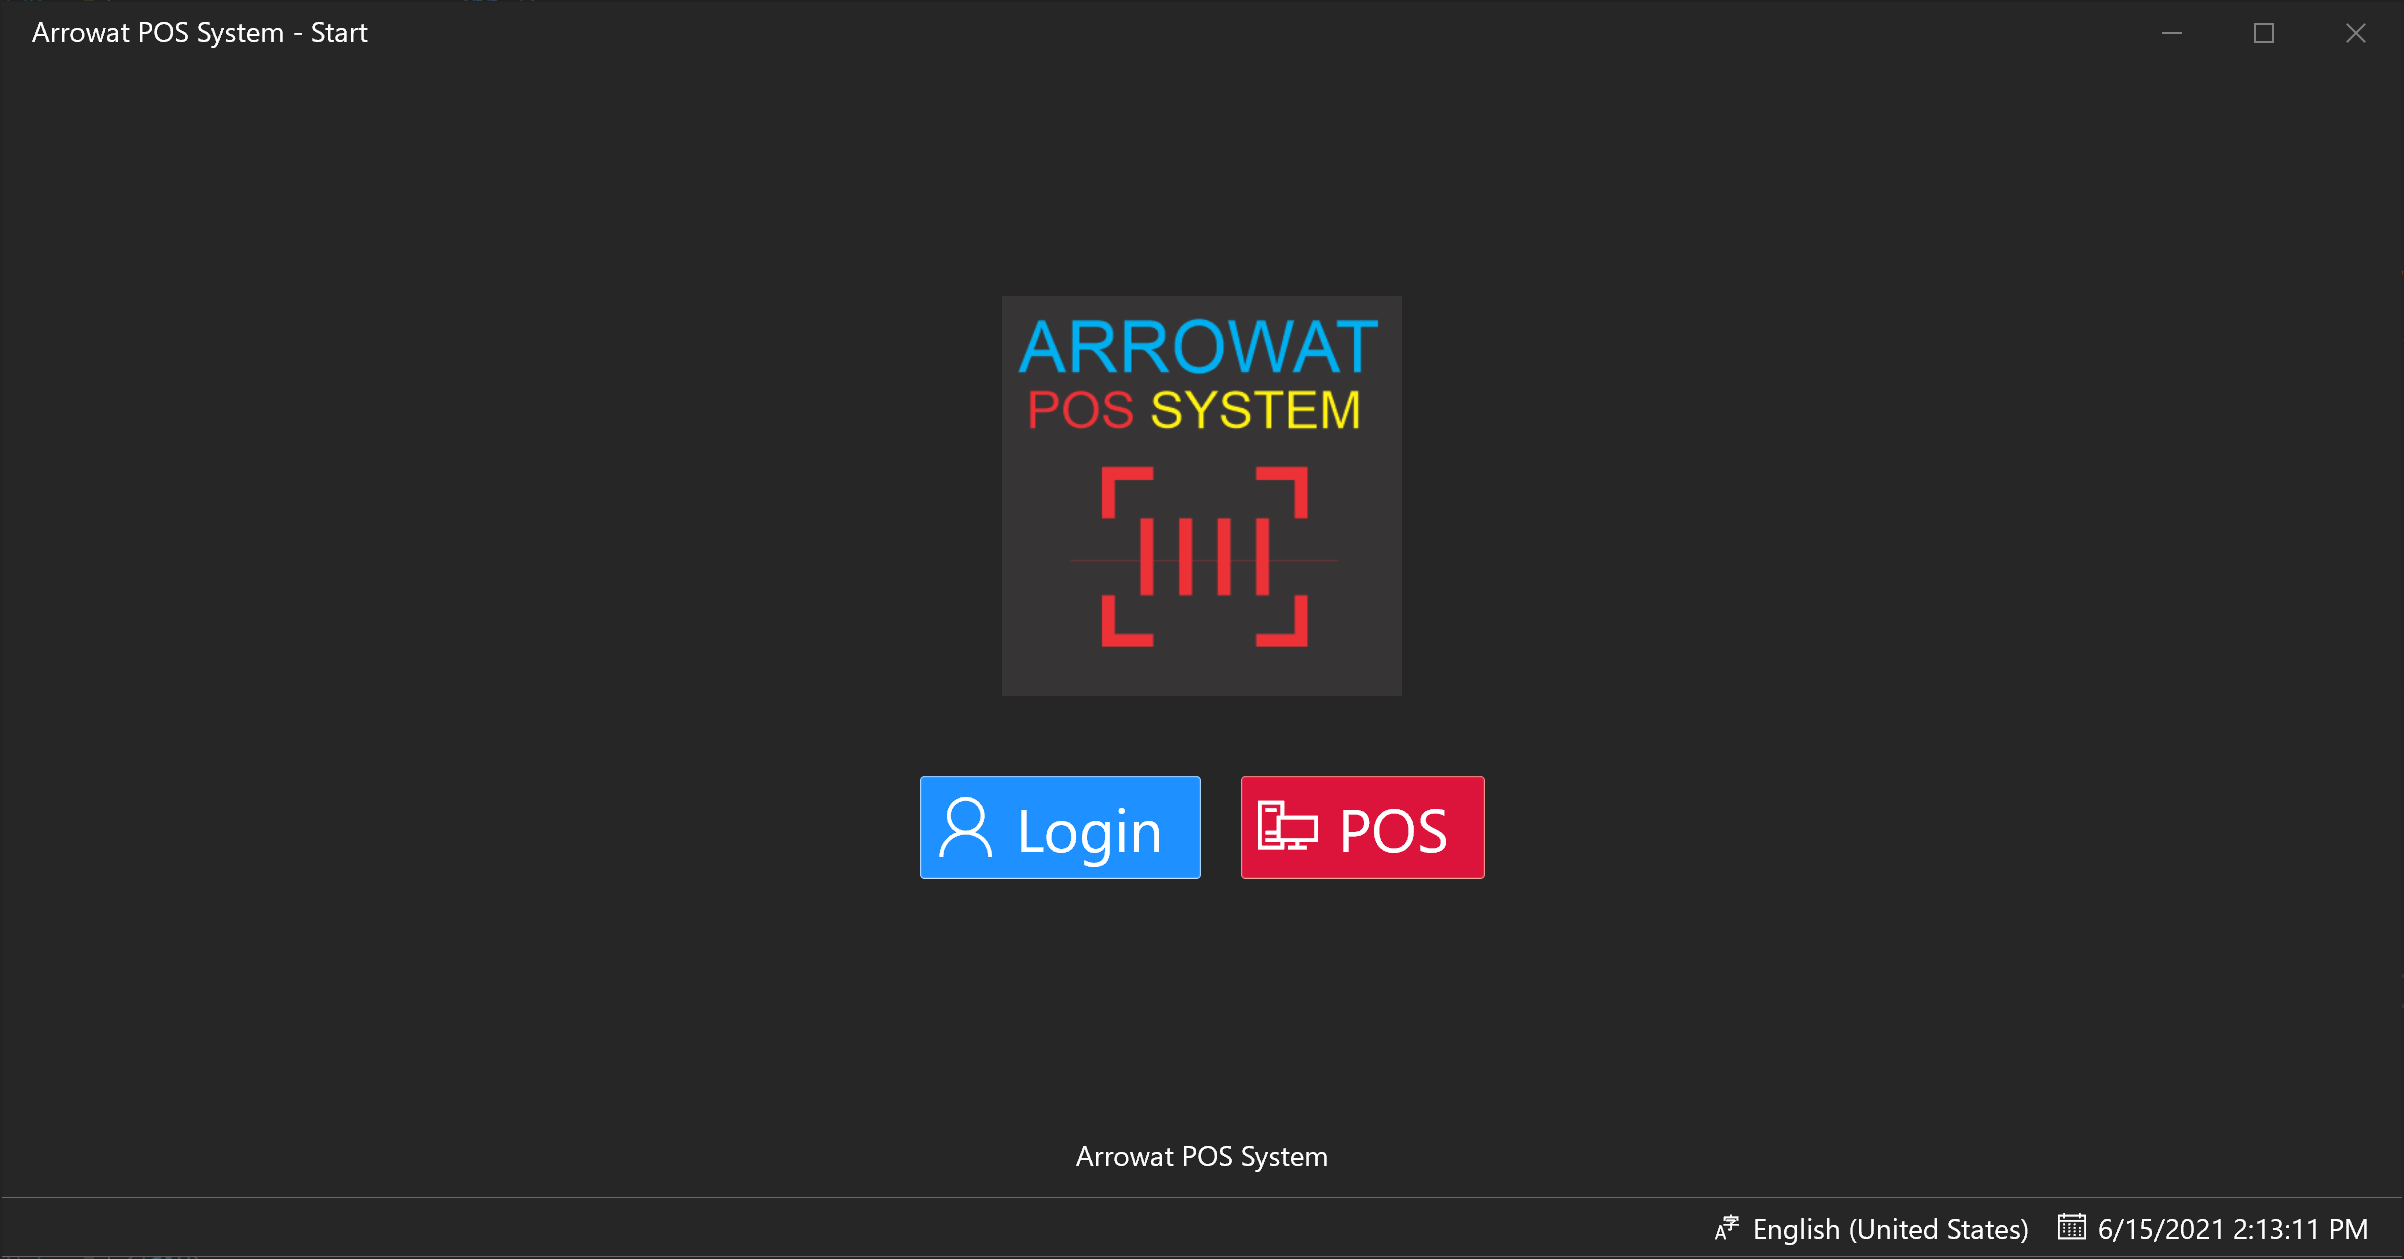
When the first time using Arrowat POS System will show the main page without asking login access this is because there is not operator account created, to add operators follow the Next Steps.
- Open Arrowat POS System
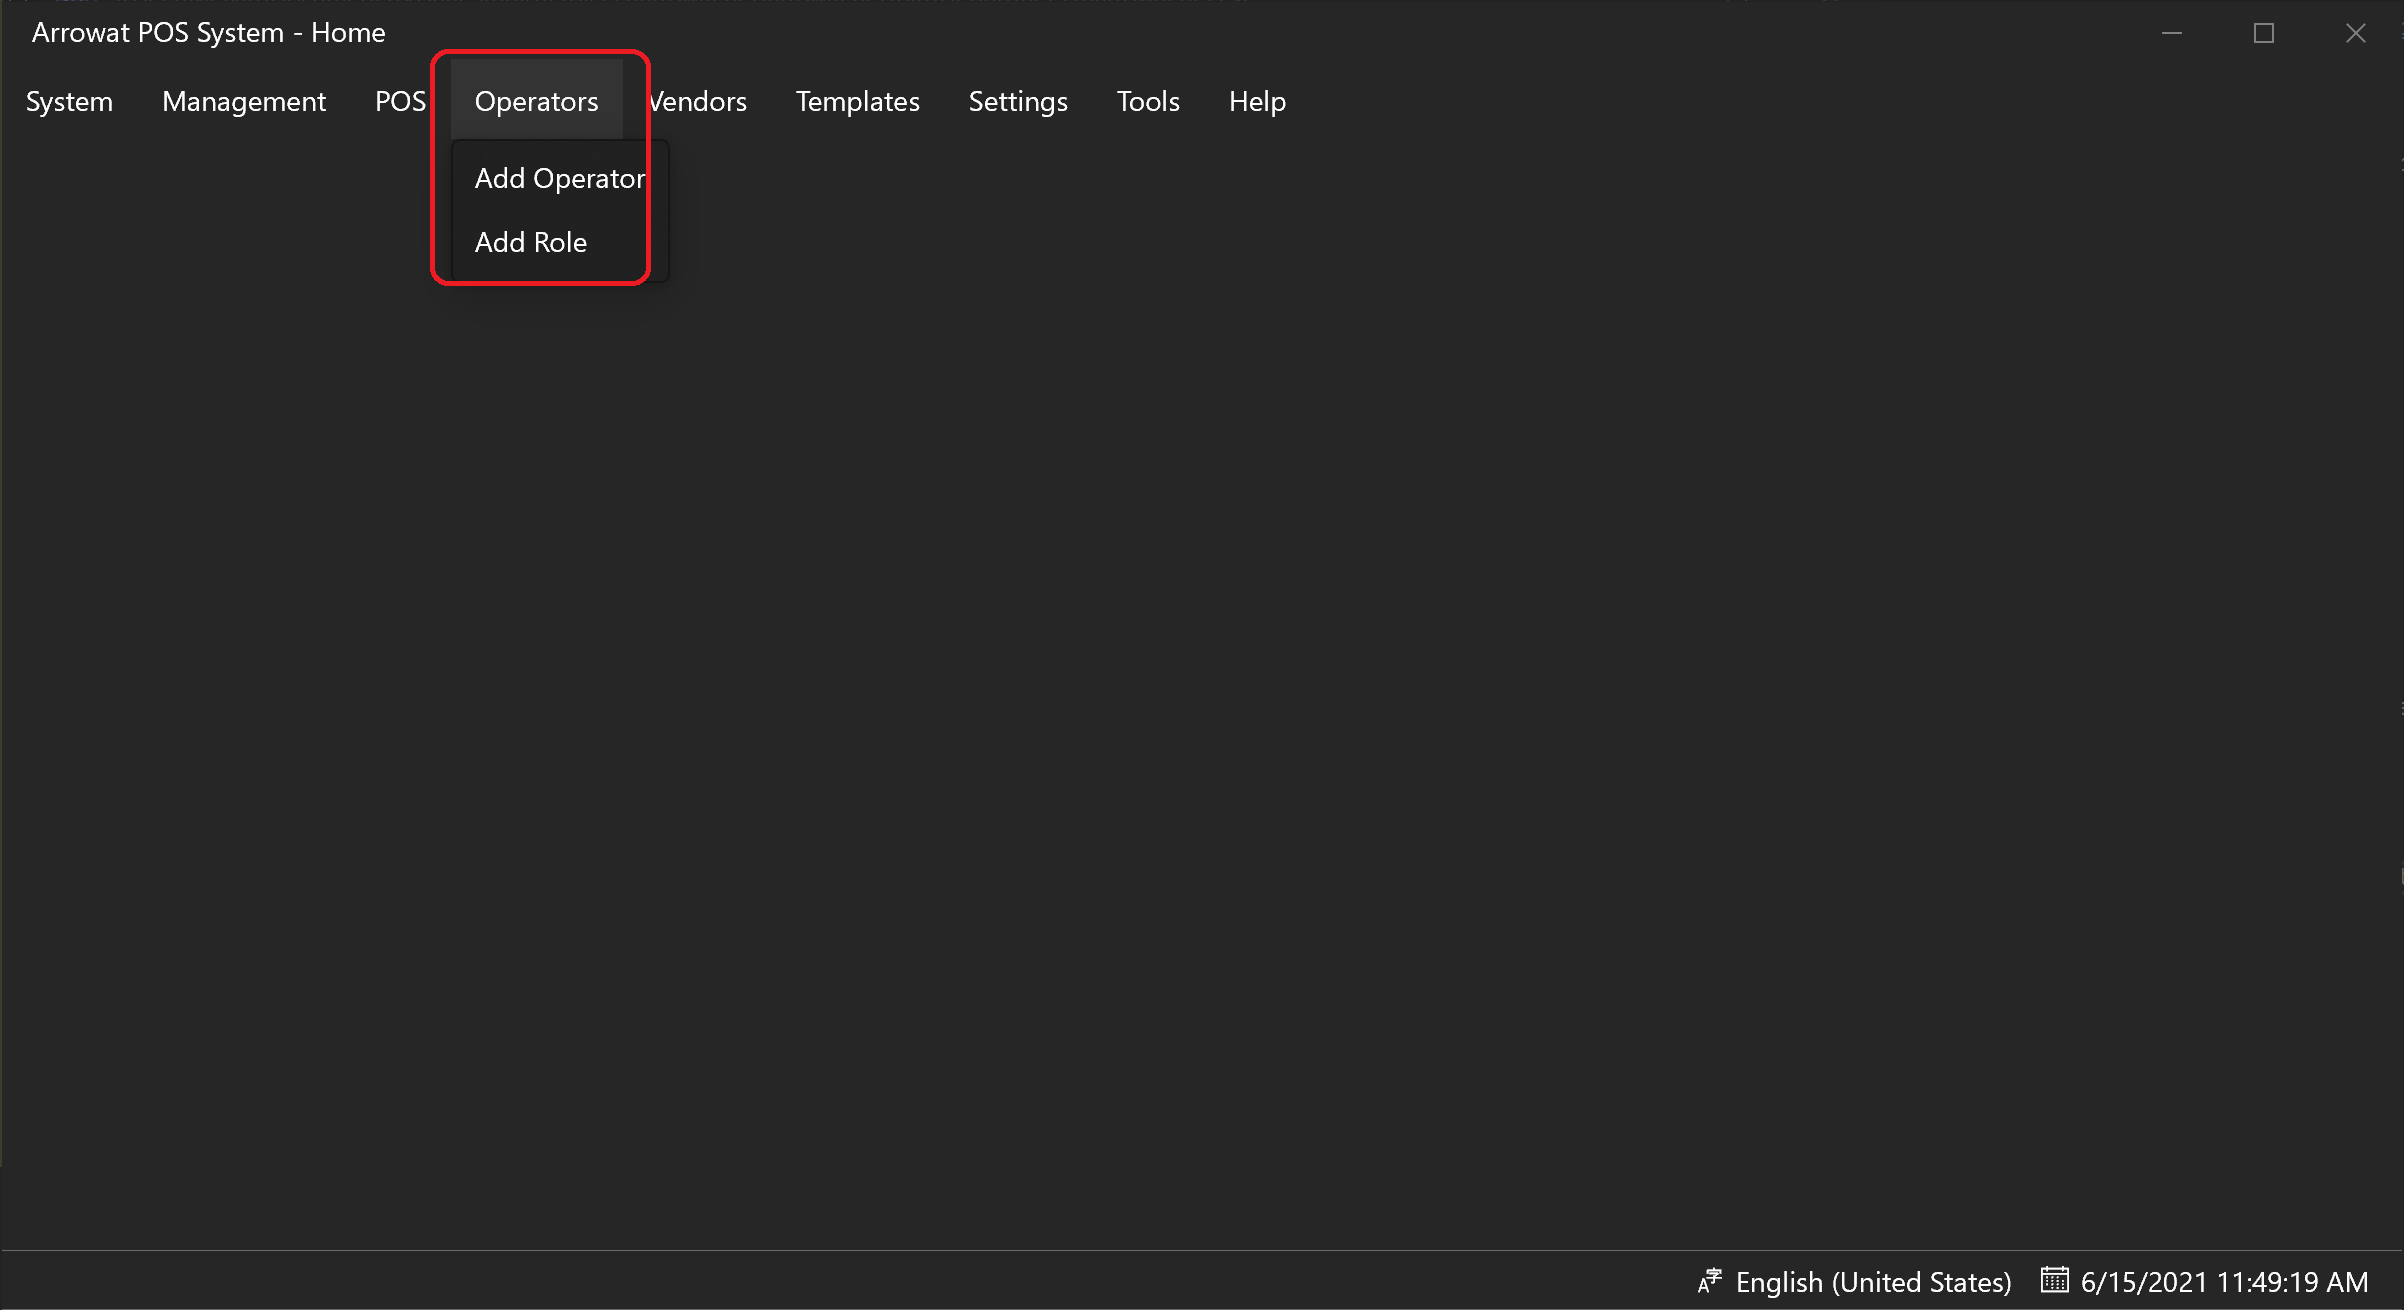
-
Click Operators > Add Role
The Operator roles page will be shown
-
Click Add
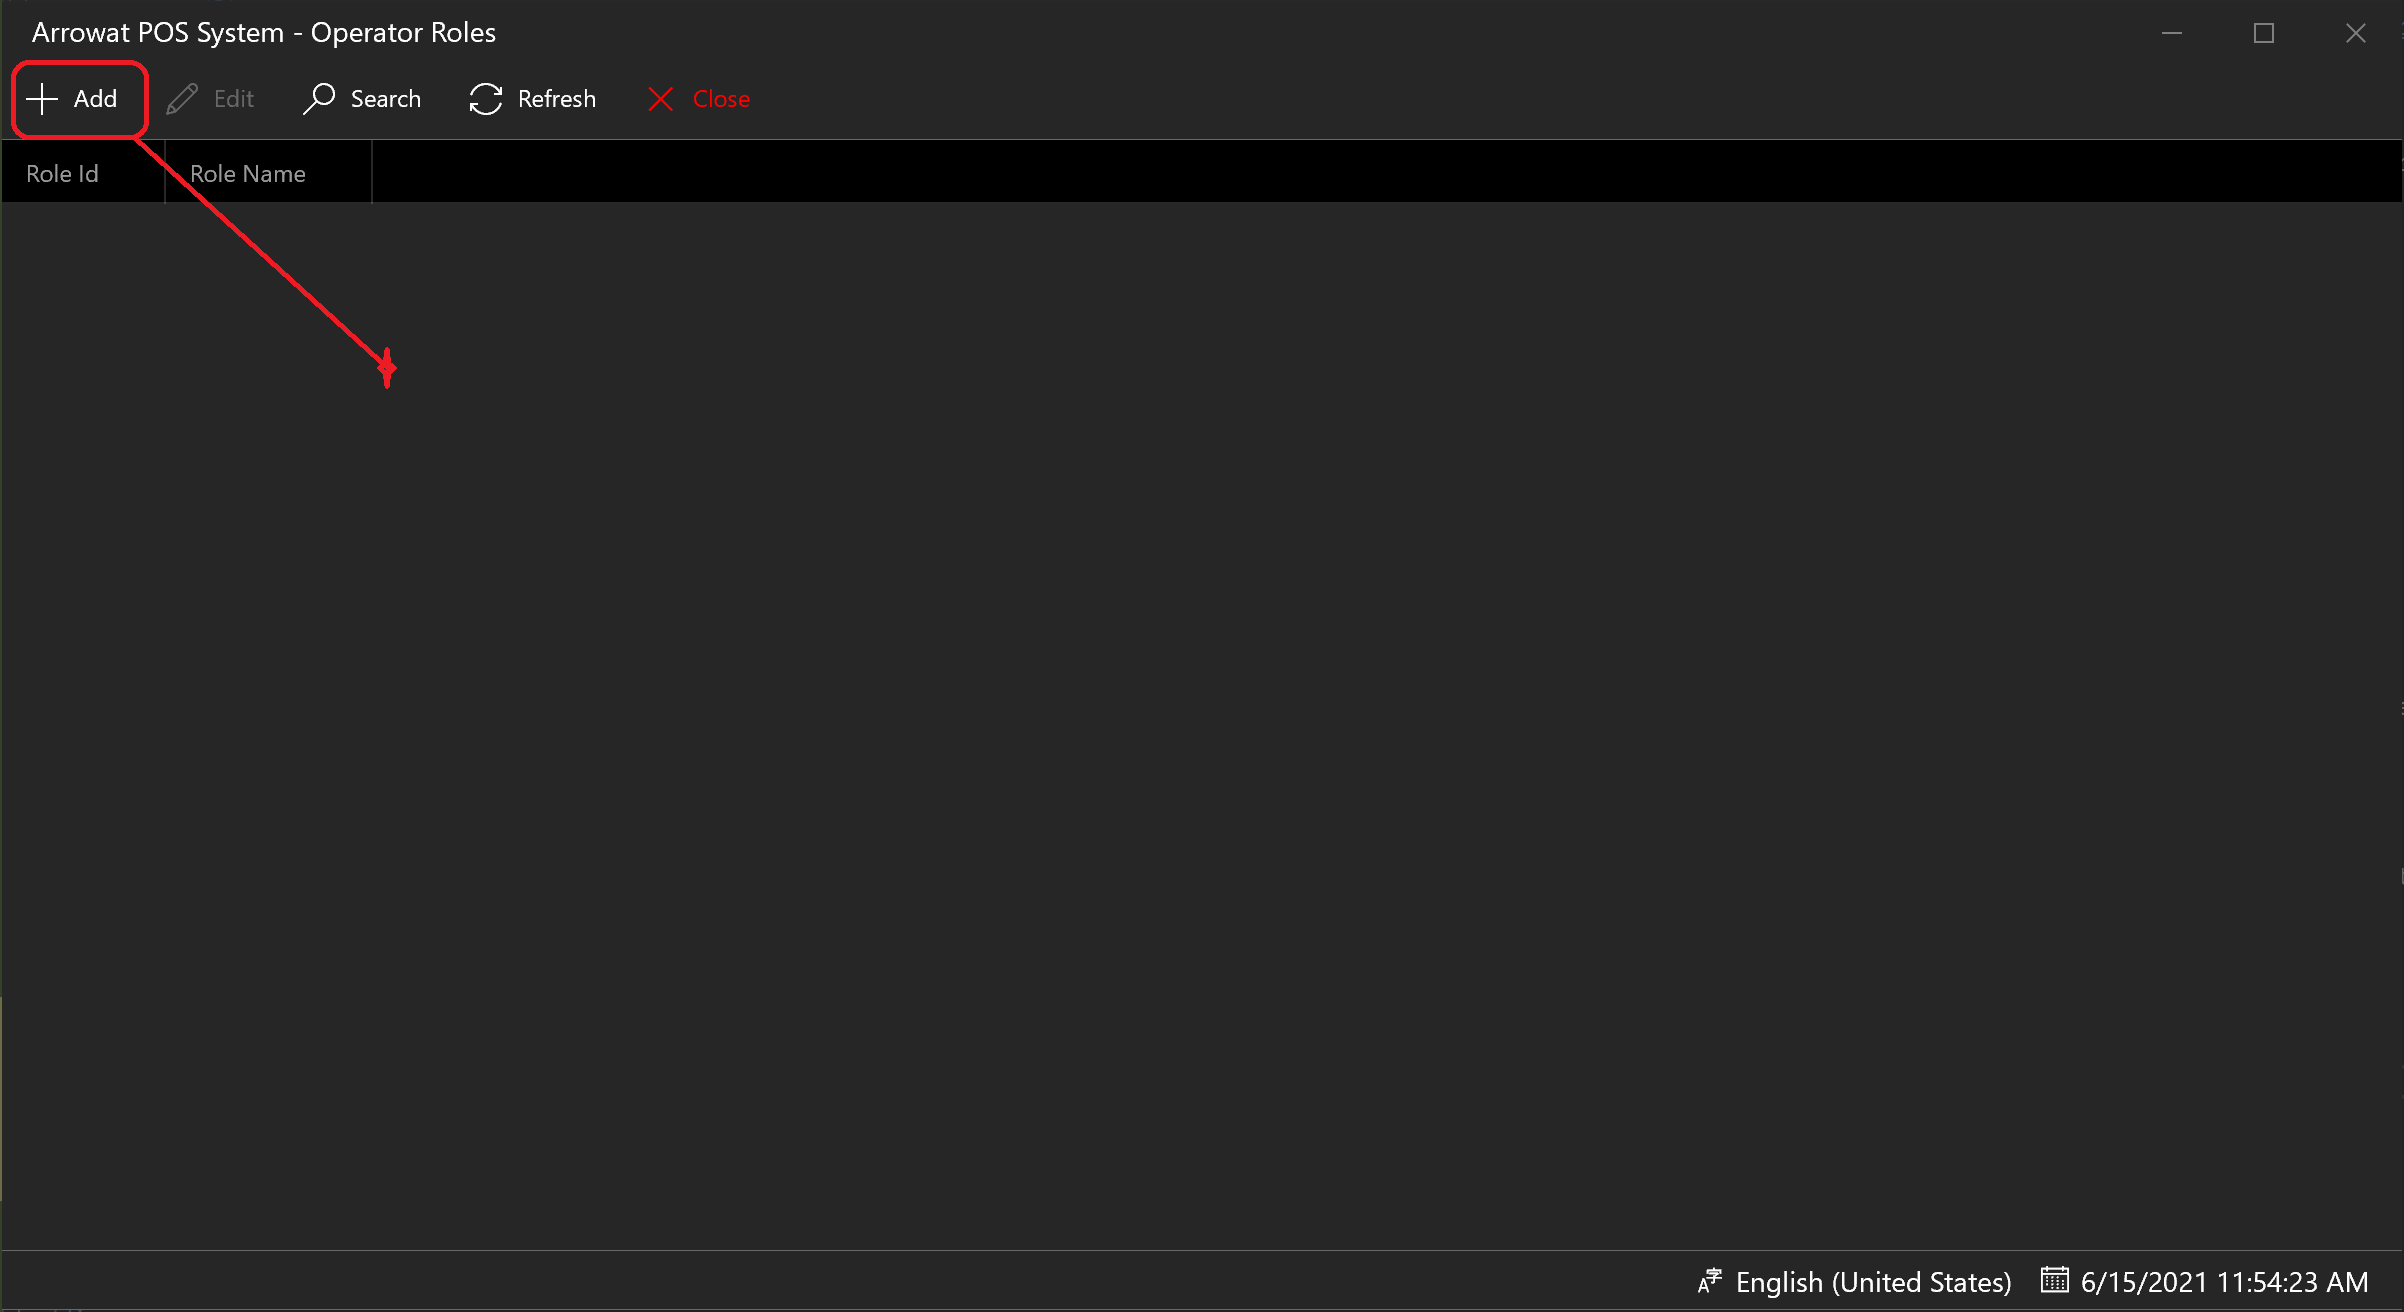
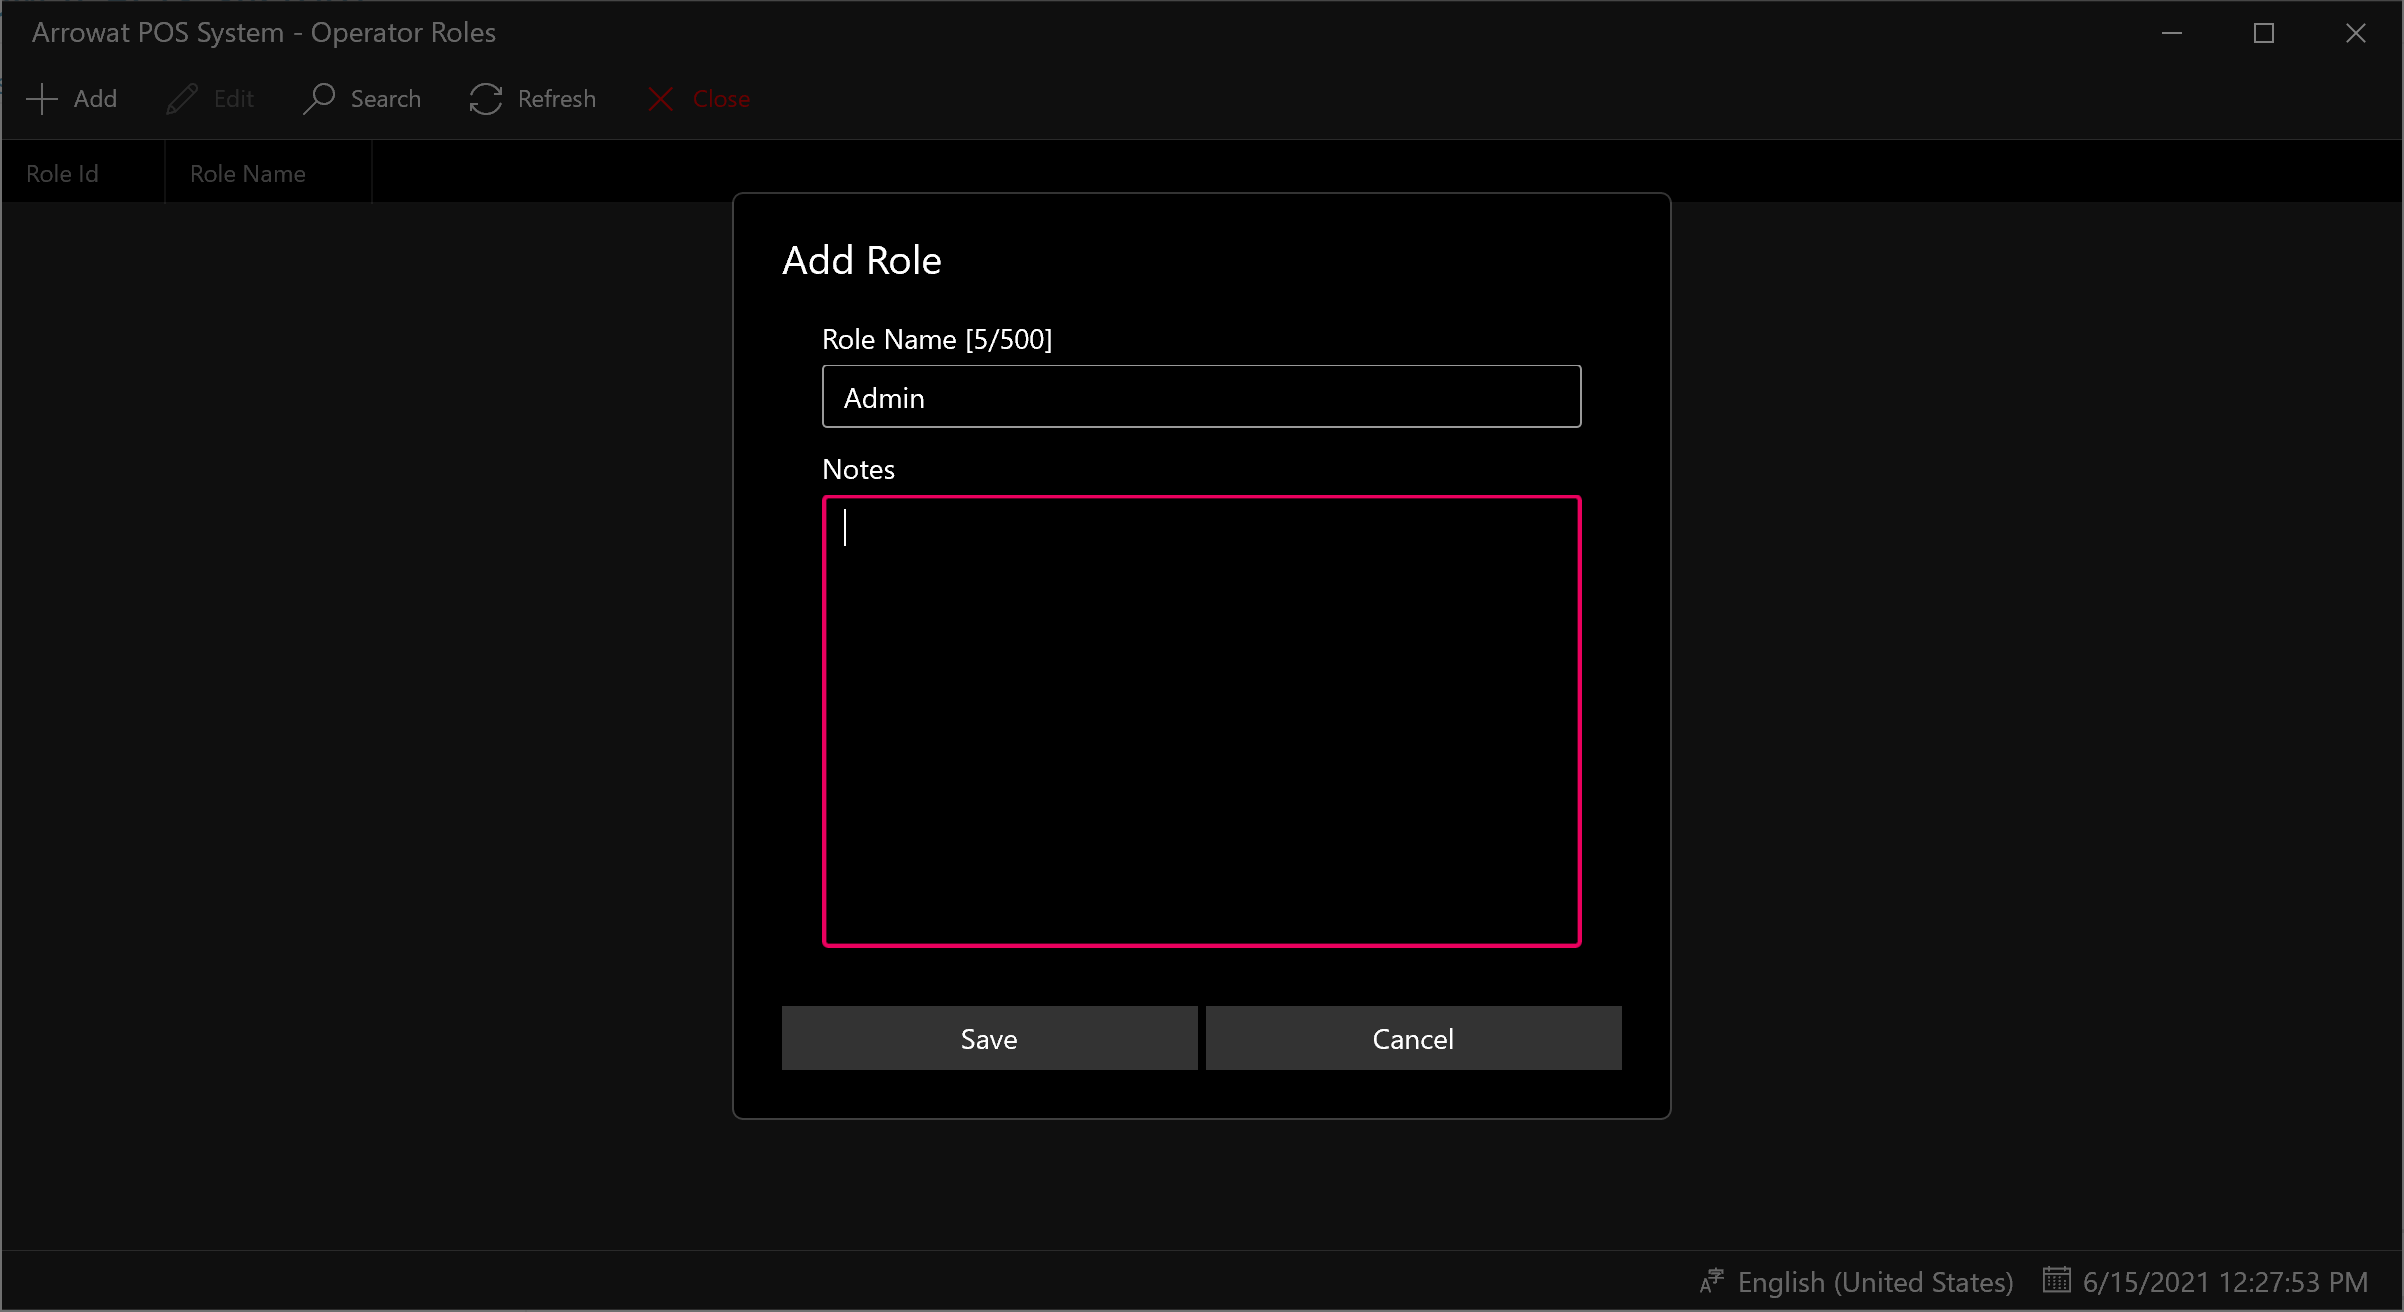
A window form will be shown, fill the texboxes with the information required as following.
- Role Name: Admin
- Notes: You can write anote or leave it empty
Click Save button to save the operator role. if you want to see the list you can click the refresh button.

Click Close Button to navigate to Home page.
-
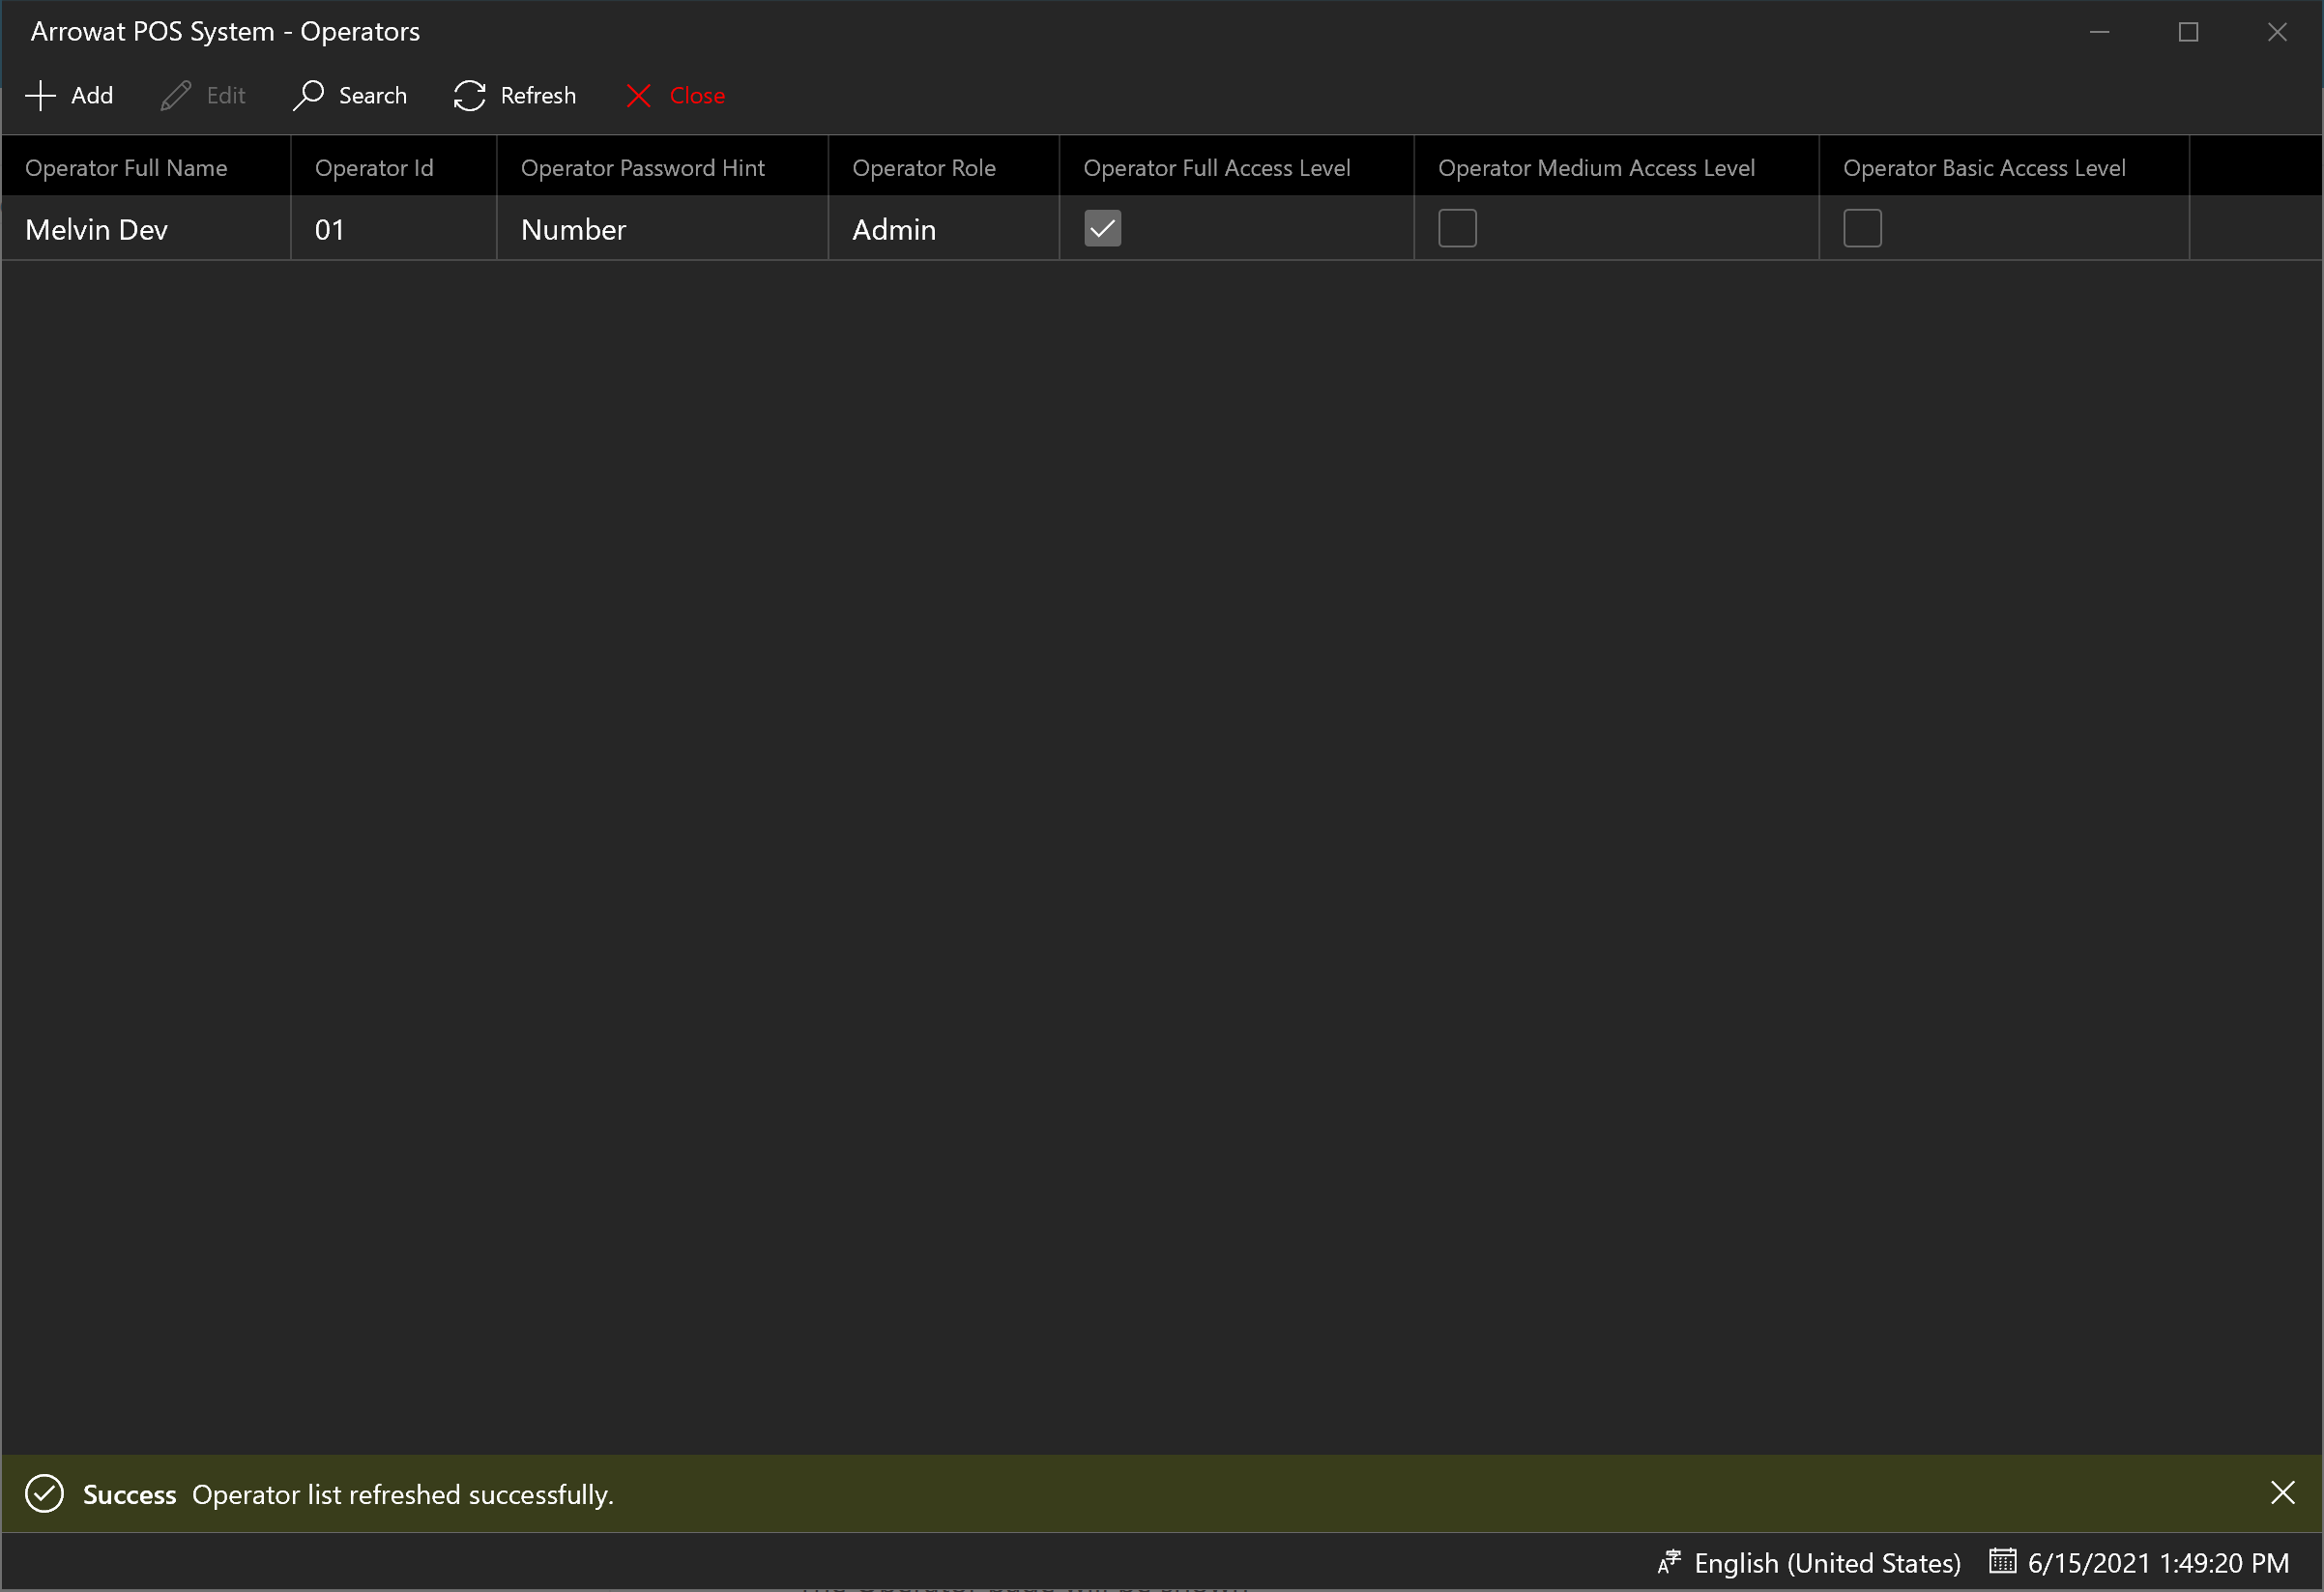
Click Operators > Add Operator
The Operator page will be shown

-
Click Add
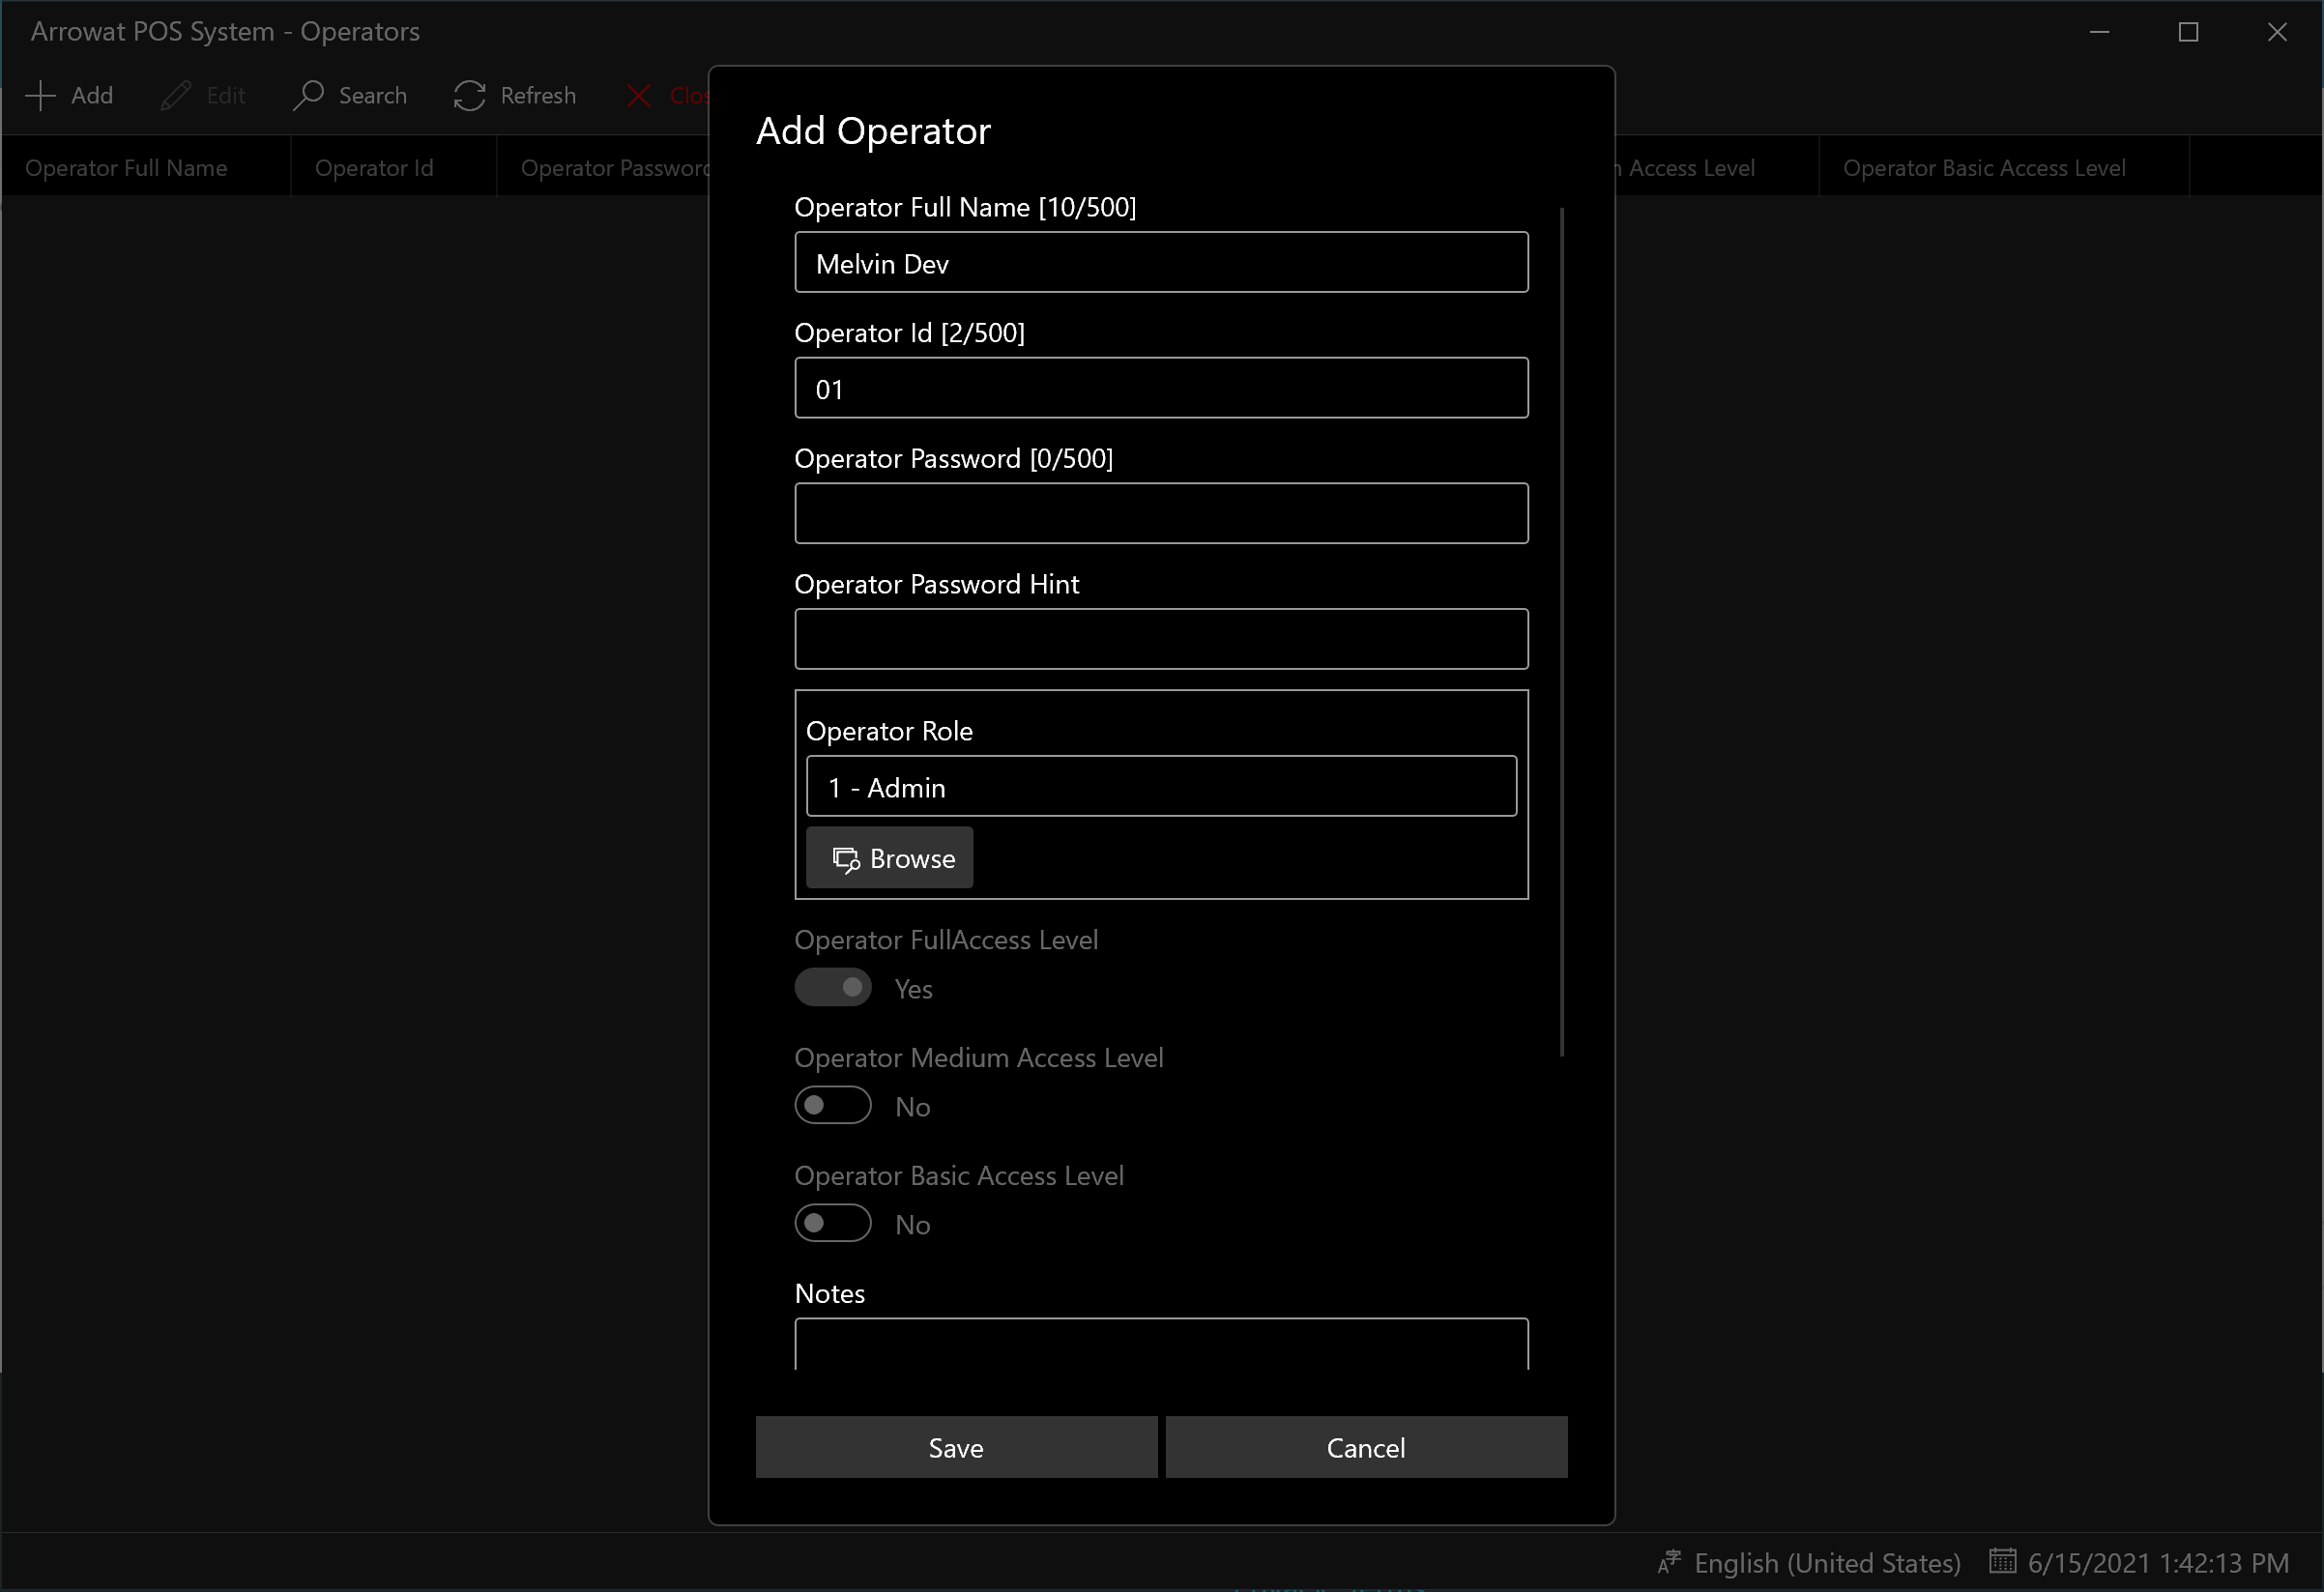
A window form will be shown, fill the texboxes with the information required as following.
Note: all information are example only, you should write the information of your operators.
- Operator Full Name: Melvin Dev
- Operator Id: 01
- Operator Password: Write a password you will remember (passwords are encrypted)
- Operator Password Hint: Write a hint related to your password in case you forgot it.
- Operator Role: Click Browse button and select the operator role, these roles are the roles that we have added on the step 3.
- Operator Access : Turn on to Yes the access you want to provide to the operator, if you are adding for first time an operator. All these options will be disabled and the selected one is Full Access, because the first operator must have a full access to operate Arrowat POS System.
- Notes: Write a note for the operator or leave it empty.
Click Save button to save the operator data. if you want to see the list you can click the refresh button.
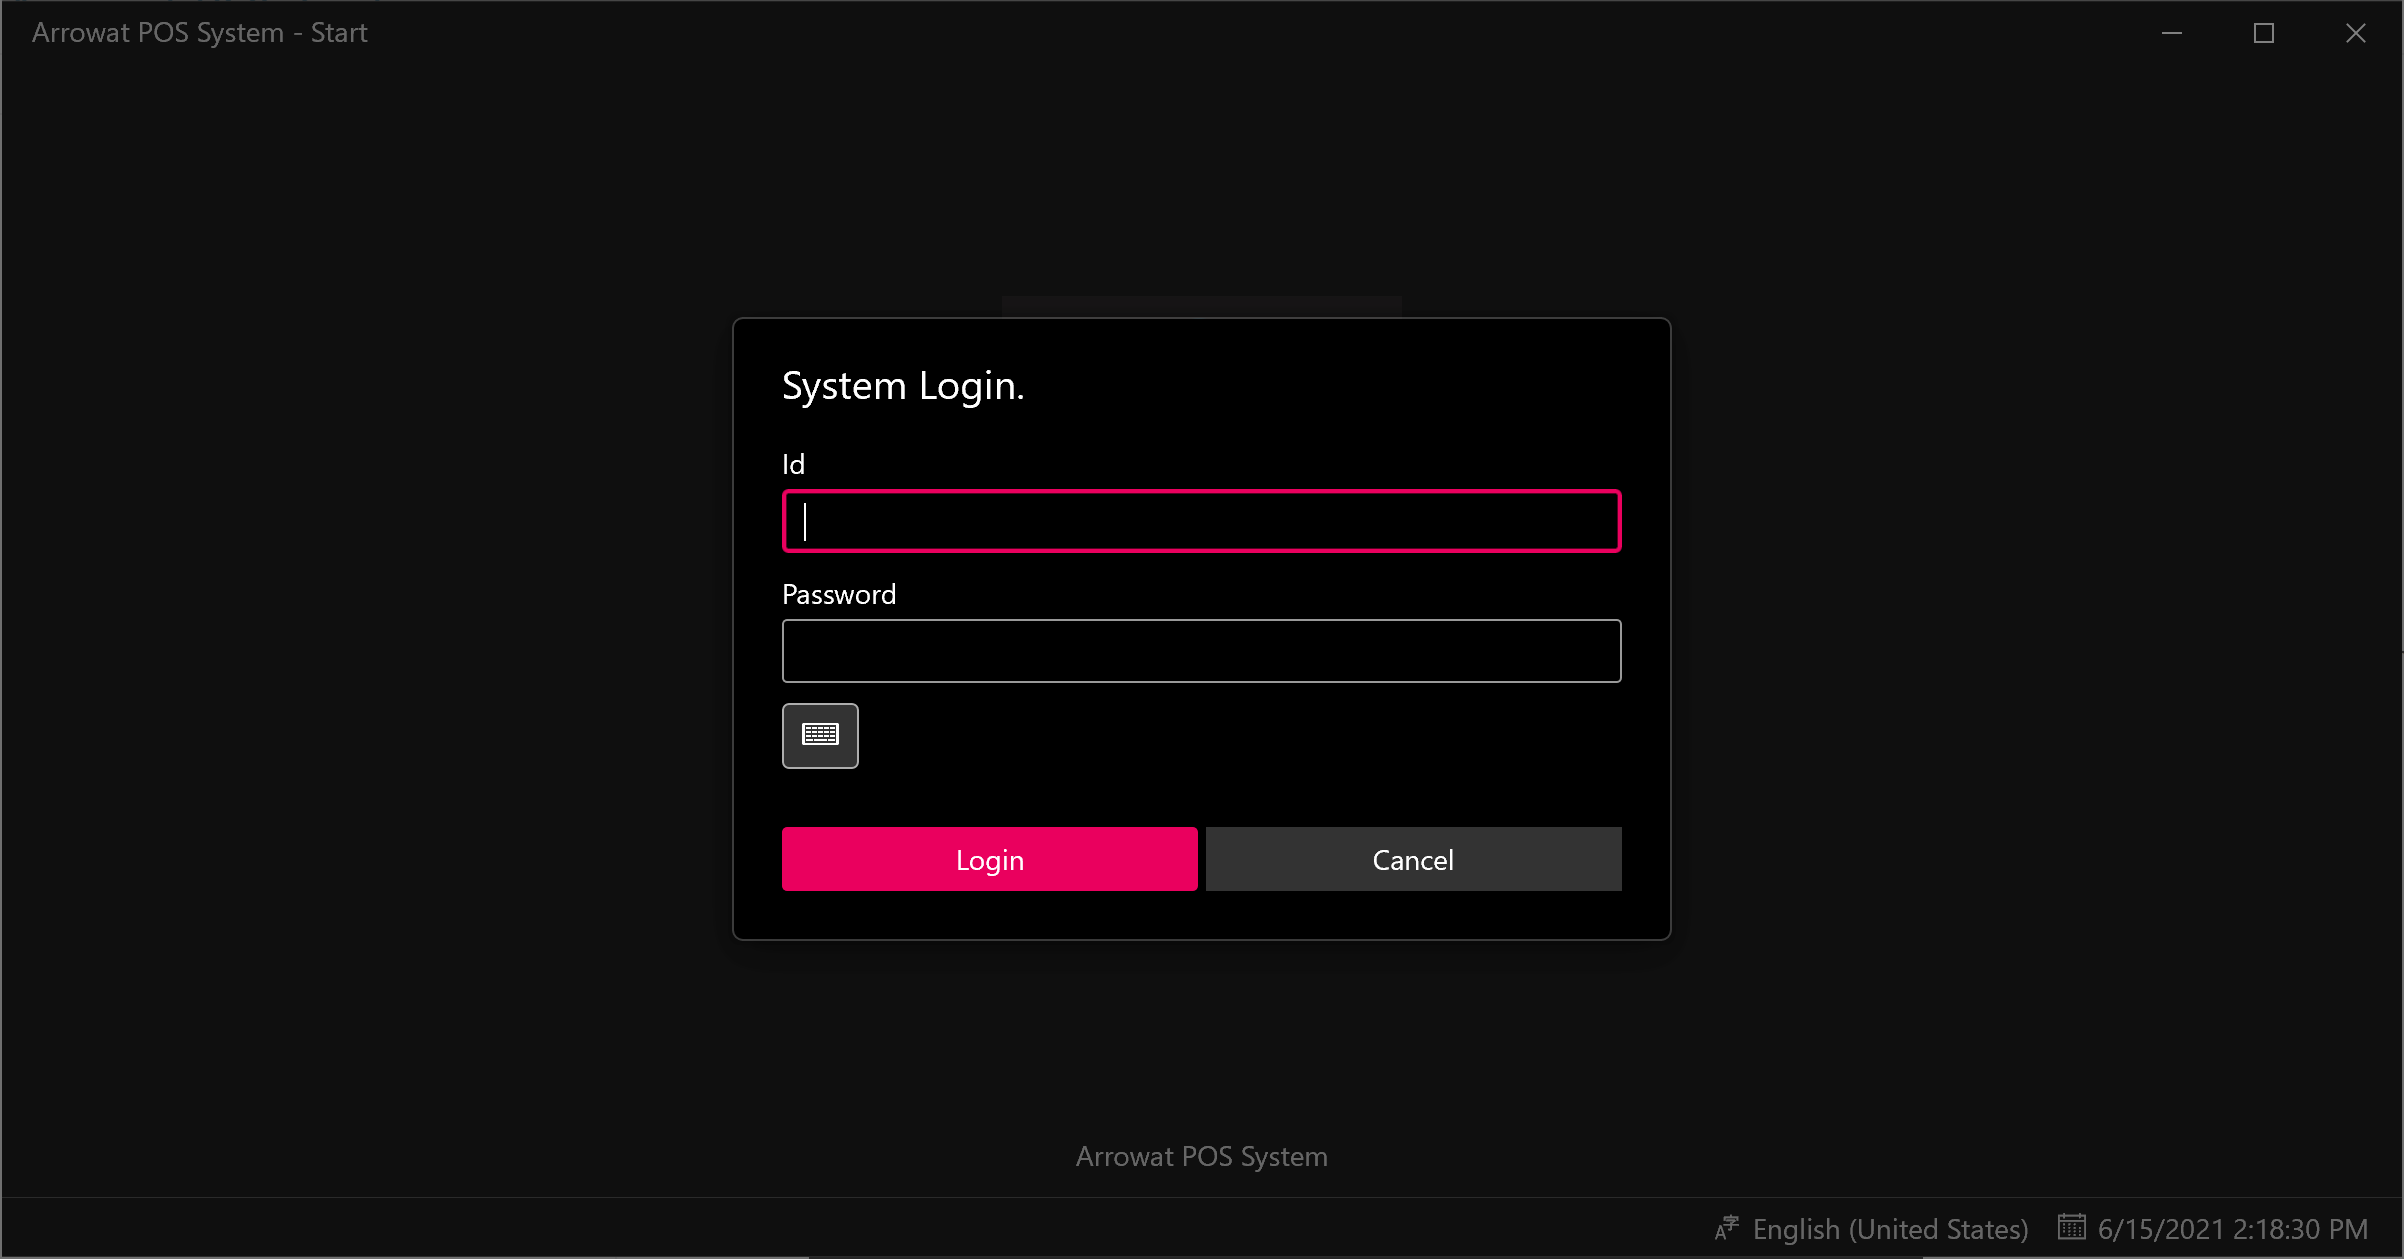
Click Close Button to navigate to Home page. if you close the app and you open it you will see the login page. the image shown can be changed for the logo of your company. We will change it in the section Configuring Store/Machine, click login button to continue configuring the app.
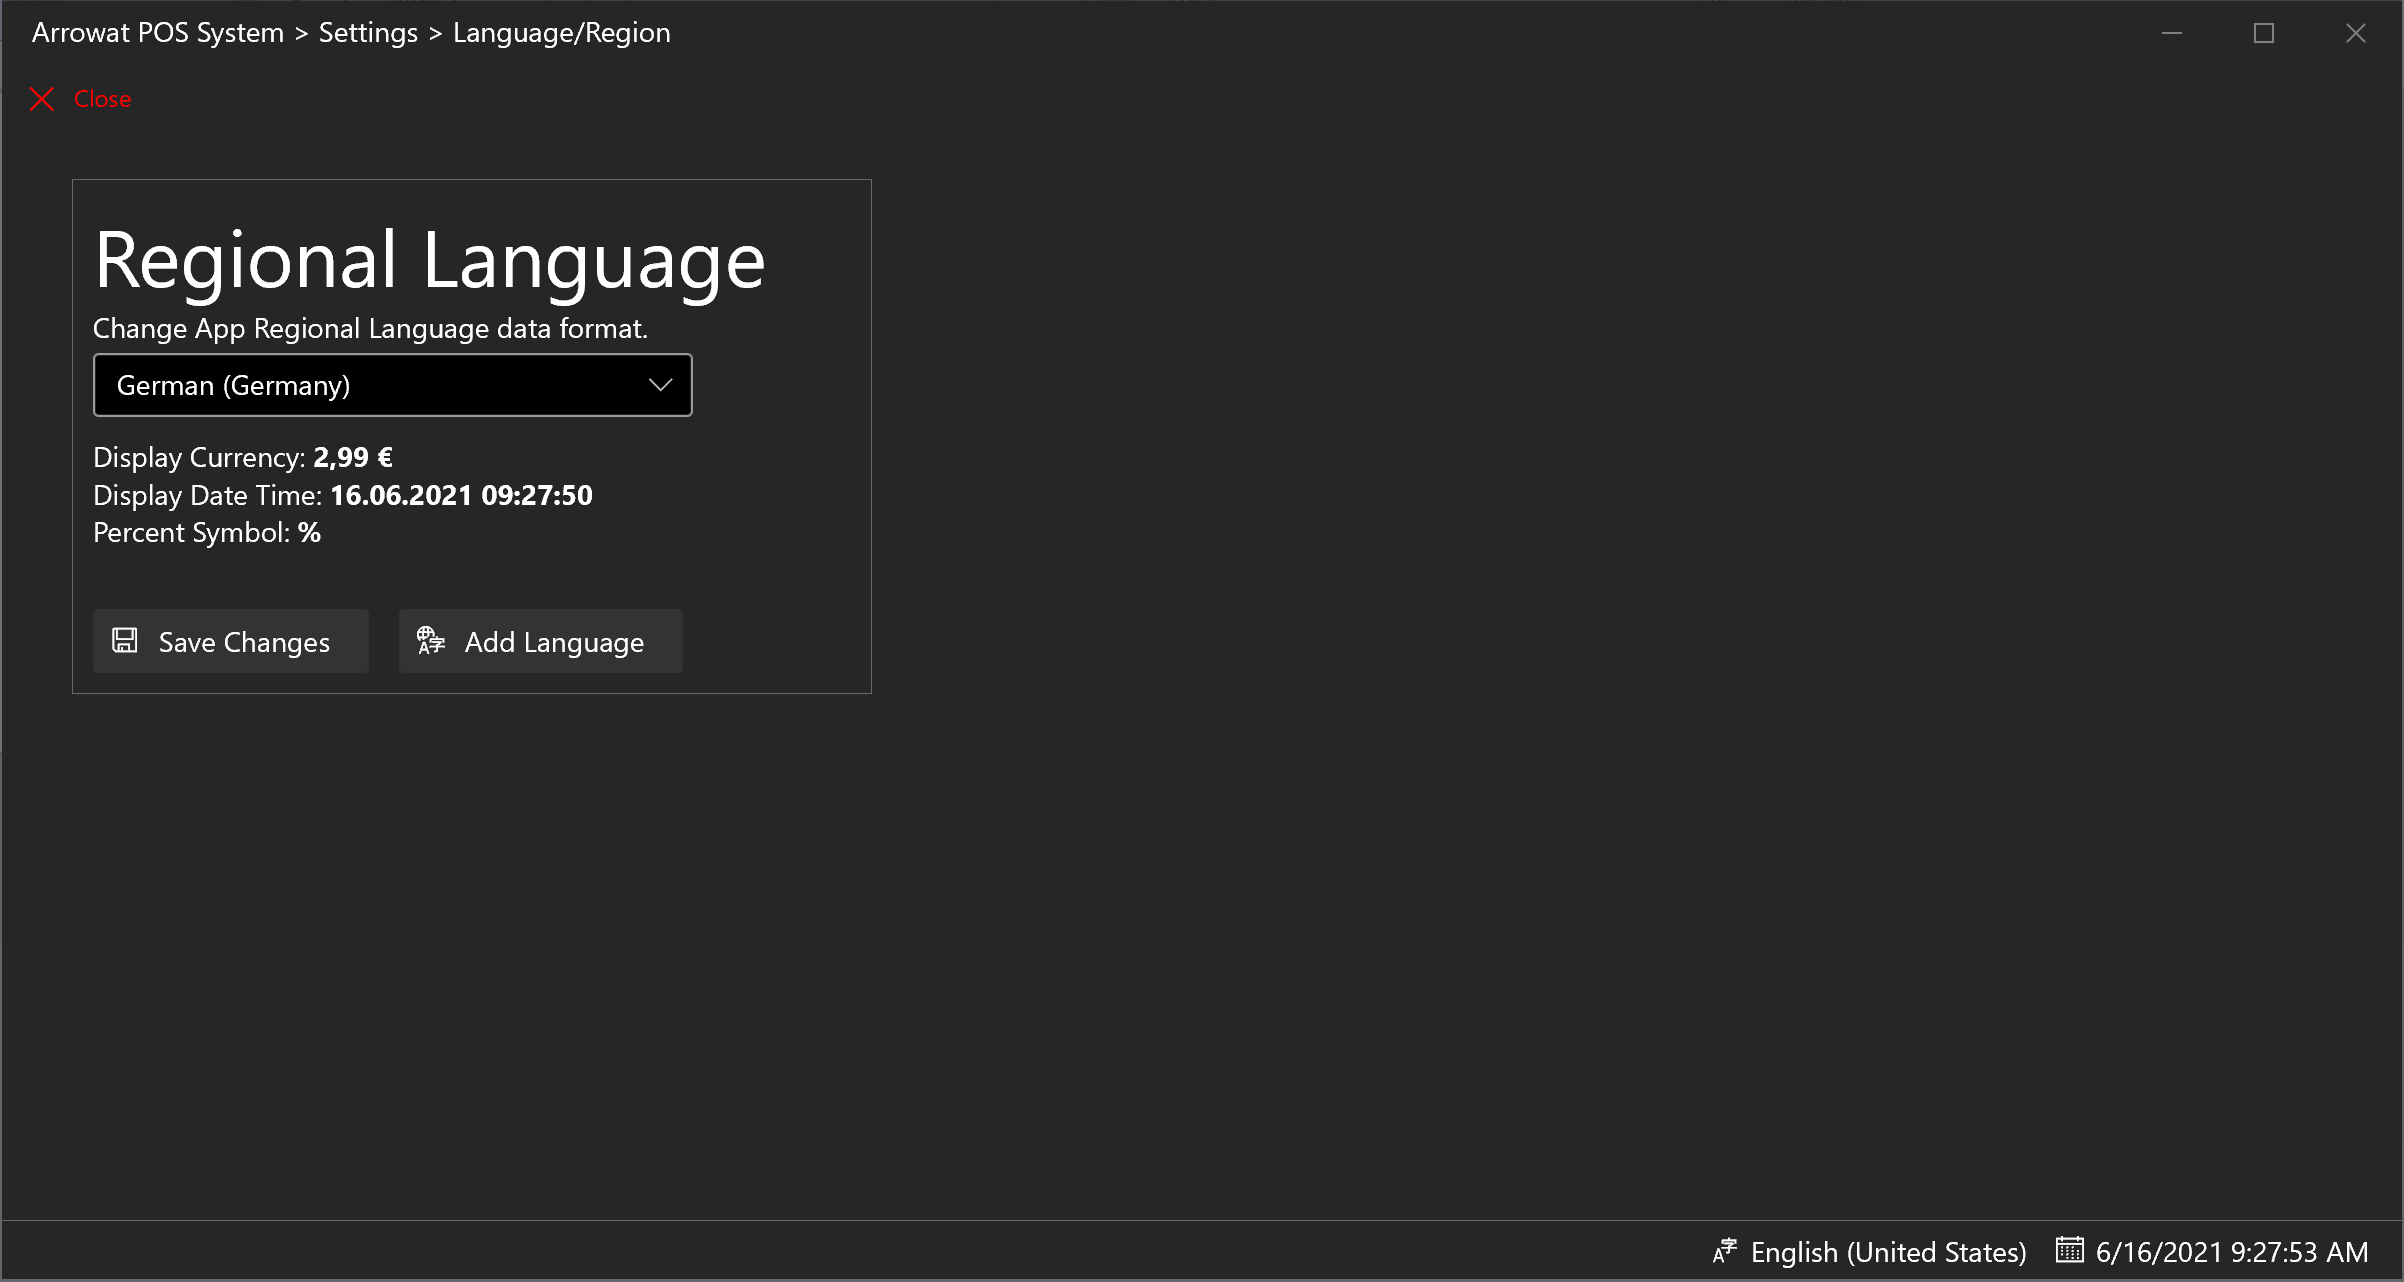
Change Language/Region Data Format
Arrowat POS System data format uses currency as format money values, date and time format, Percent Symbol from the Language/Region configured to use. for example if you live in United States the app can be set to use currency and data format of United States that is Dollar '$' example: $2.59
If you live in Germany the app can be configured to use currency and data format of Germany that is Euro '€' example: 2,99 €
Any Language/Region data format supported on Windows 10 can be configured to use on Arrowat POS System. by default Arrowat POS System uses the primary Language/region set by
the Operating System. The country data format and date time is shown on the status bar, see the following image.
Using Regional Data Format on Arrowat POS System allows you to use the app on any country Arrowat POS System can be installed, you only will need to configure it to appropiate Language/Region by downloading it to your computer and then set it on Arrowat POS System. we say no matter where you are using the app you can select the currency you want to use on Arrowat POS System. To configure Arrowat POS System Language/Region follow the next steps.
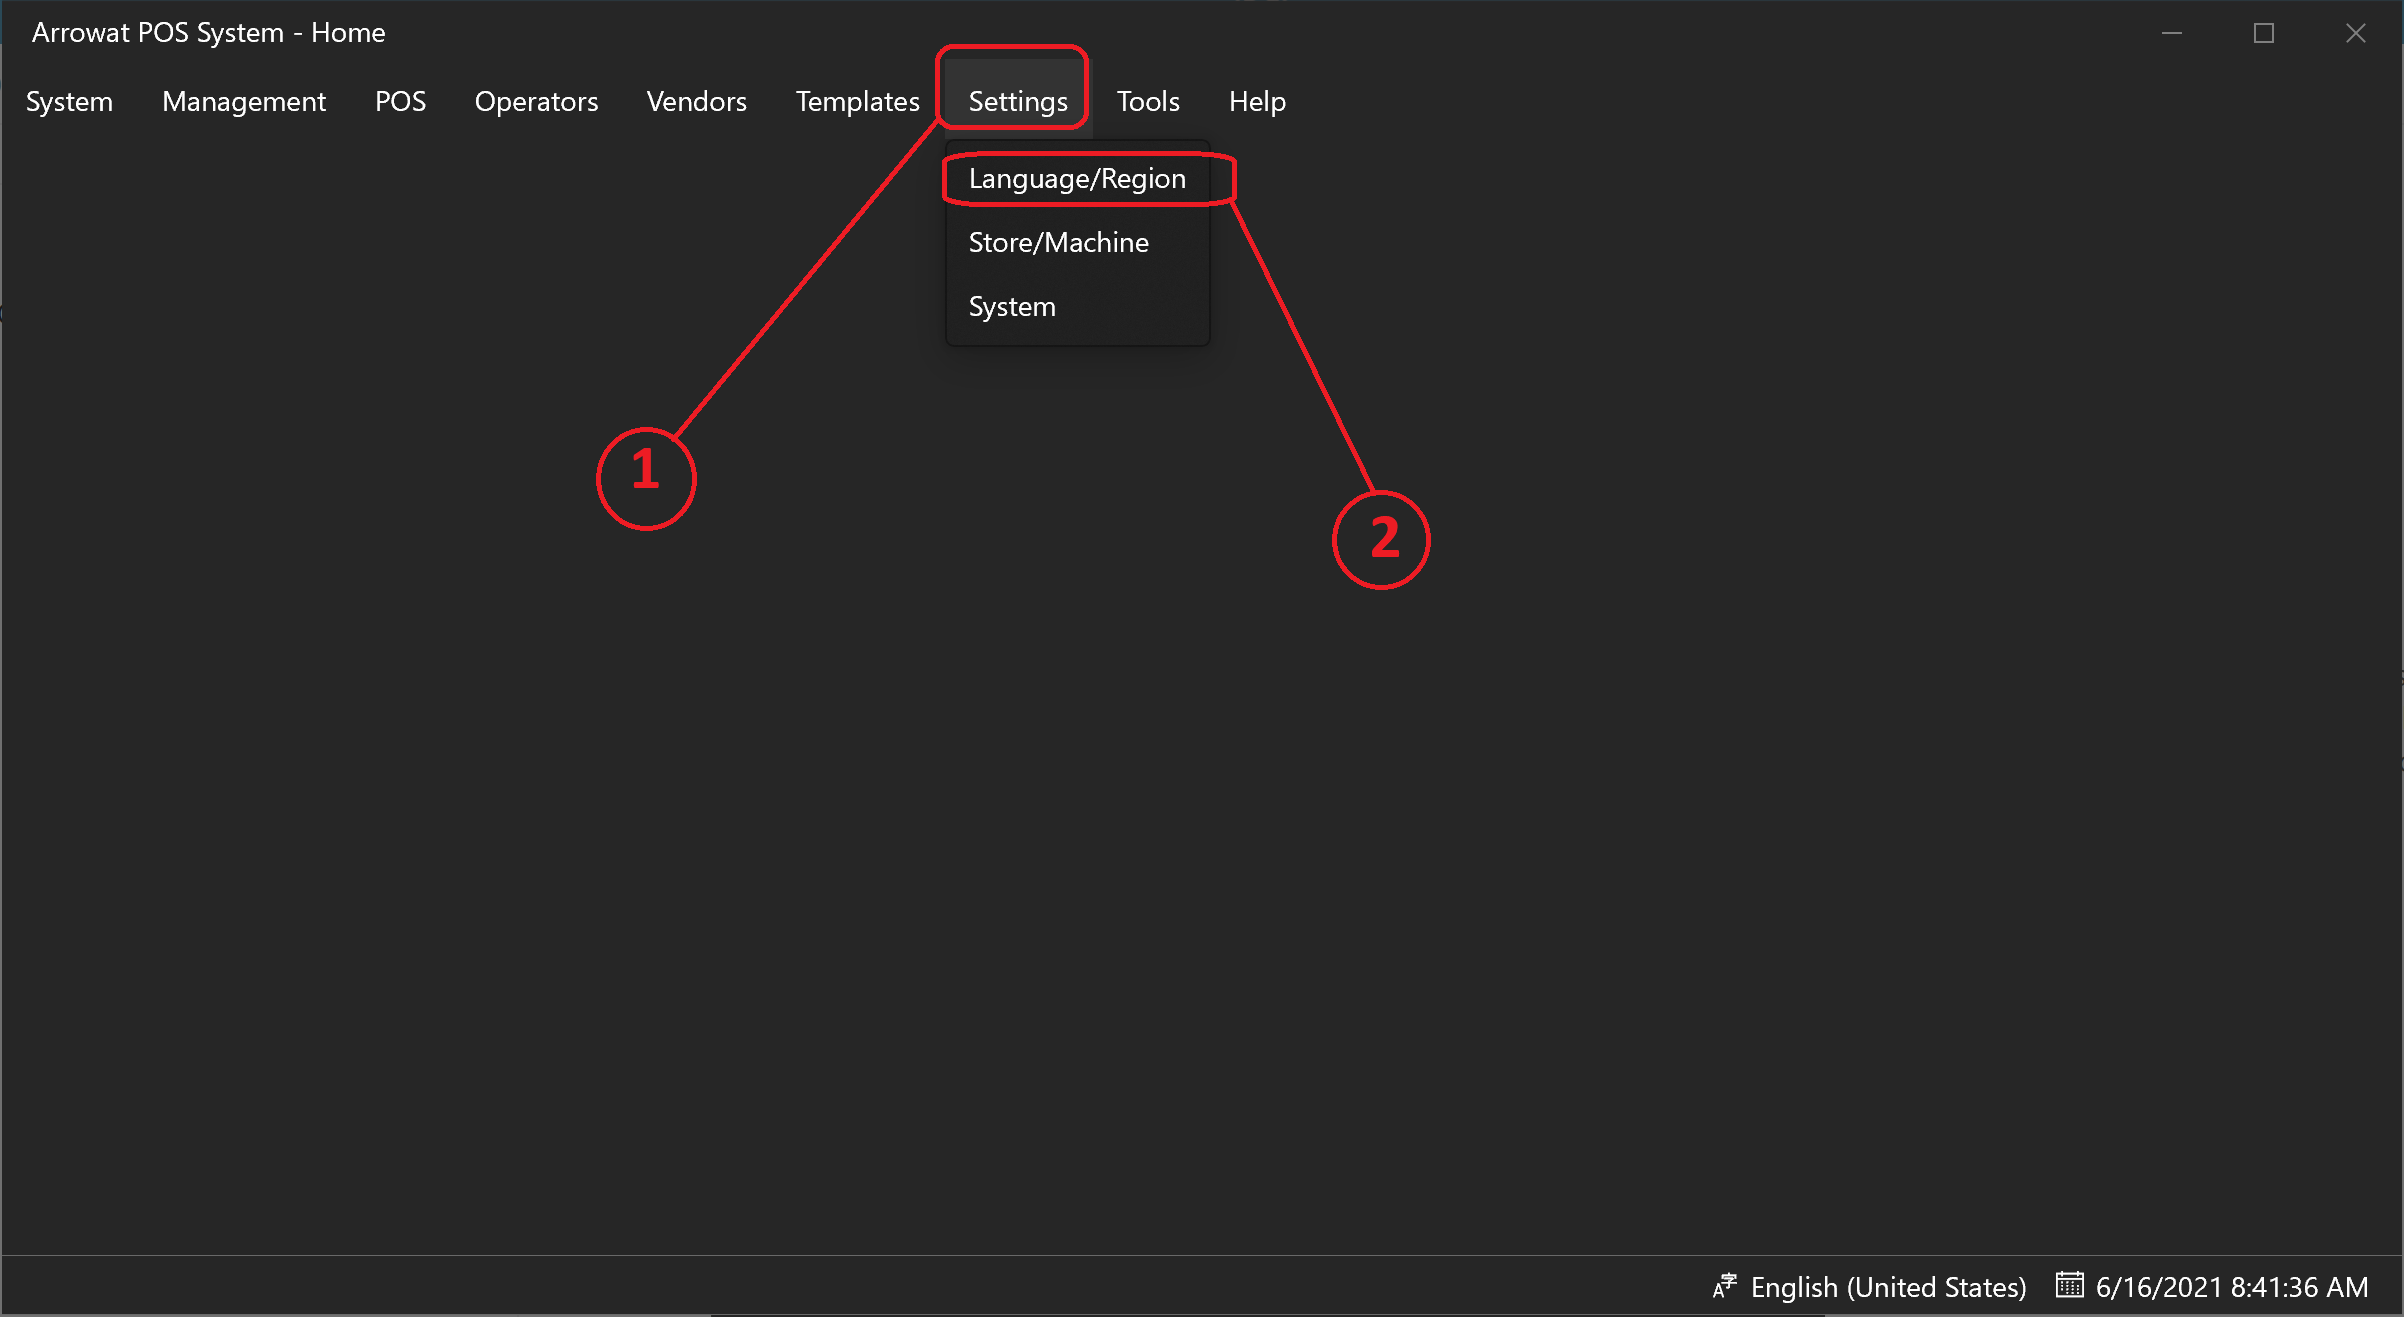
- Open Arrowat POS System
-
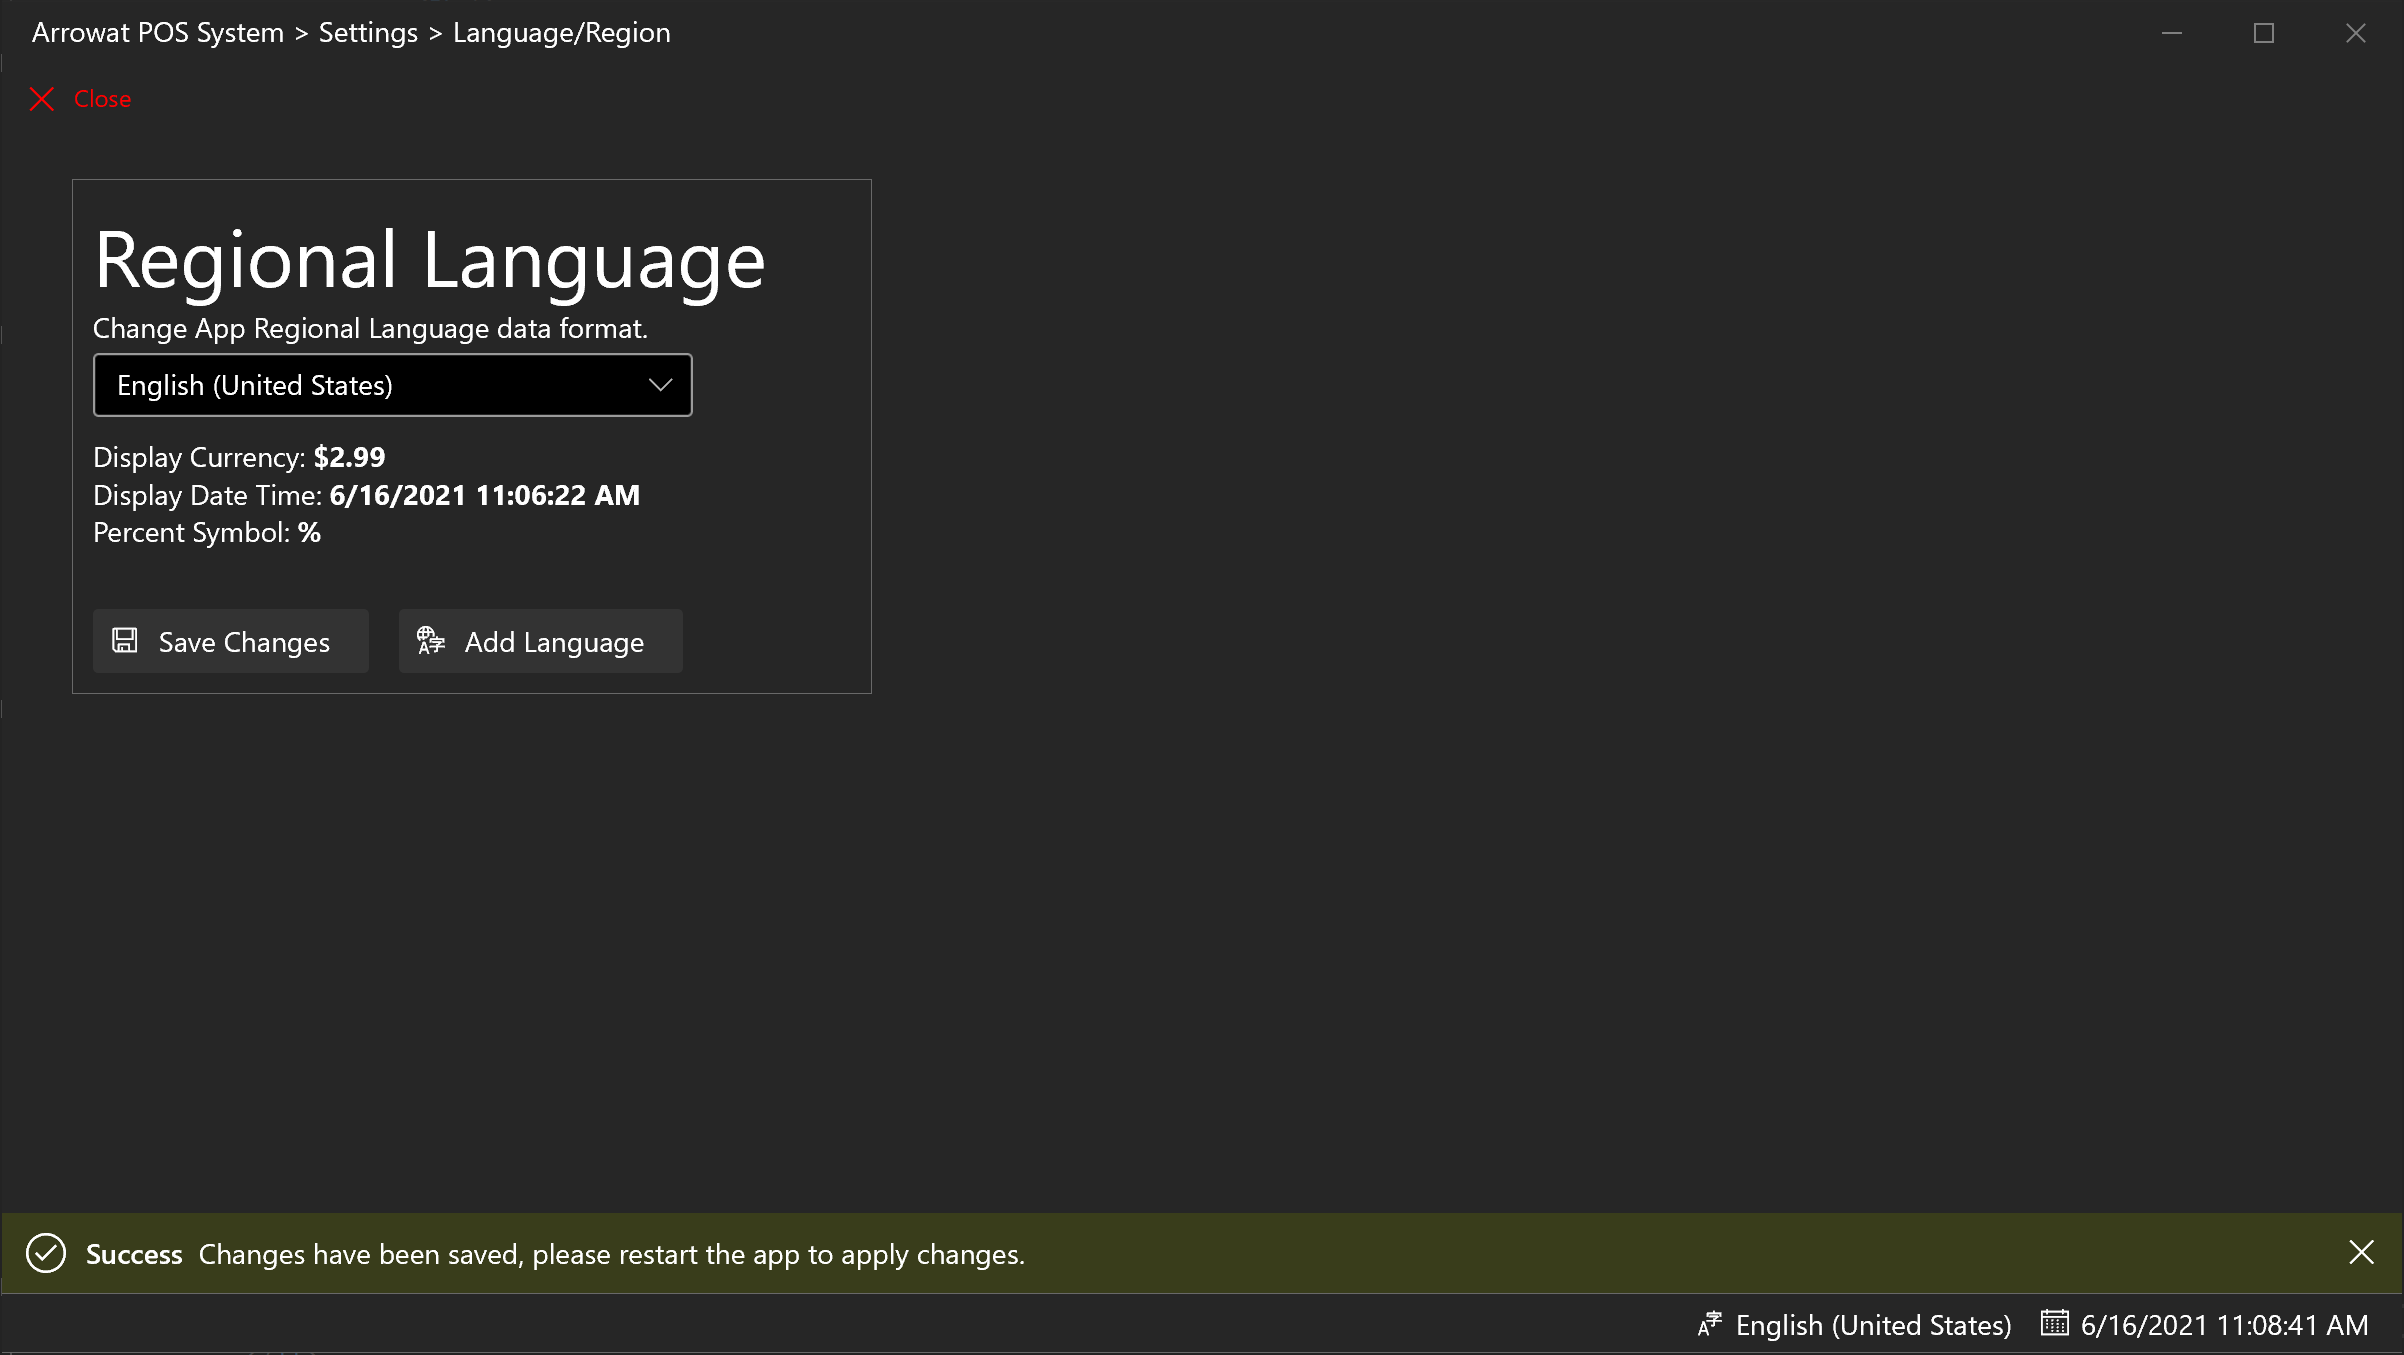
Click Settings > Language/Region
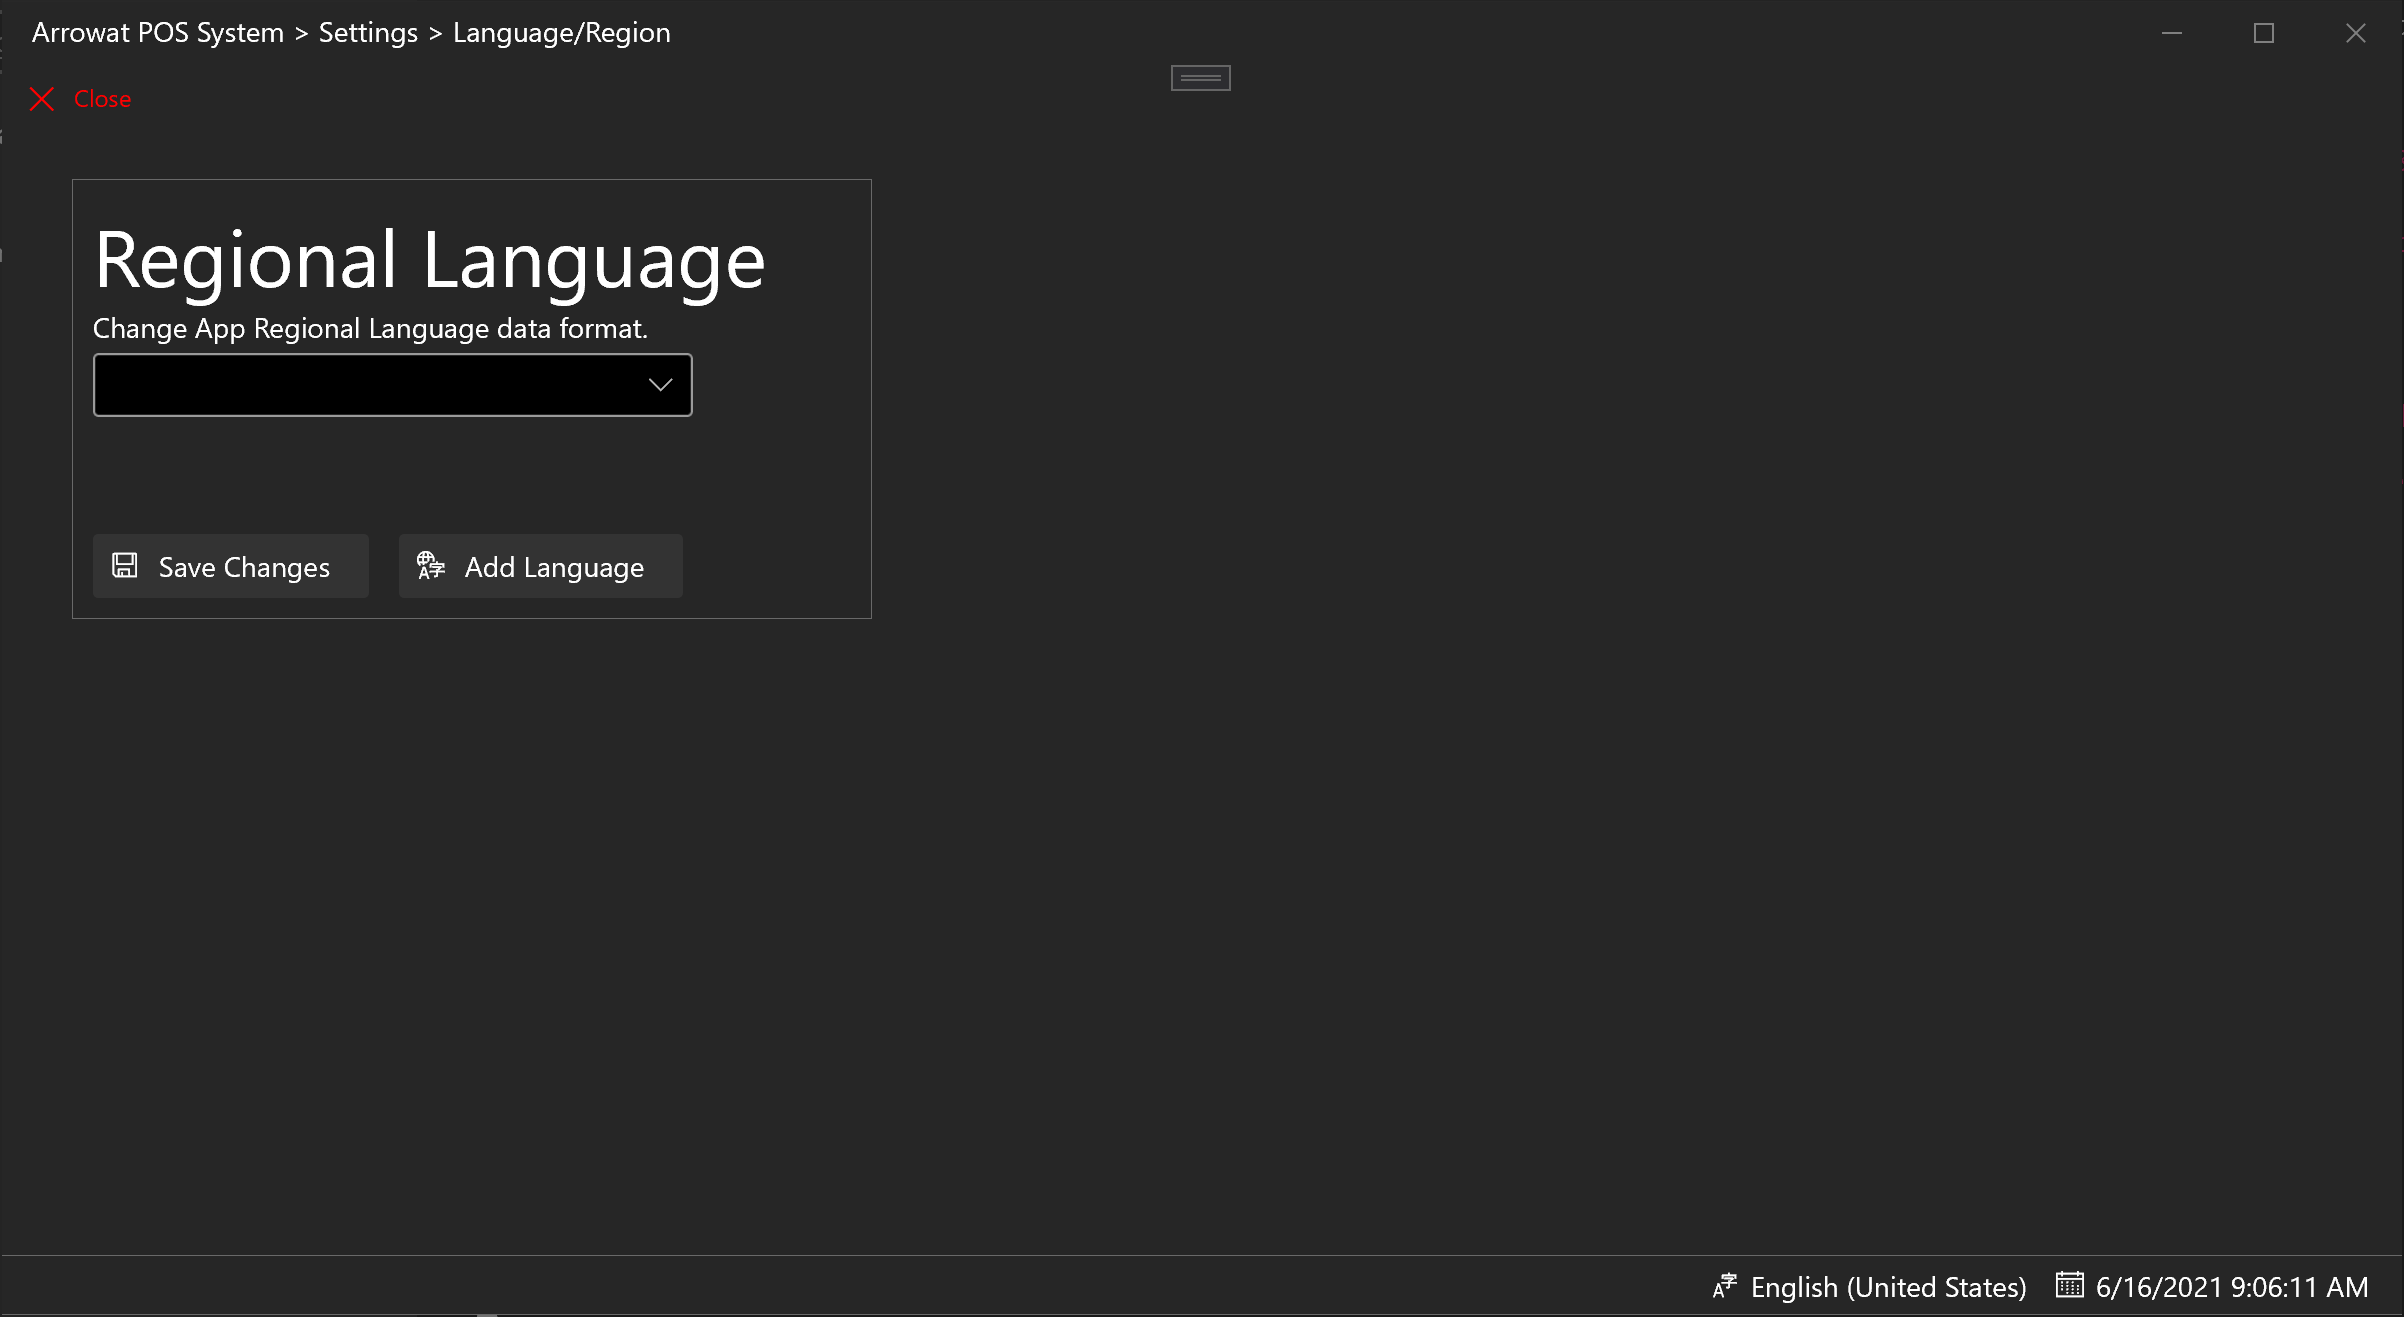
The Regional Language page will be shown
-
Change the Language/Region
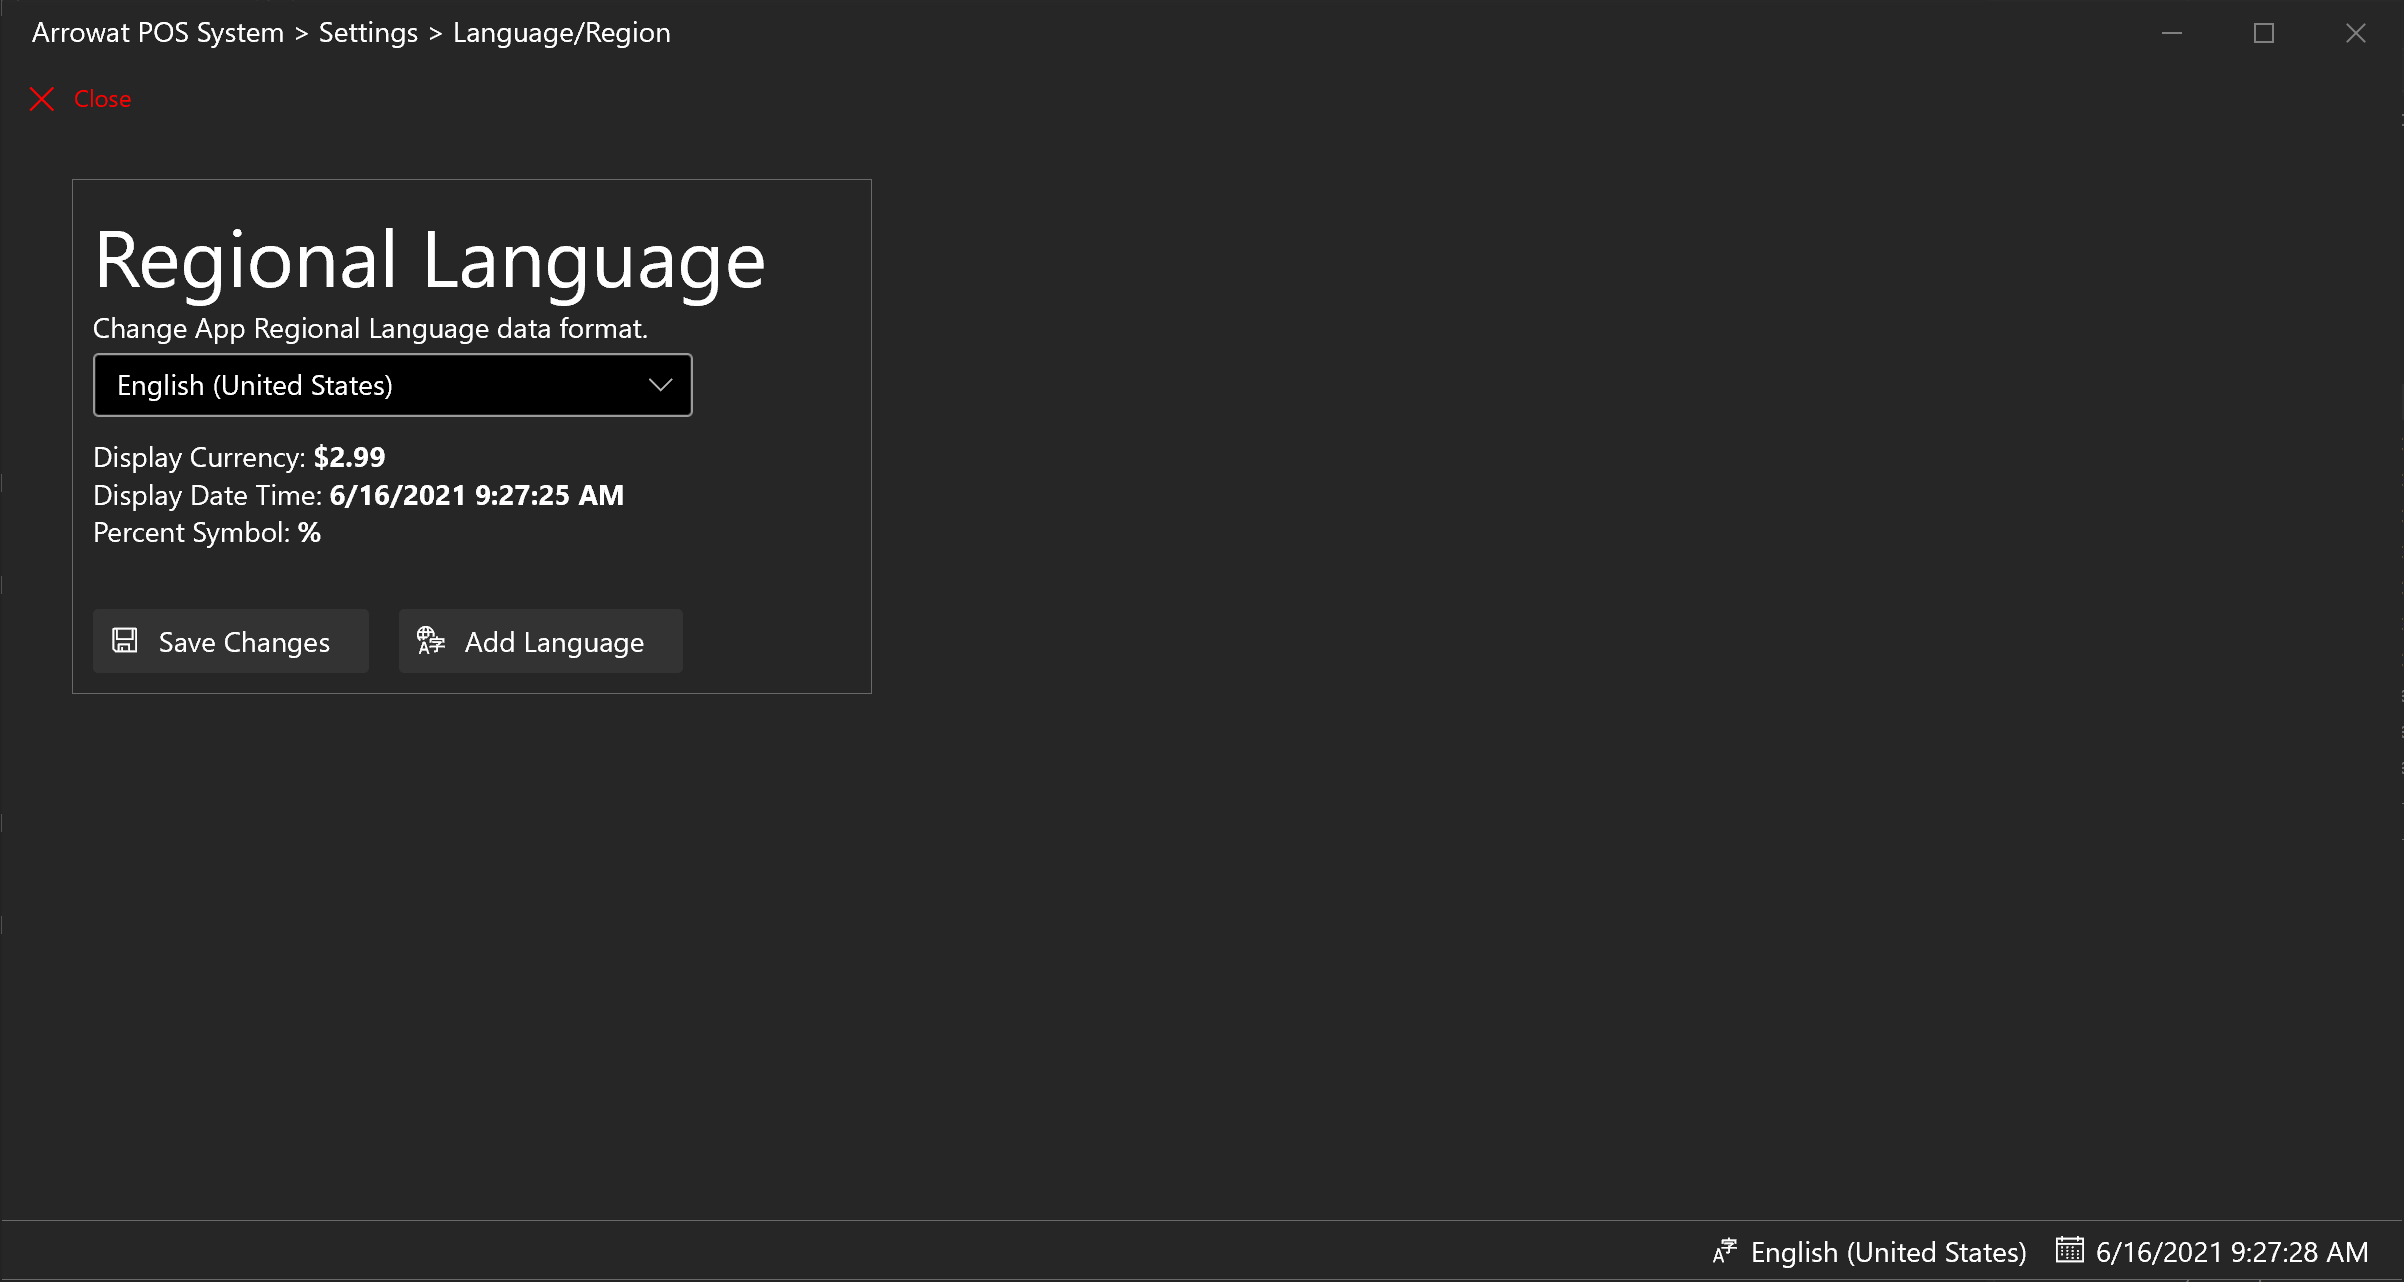
When you chage the Language/Region you will see the display data format the app will be use for currency, Date and Time format, Percent Symbol.
- Select a Language data from the dropdown list
- click Save Changes Button
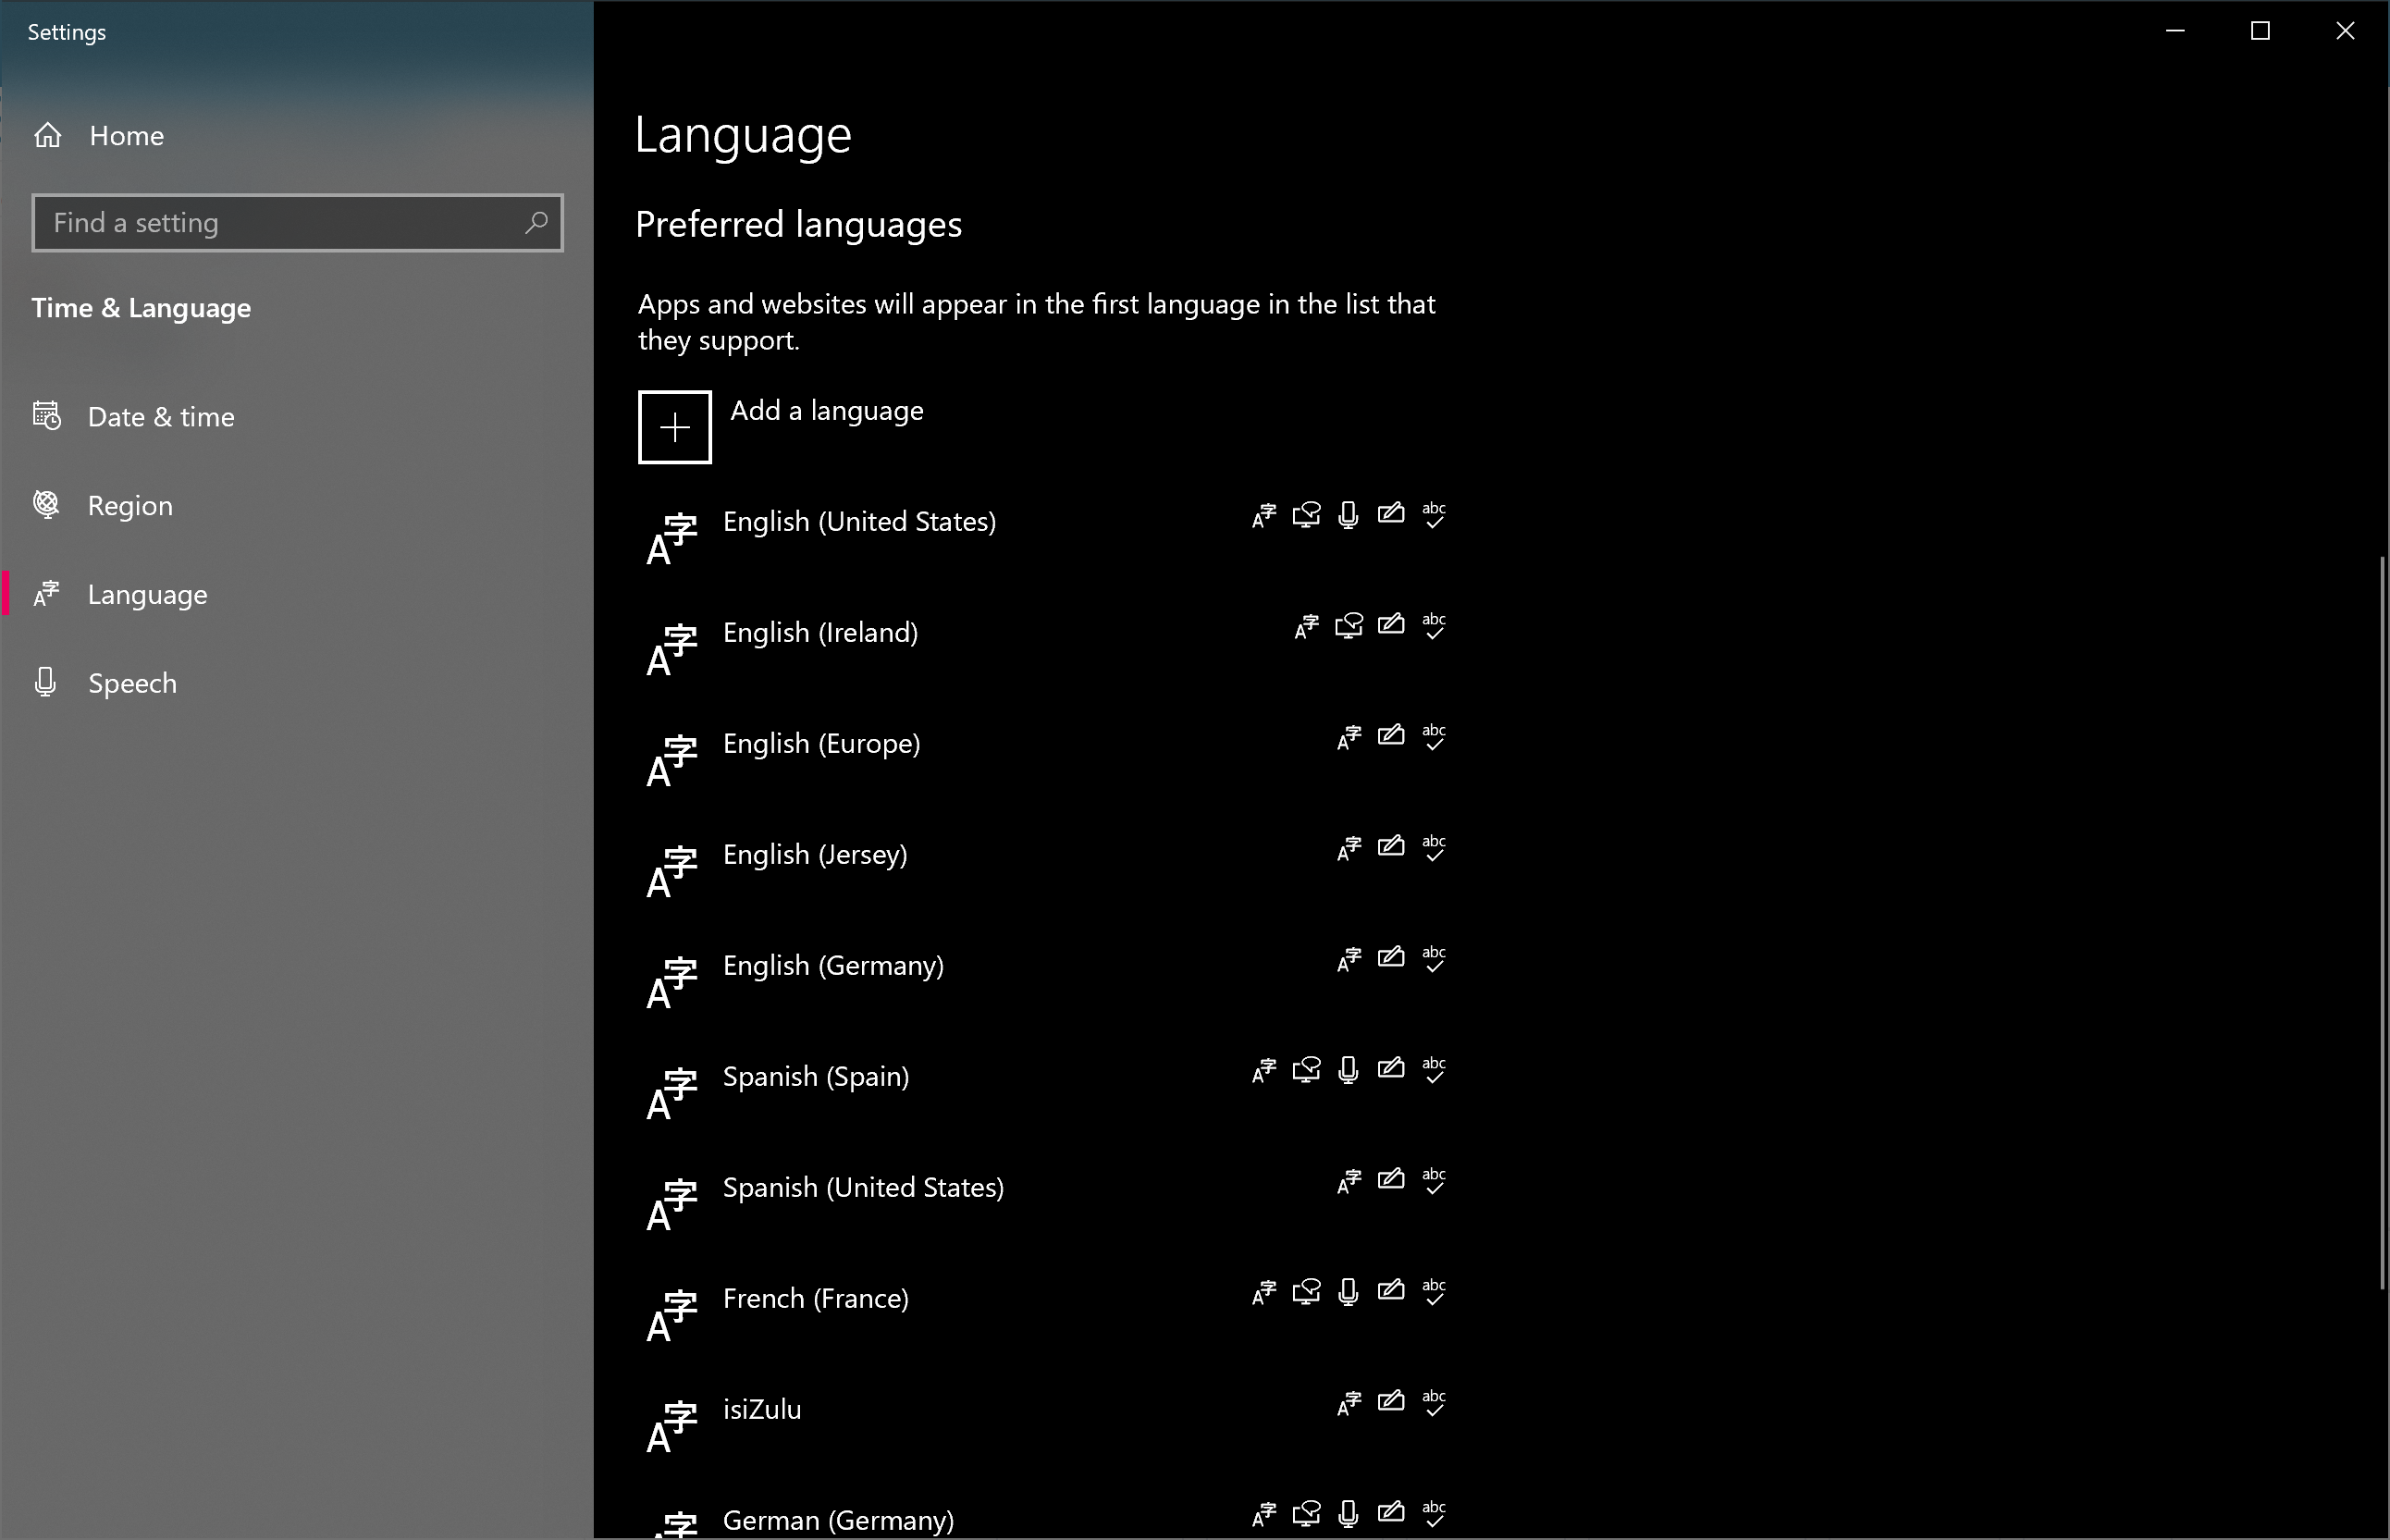
Languages Added to list.
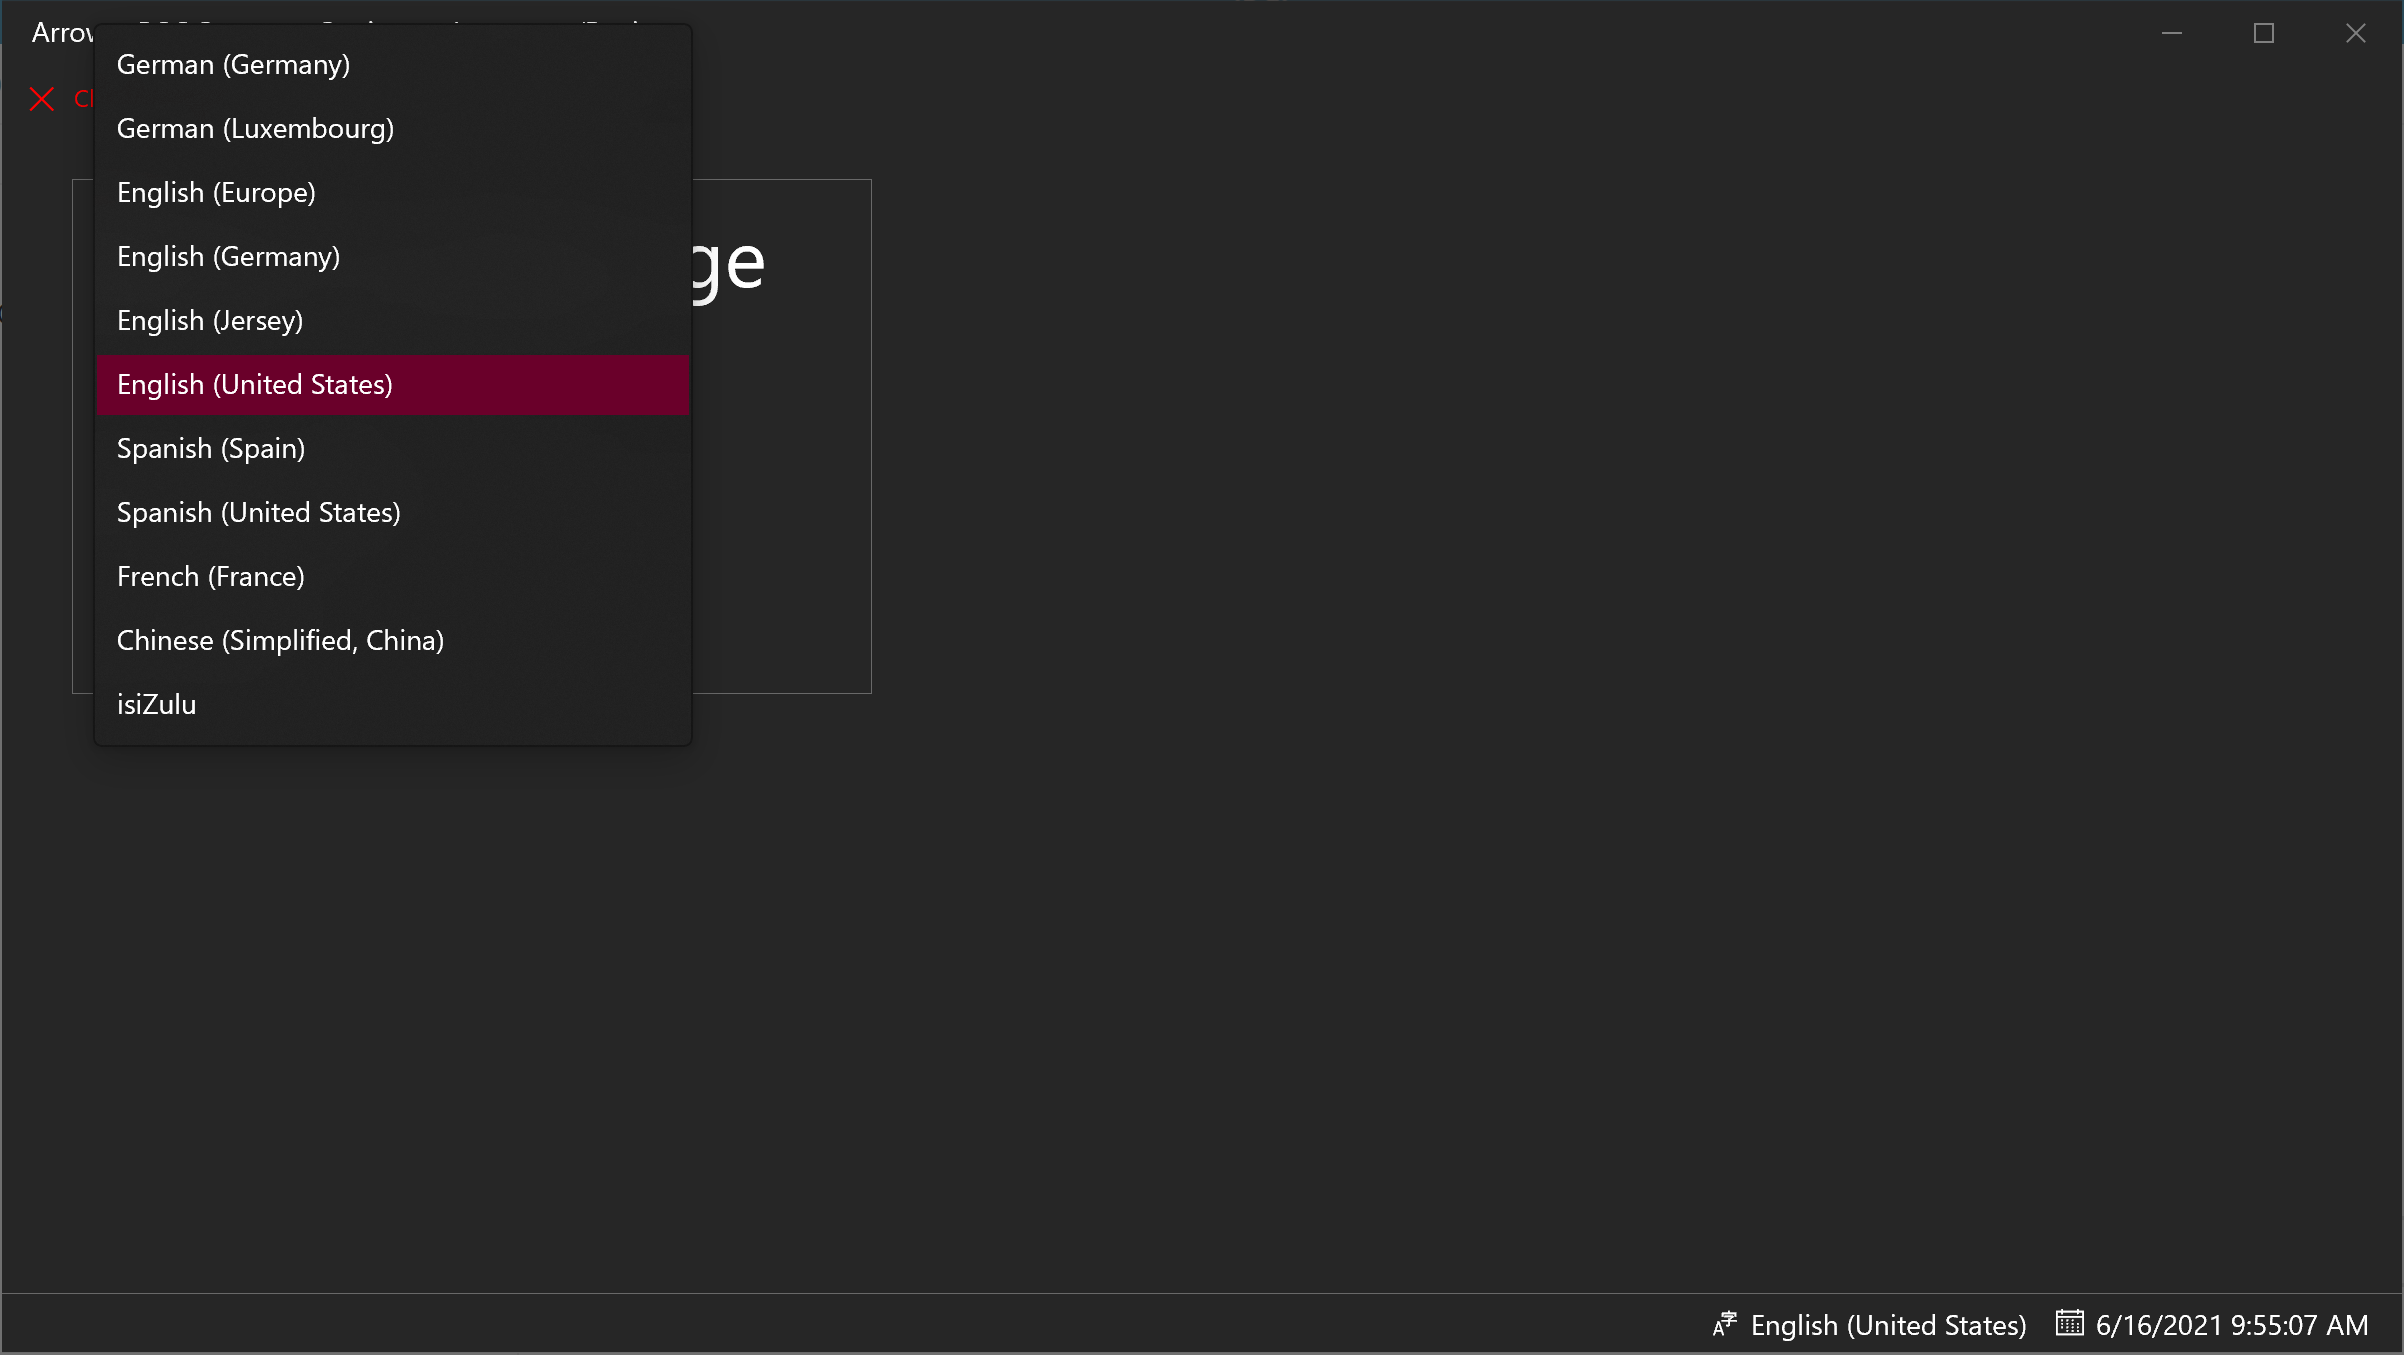
If you select English(United States) you will see.
If you select Germany(Germany) you will see.
If you select Chinese(Simplified, China) you will see.

-
Add Language
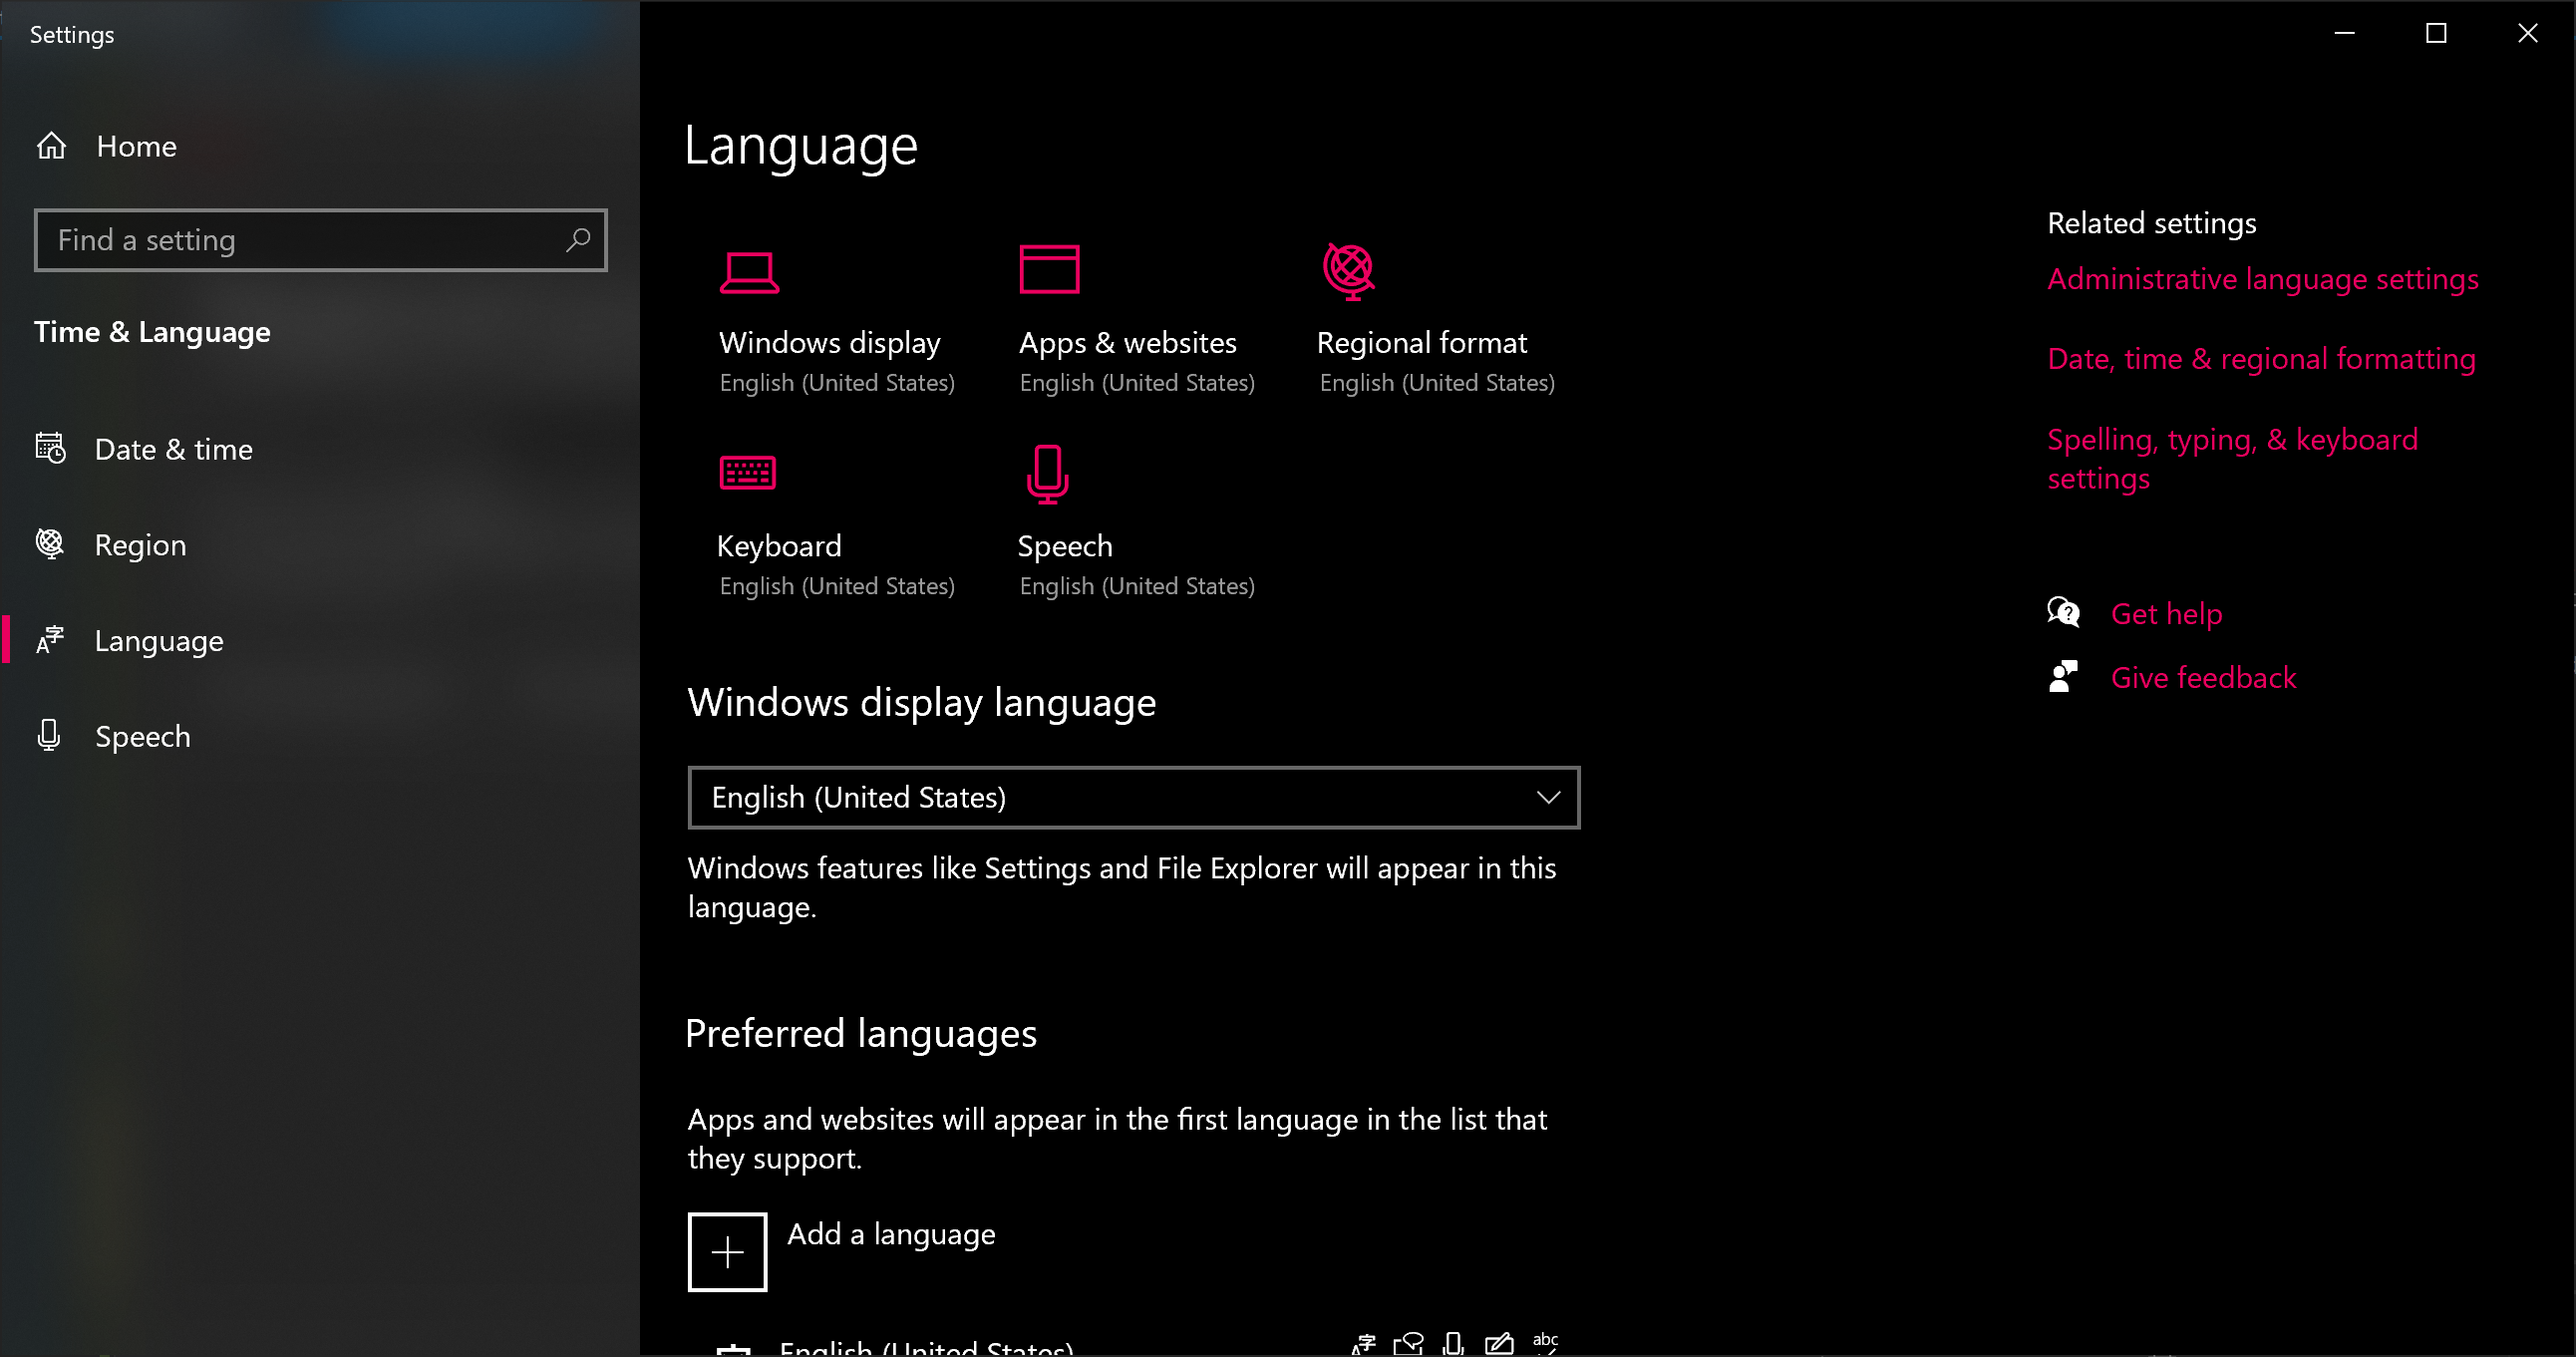
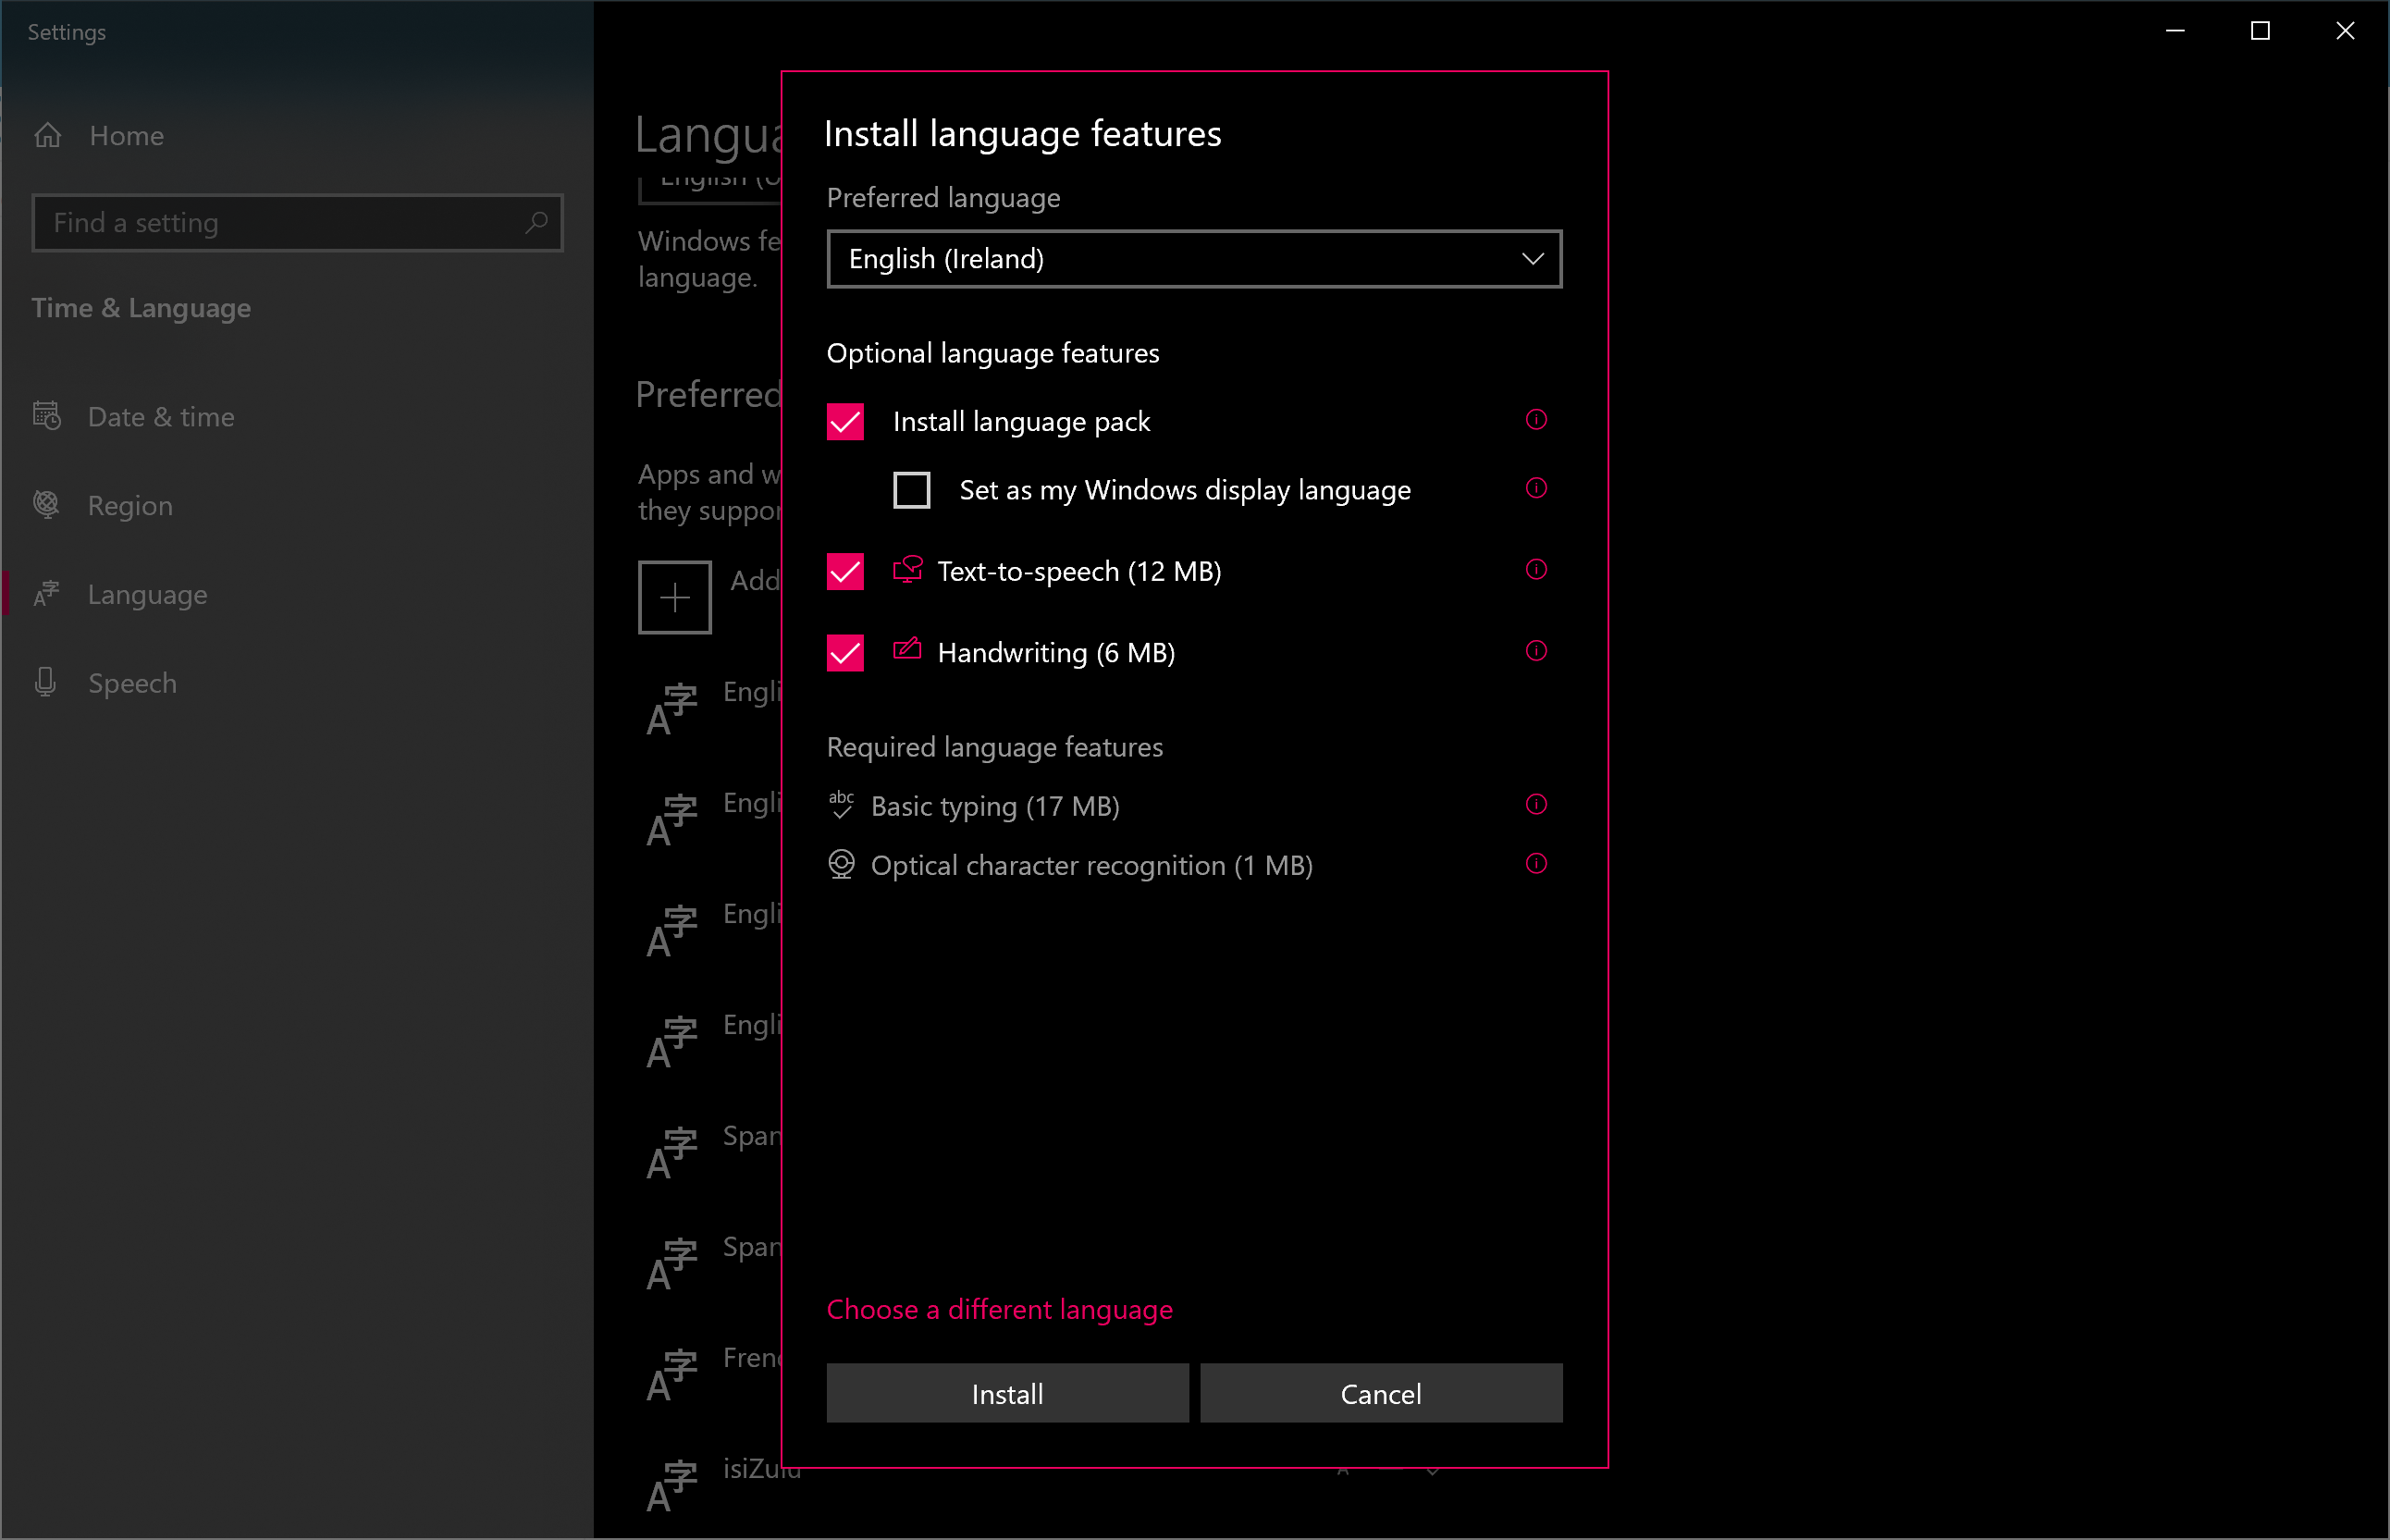
Some of the languages shown above are examples how the data is displayed. If you want to test that you need to download the languages to your computer. of course You don't need to have languages you wont use. however we need to explain how the language and regional data format works on Arrowat POS System without changing it directly from your operating system. you only need to download the language you want to use on Arrowat POS System to display the data. Follow the next step to download a language to your computer, after you download a language you need to reload Arrowat POS System app by closing it and open again.
-
Click Add Language Button
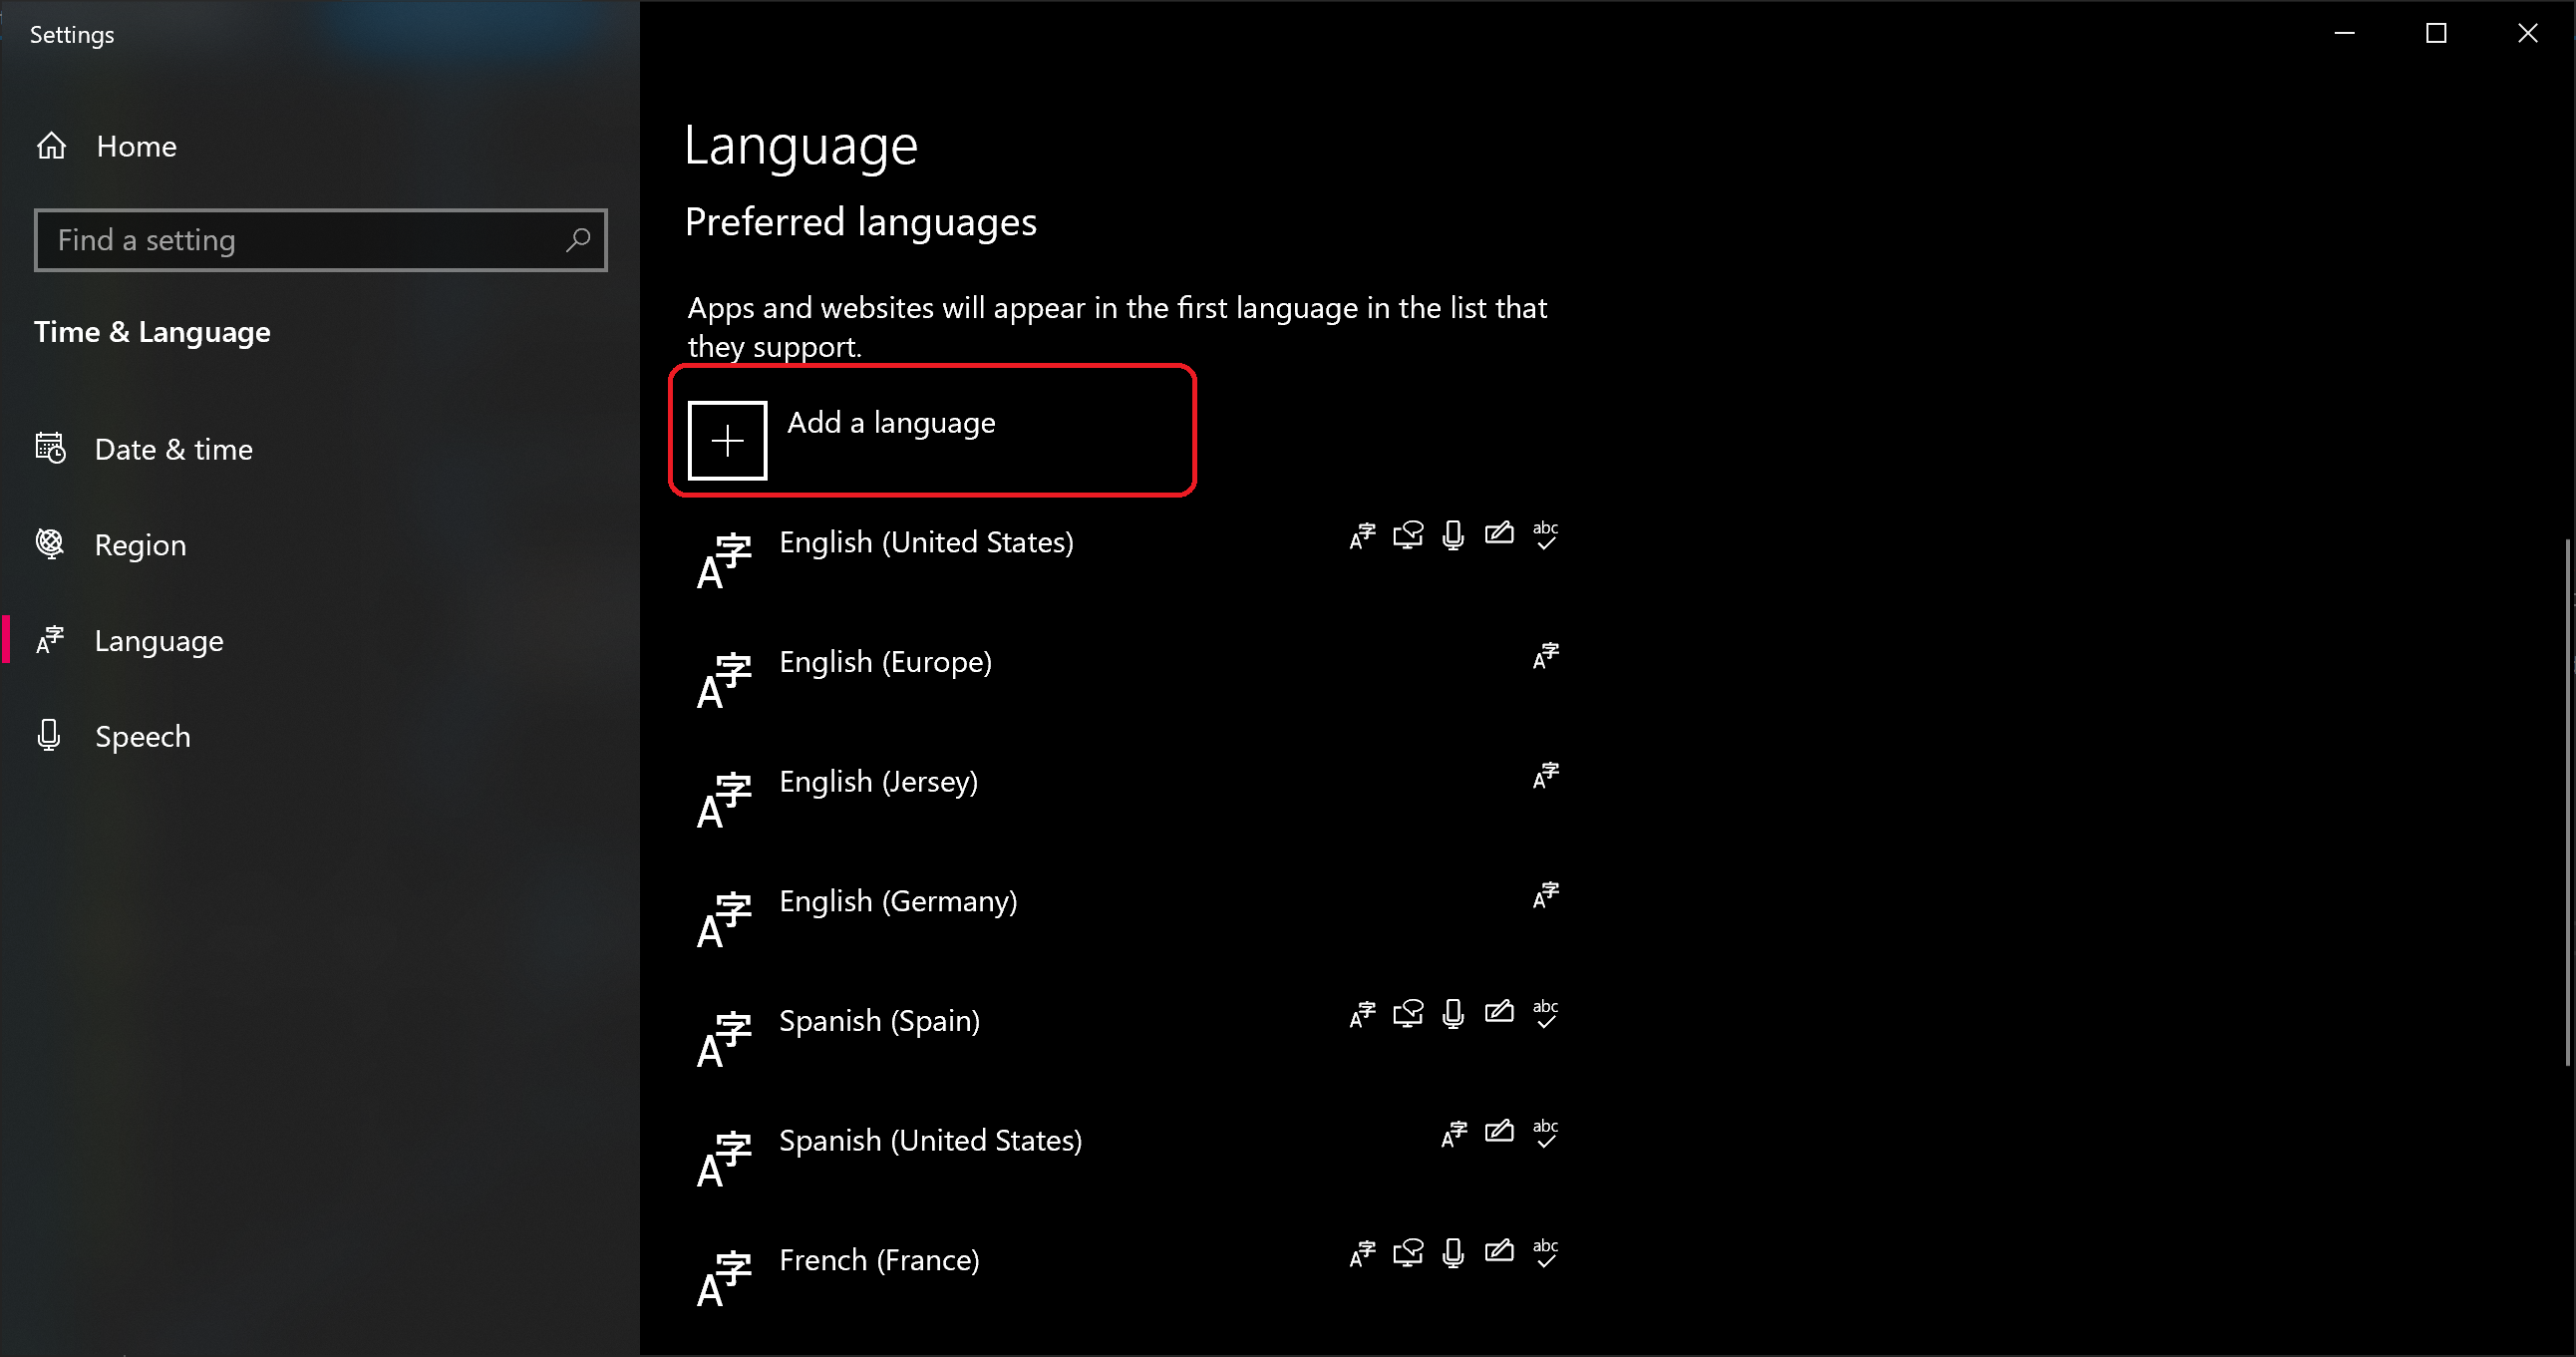
The Setting Languages from your operating system will be open, Scroll down to Preferred Languages section
-
Click Add Language
-
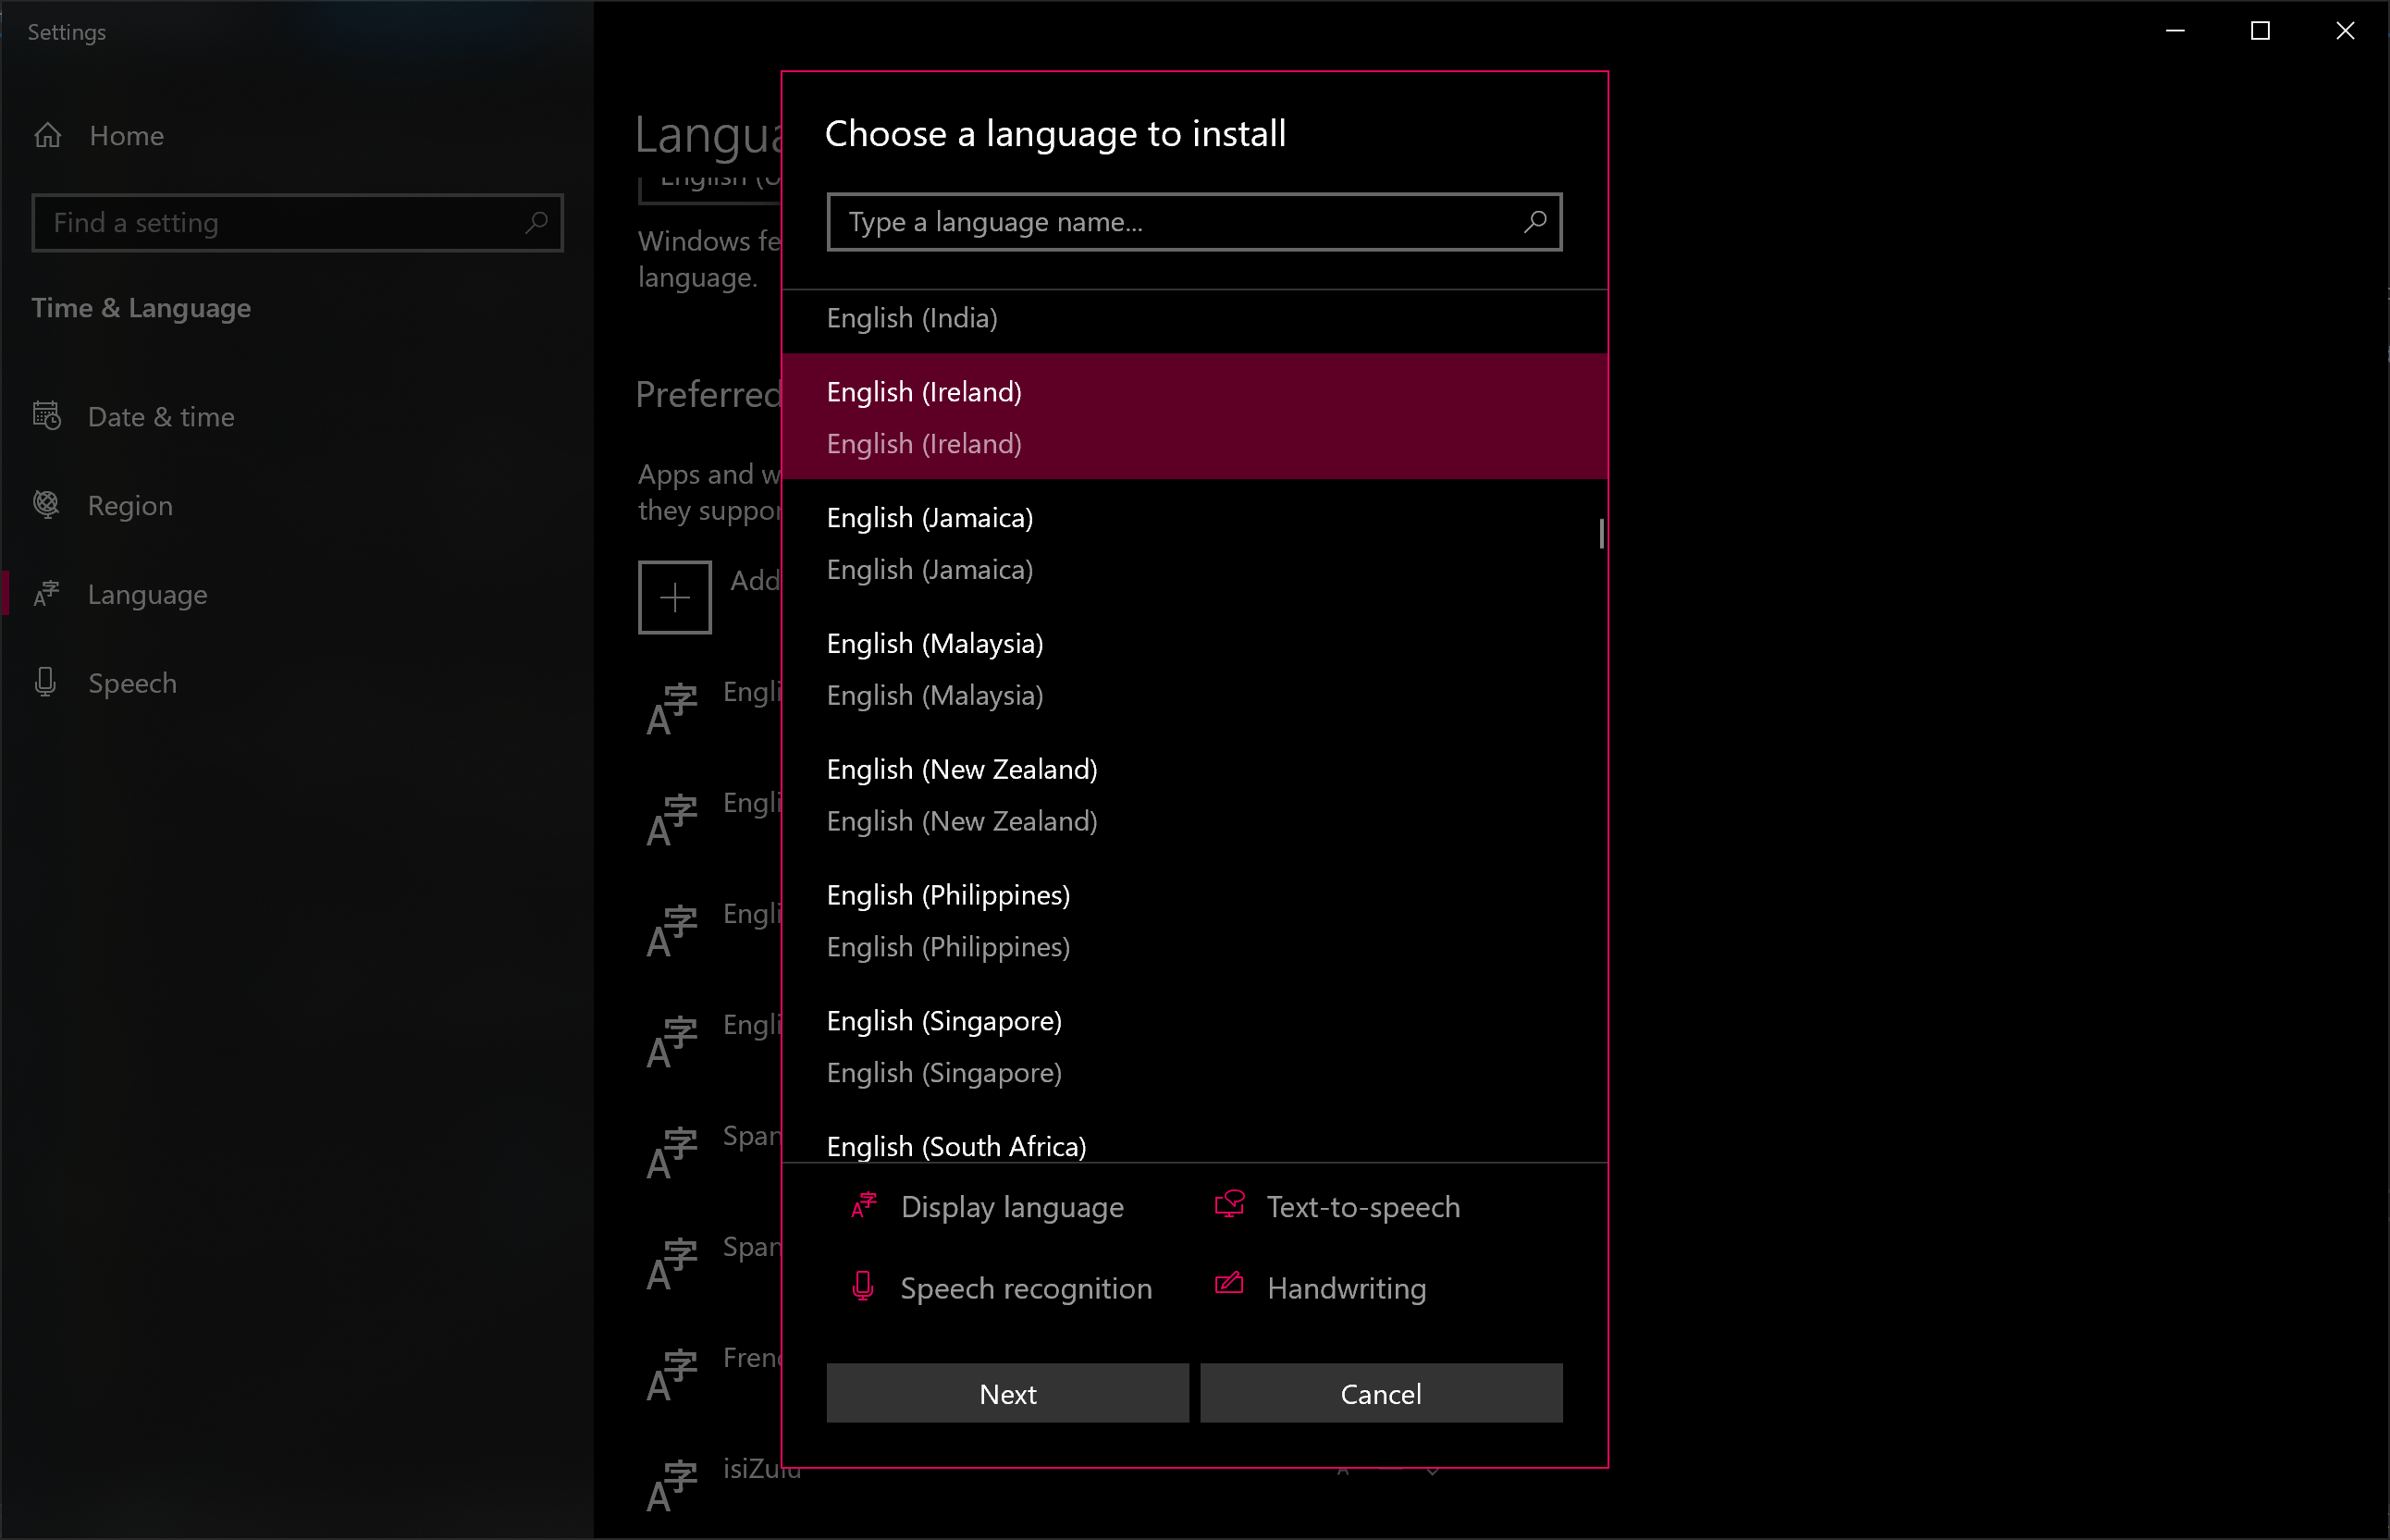
Select or Search the language you want to install and Click Next Button

-
Click Install Button
-
Click Add Language Button
- Go to Arrowat POS System and close the app
- Open Arrowat POS System
- Click Settings > Language/Region
- Select the language you downloaded
-
Click Save Changes Button
-
Important: Once you started to add data to Arrowat POS System and you want to change the language data format, the best way is to start the app refreshed (uninstalling and installing it make sure you have backed up the database) because the data is interpreted as diferent value like '$2.99' and '2,99 €'
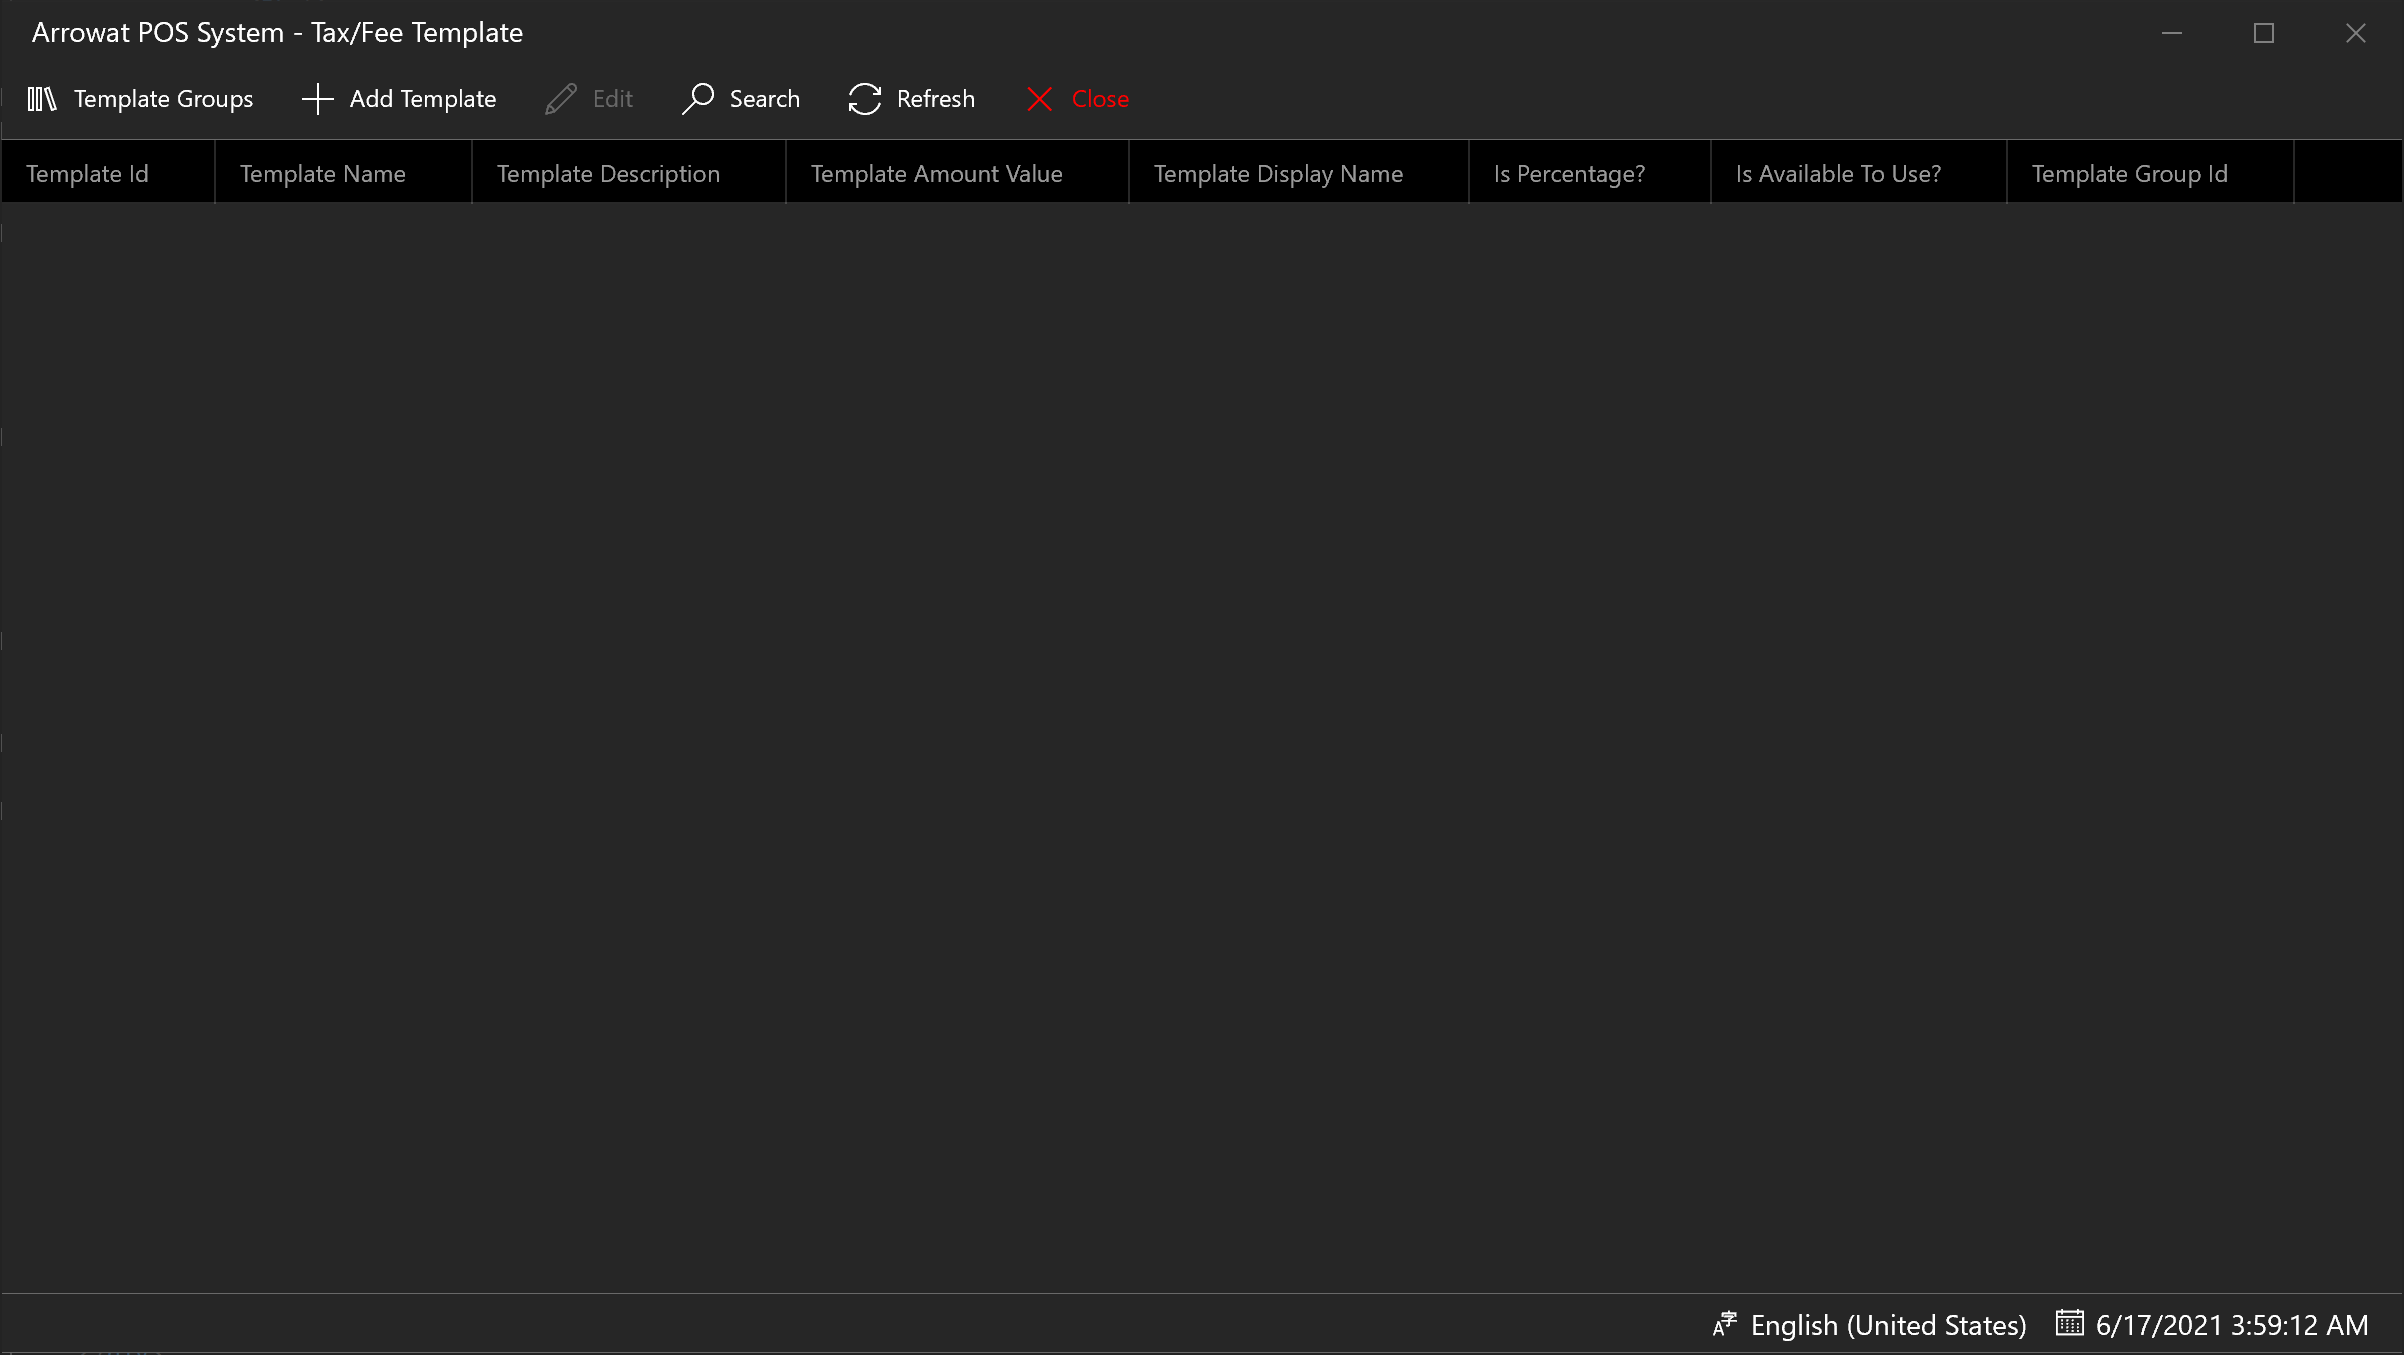
Tax/Fee Templates
Arrowat POS System provides a Tax/Fee template, this template is useful when the product has tax or fee amount the value can be percent (%) or fixed amount like 20% tax or 0.10 fee value.
in most cases you use tax on products like soda, cooked food, etc. fee are used when the product has extra amount of the priced item, like decoration, an example of
fee amount is: You buy a gift on a shopping store for a friend and you want to decorate it with a beautiful bag design, you pay for the product and the decoration but they charge
you a fee for decoration job, like say the gift cost $200.00 the decoration accesories cost $25.00 and the fee decoration $10.00, in most cases you need to specify it directly to the
product when the customer pays for the gift.
Having tax/fee template help you to create fee or percent to product that are on the same category. Arrowat POS System does not have limit to the template you can create. template can
have the same name with a different value, tax/fee template are added to a group of templates with a name to show to customer when the product is scanned on the POS Machine, and also when
the receipt is printed.
for example the following tax/fee template can be on the same group. the example is based on the state of California city of Los Angeles United States where the soda in bottles and cans have fee for recycling CRV.
-
CRV
- CRV 8 oz, $0.05 fee
- CRV 4PK, $0.40 fee
- CRV 12 oz, $0.10 fee
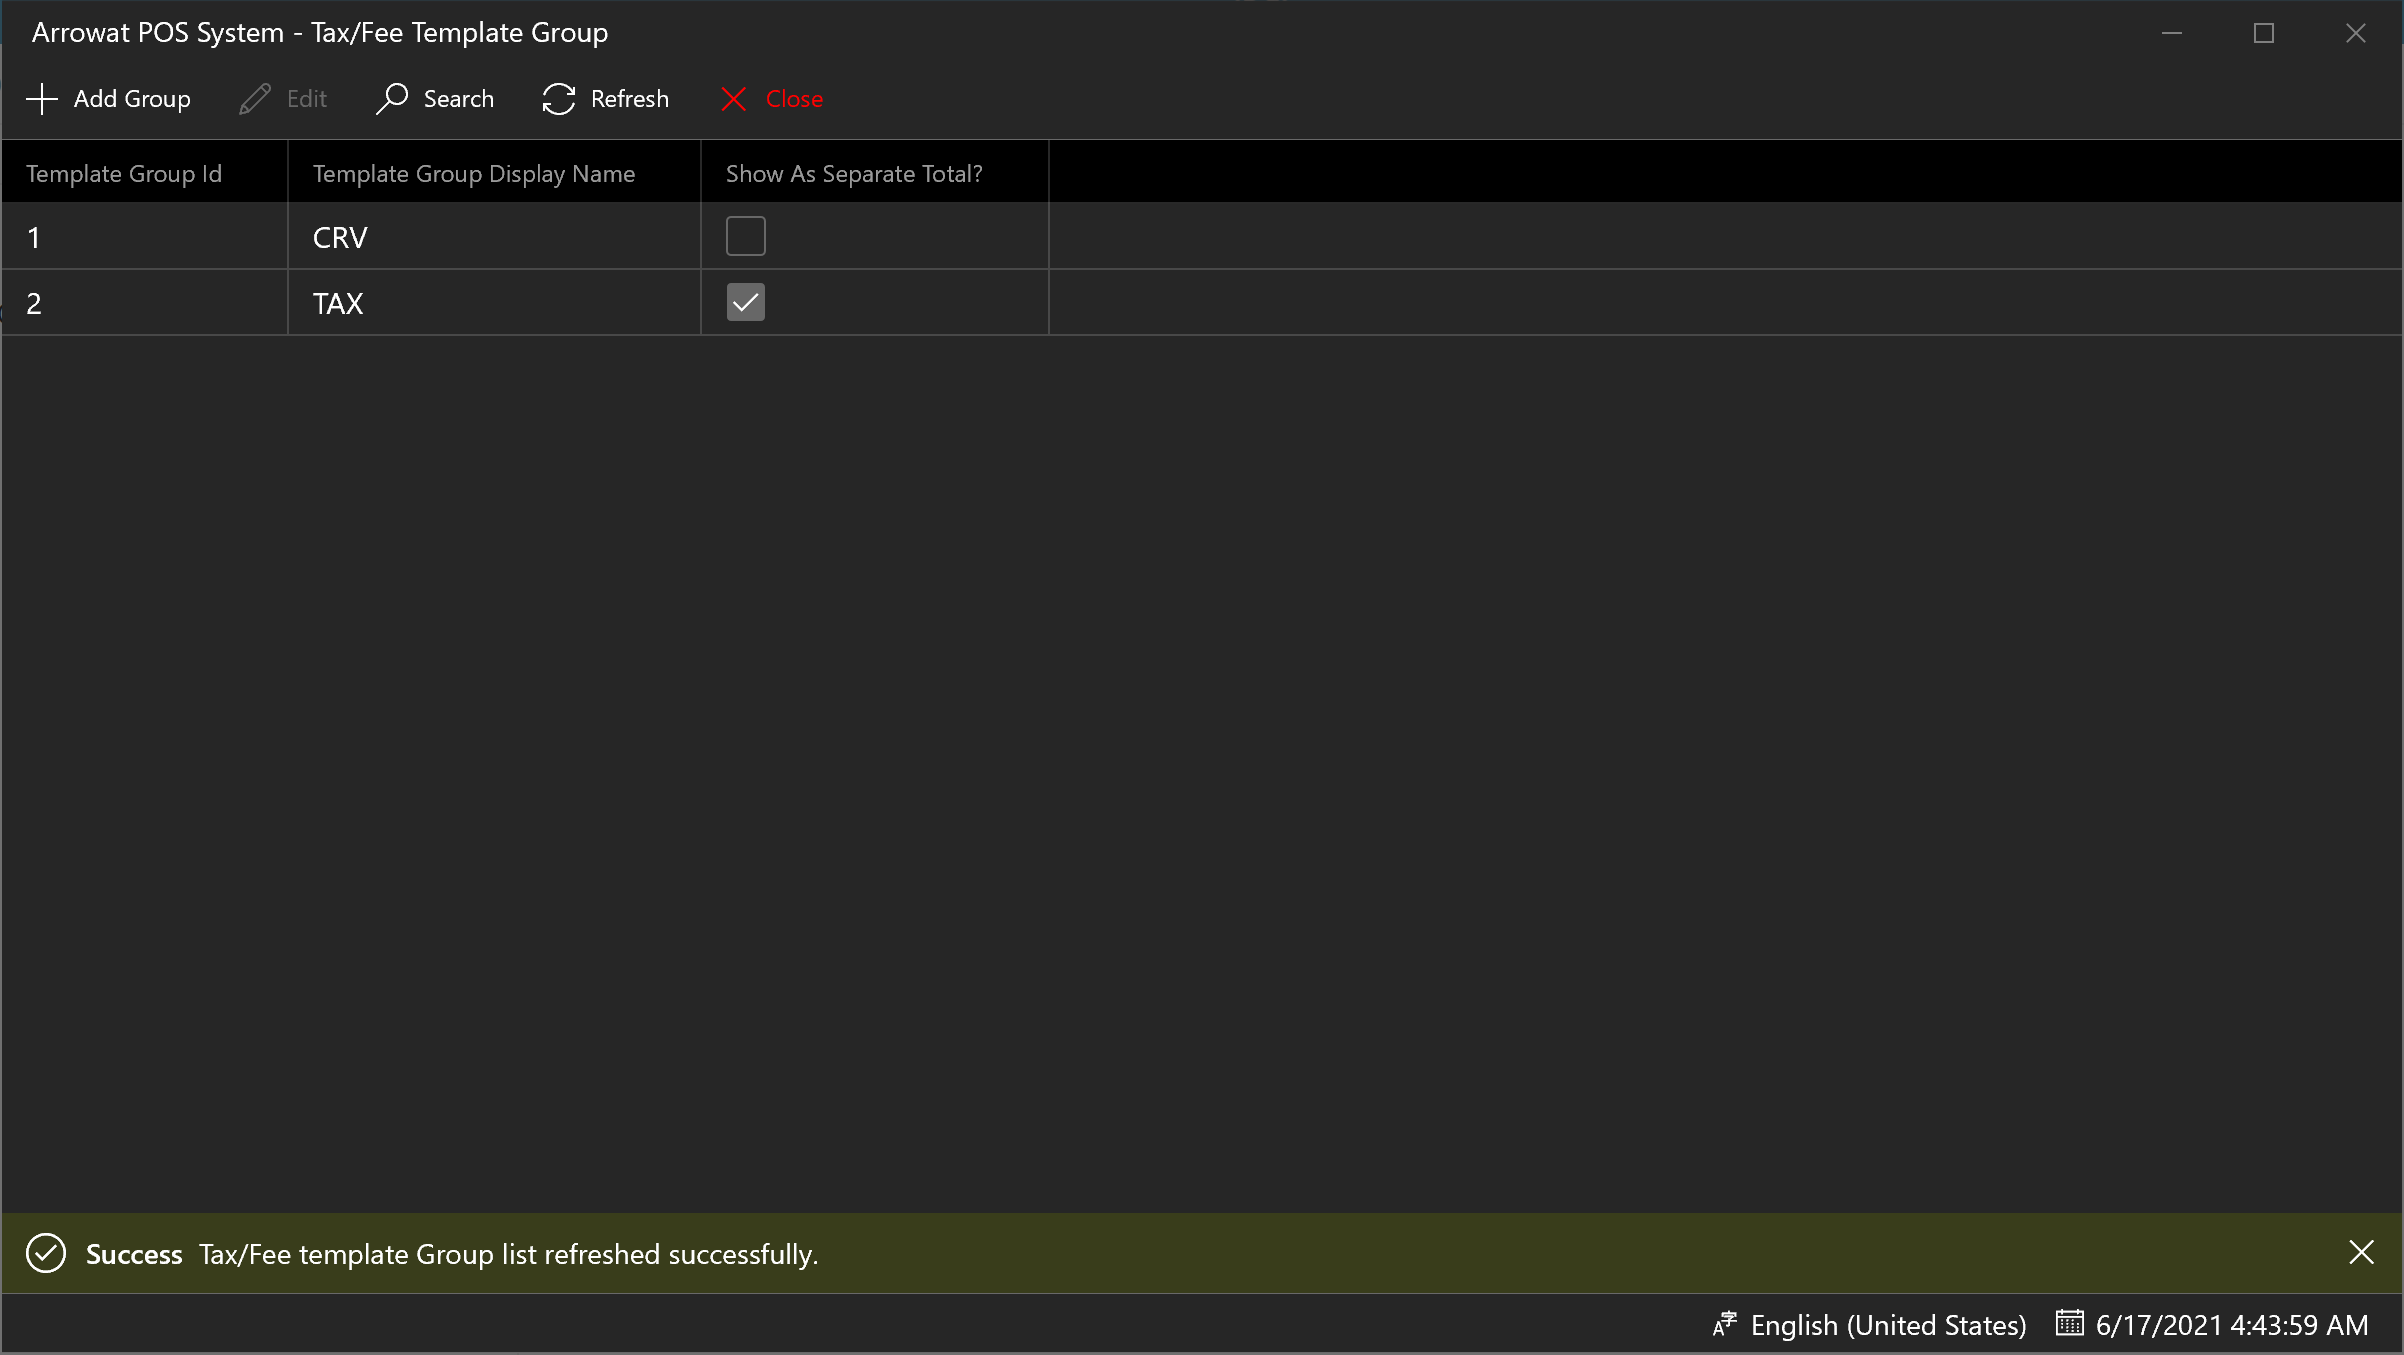
All CRV fee templates above are in the same template group because they represent the same category but not the same fee amount.
To add Tex/fee templates follow the next steps.
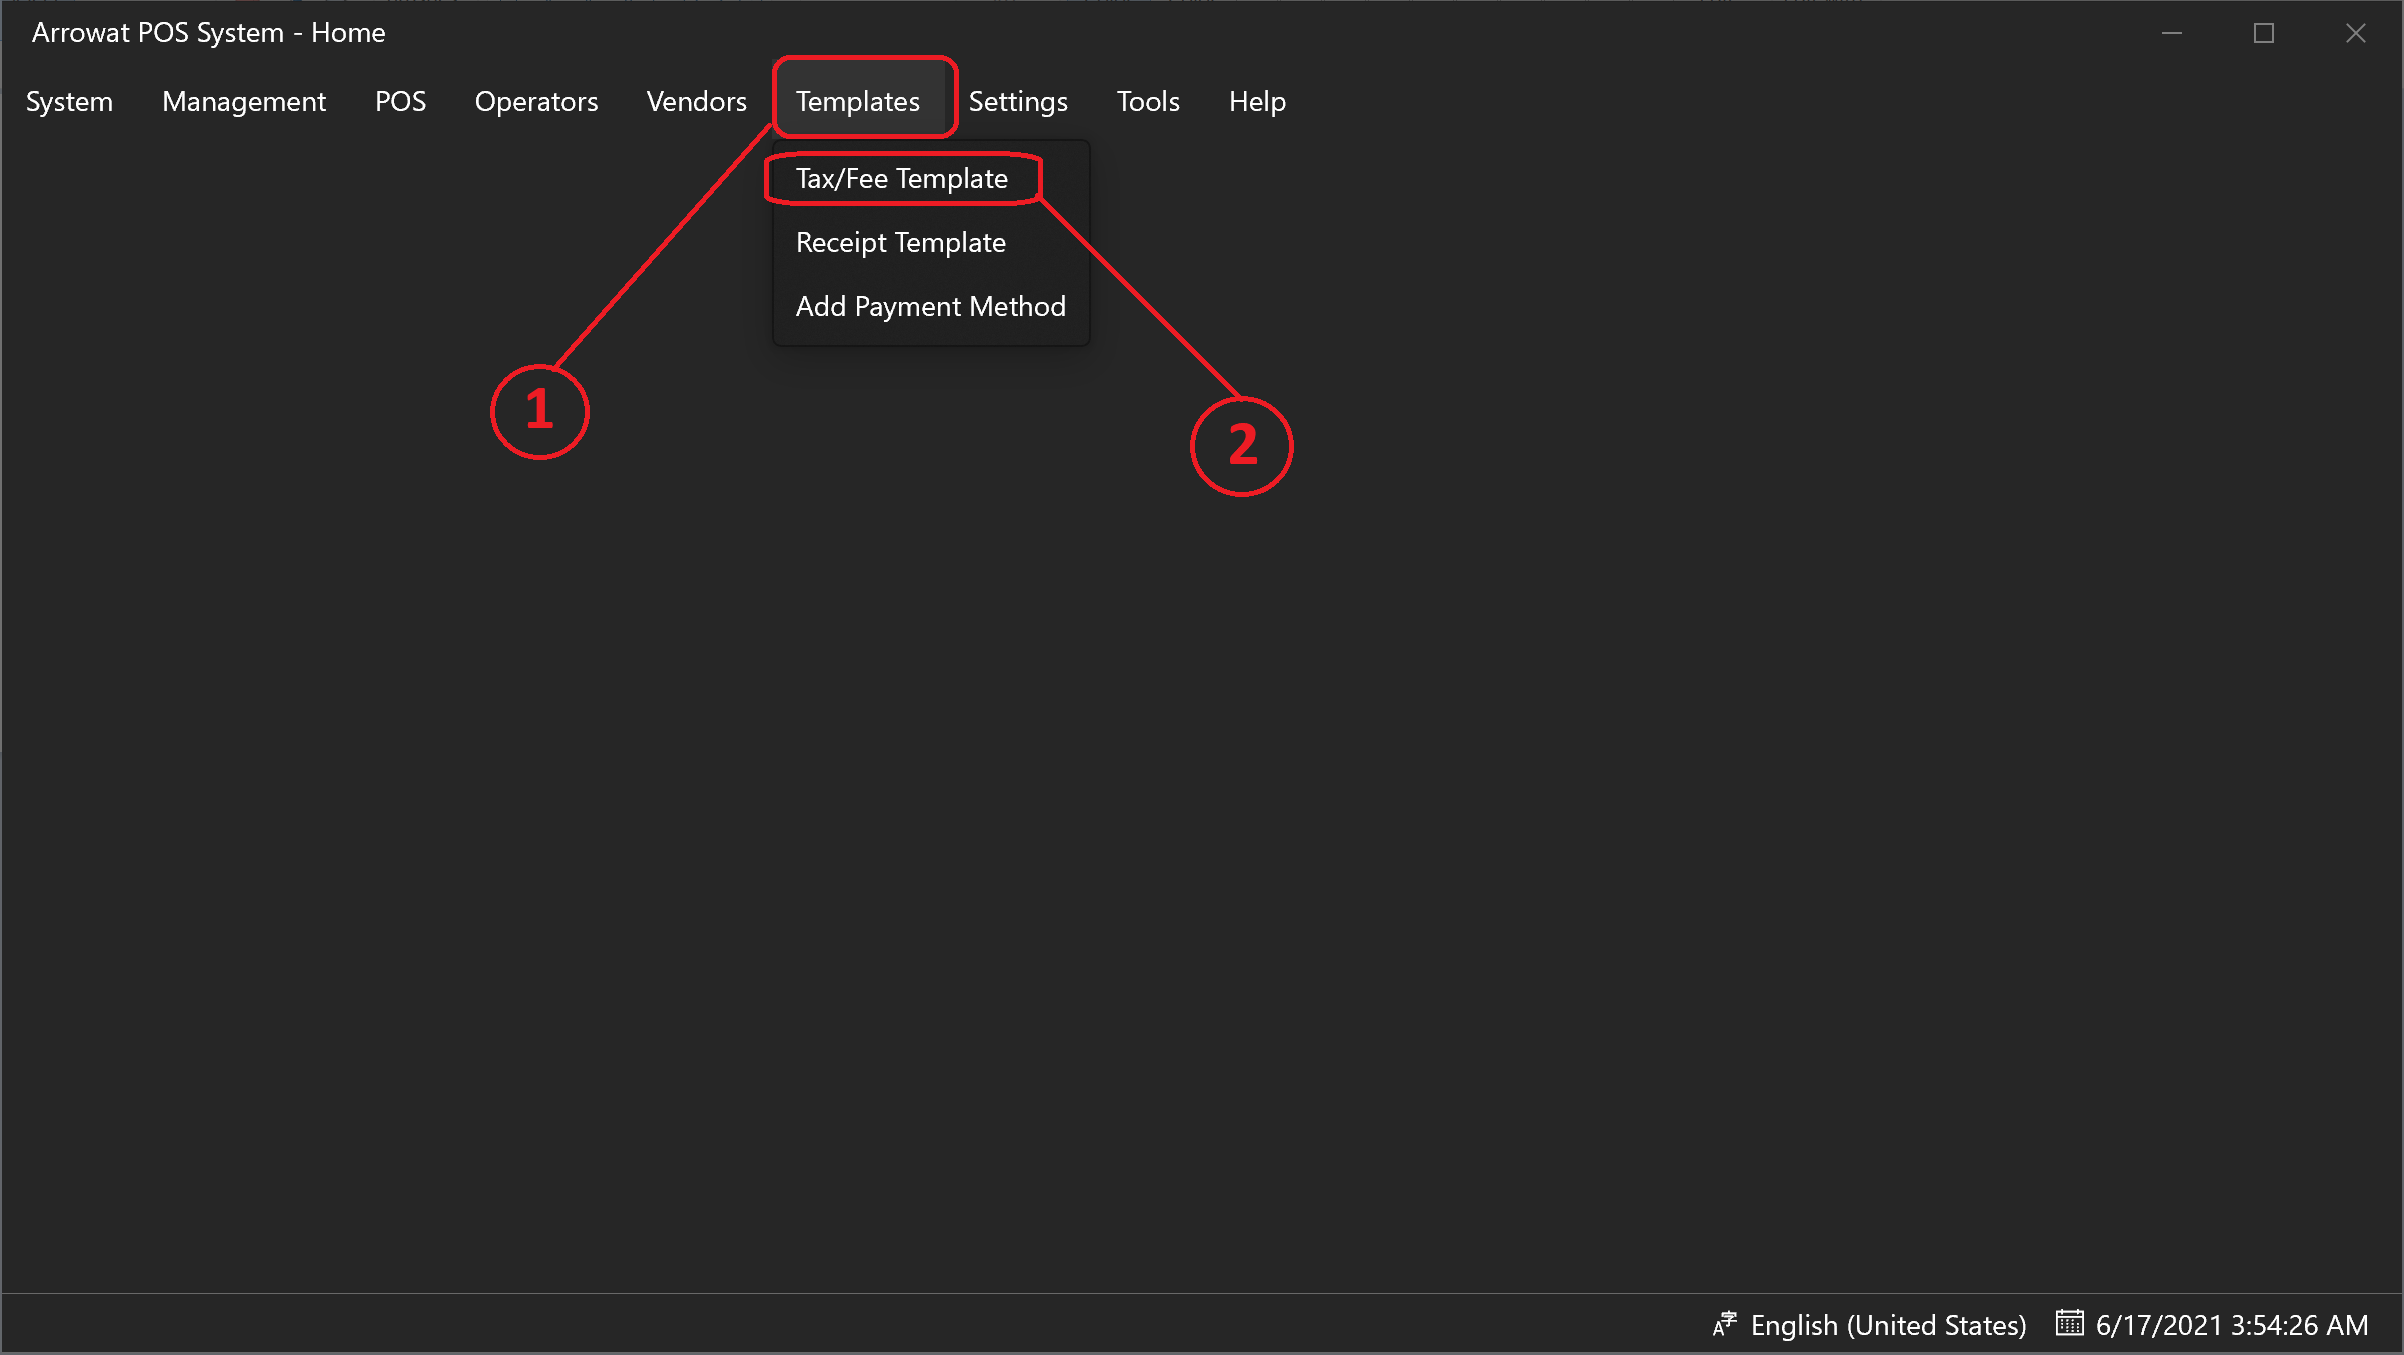
- Open Arrowat POS System
-
Click Templates > Tax/Fee Template
You will navigate to tax/fee template page
-
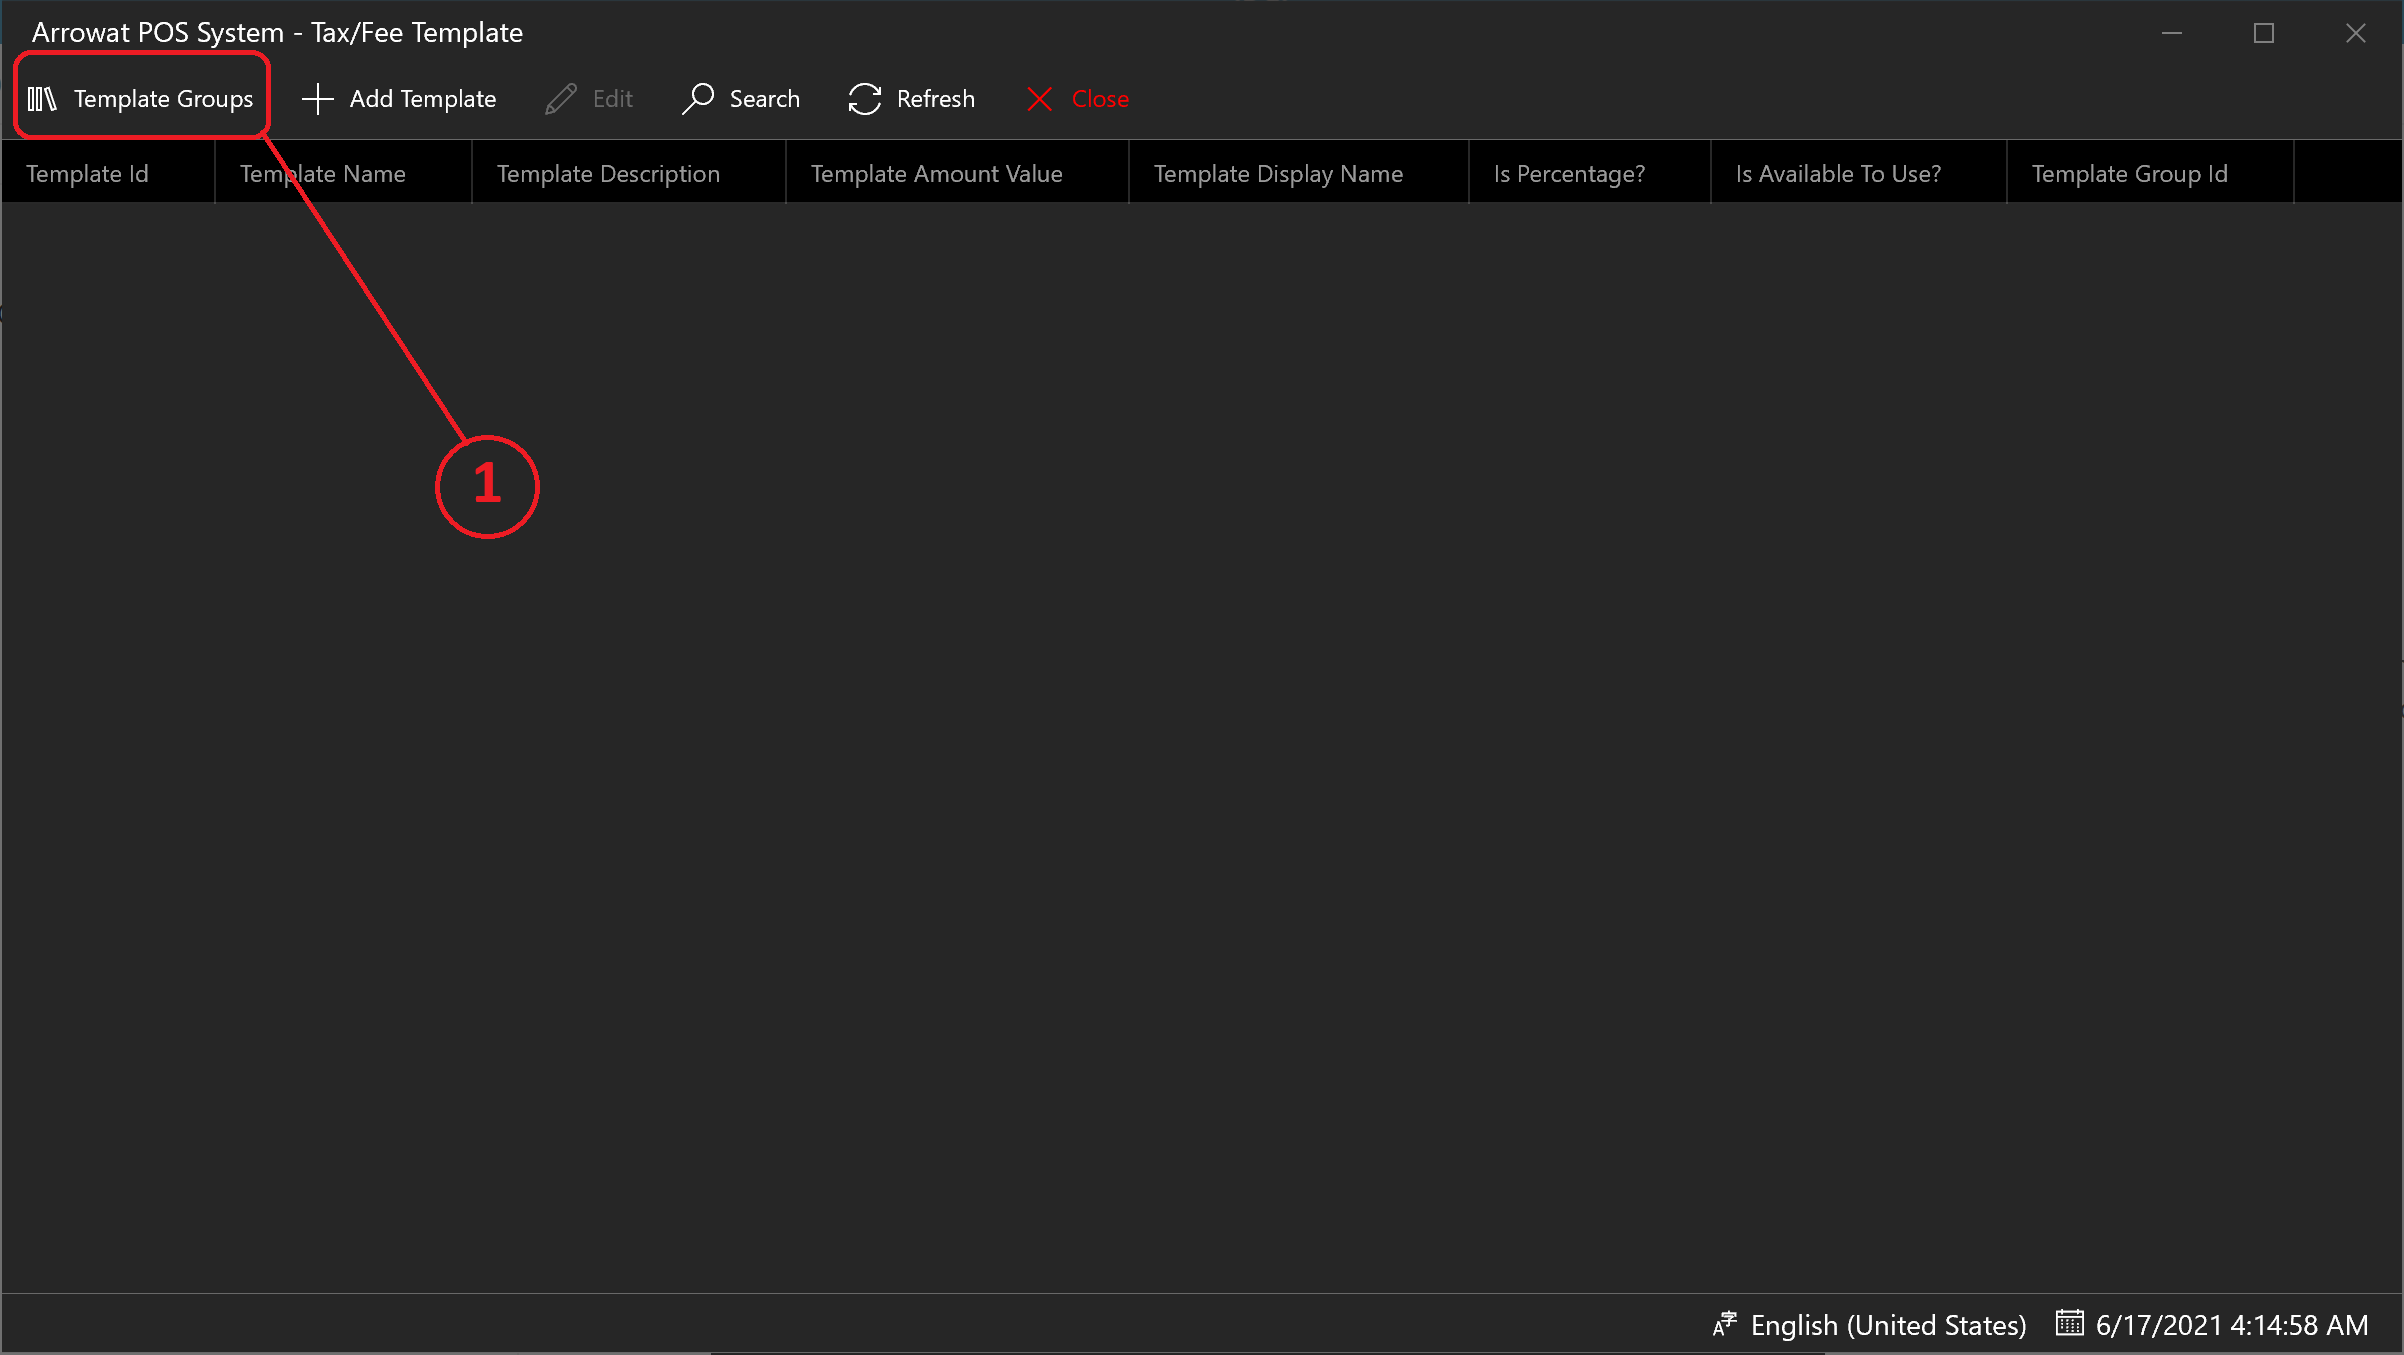
Click Template Group
As we mention earlier the tax/fee templates need to be grouped on a template name, this is because in some countries the TAX amount need to be shown as separated item on POS Screen and receipt to customers, so, when cashier scans the product and that product has tax it can be shown as separated item in the total amount on the receipt, you will see how it works on Working With POS
-
Click Add Group
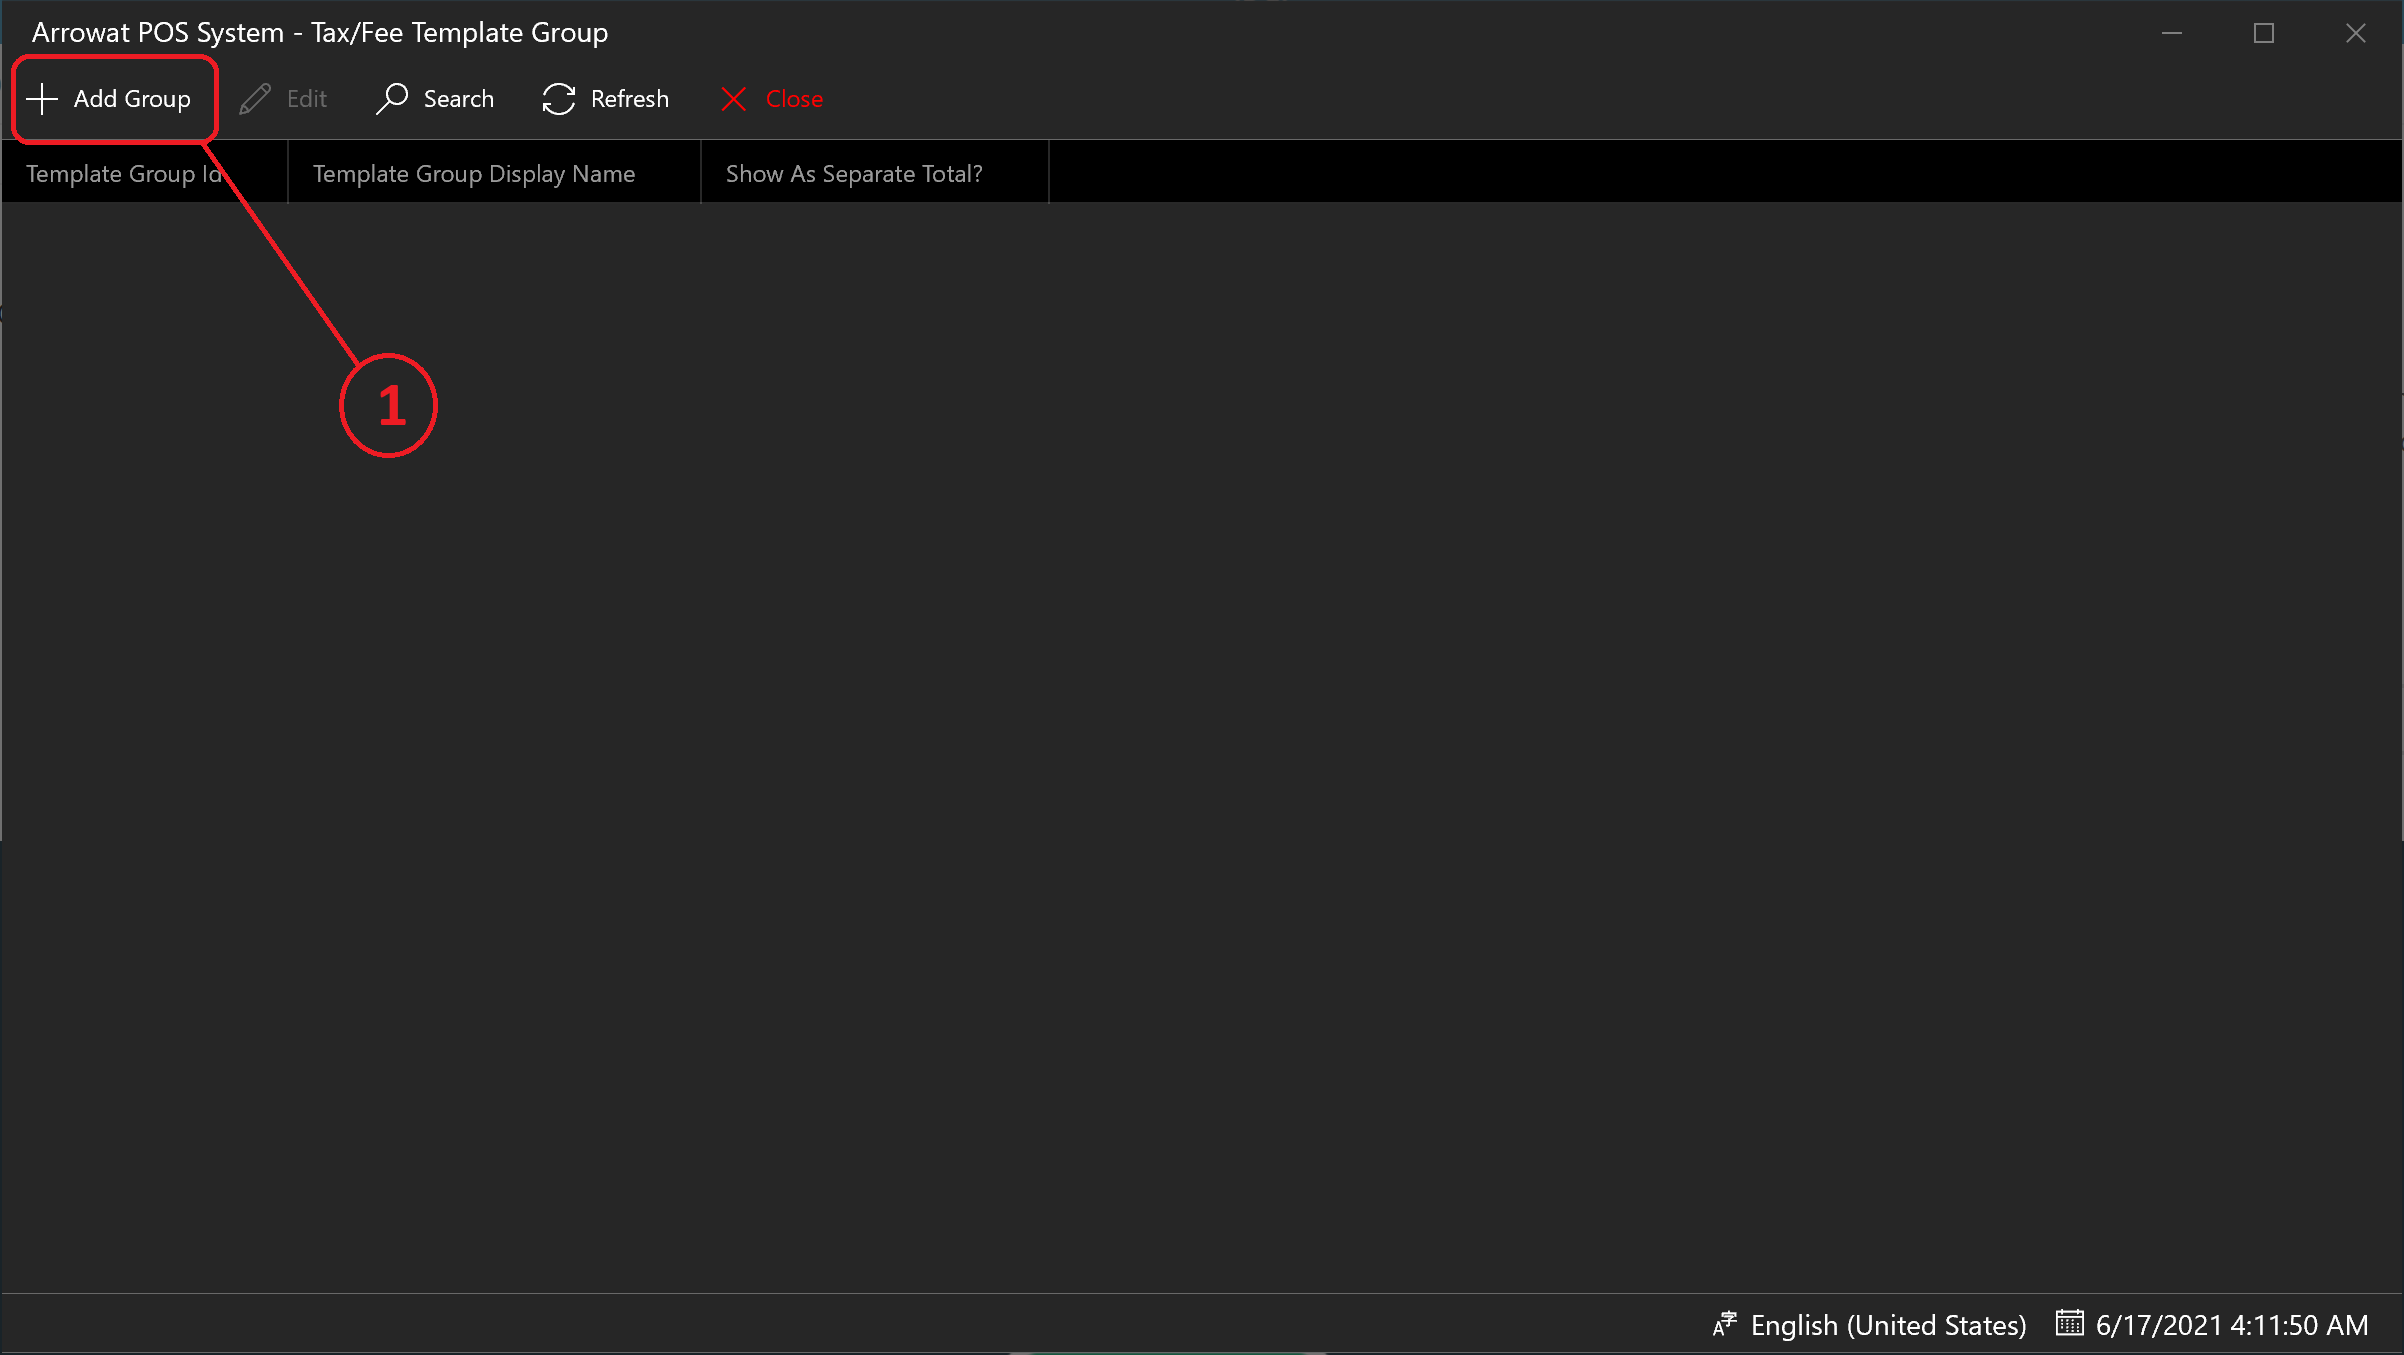
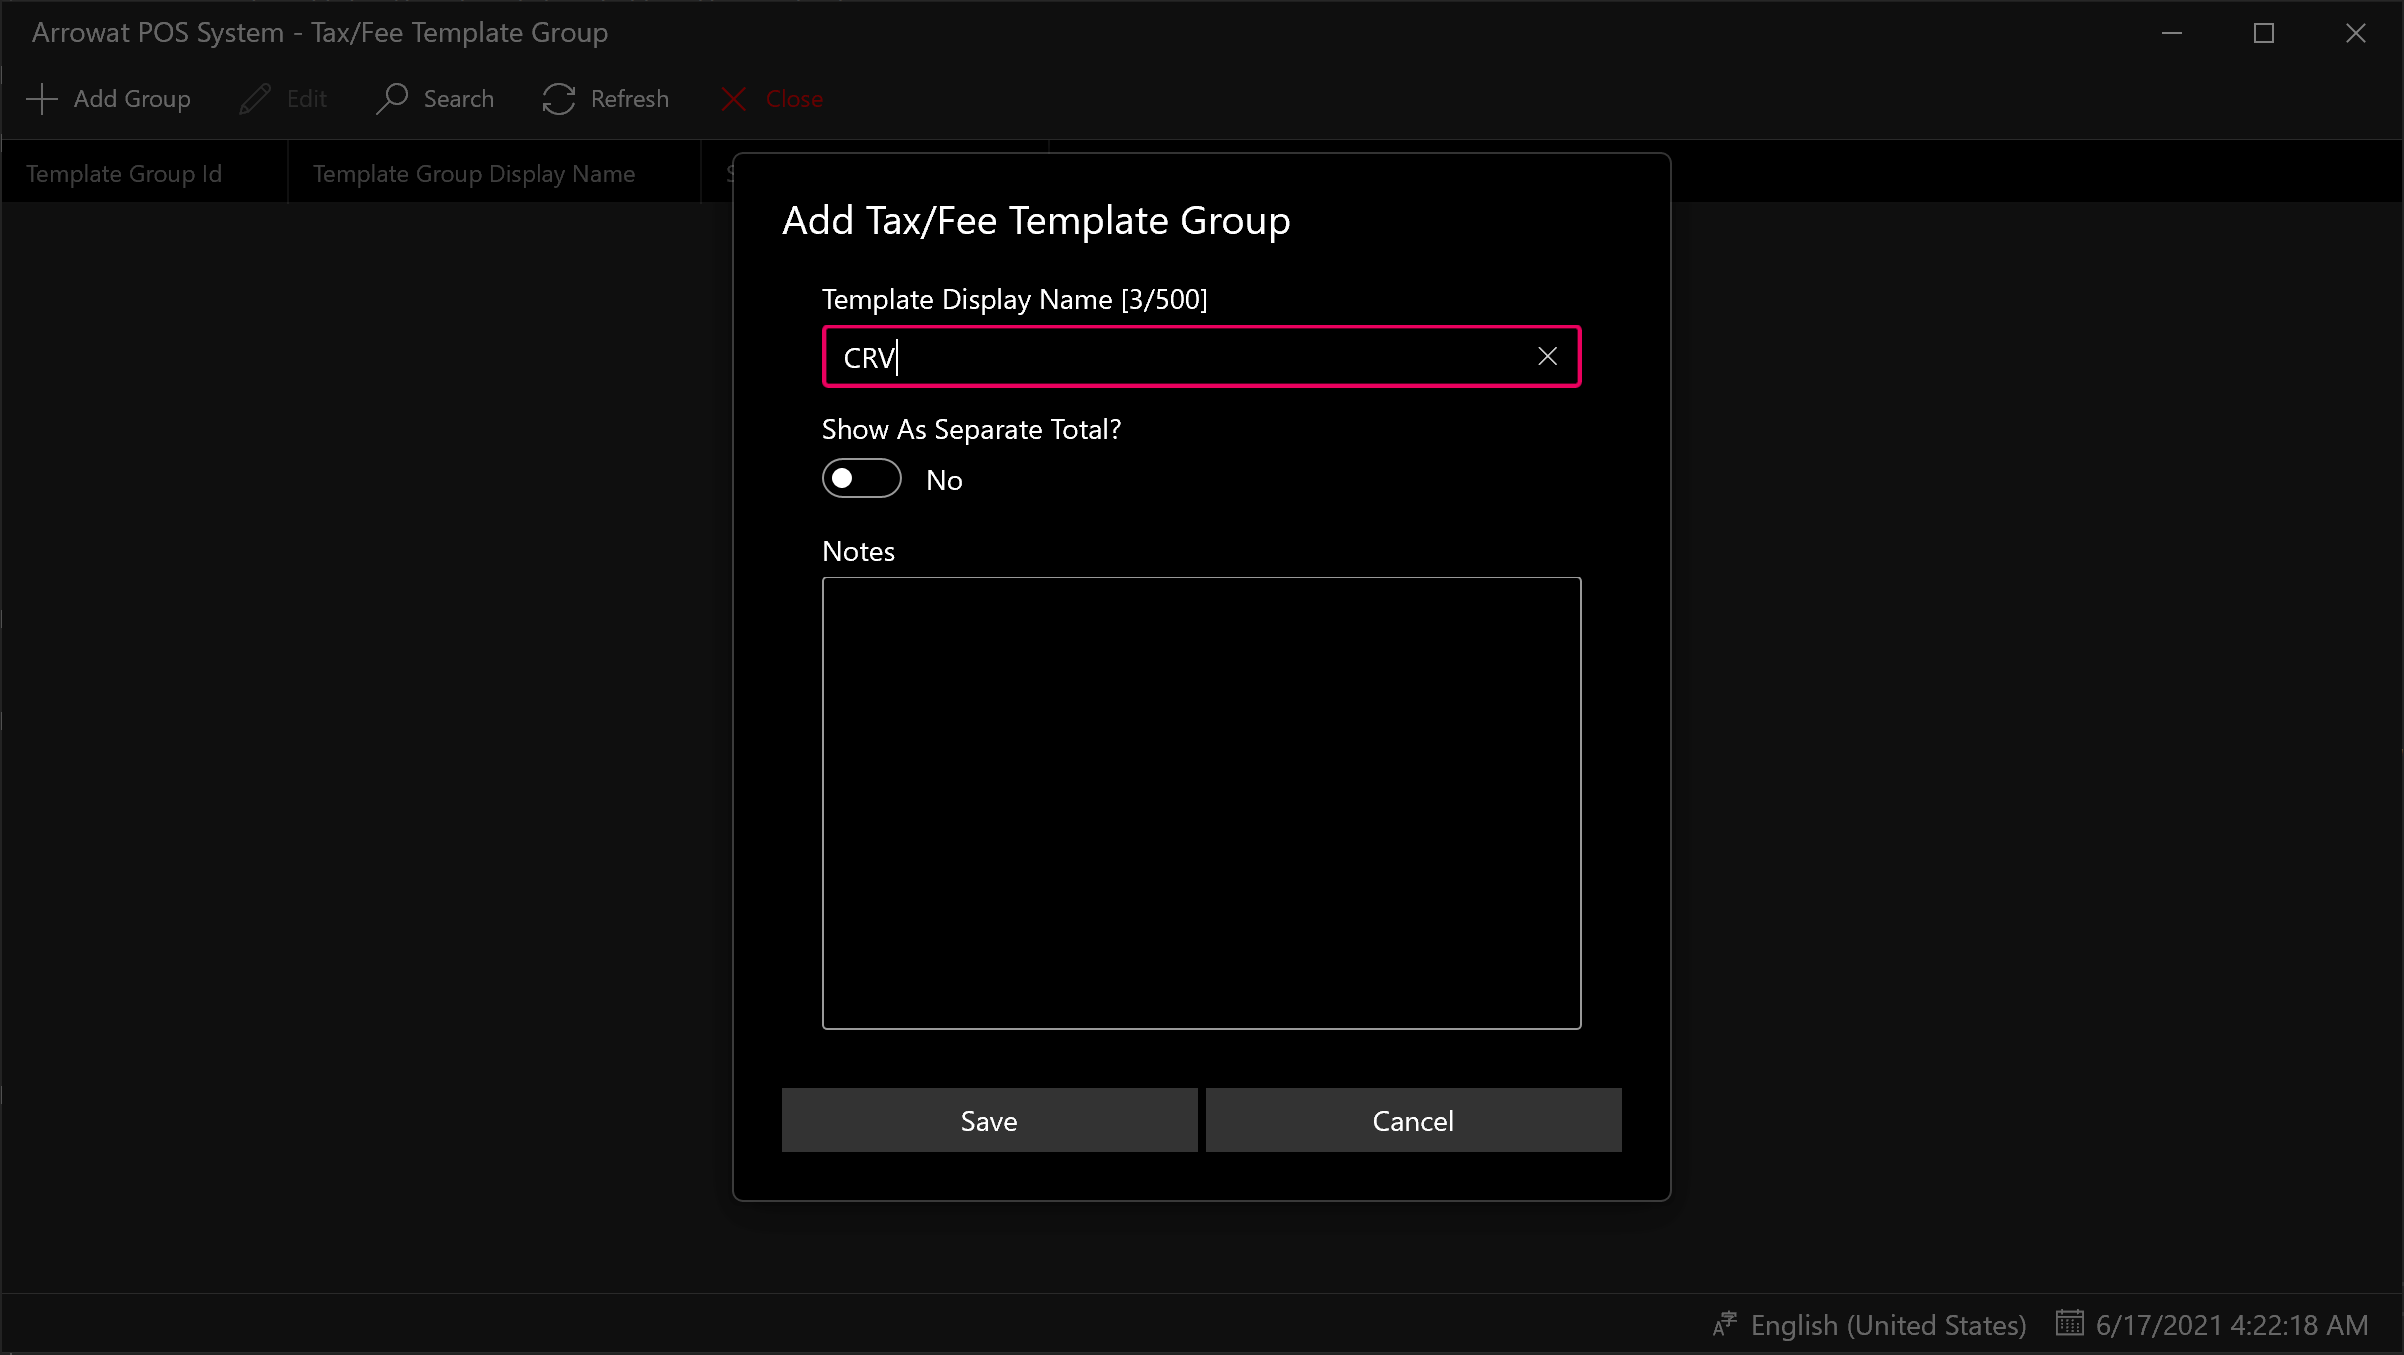
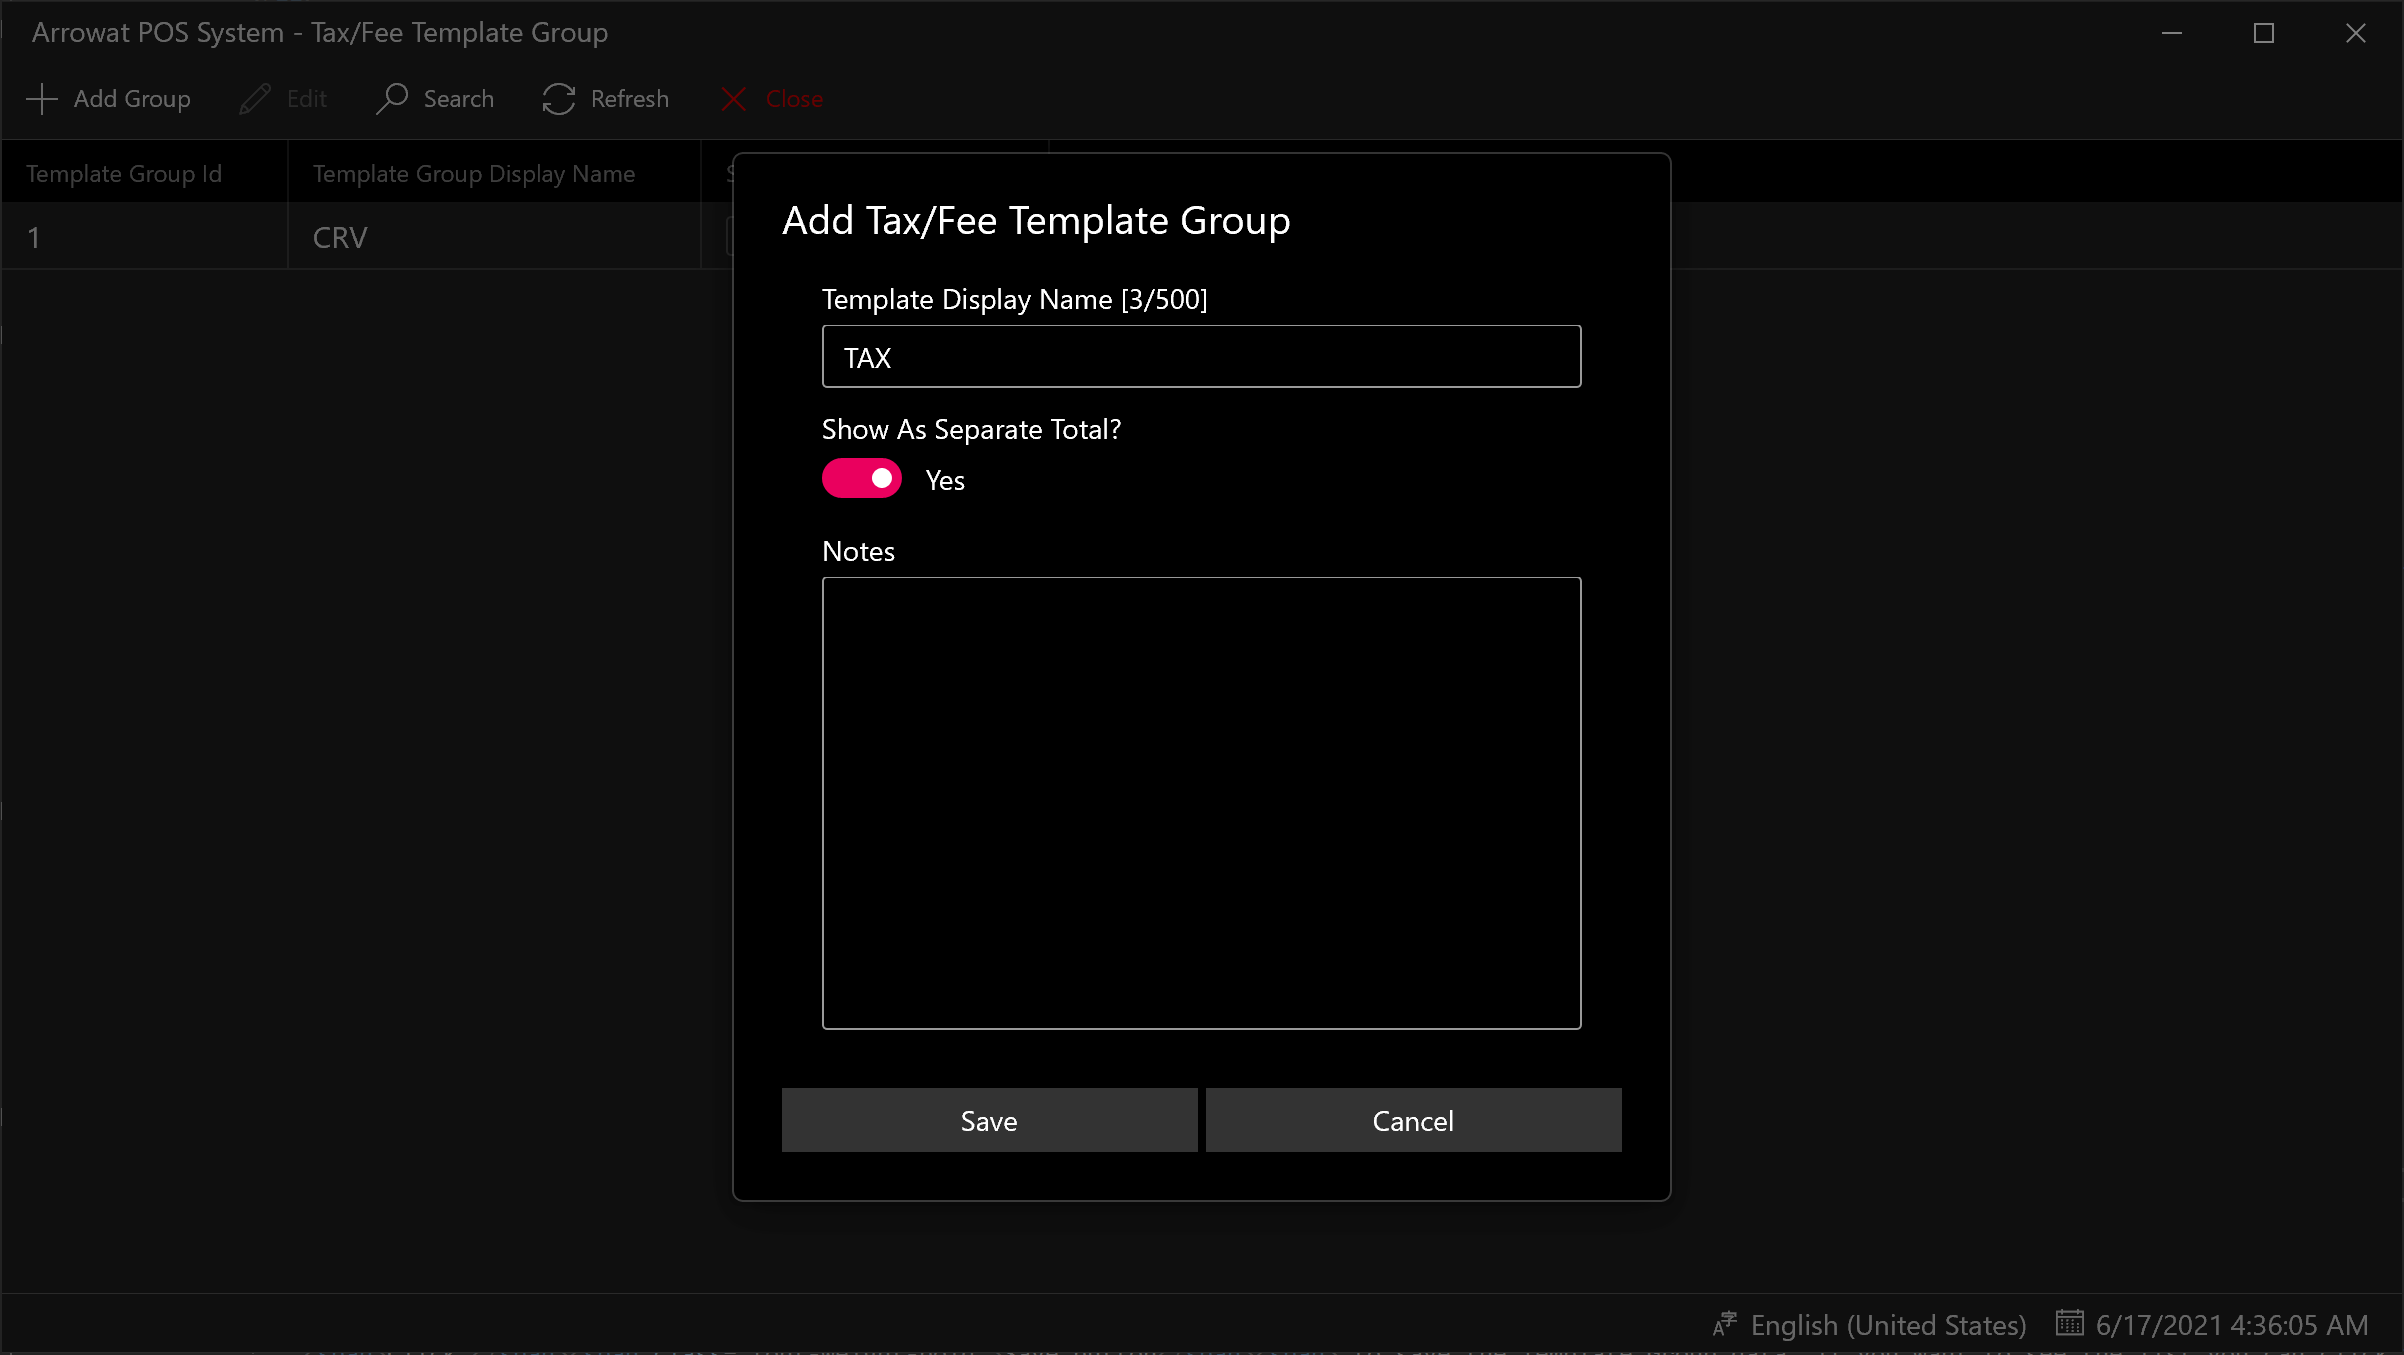
A window form will be shown, fill the texboxes with the information required as following.
- Template Display Name: CRV
- Show As Separated Total?: No
- Notes: Write a template note or leave it empty
Click Save button to save the Template Group data. if you want to see the list you can click the refresh button.
-
Click Add Group
A window form will be shown, fill the texboxes with the information required as following.
- Template Display Name: TAX
- Show As Separated Total?: Yes
- Notes: Write a template note or leave it empty
Click Save button to save the Template Group data. if you want to see the list you can click the refresh button.
-
Click Close Button
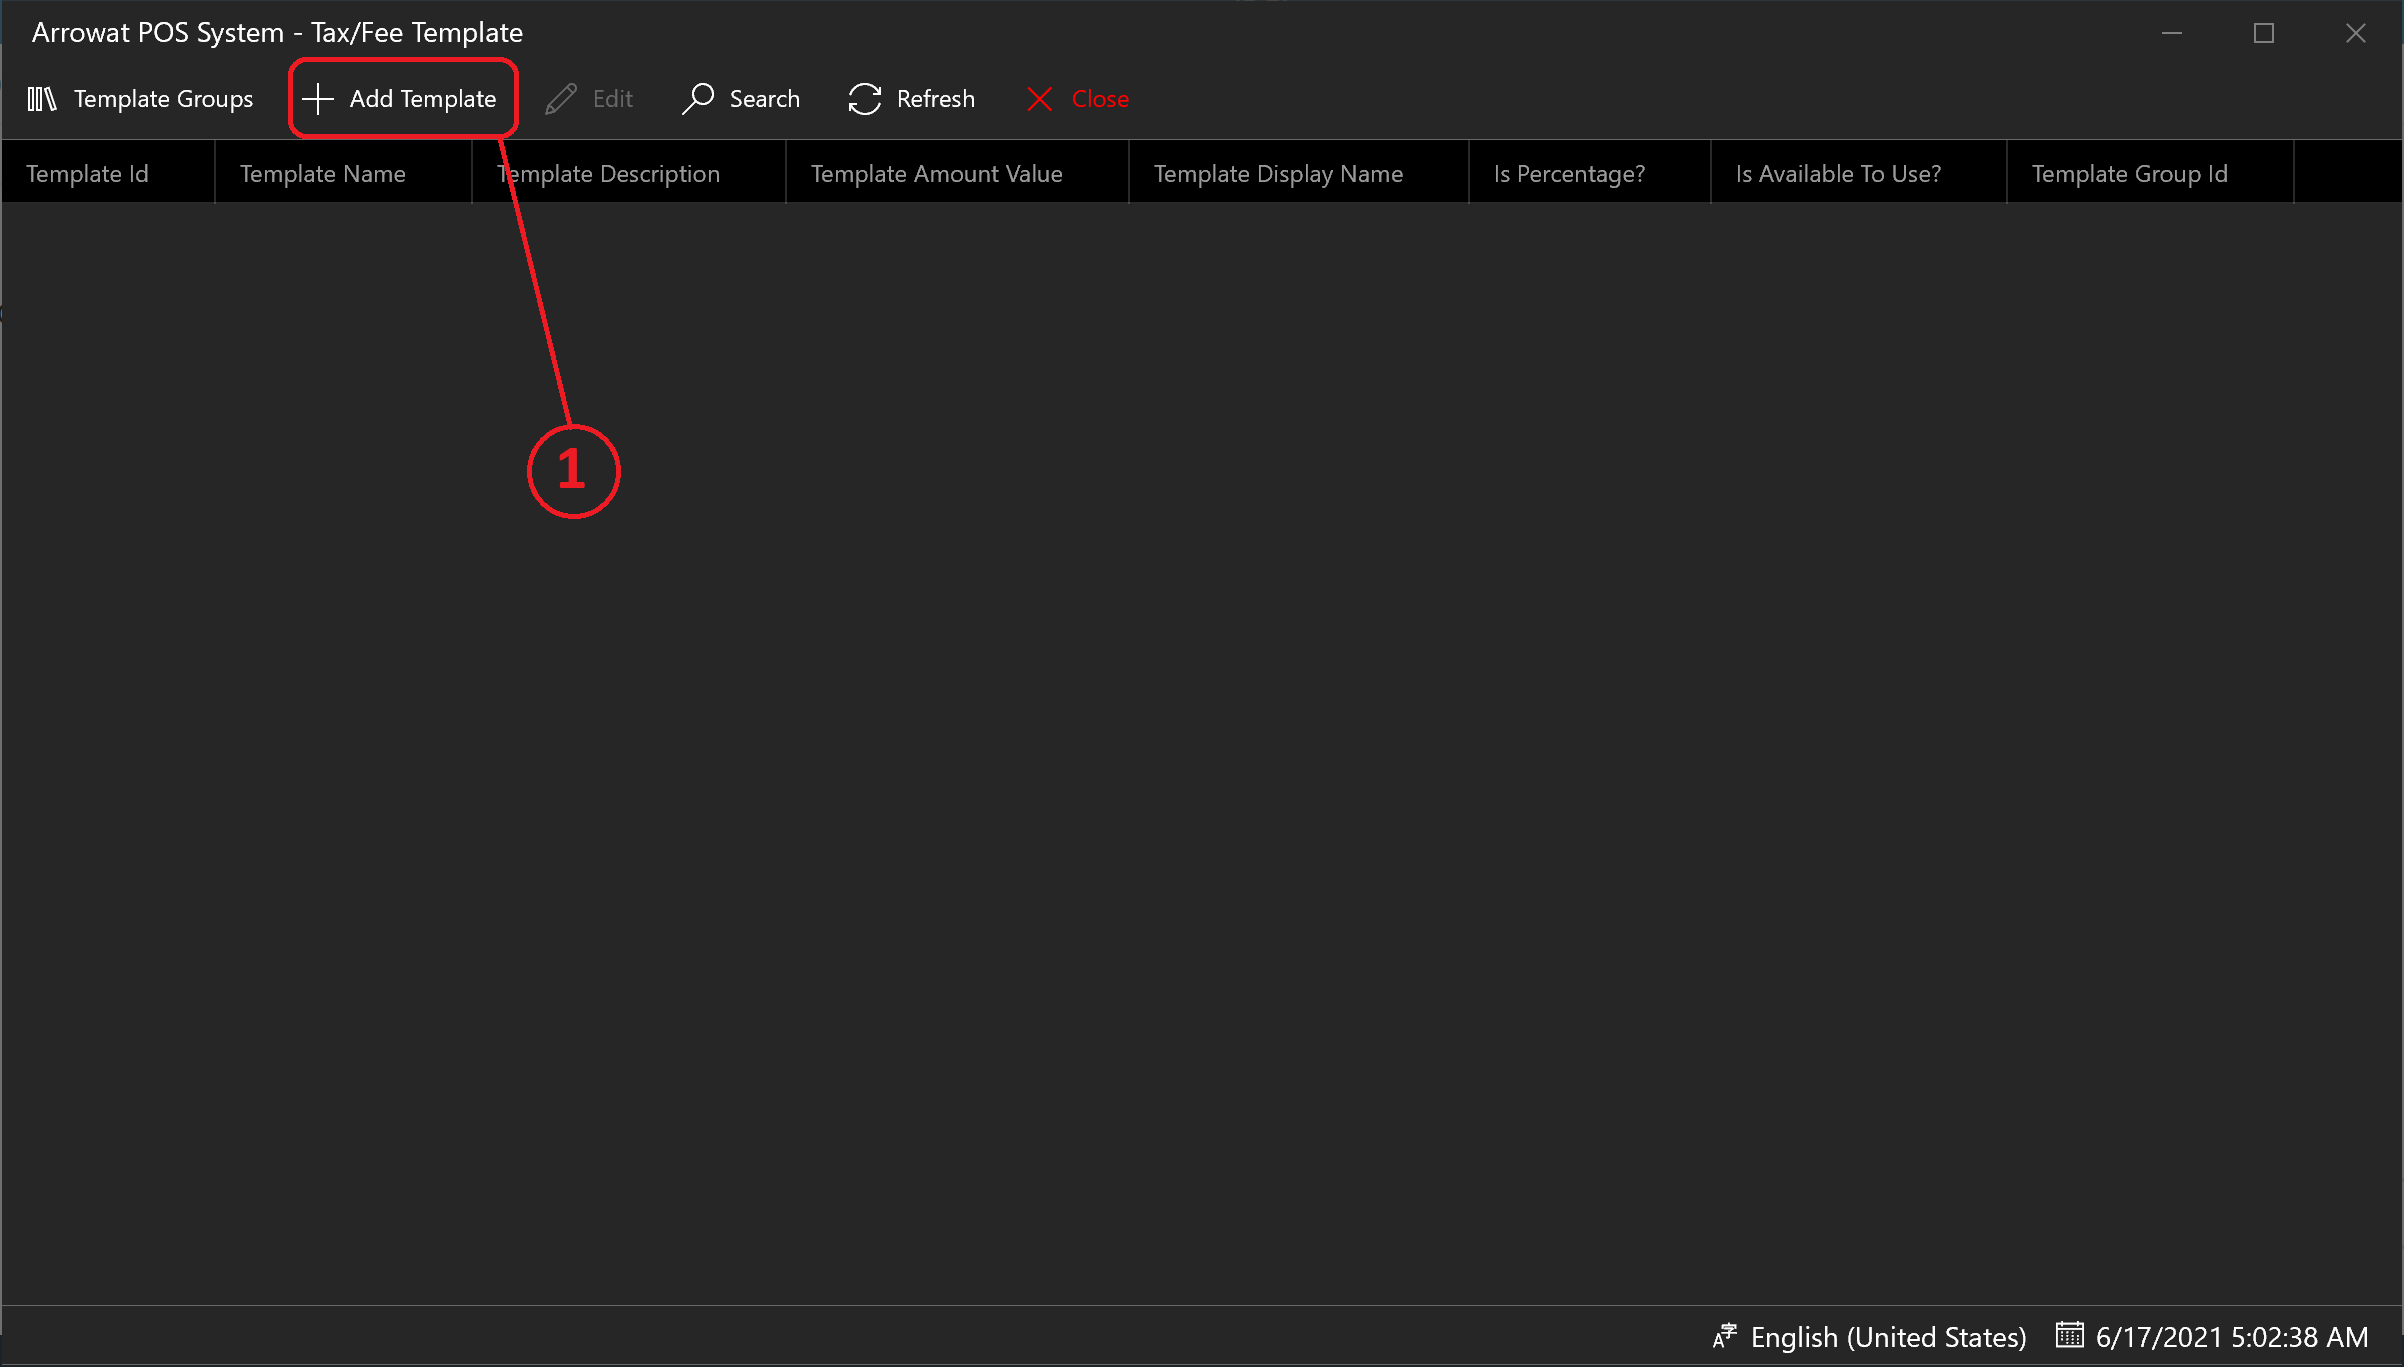
You will navigate to Tax/Template Fee page.
-
Click Add Template
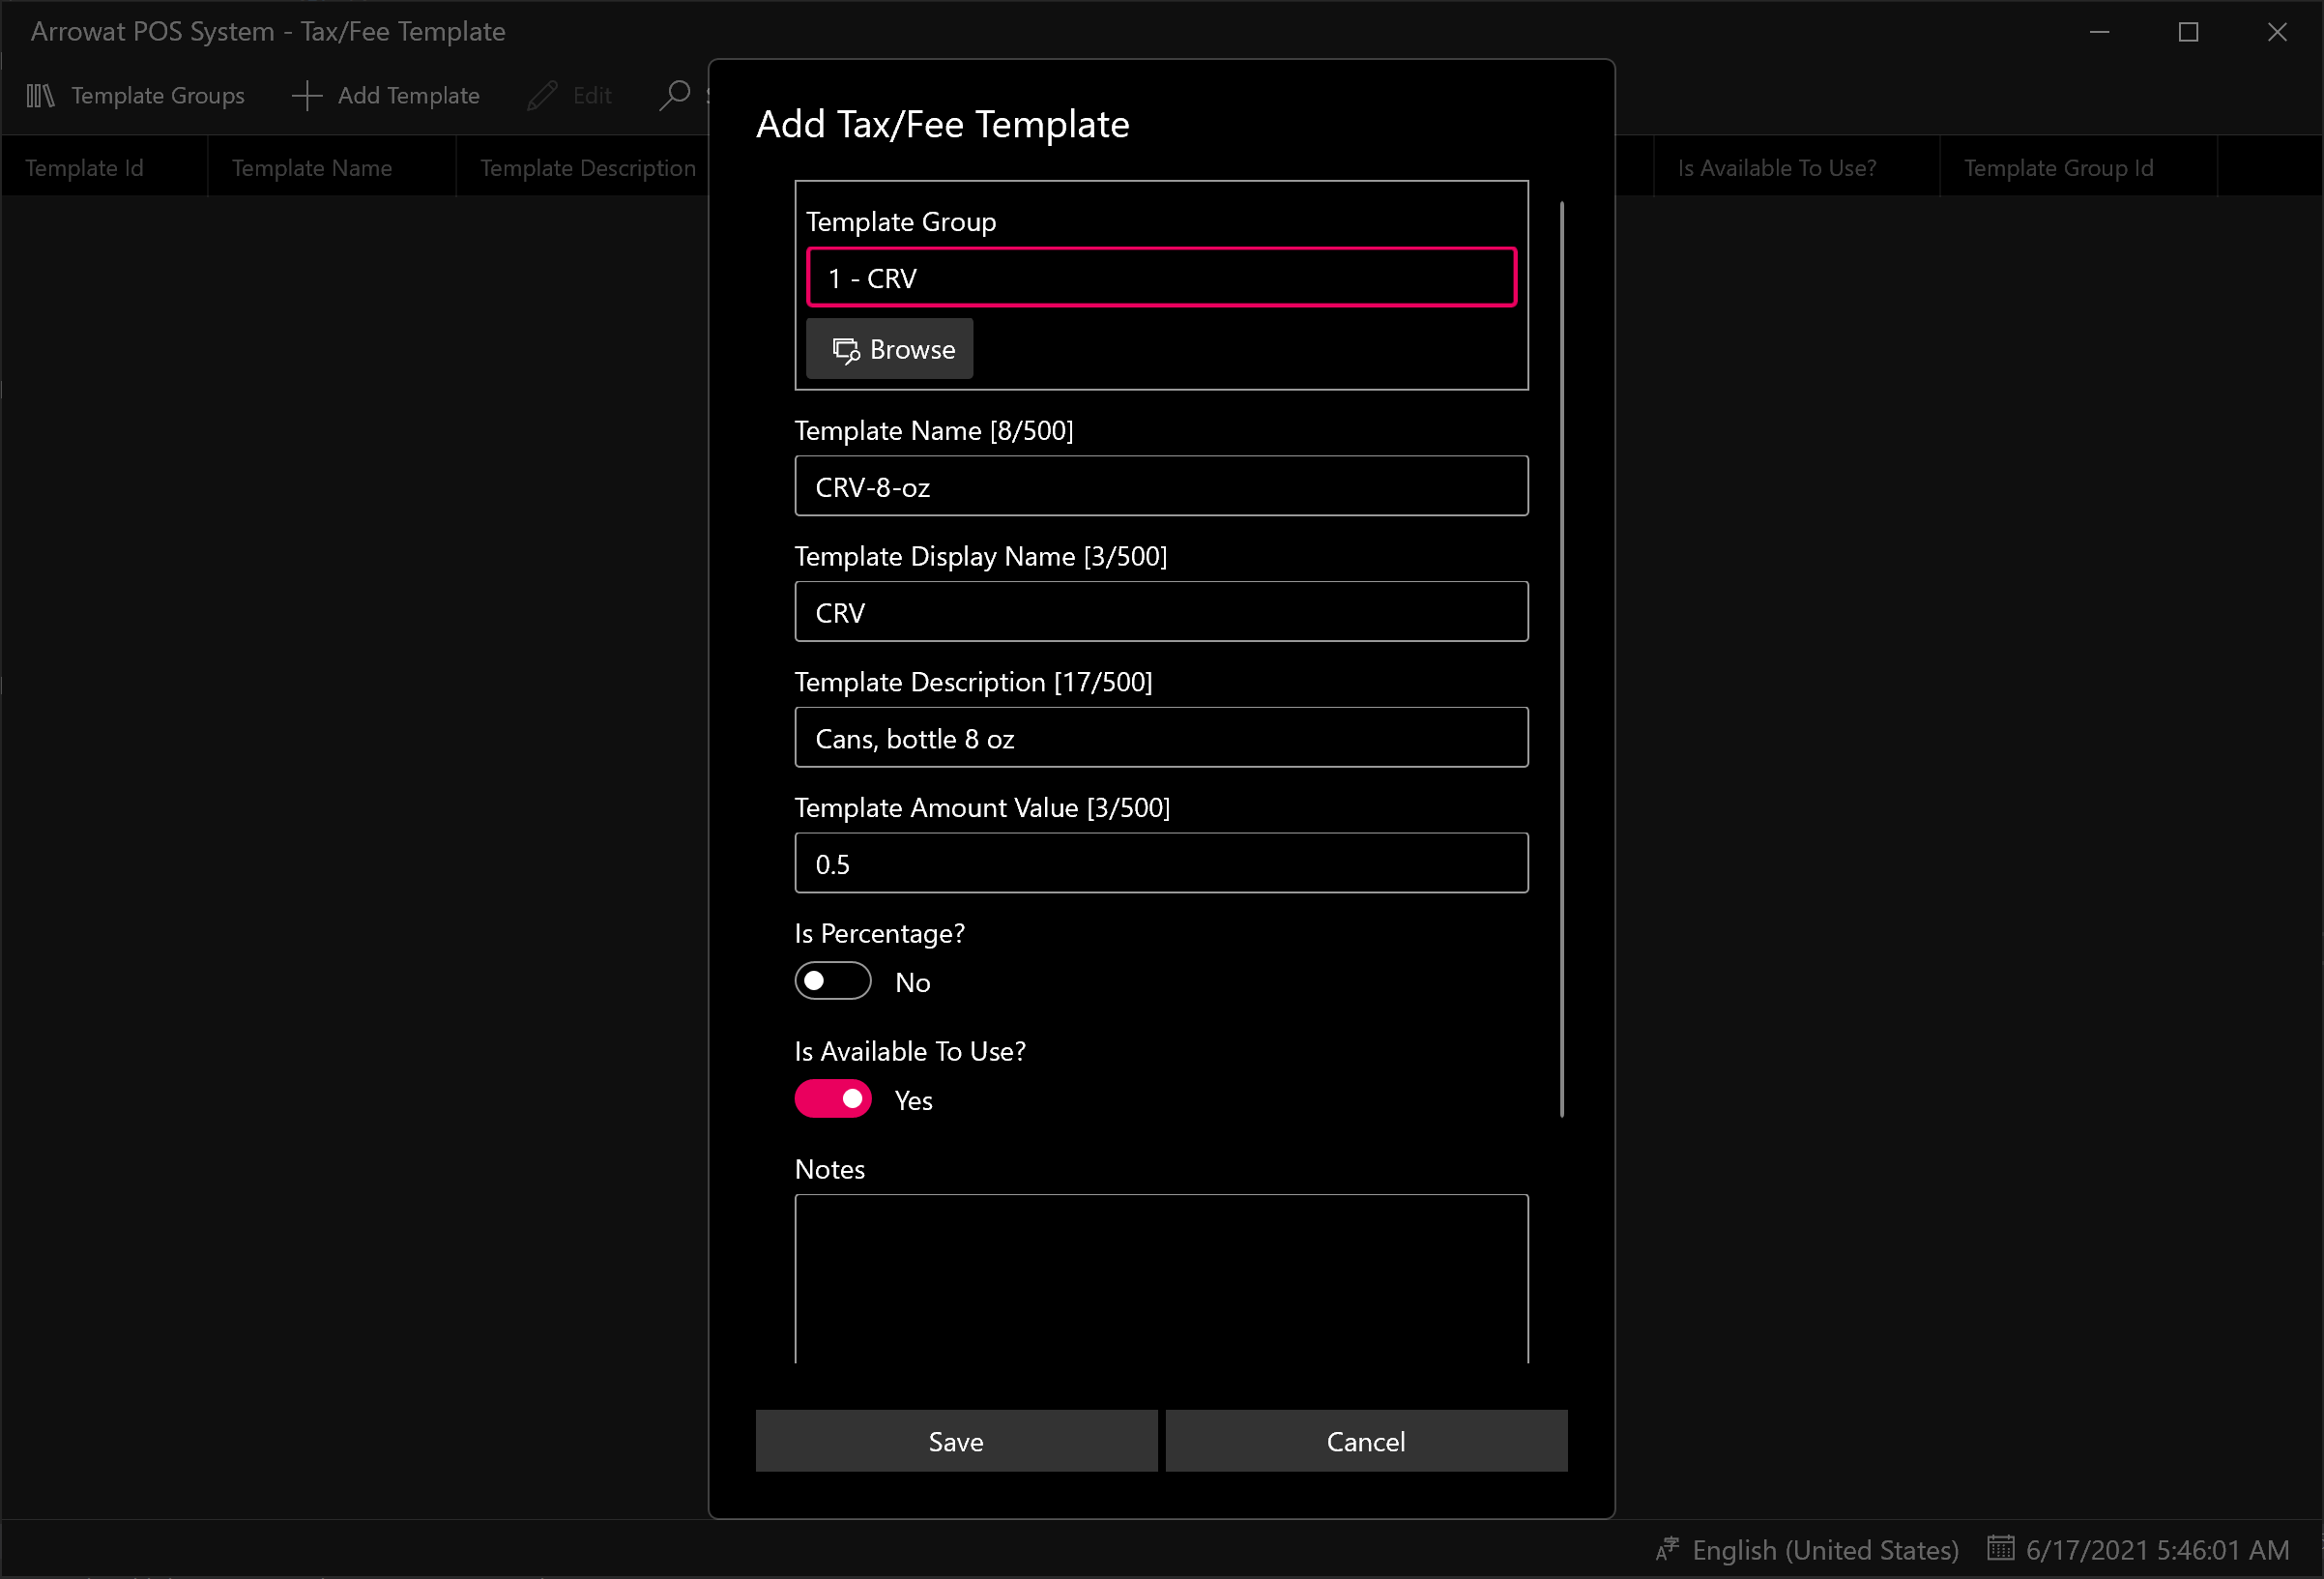
A window form will be shown, fill the texboxes with the information required as following.
- Template Group: Select One of the template you added above, we will select CRV for this guide
- Template Name: CRV-8-oz
- Template Display Name: CRV
- Template Description: Cans, bottle 8 oz
- Template Amount Value: 0.05
- Is Percentage: No
- Is Available To Use: Yes
- Notes: Write a note or leave it empty
Click Save button to save the Template Tax/Fee data. if you want to see the list you can click the refresh button.
Repeat the step above and add the Tax Template
- Template Group: Select One of the template you added above, we will select TAX for this guide
- Template Name: TAX-01
- Template Display Name: TAX
- Template Description: Cooked Food
- Template Amount Value: 9.5
- Is Percentage: Yes
- Is Available To Use: Yes
- Notes: Write a note or leave it empty
Click Save button to save the Template Tax/Fee data. if you want to see the list you can click the refresh button.
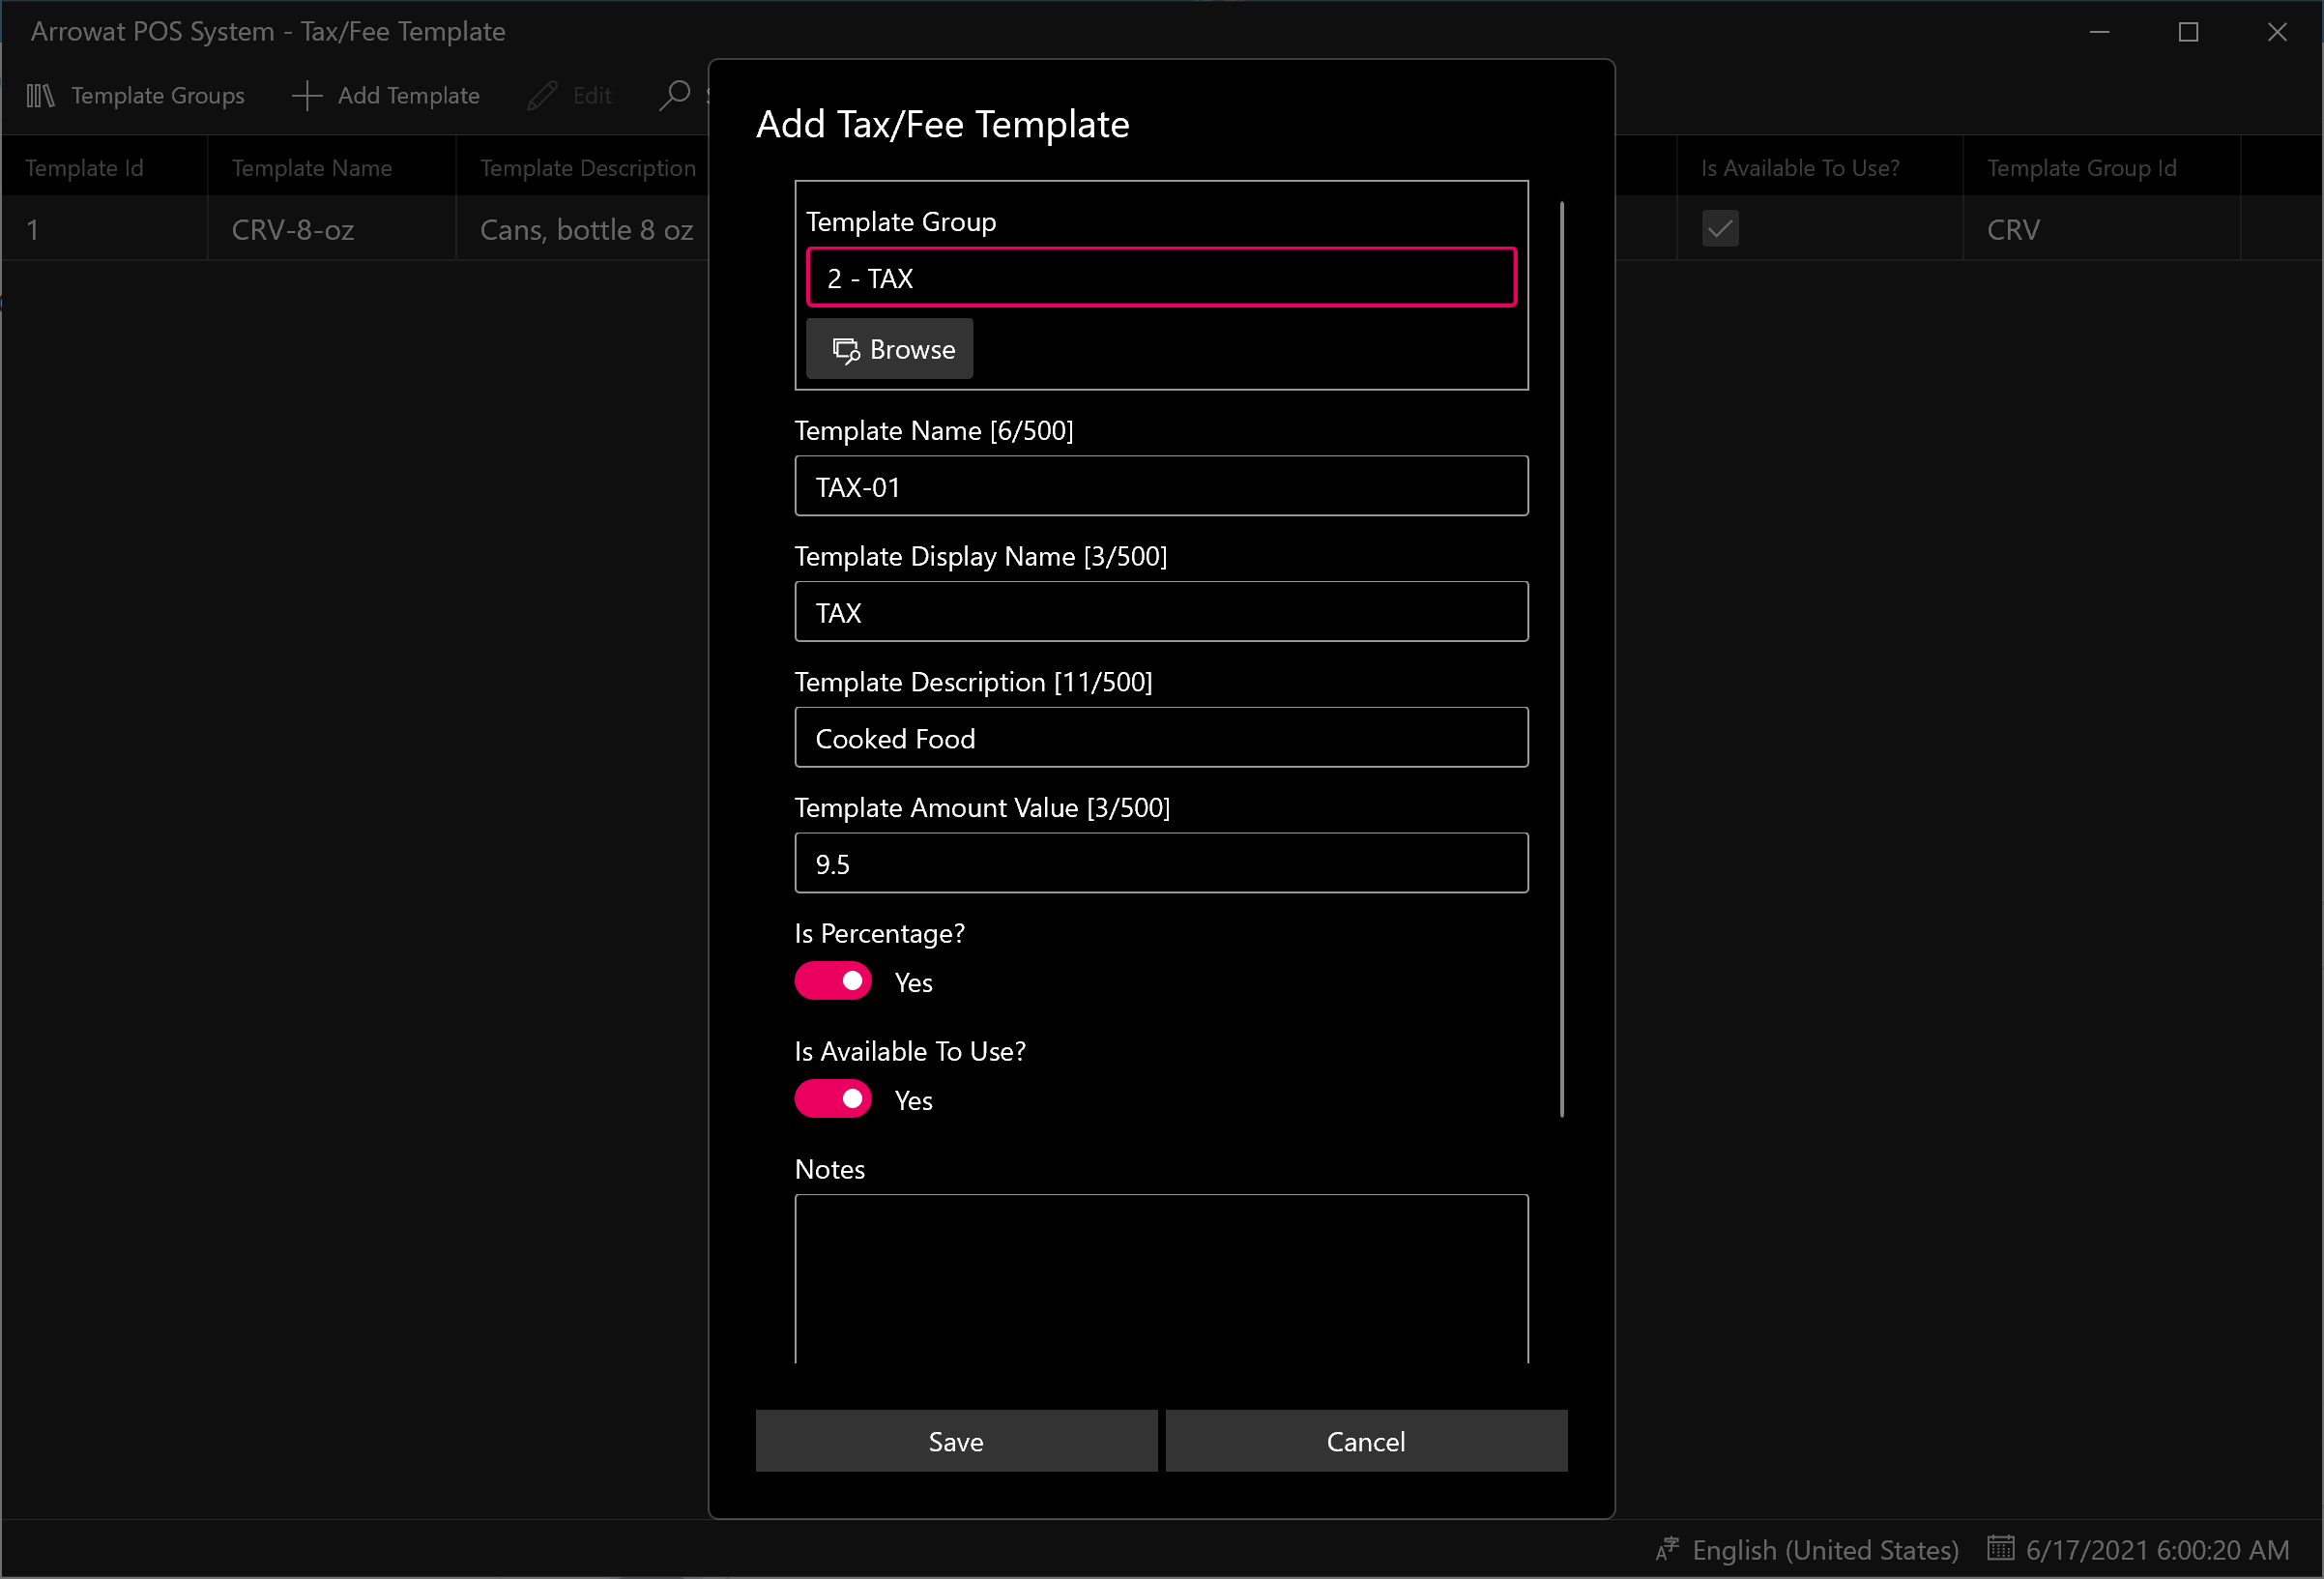
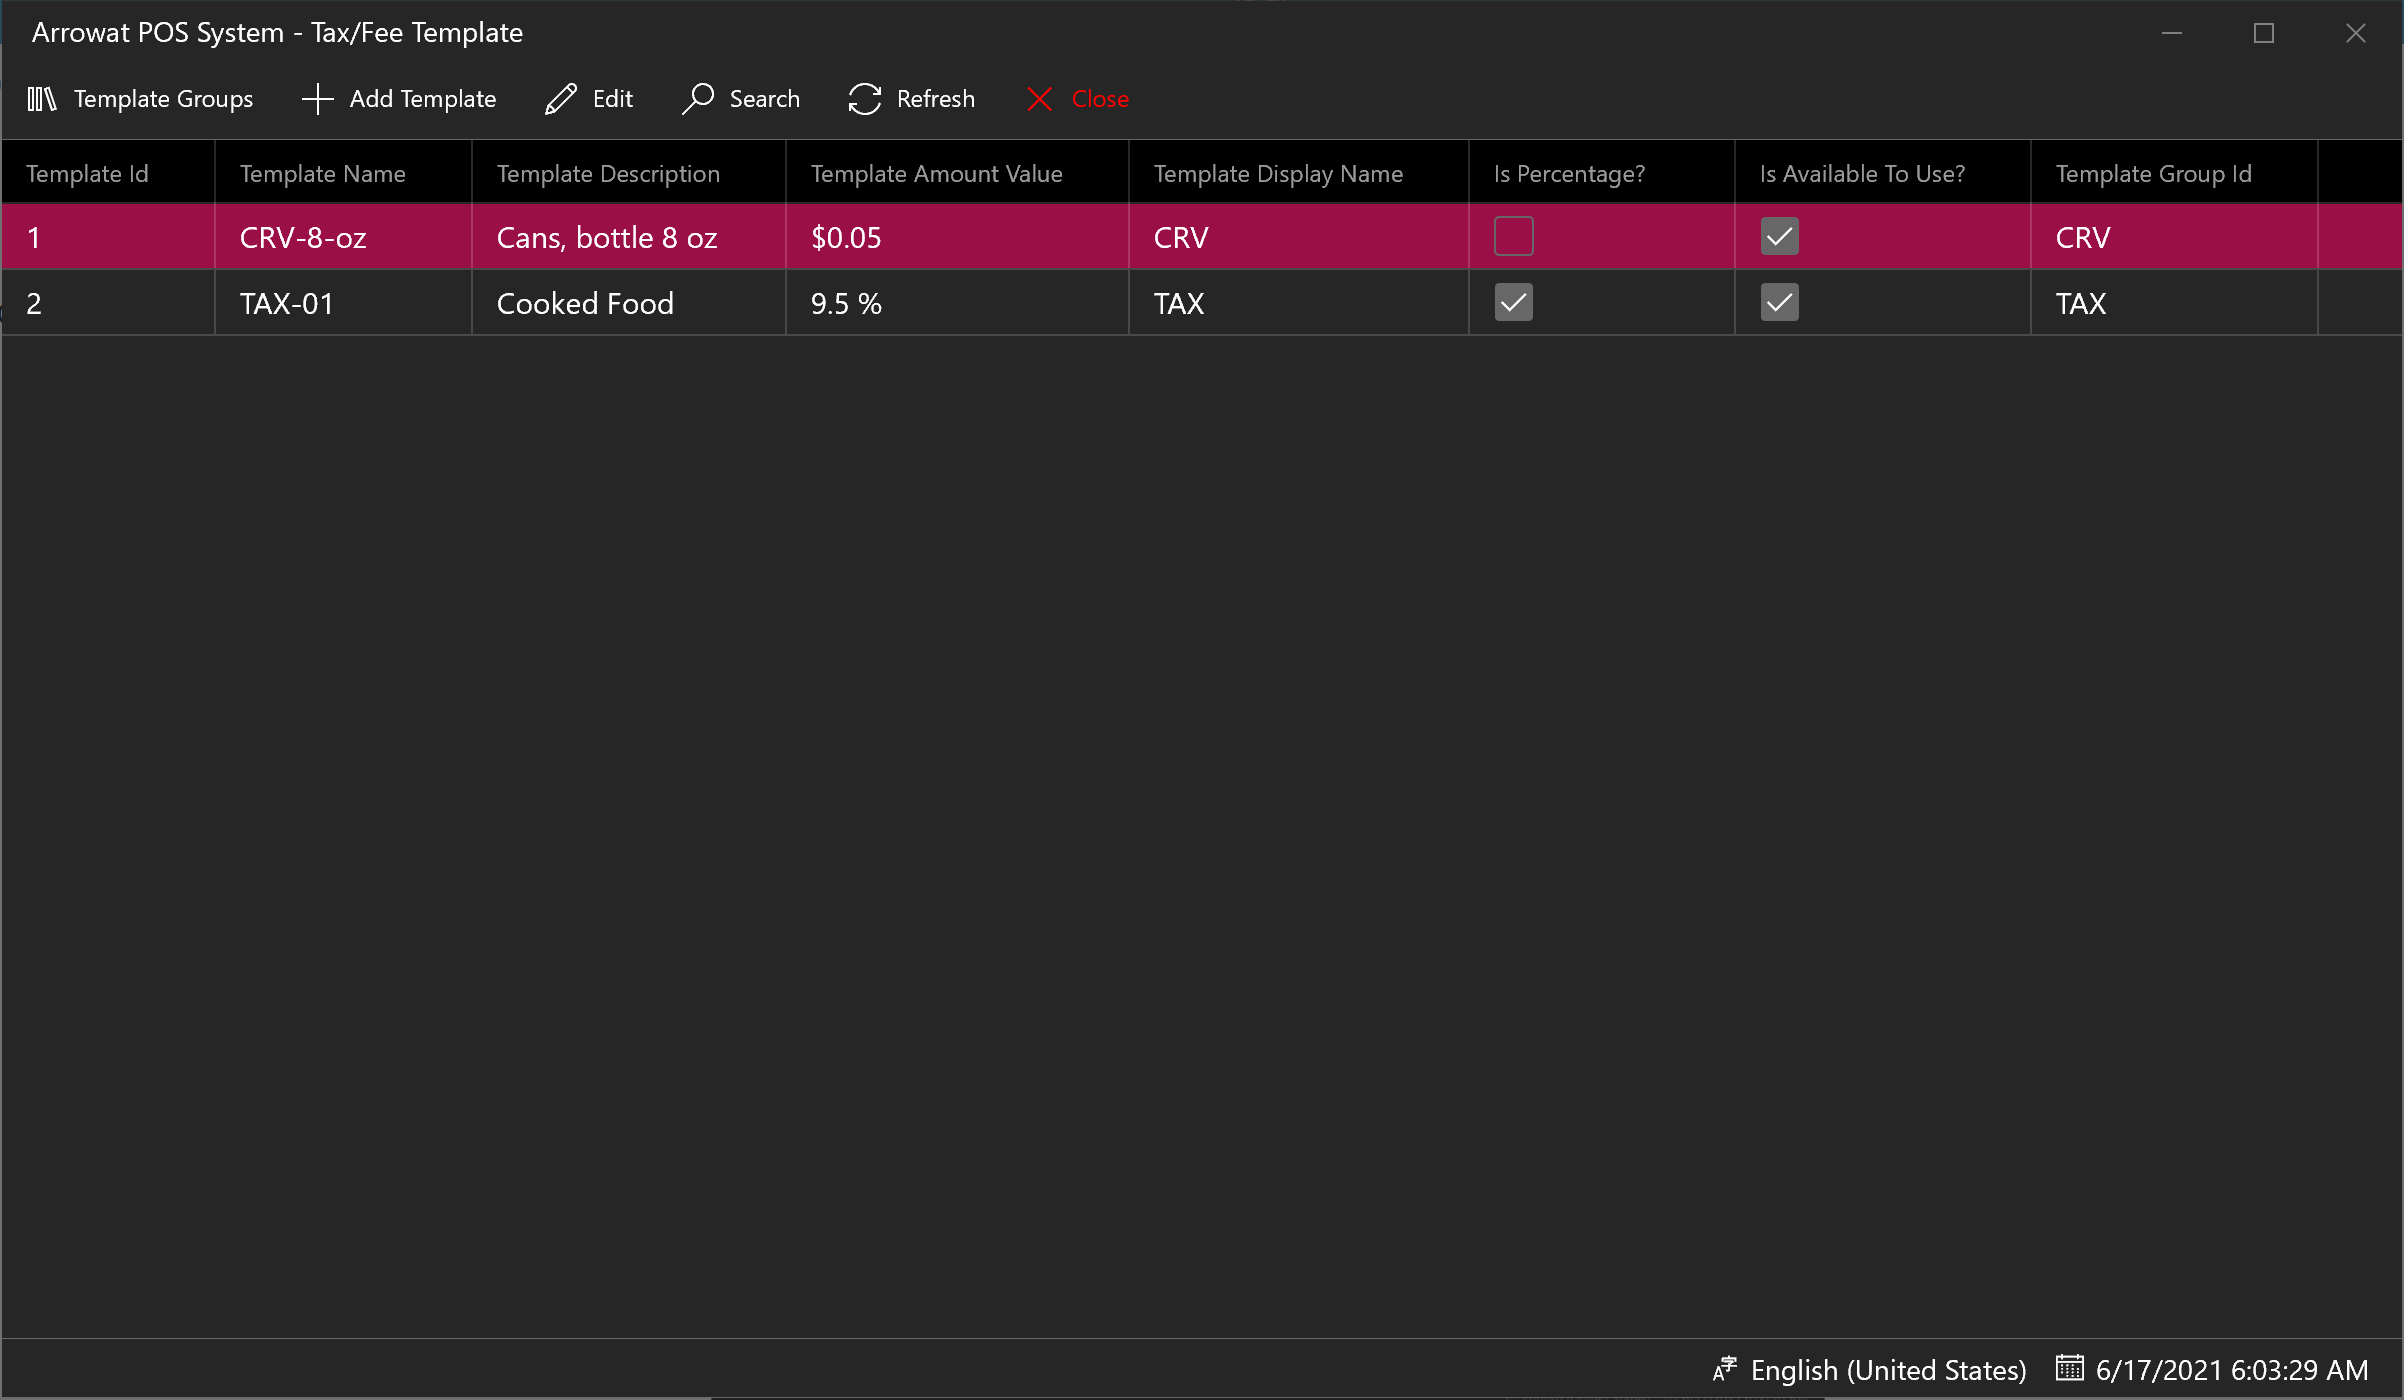
Click Close Button to navigate to Home page.
Important: All information added to template above are examples only. Your Country, City, State may have a different rate value and name.
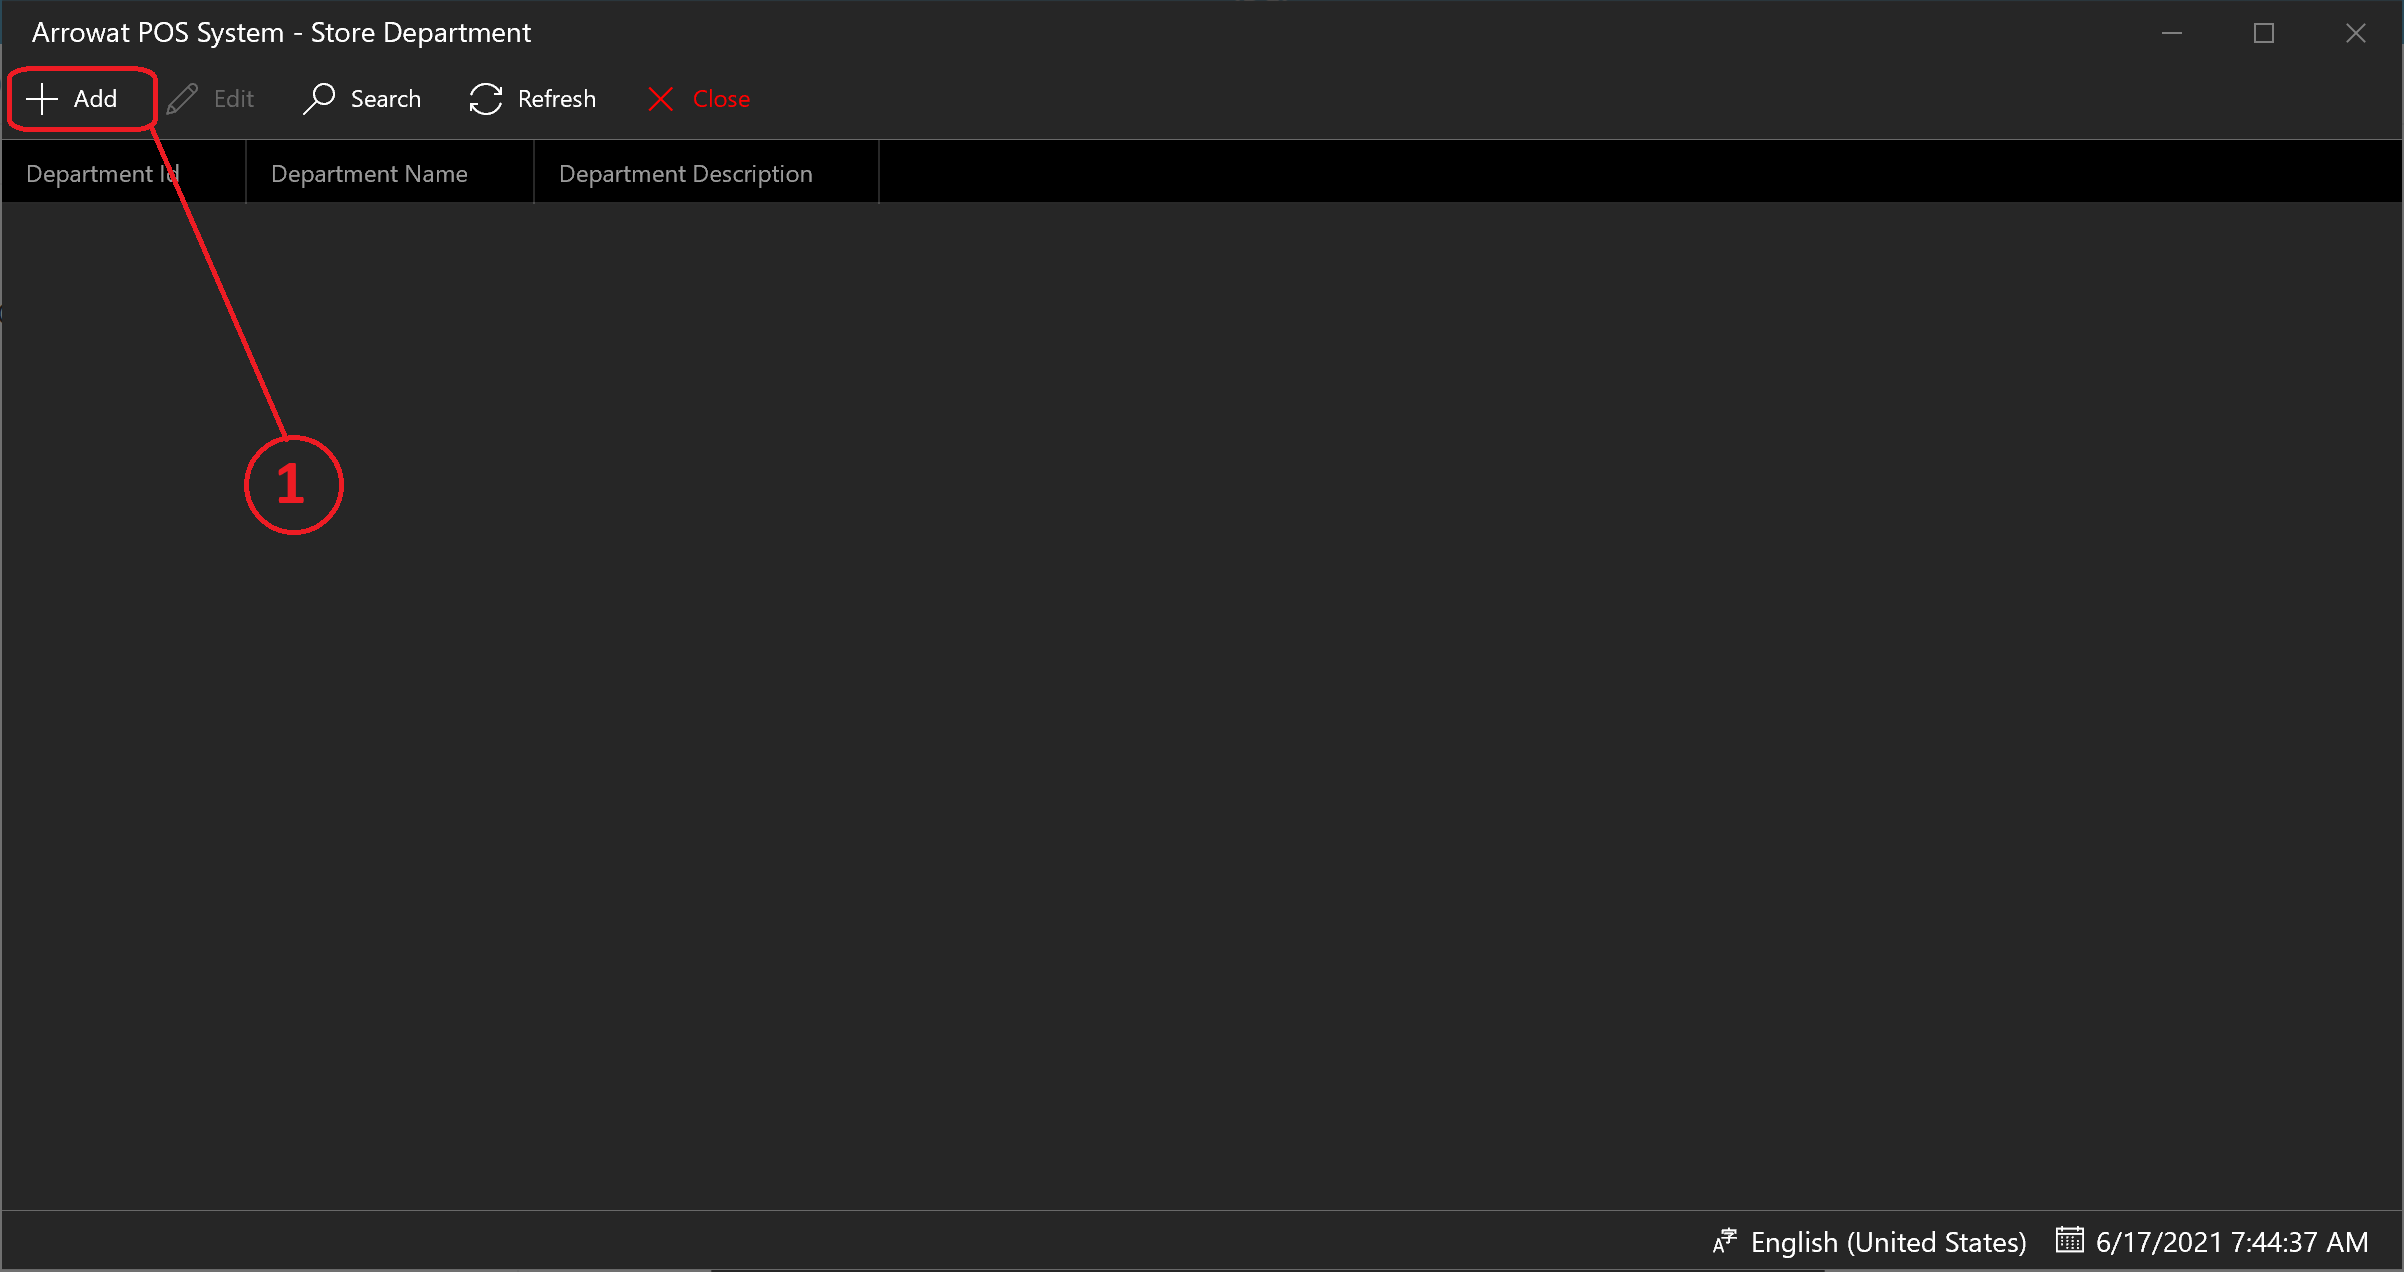
Adding Store Departments
Store Departments are where products are located, in a Super Market you have the following departments
- Grocery
- Deli
- Frozen
- Meat
Those departments have products corresponding to their type, Grocery has Canned Fruit, Beans, Rice, Soda, Candy. Depend on your country or location you have store department with differente names.
To add Store Departments follow the next steps.
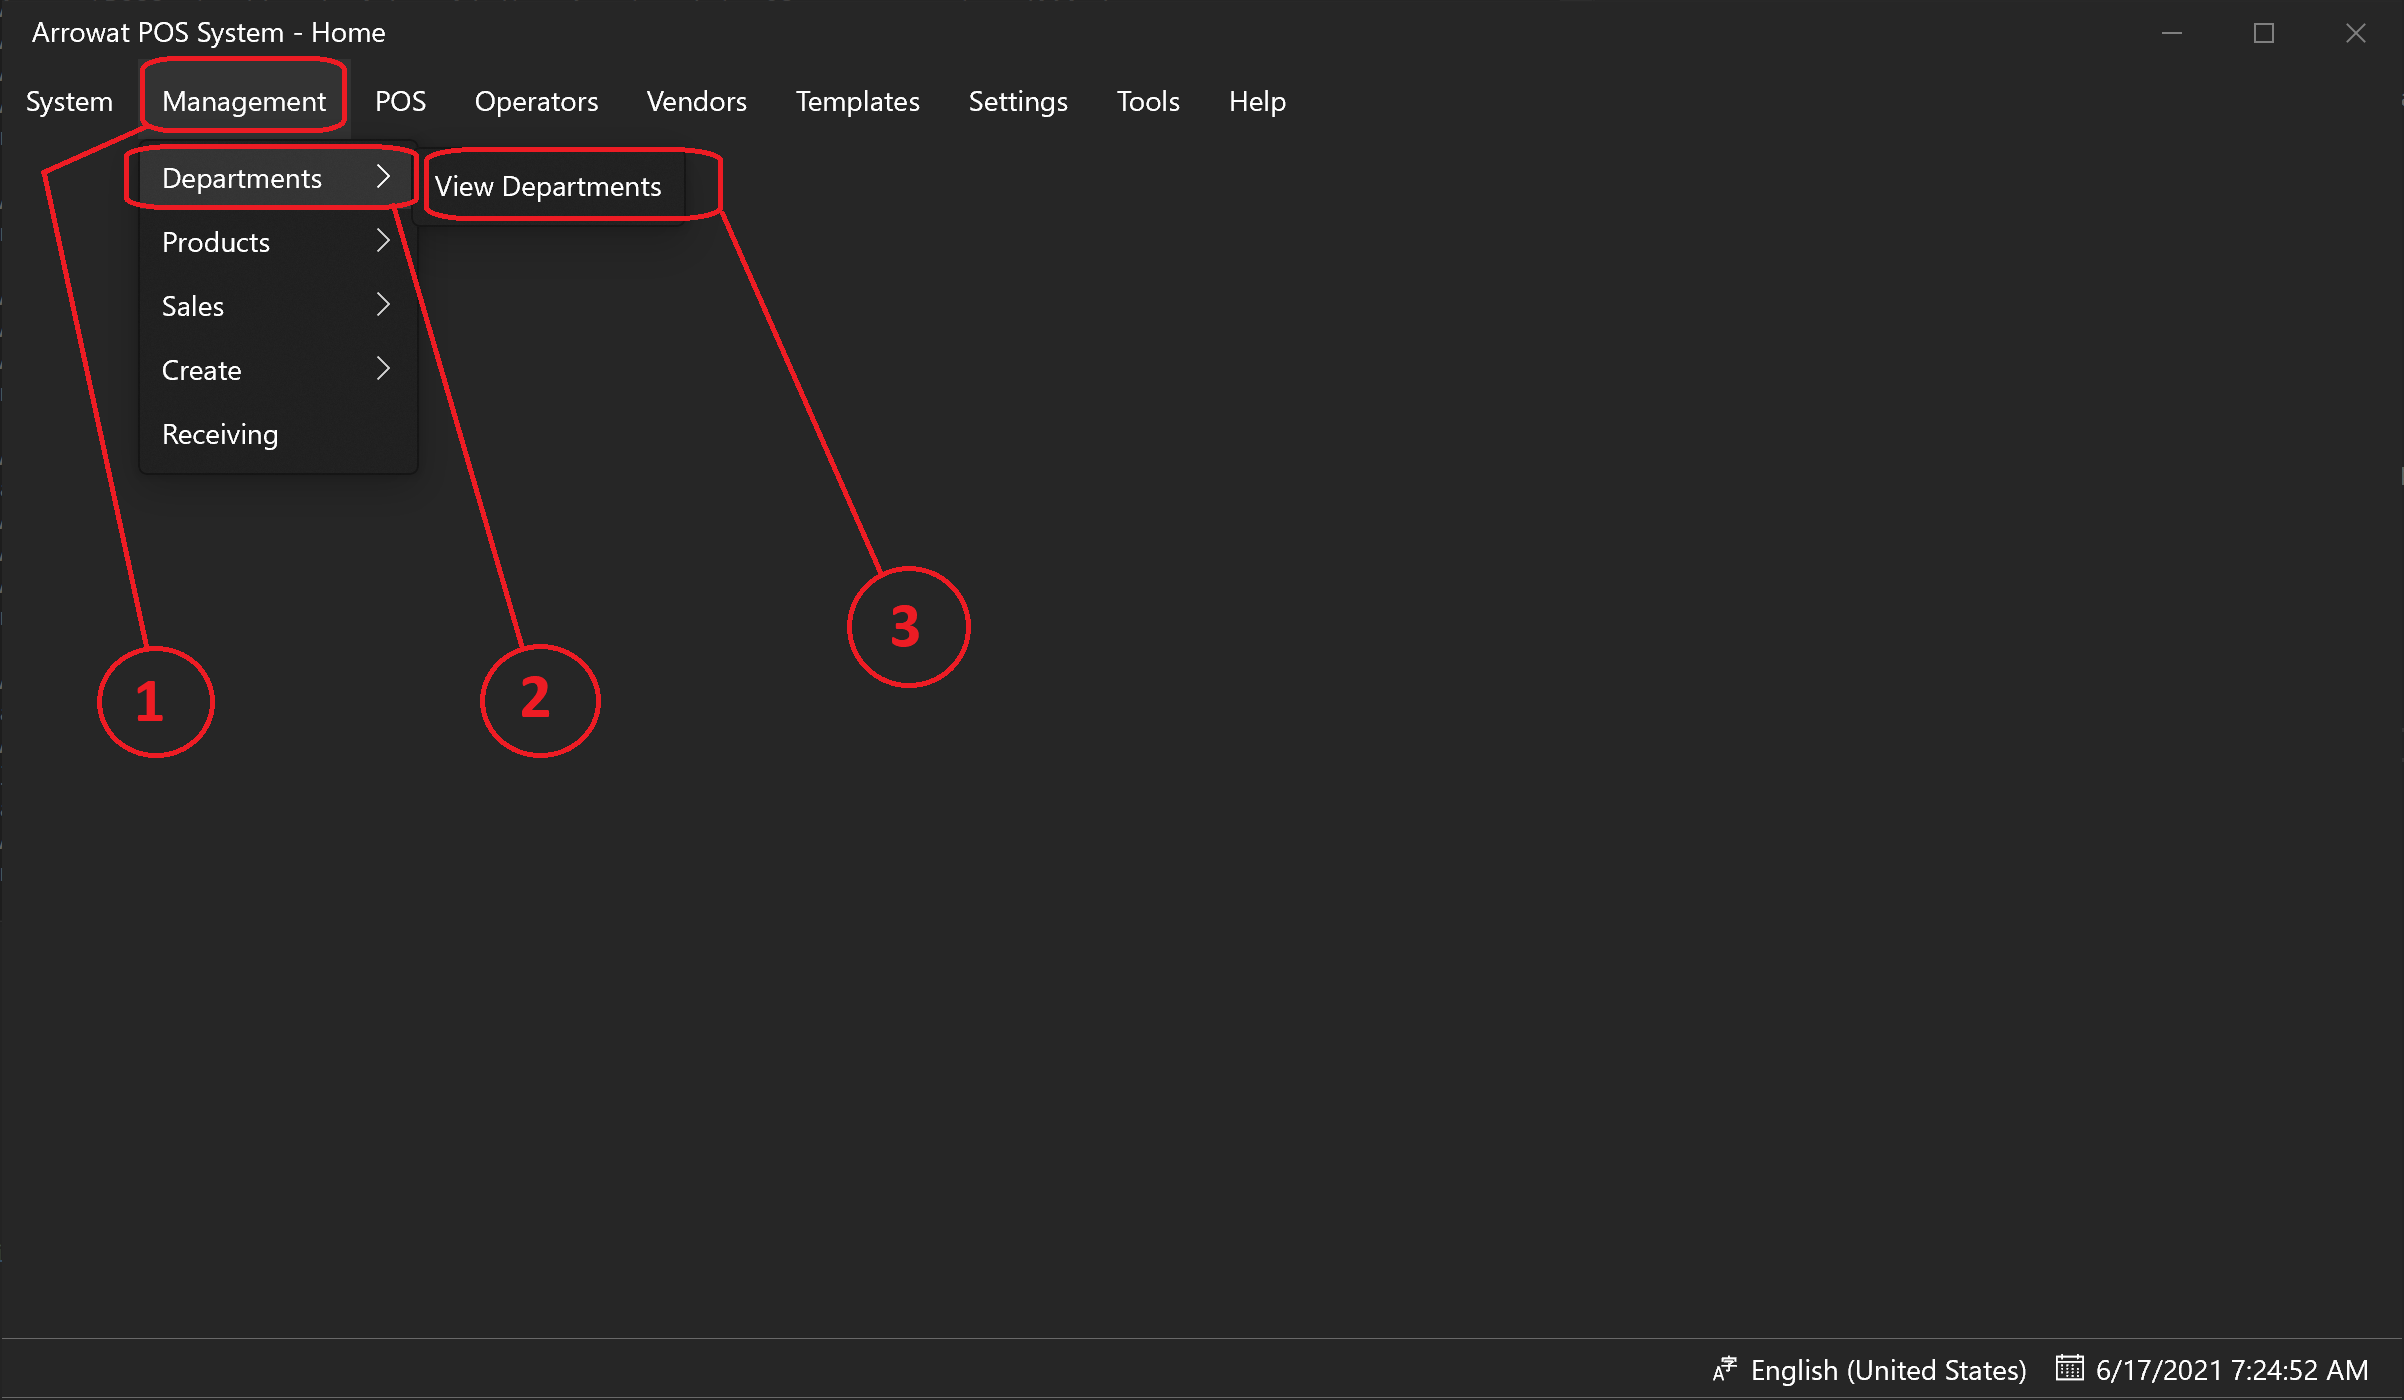
- Open Arrowat POS System
-
Click Management > Departments > View Departments
You will navigate to Store Department page
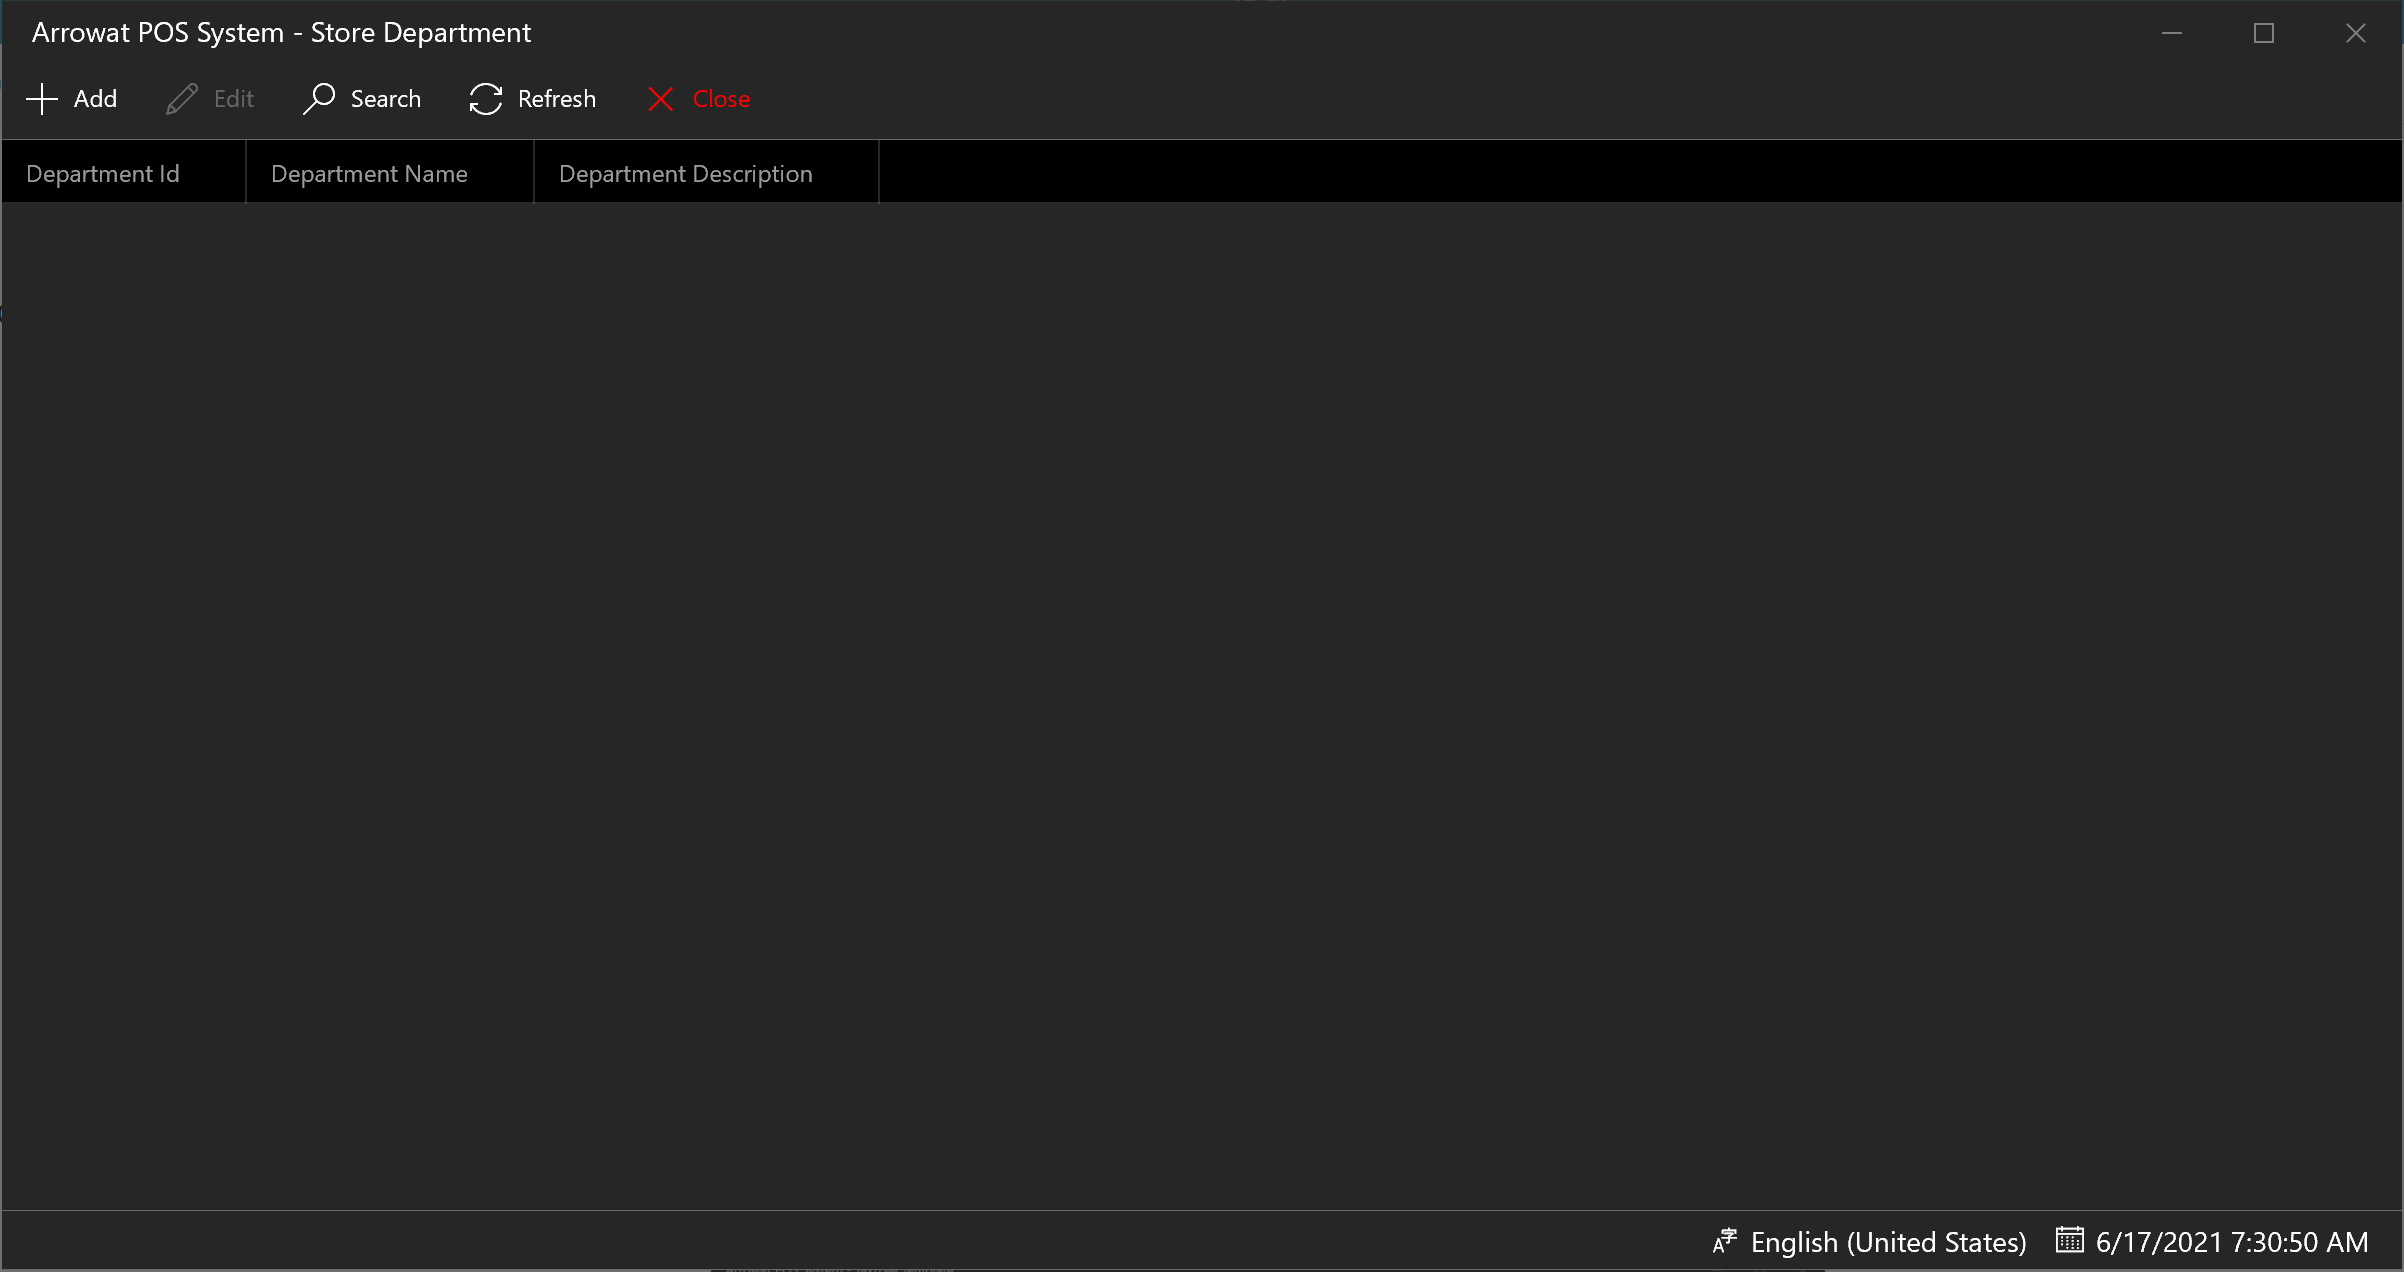
-
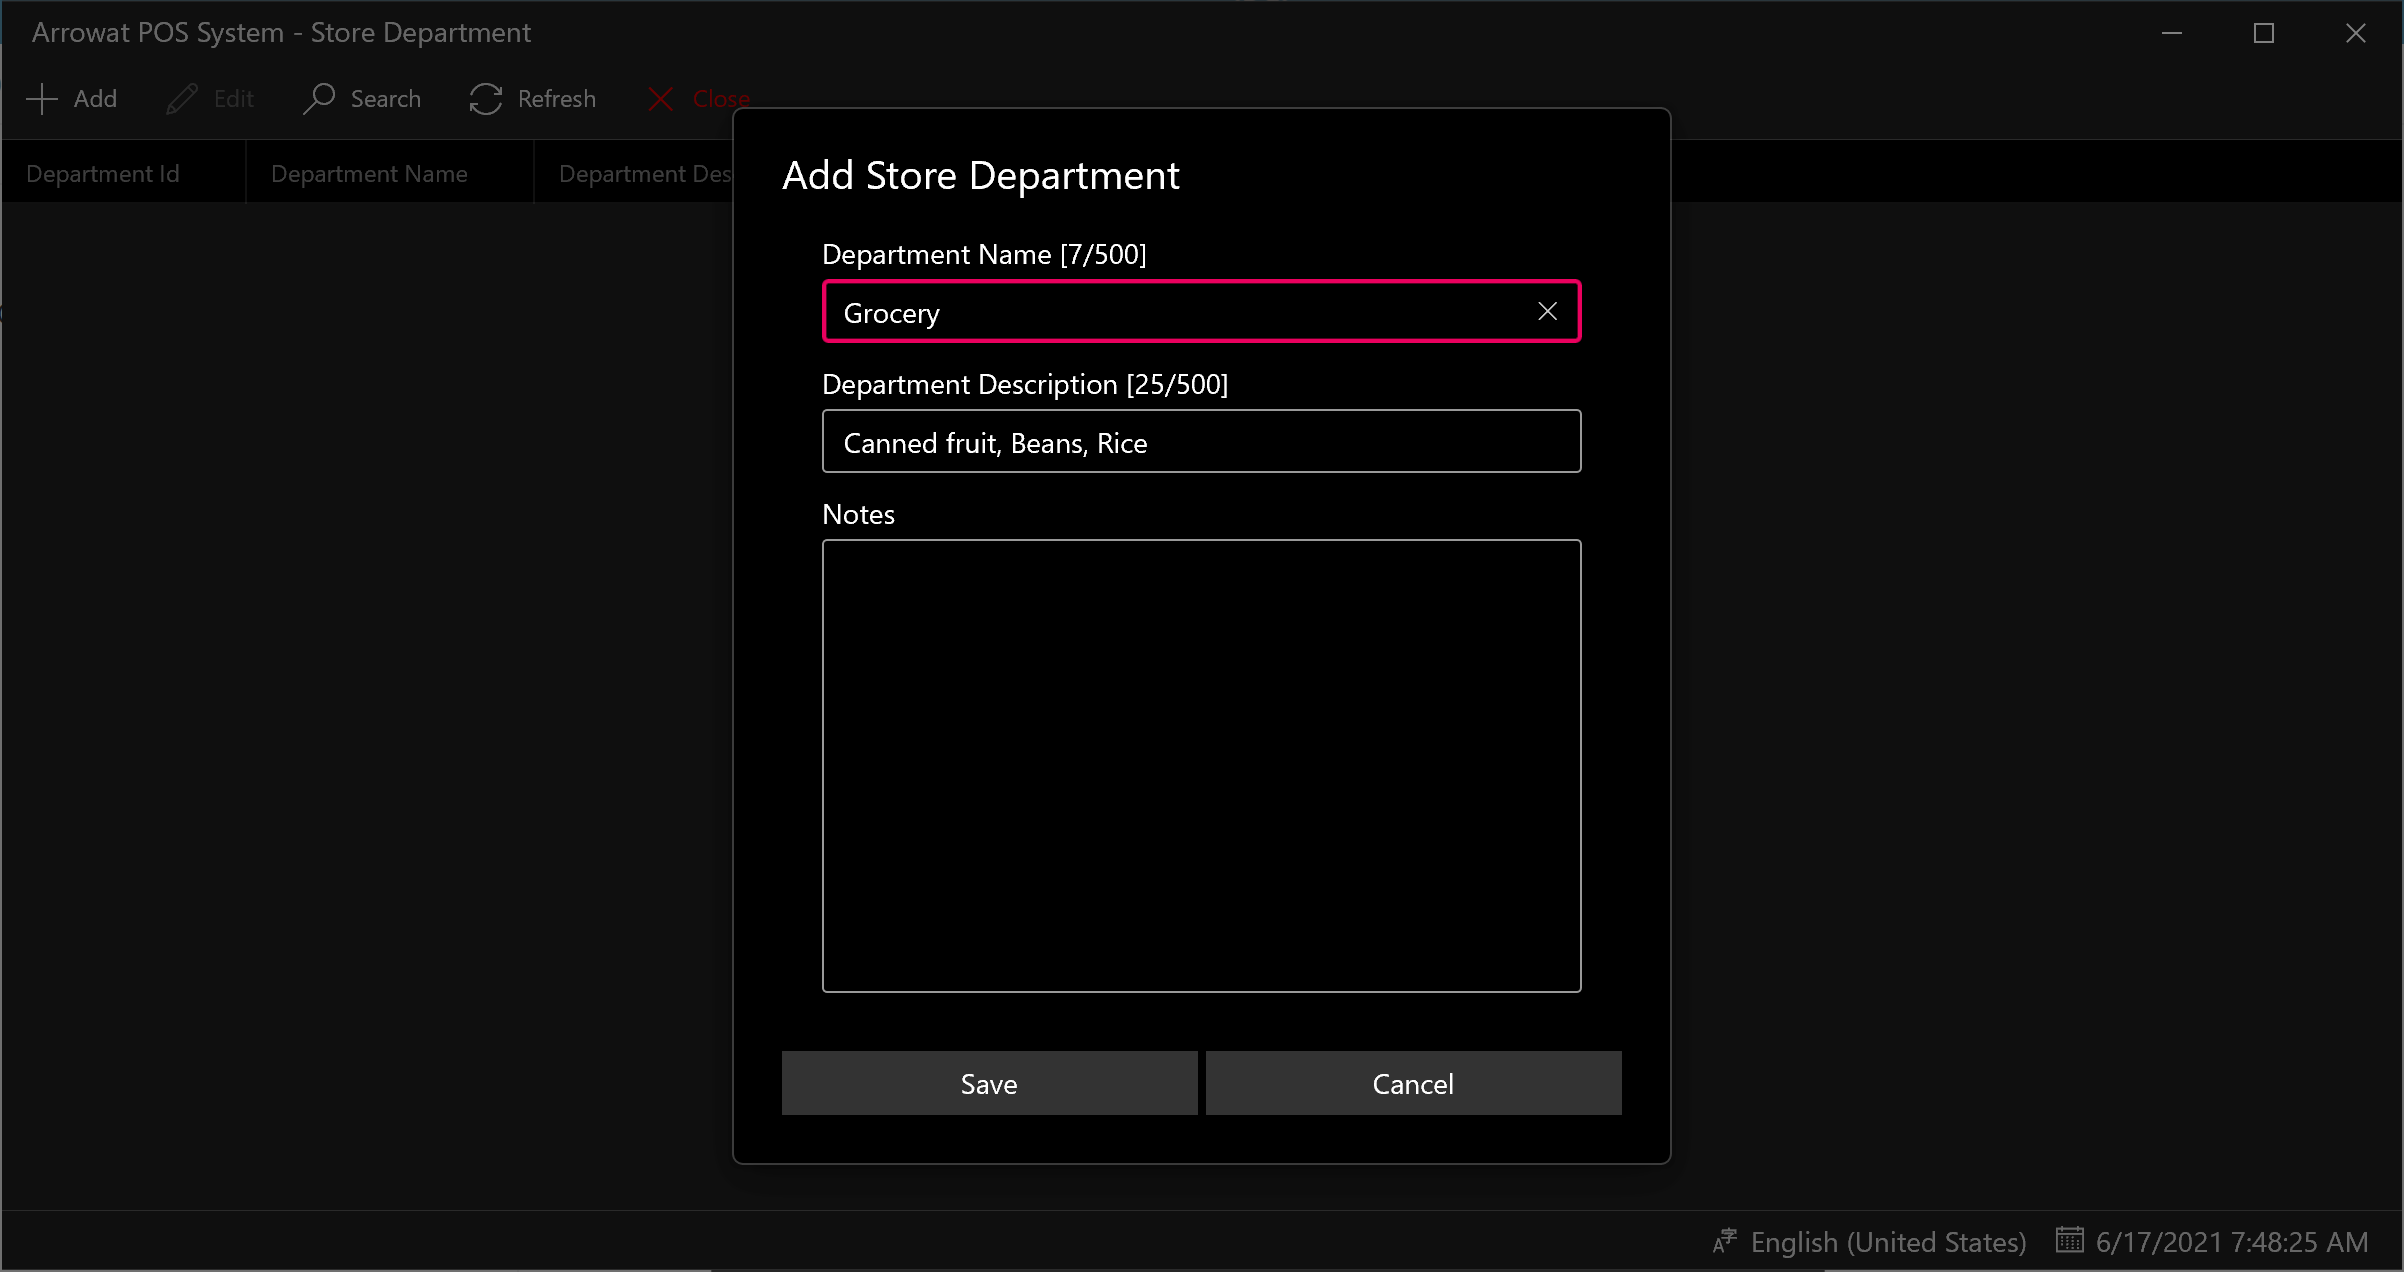
Click Add
A window form will be shown, fill the texboxes with the information required as following.
- Department Name: Grocery
- Department Description: Canned fruit, Beans, Rice
- Notes: Write a template note or leave it empty
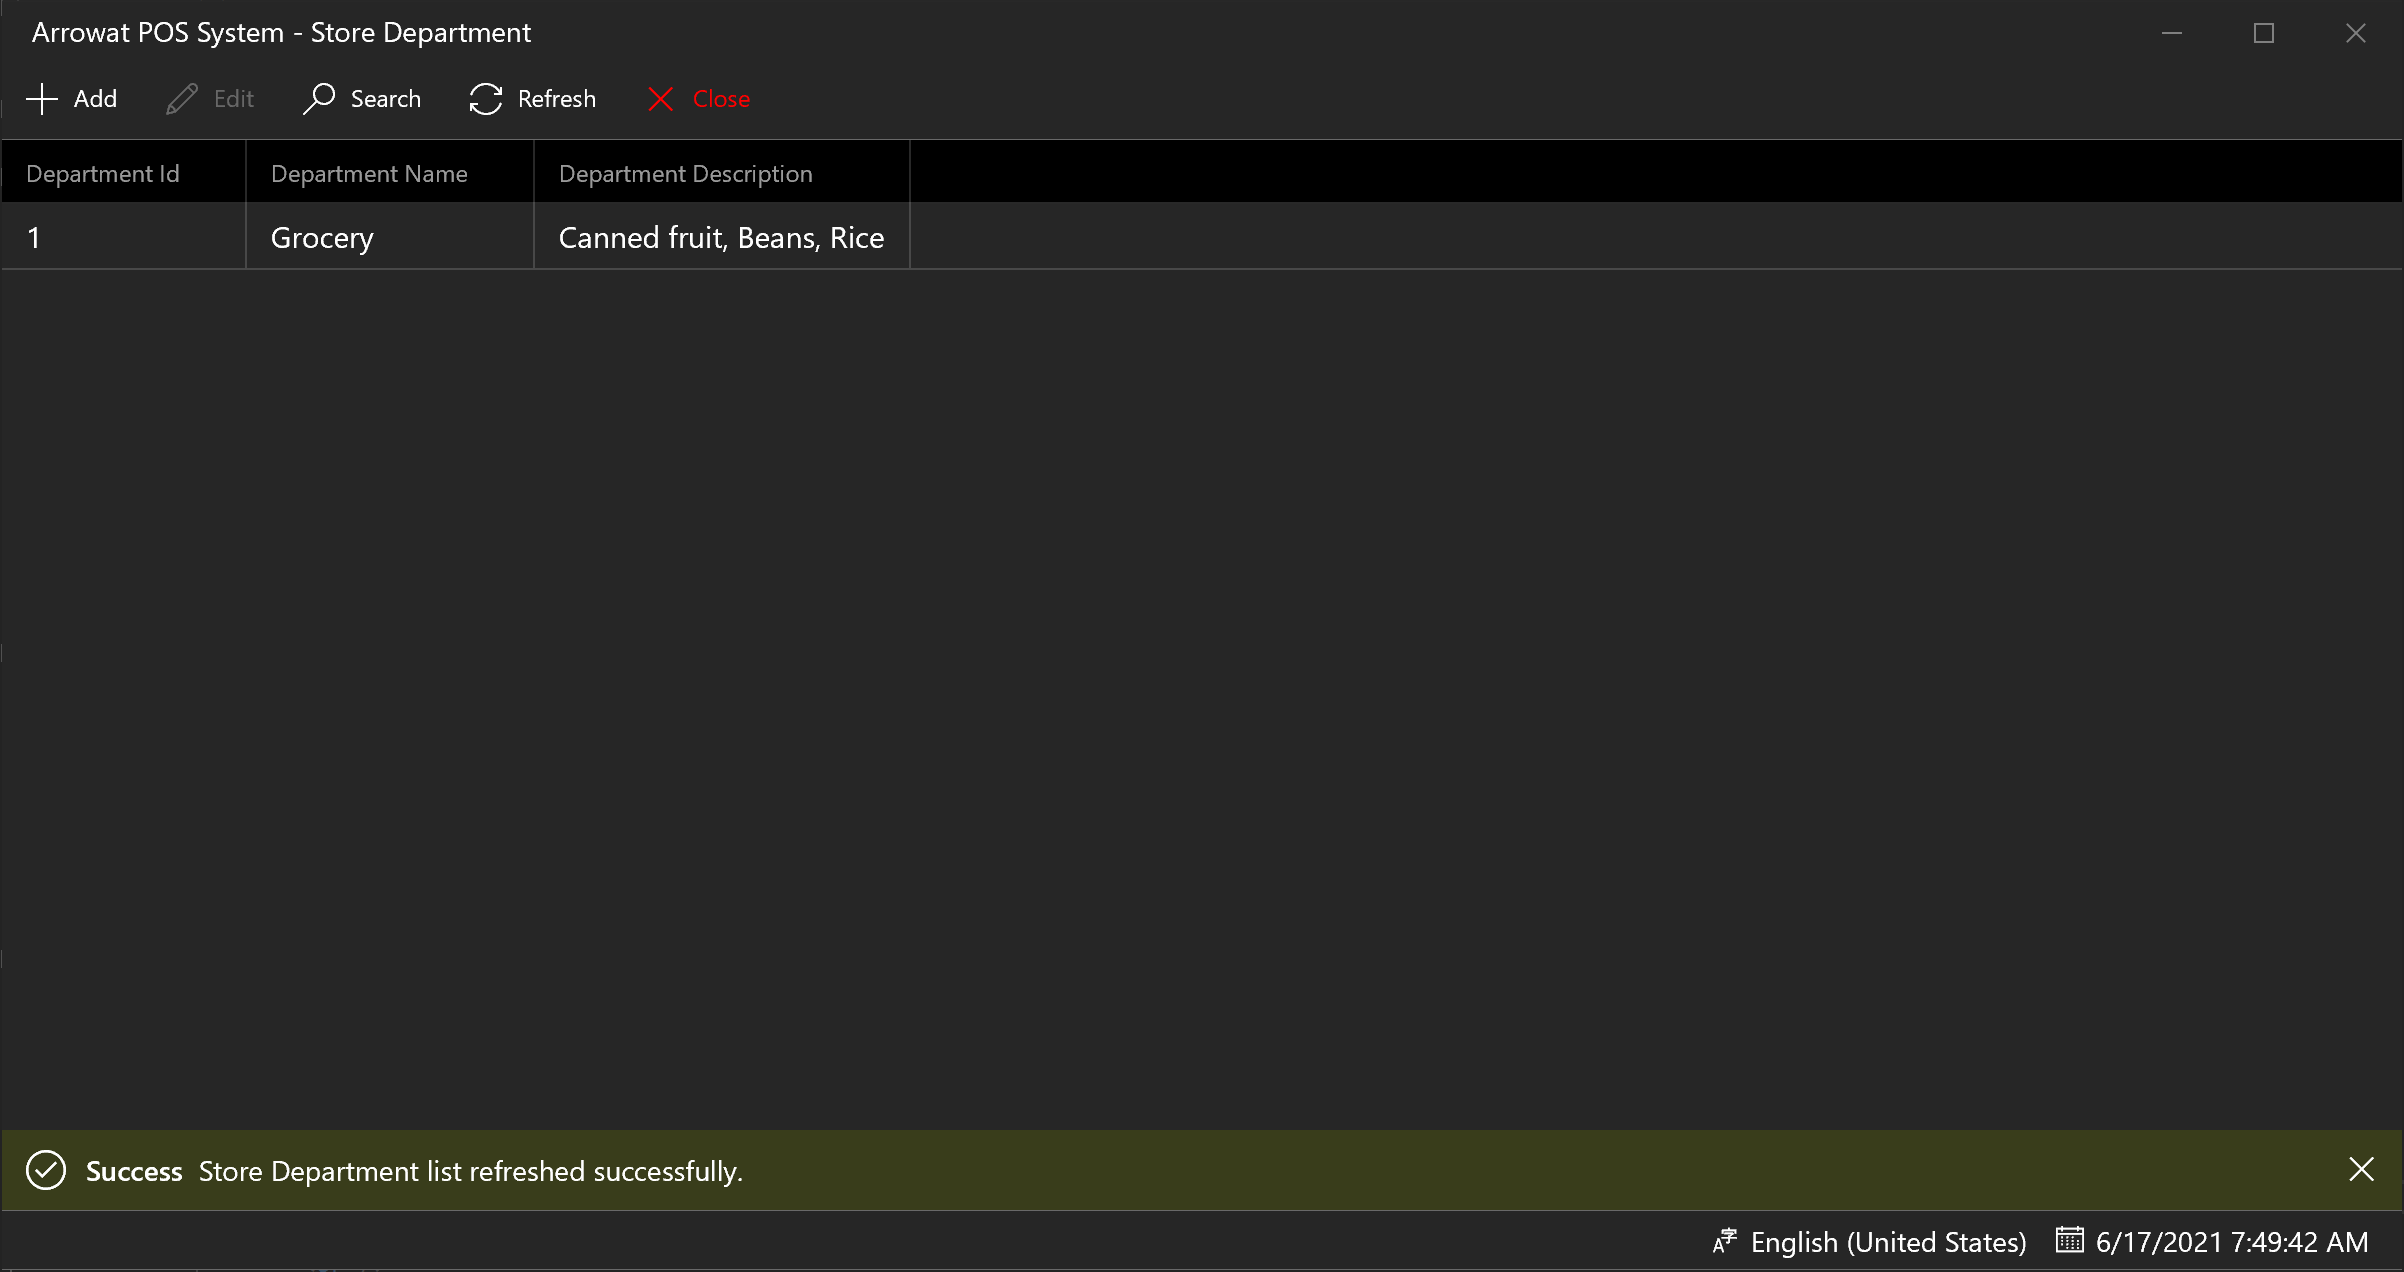
Click Save button to save the Department data. if you want to see the list you can click the refresh button.
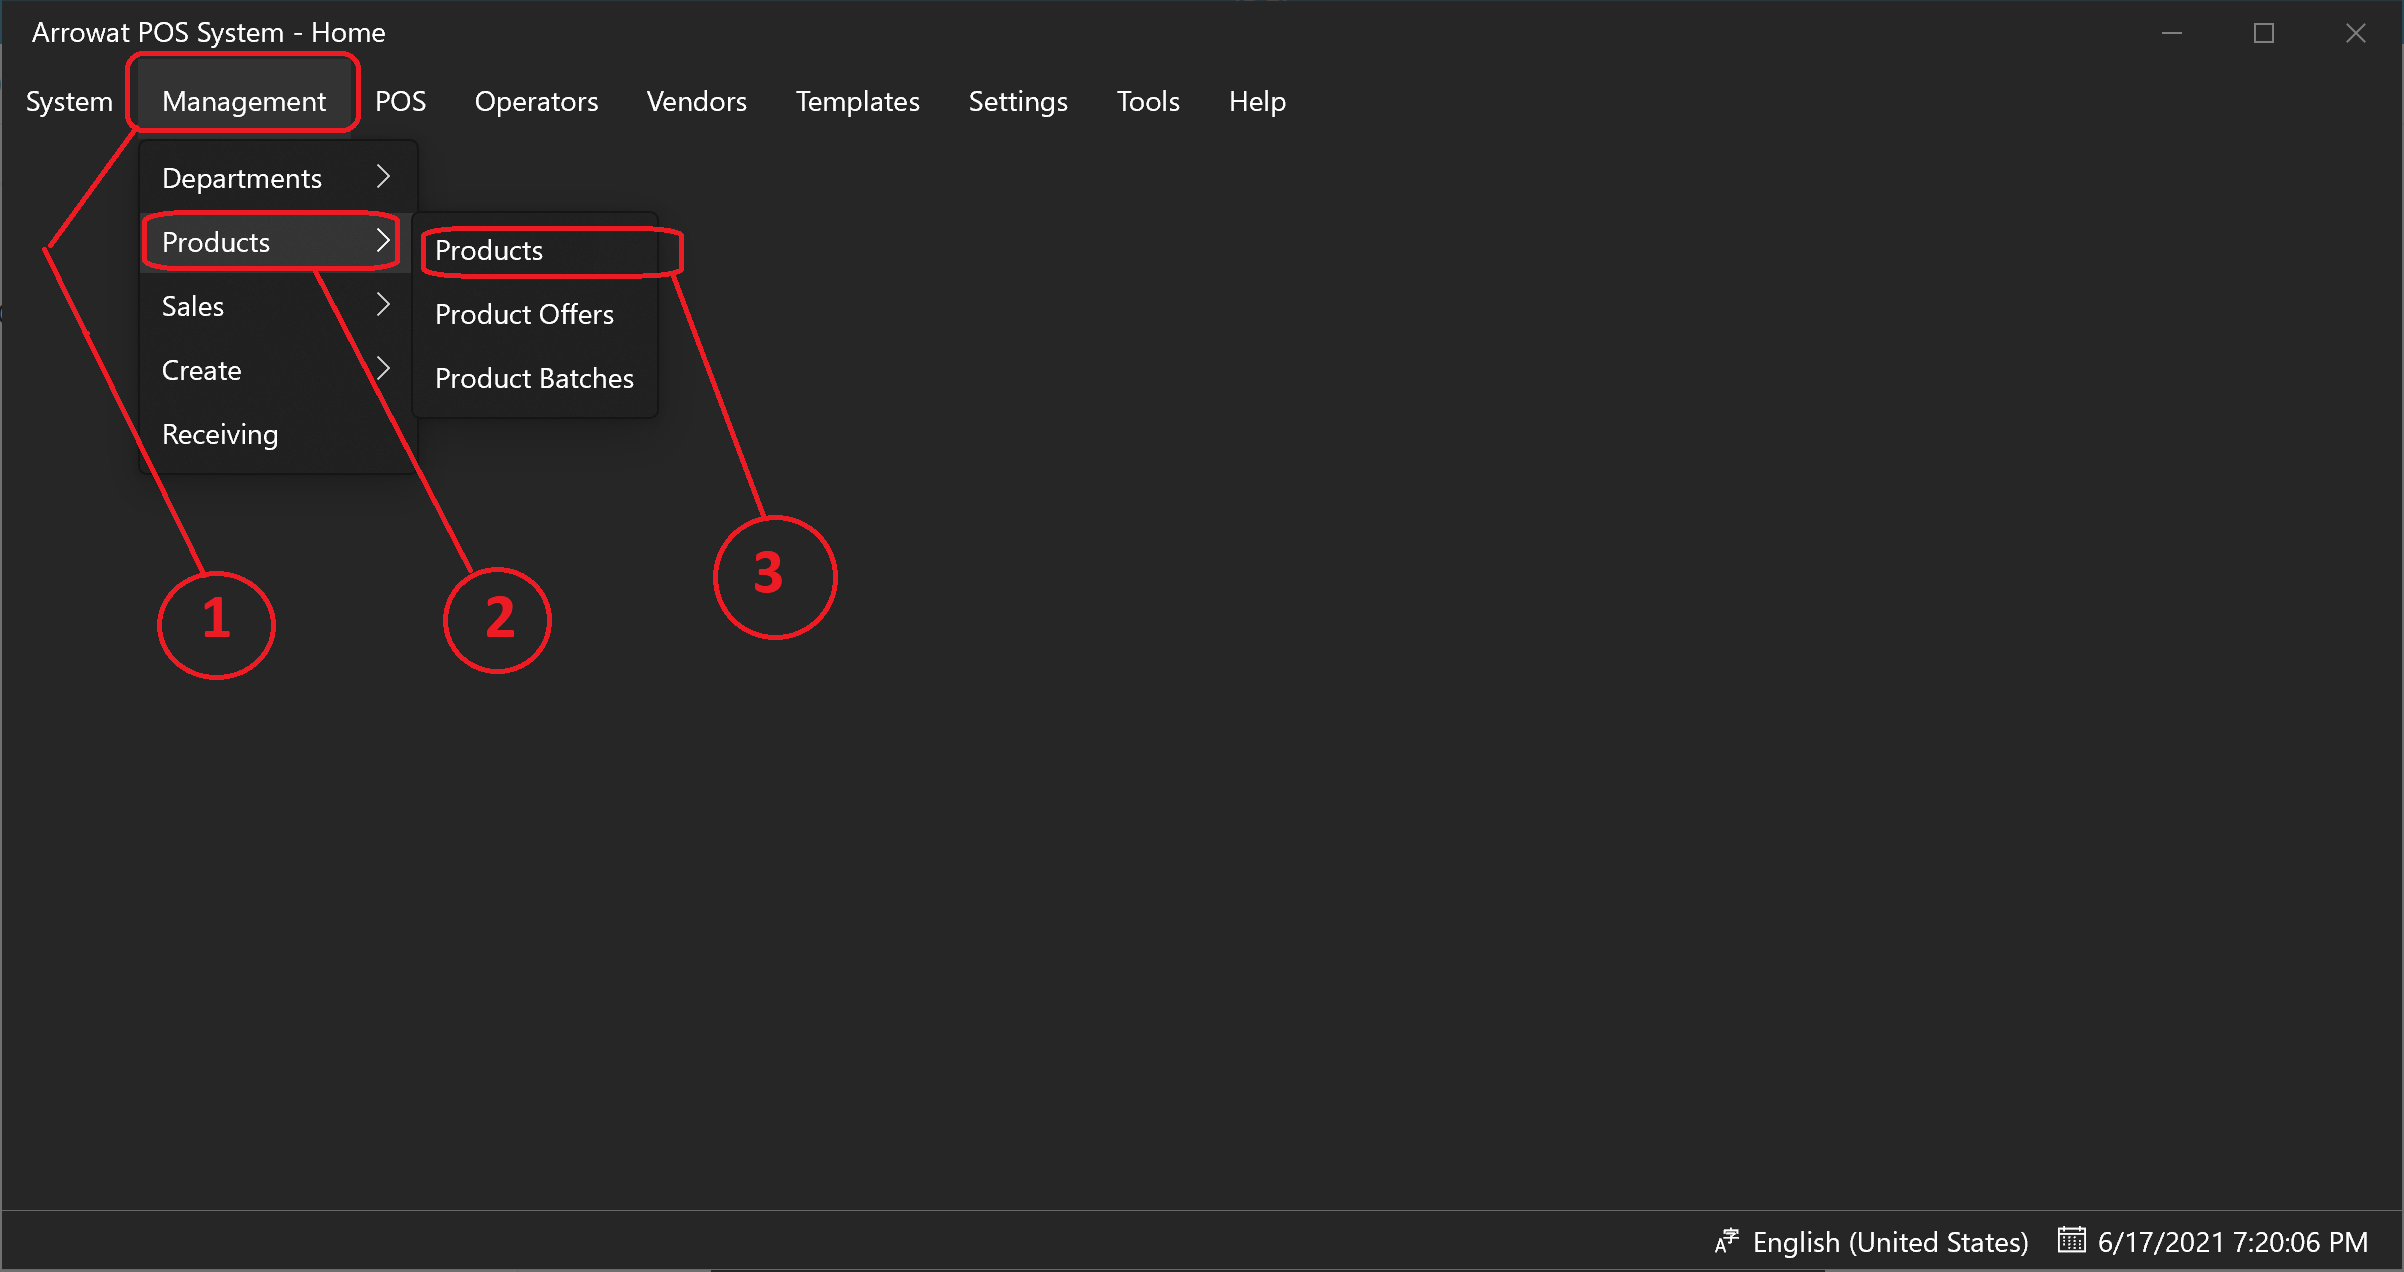
Adding Products
- Open Arrowat POS System
-
Click Management > Products > Products
You will navigate to Products page
-
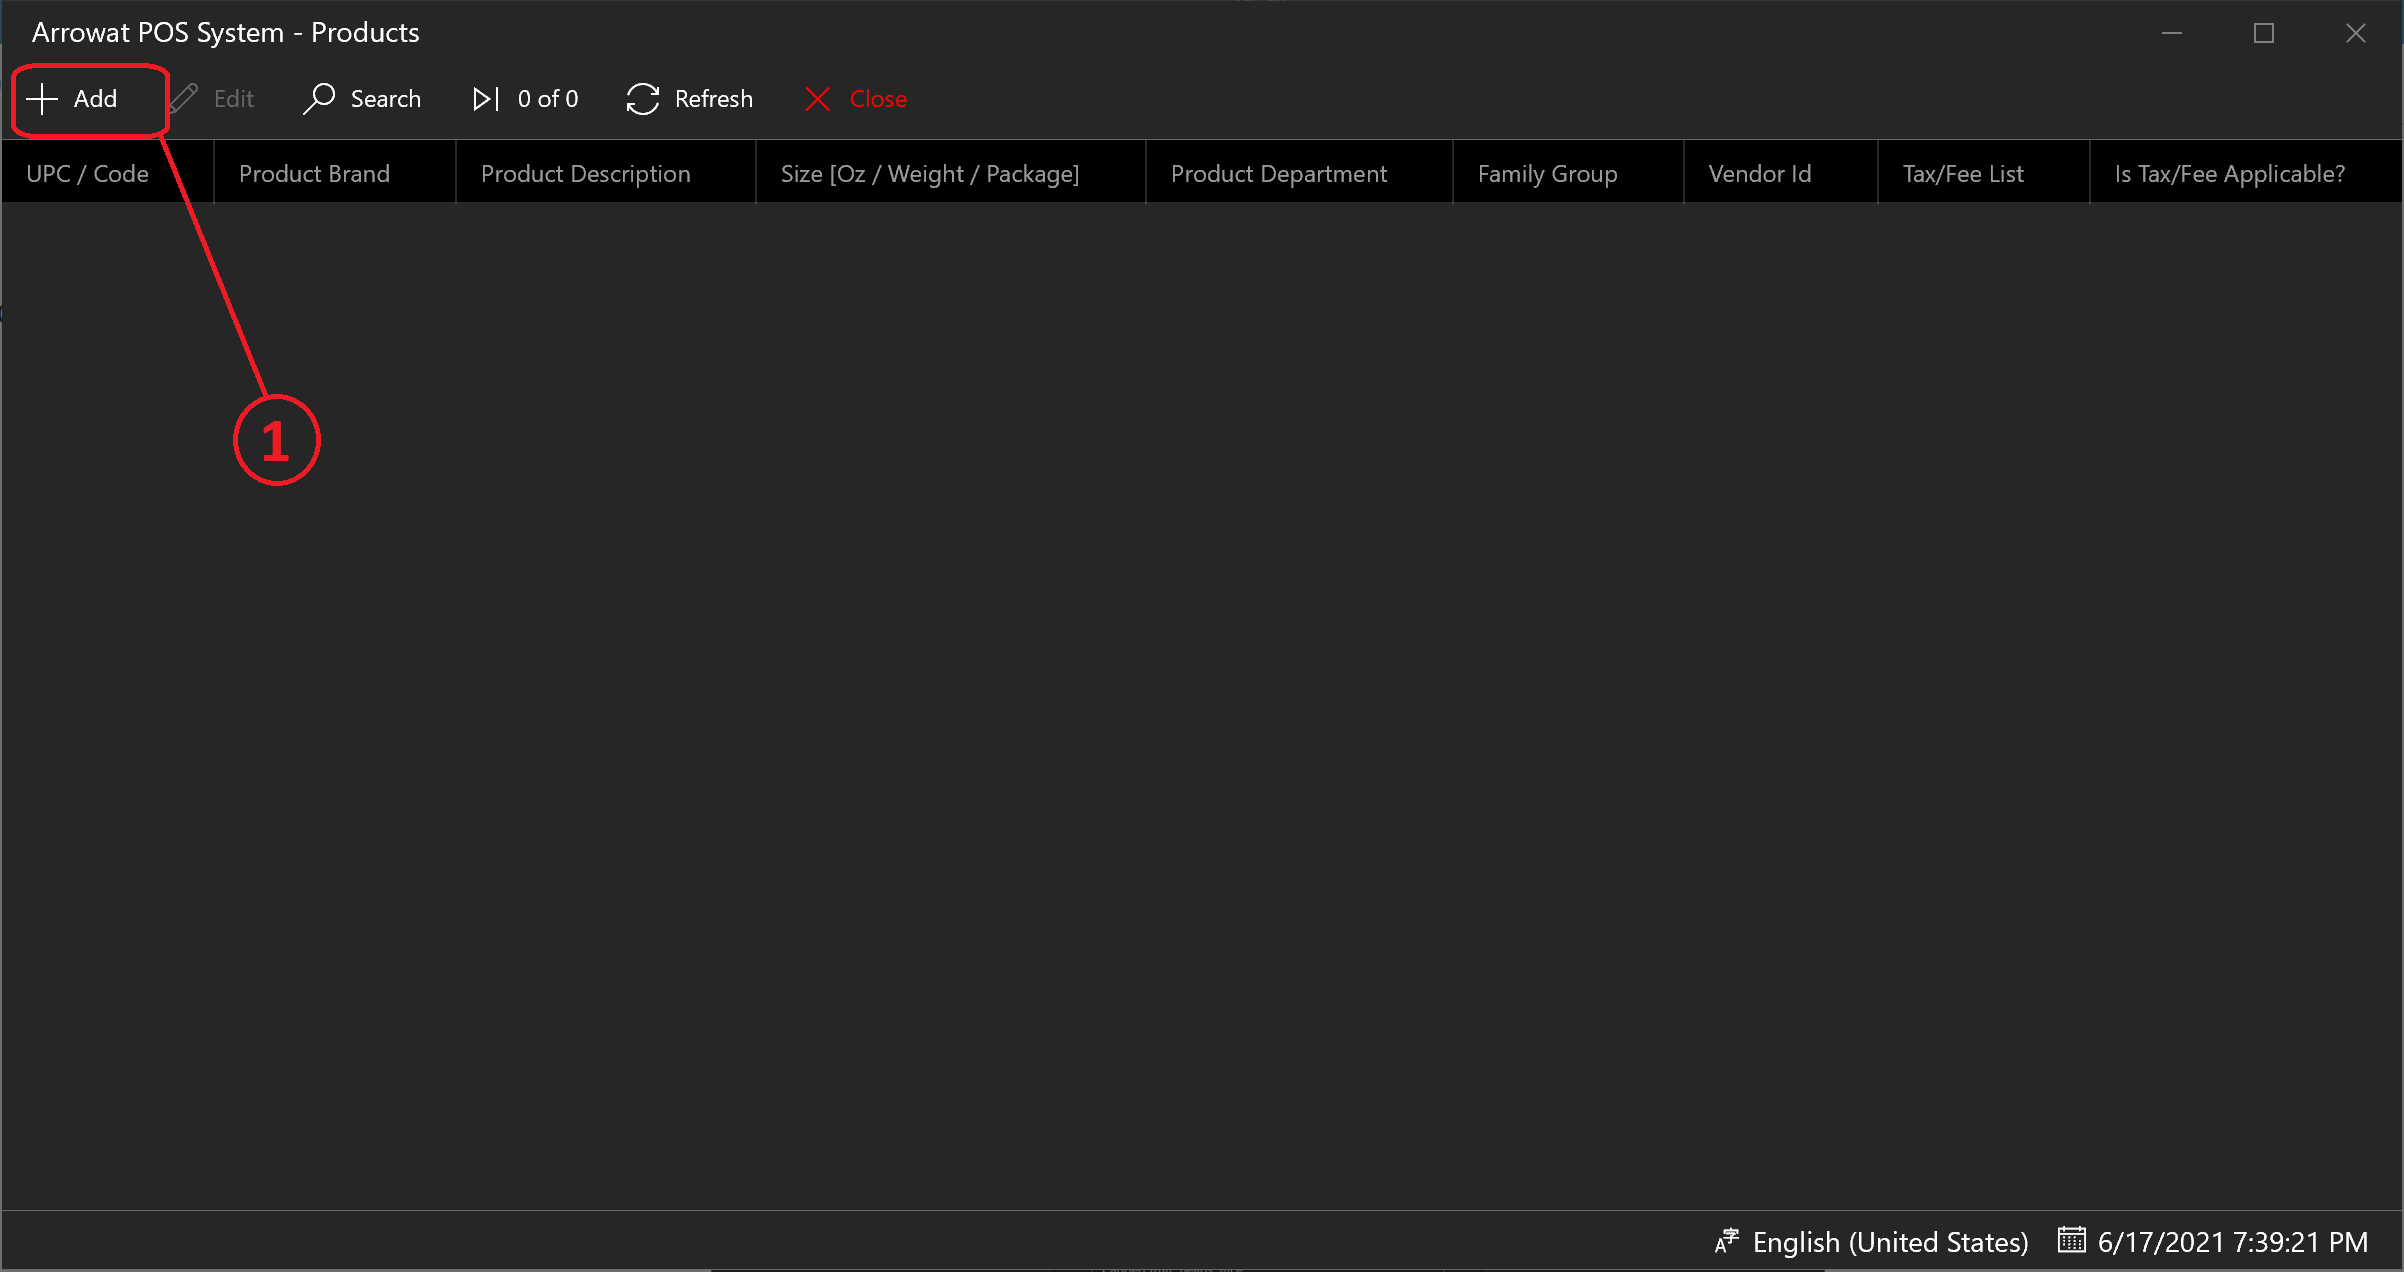
Click Add
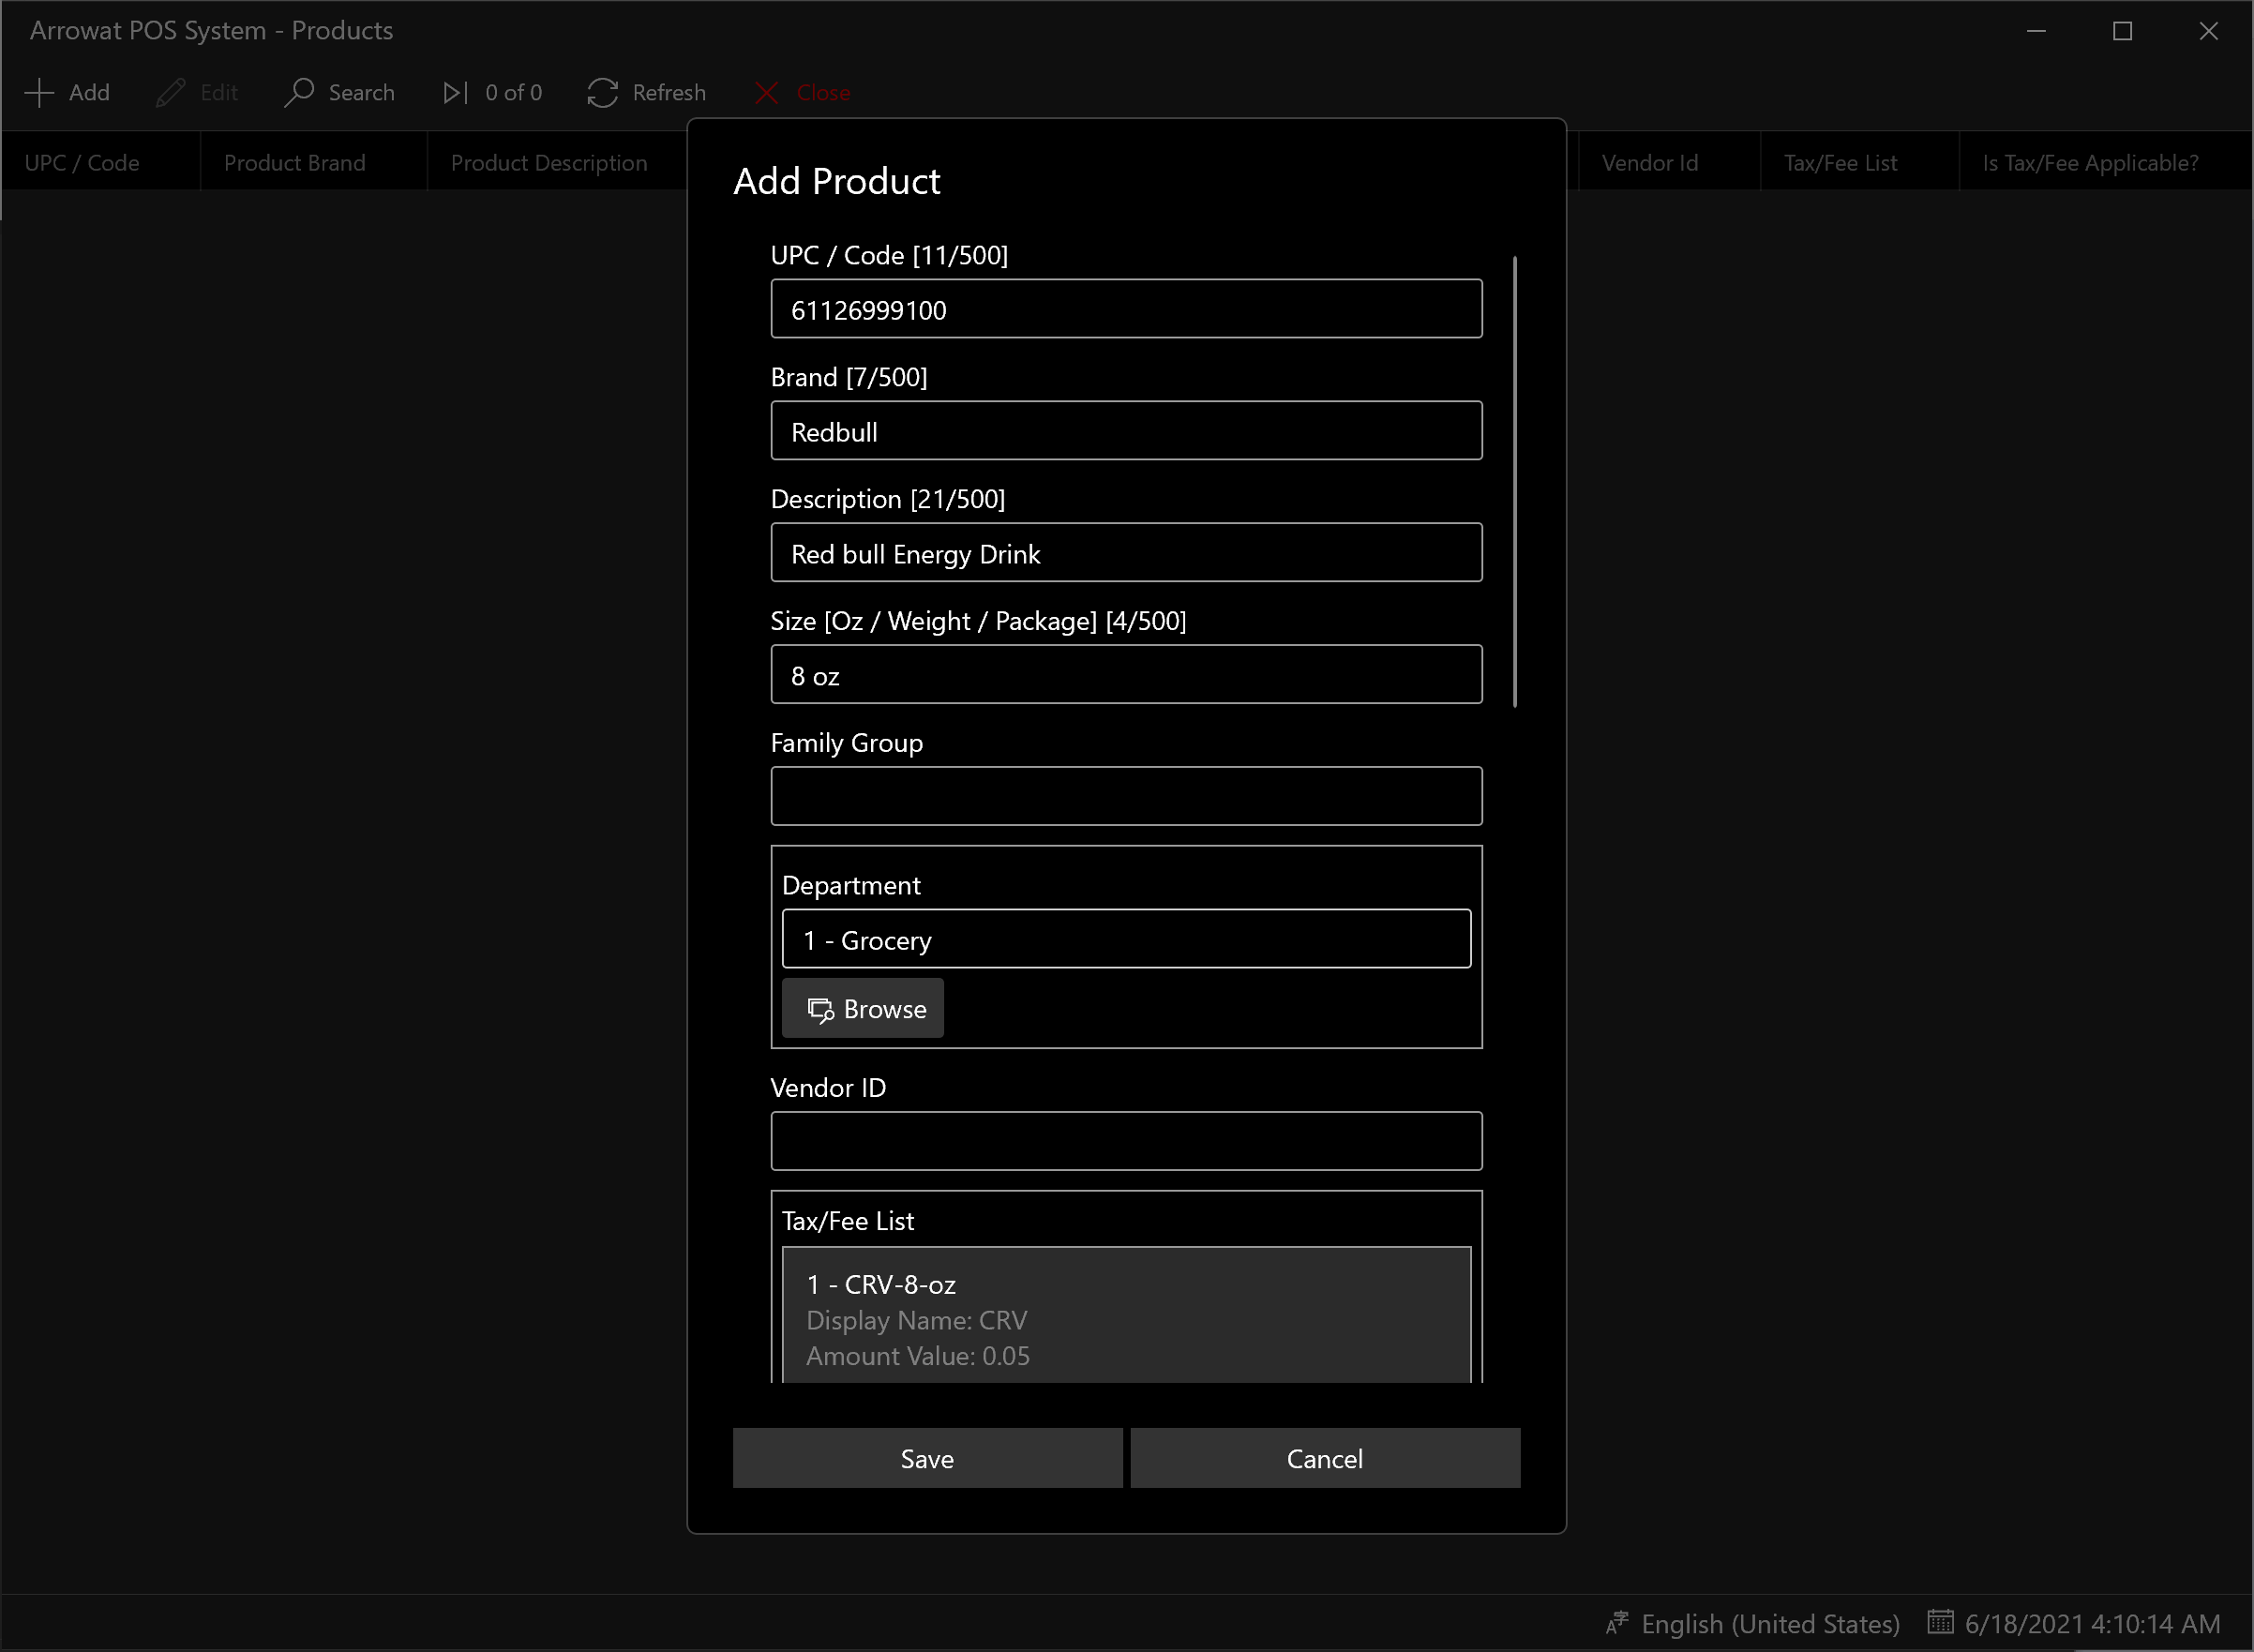
A window form will be shown, fill the texboxes with the information required as following.
- UPC/Code: Enter the Product id or UPC barcode
- Brand: The brand of the product
- Description: Describe the product (the description is that is shown on POS Screen to customer and is printed on the receipt)
- Size[Oz/Weight/Package]: Normally it is only to describe the size of the product example 16 Oz, 12 Pk.
- Family Group: The group of product it is related to.
- Department: Click Browse button to select a department for the product, the departments on the list are the department you have added as explained on Adding Deparment section
- Vendor id: The id of the company or person who provide the product to your store
- Tax/Fee List: Click Browse Button, Select the Tax or Fee for the product if Tax or fee is applicable, you may select more than one from the list because some products are taxable and has fee too.
- Is Tax Applicable?: Yes to Apply, No to Not Apply
- Sell Price: The Retail Price you will sell the product to customers
- Cost: The Product cost that the vendor gave you when you purchase to them.
- Cost Details: You may enter the details of the cost Like [8 Units], [12 pk] etc.
- Is Available For sale: Yes If the product will be scanned and cashier will be able to sale, NO if the product won't be available for sale, a Message That Product is not available for sale will be shown when cashier try to sale it.
- Notes: You may write a not or leave it empty
- Last Updated Date: The last date and time the product was updated
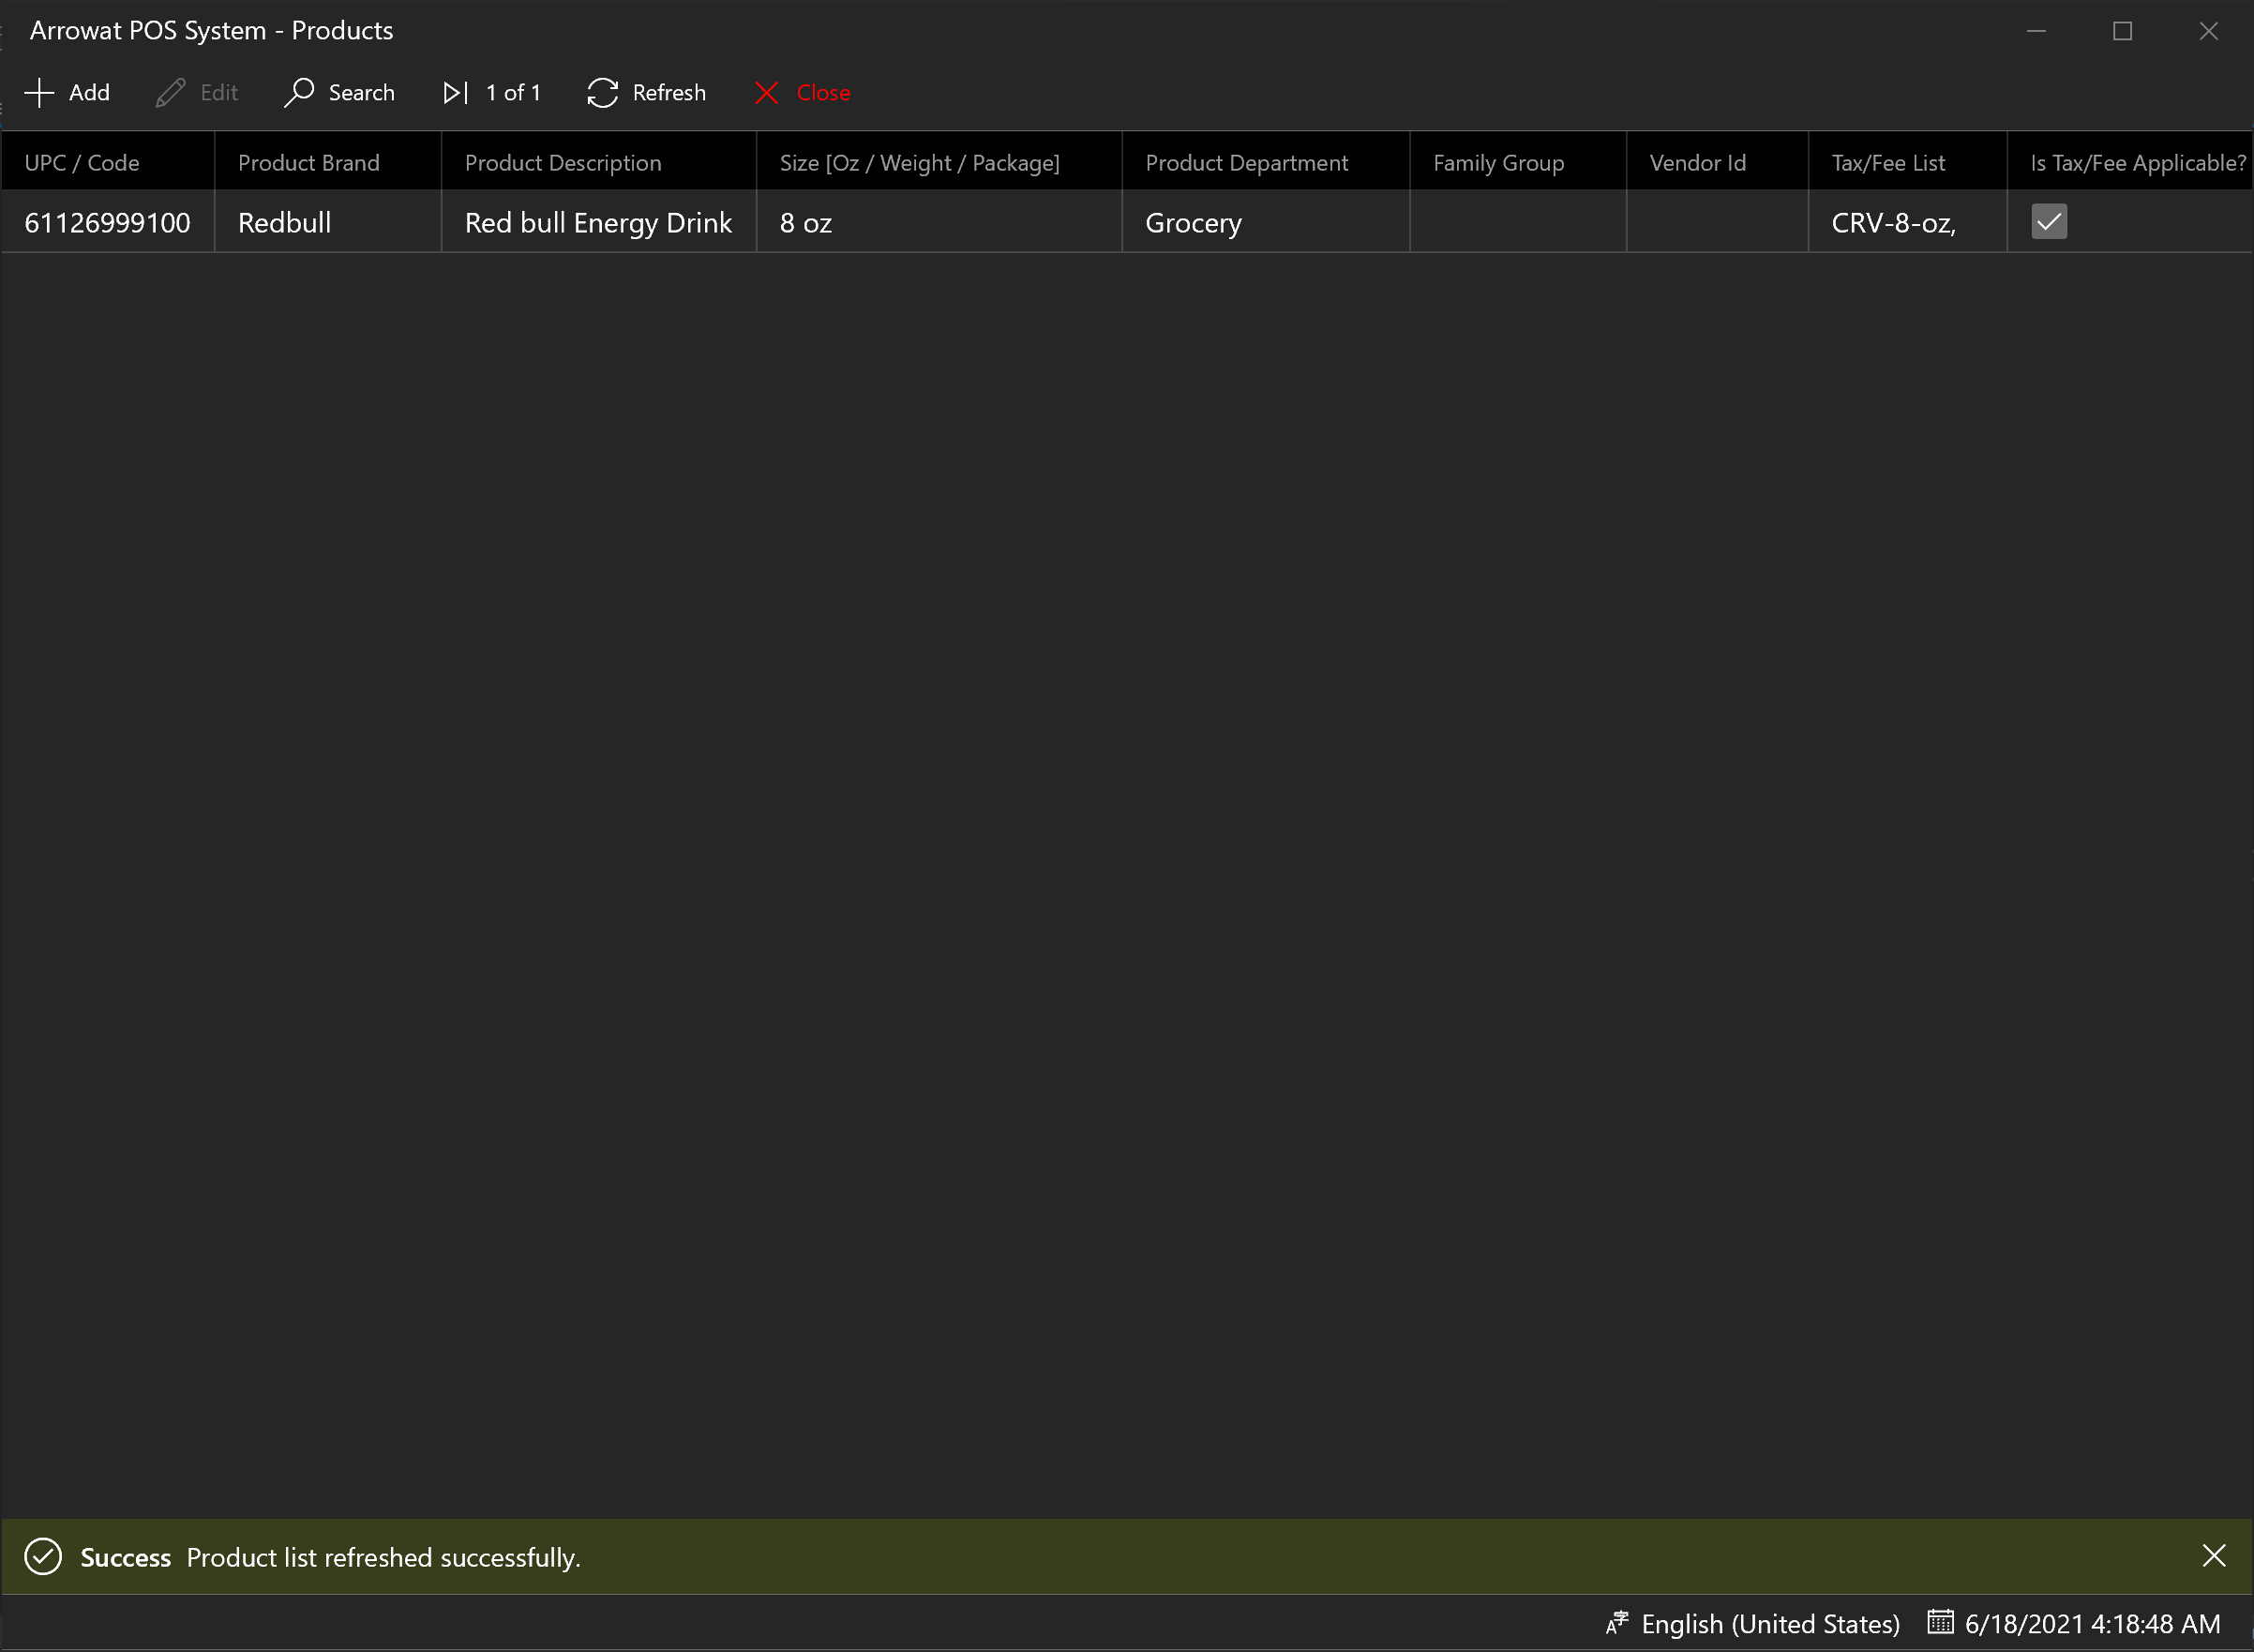
Click Save button to save the Product data. if you want to see the list you can click the refresh button.
Arrowat POS System can have many products added, once you have added the products are available to sell and to create offers.
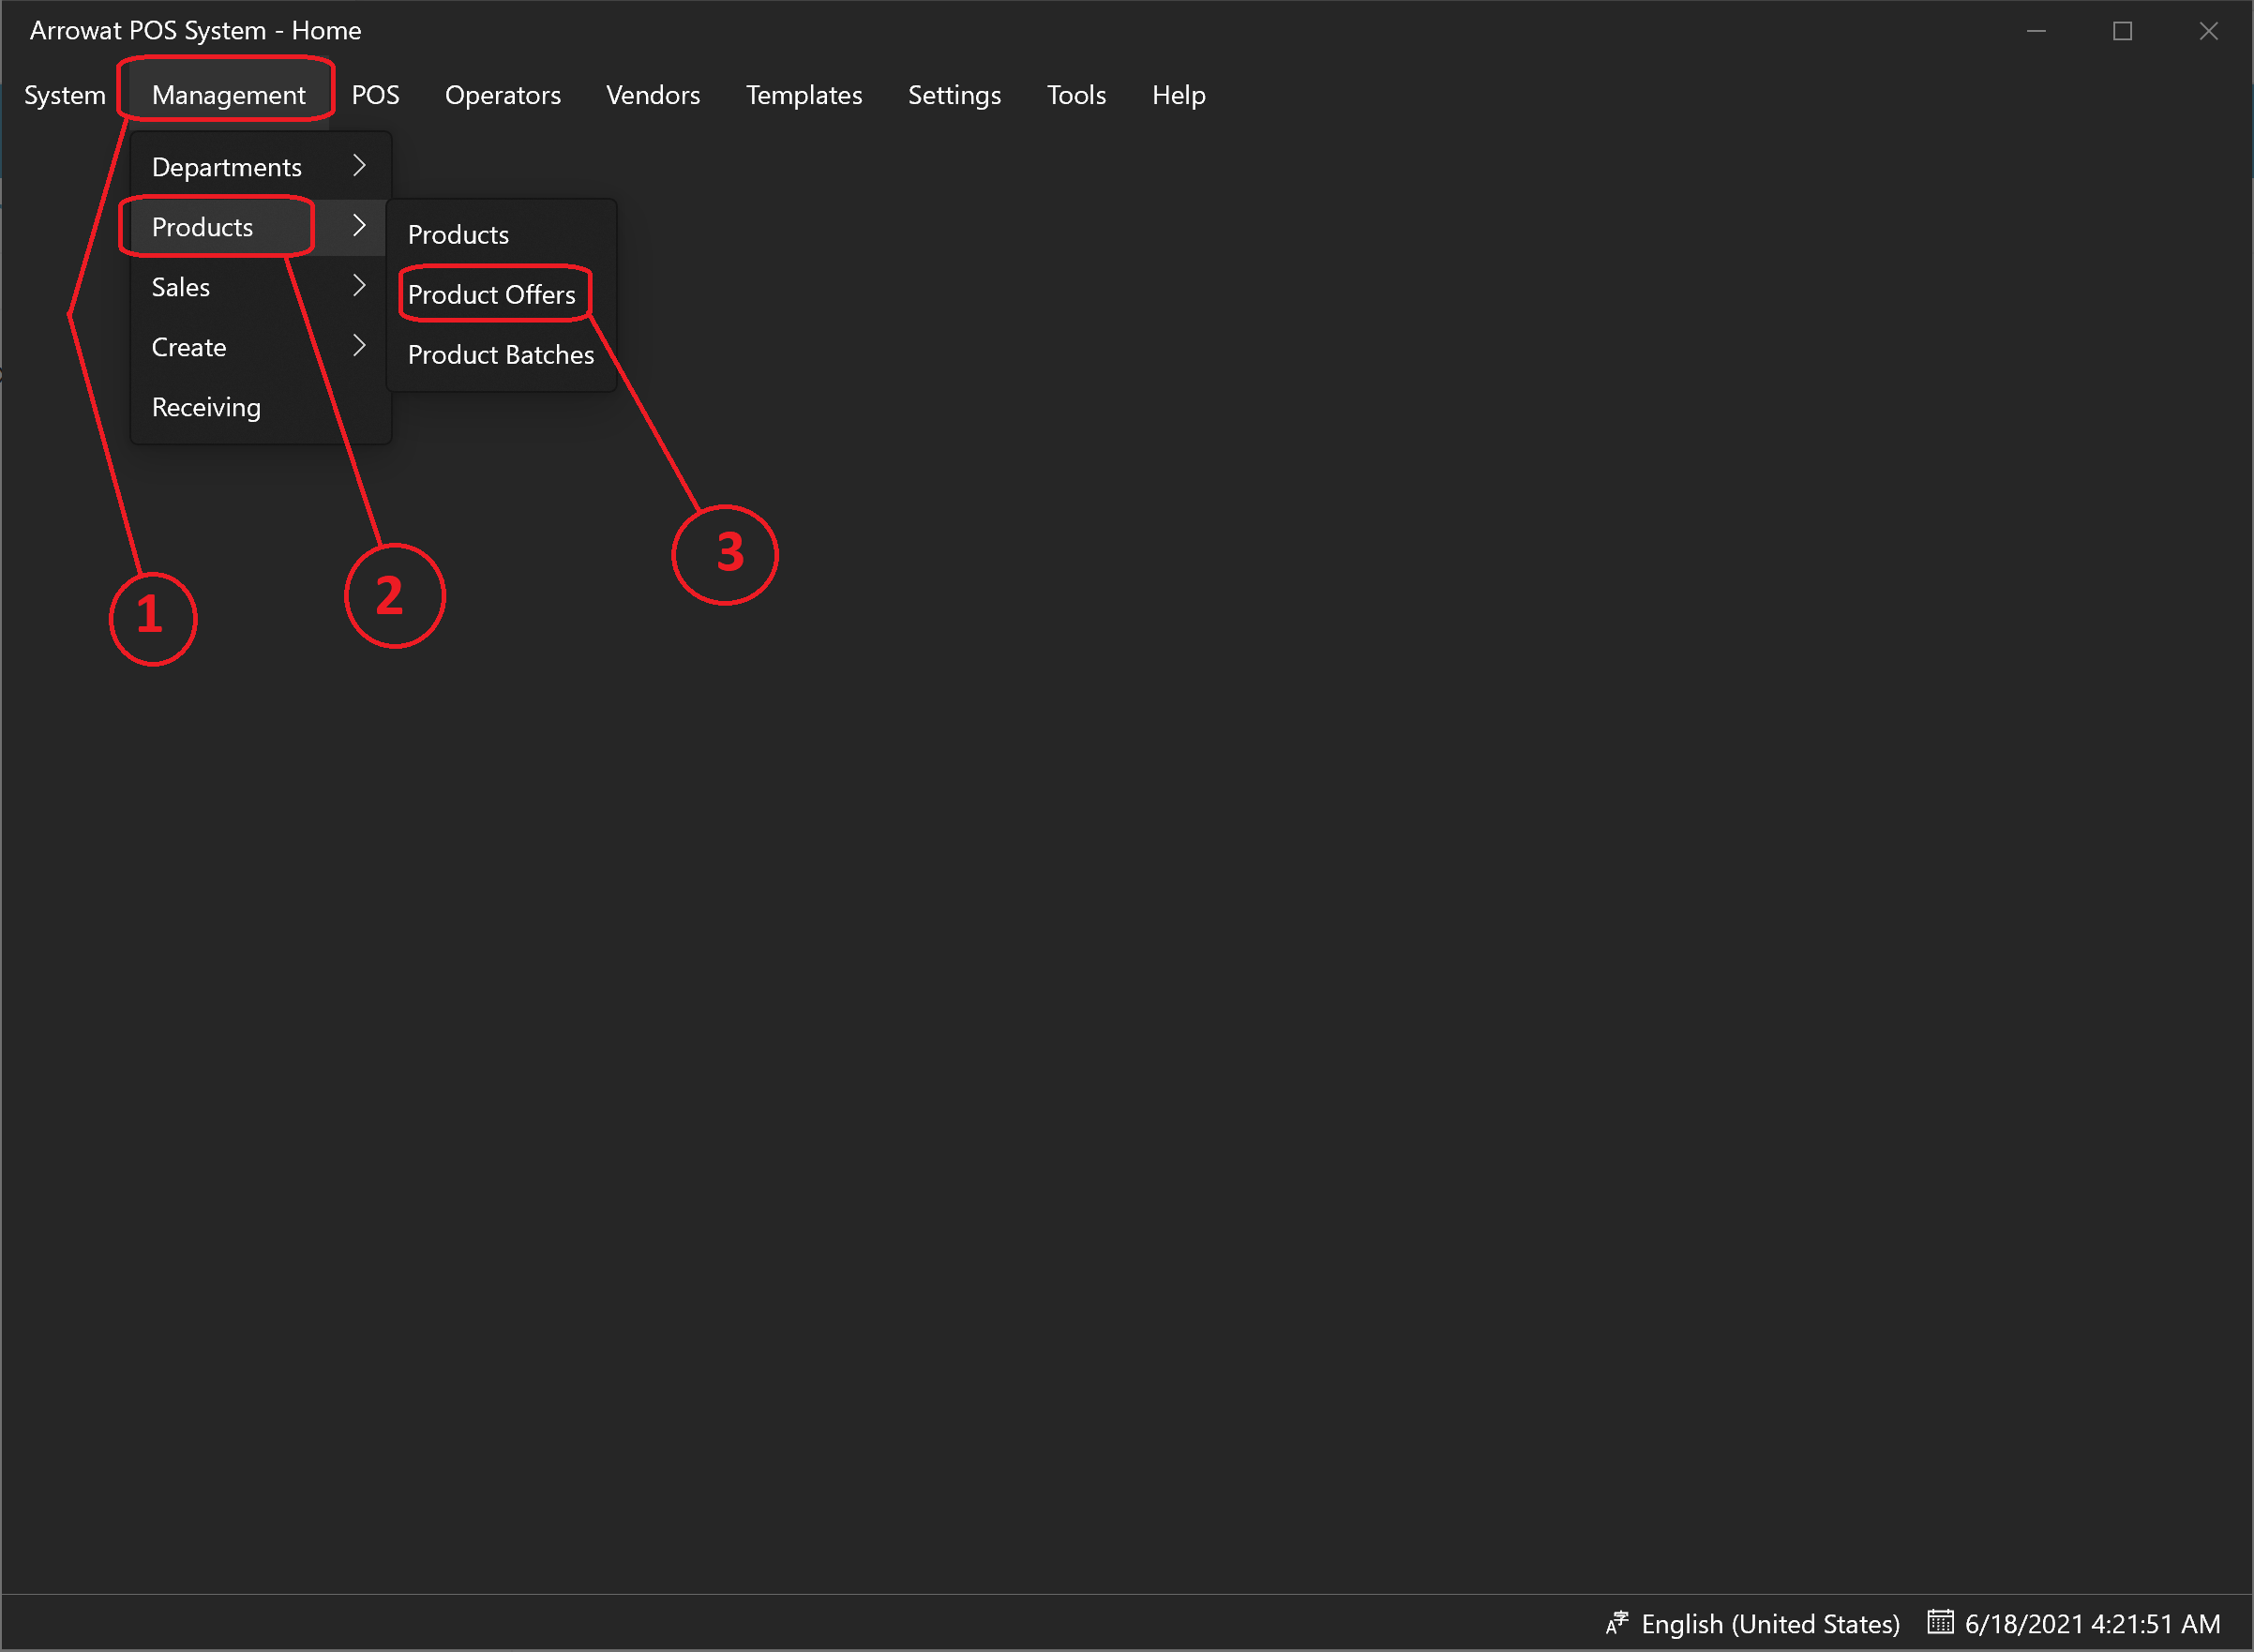
Adding Product Offers
Products offer works by Start Date Time and End Date Time, for example a product start date 6-19-2021 at time 7:00 AM and End date 6-20-2021 at 5:00 AM, before trying to add product offer make sure the product has been added on the product data exaplined in the previous section Adding Products.
- Open Arrowat POS System
-
Click Management > Products > Product Offers
You will navigate to Product Offers page
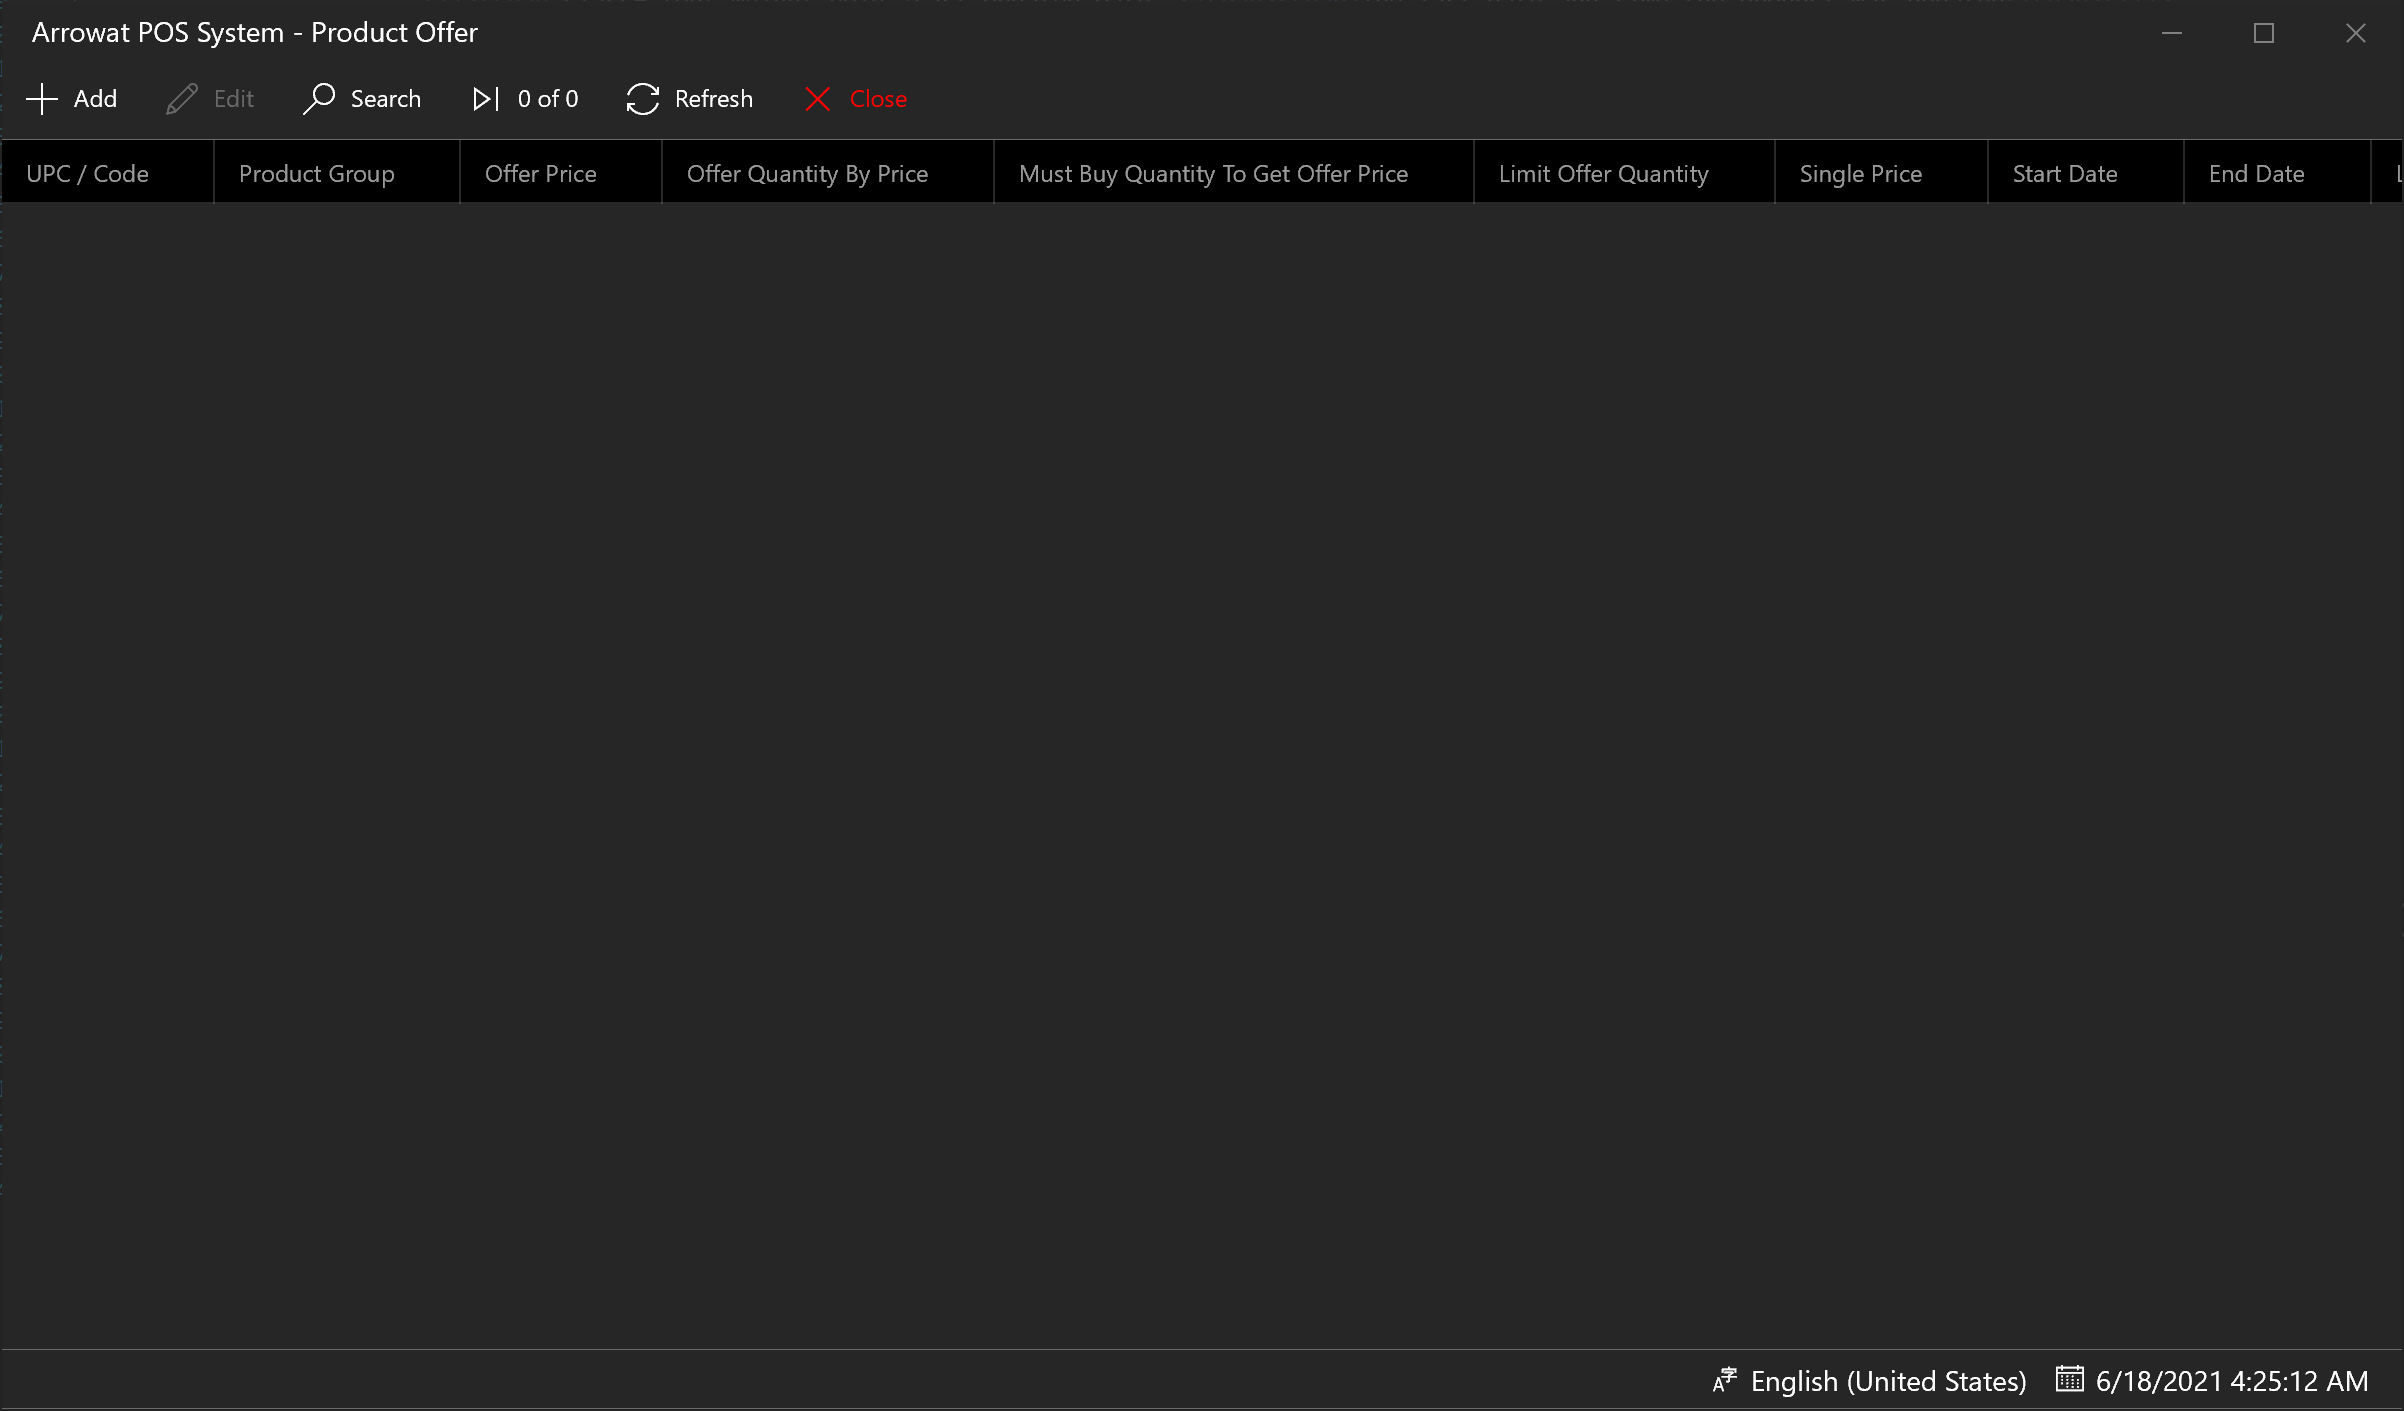
-
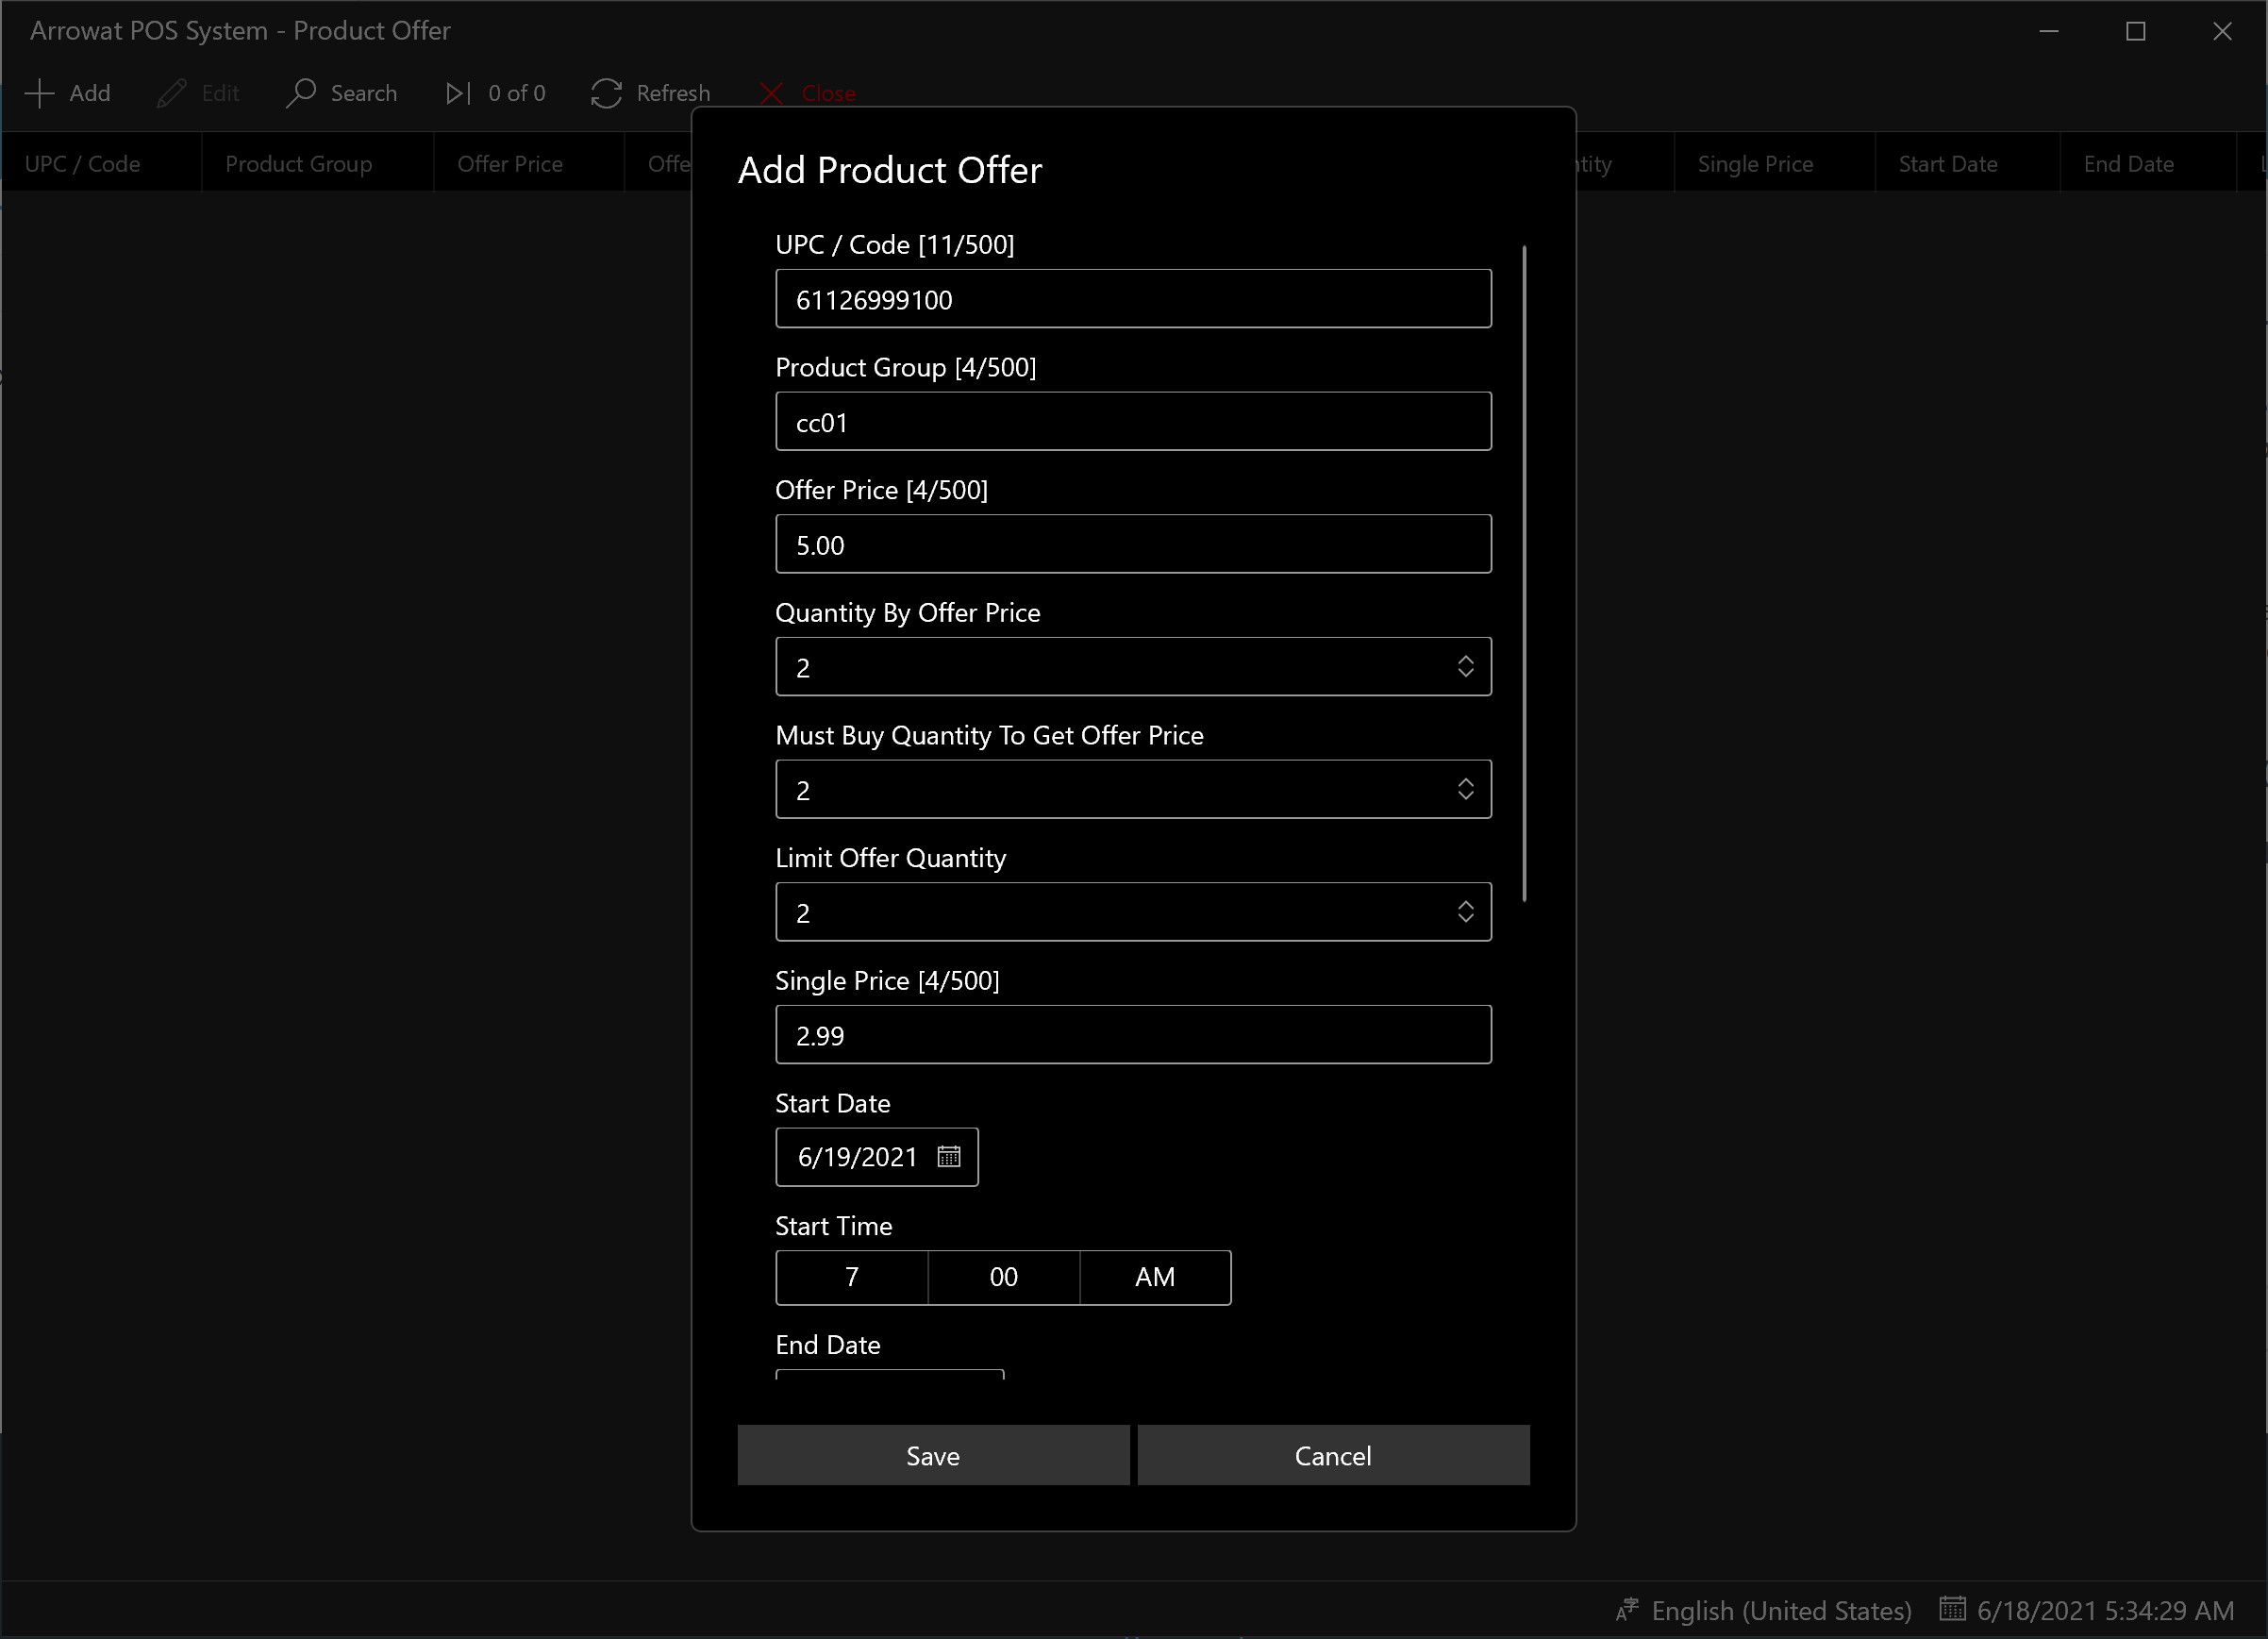
Click Add
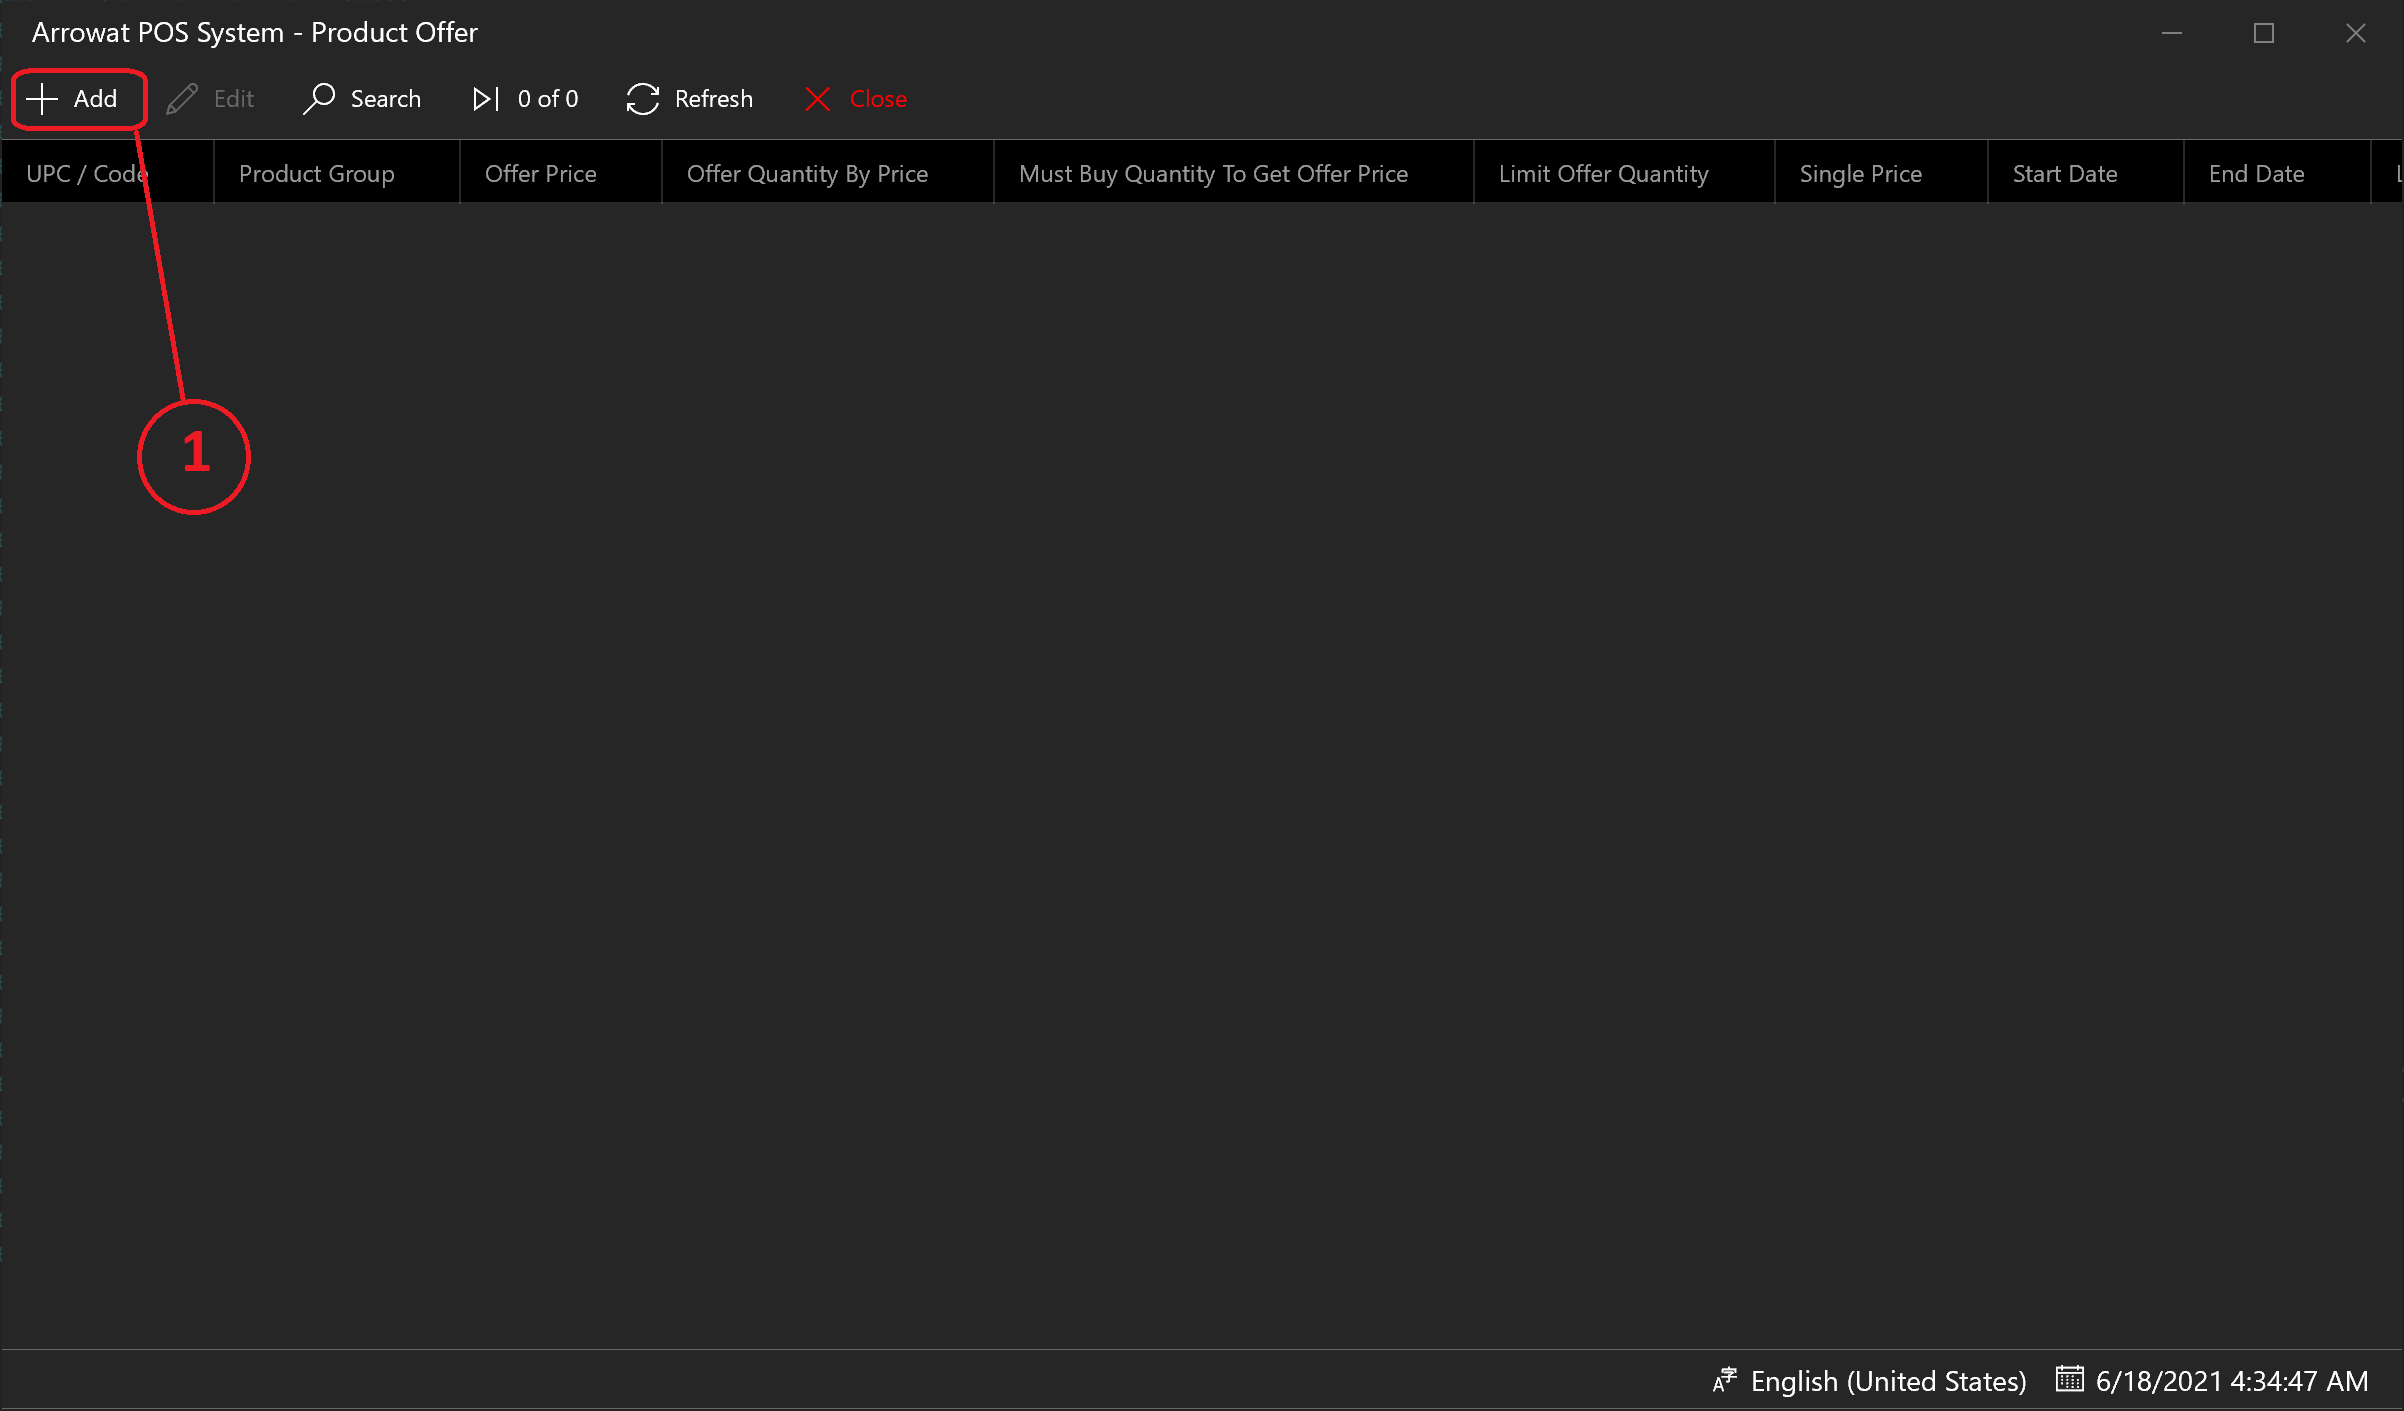
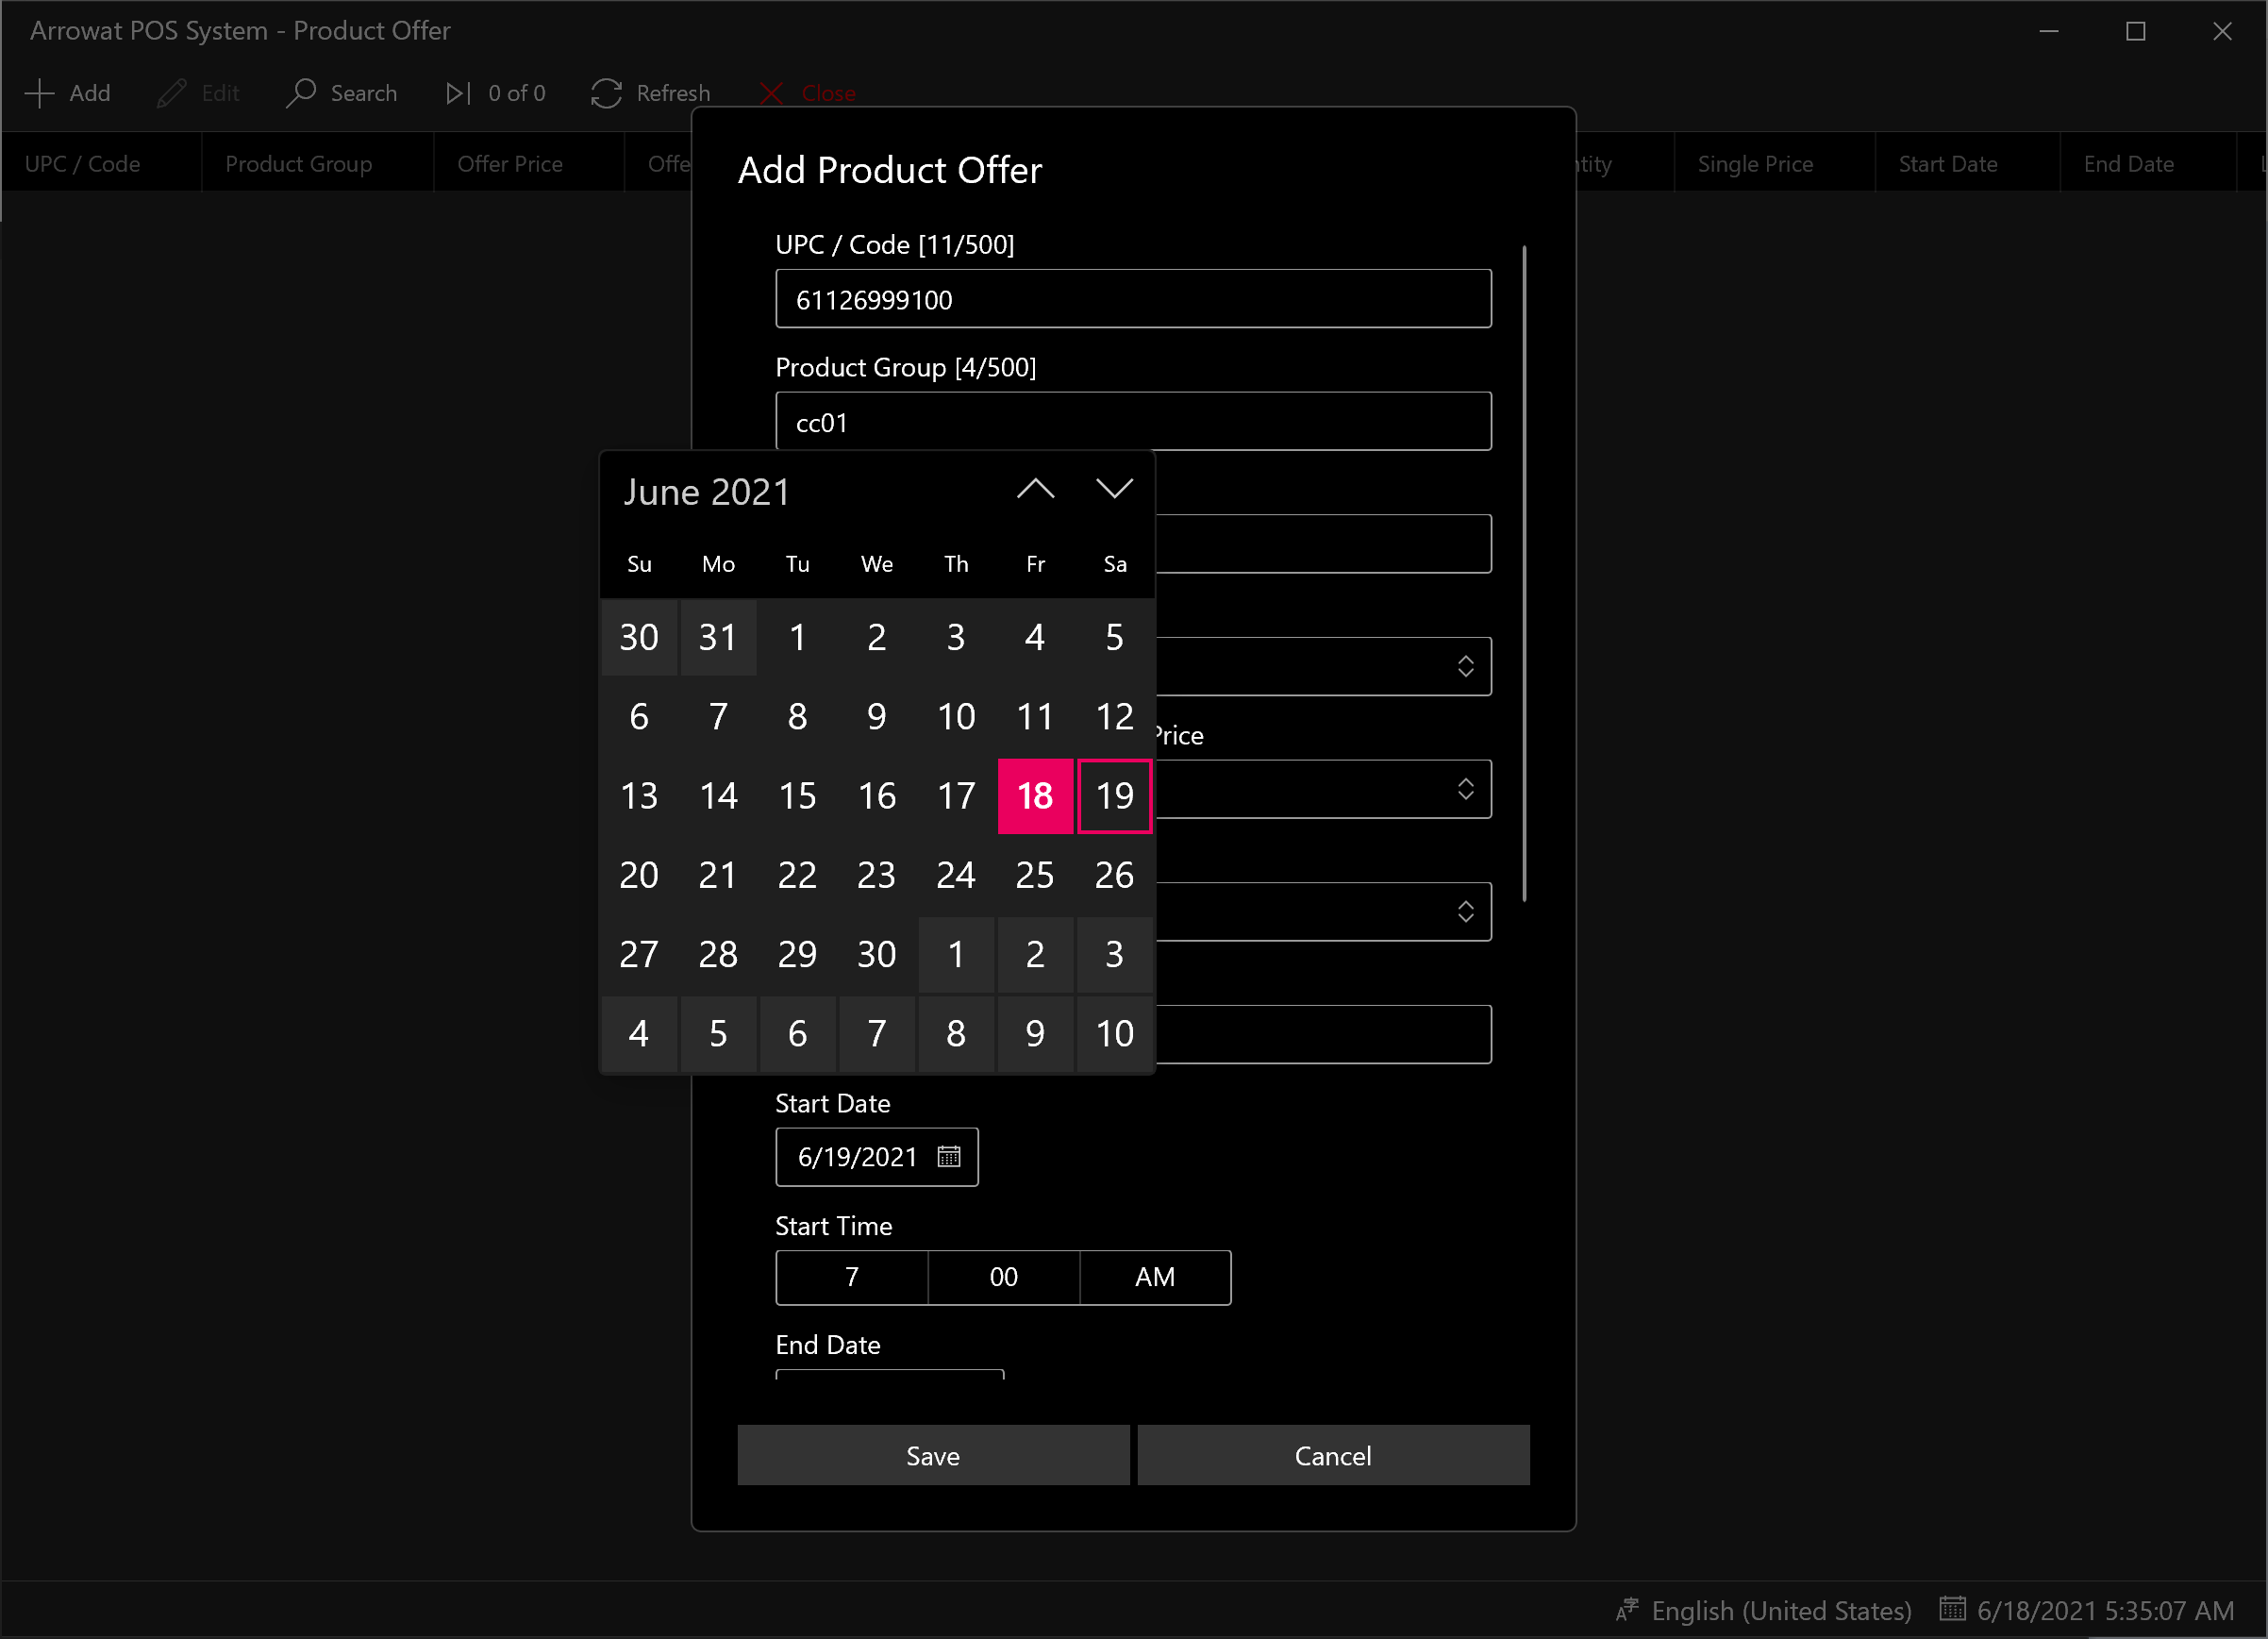
A window form will be shown, fill the texboxes with the information required as following.
- UPC/Code: Enter the Product id or UPC barcode
- Product Group: Enter Product Group or leave it empty. This helps you when you are adding offer for many products that can be mixed to get the price you set up to them. an example is you offer the product brand but they are 3 different flavors you can set a Product Group like "cc01" it depends on you the group id you want to use, but remember all product with the same Product Group will have the same discount no matter what brand is if you set it up in the same they will have the same discount price. you will see it when we start working with POS.
- Offer Price: Enter The Price you will offer to customers
- Quantity By Offer Price: This are the units you will offer by the offer price
- Must Buy Quantity To Get Offer Price: Customer Needs to buy the quantity you set here, if the customer buys less than it They will get the Single Price you set on the Single Price Field, Note that it is applied if the quantity value is more than One (1)
- Limit Offer Quantity: You can put a limit of the product that customer can buy in a single transaction, once the limit is met cashier won't be able to sale more product to the current sale. An Overlimit Message will be shown. Enter Cero (0) to make it unlimited if the number if more than Cero (0) a limit will be added
- Single Price: The Single price is used if the Customer buys product Quantity less than the quantity set on Must Buy Quantity To Get Offer Price Field
- Start Date: Select the date when the roduct offer will start
- Start Time: Select the time that product offer will start
- End Date: Select the date when the product offer will end
- End Time: Select the time that product offer will end
- Notes: Write a note or leave it empty
- Last Updated Date: The last date and time the product offer was updated
Click Save button to save the Product Offer data. if you want to see the list you can click the refresh button.
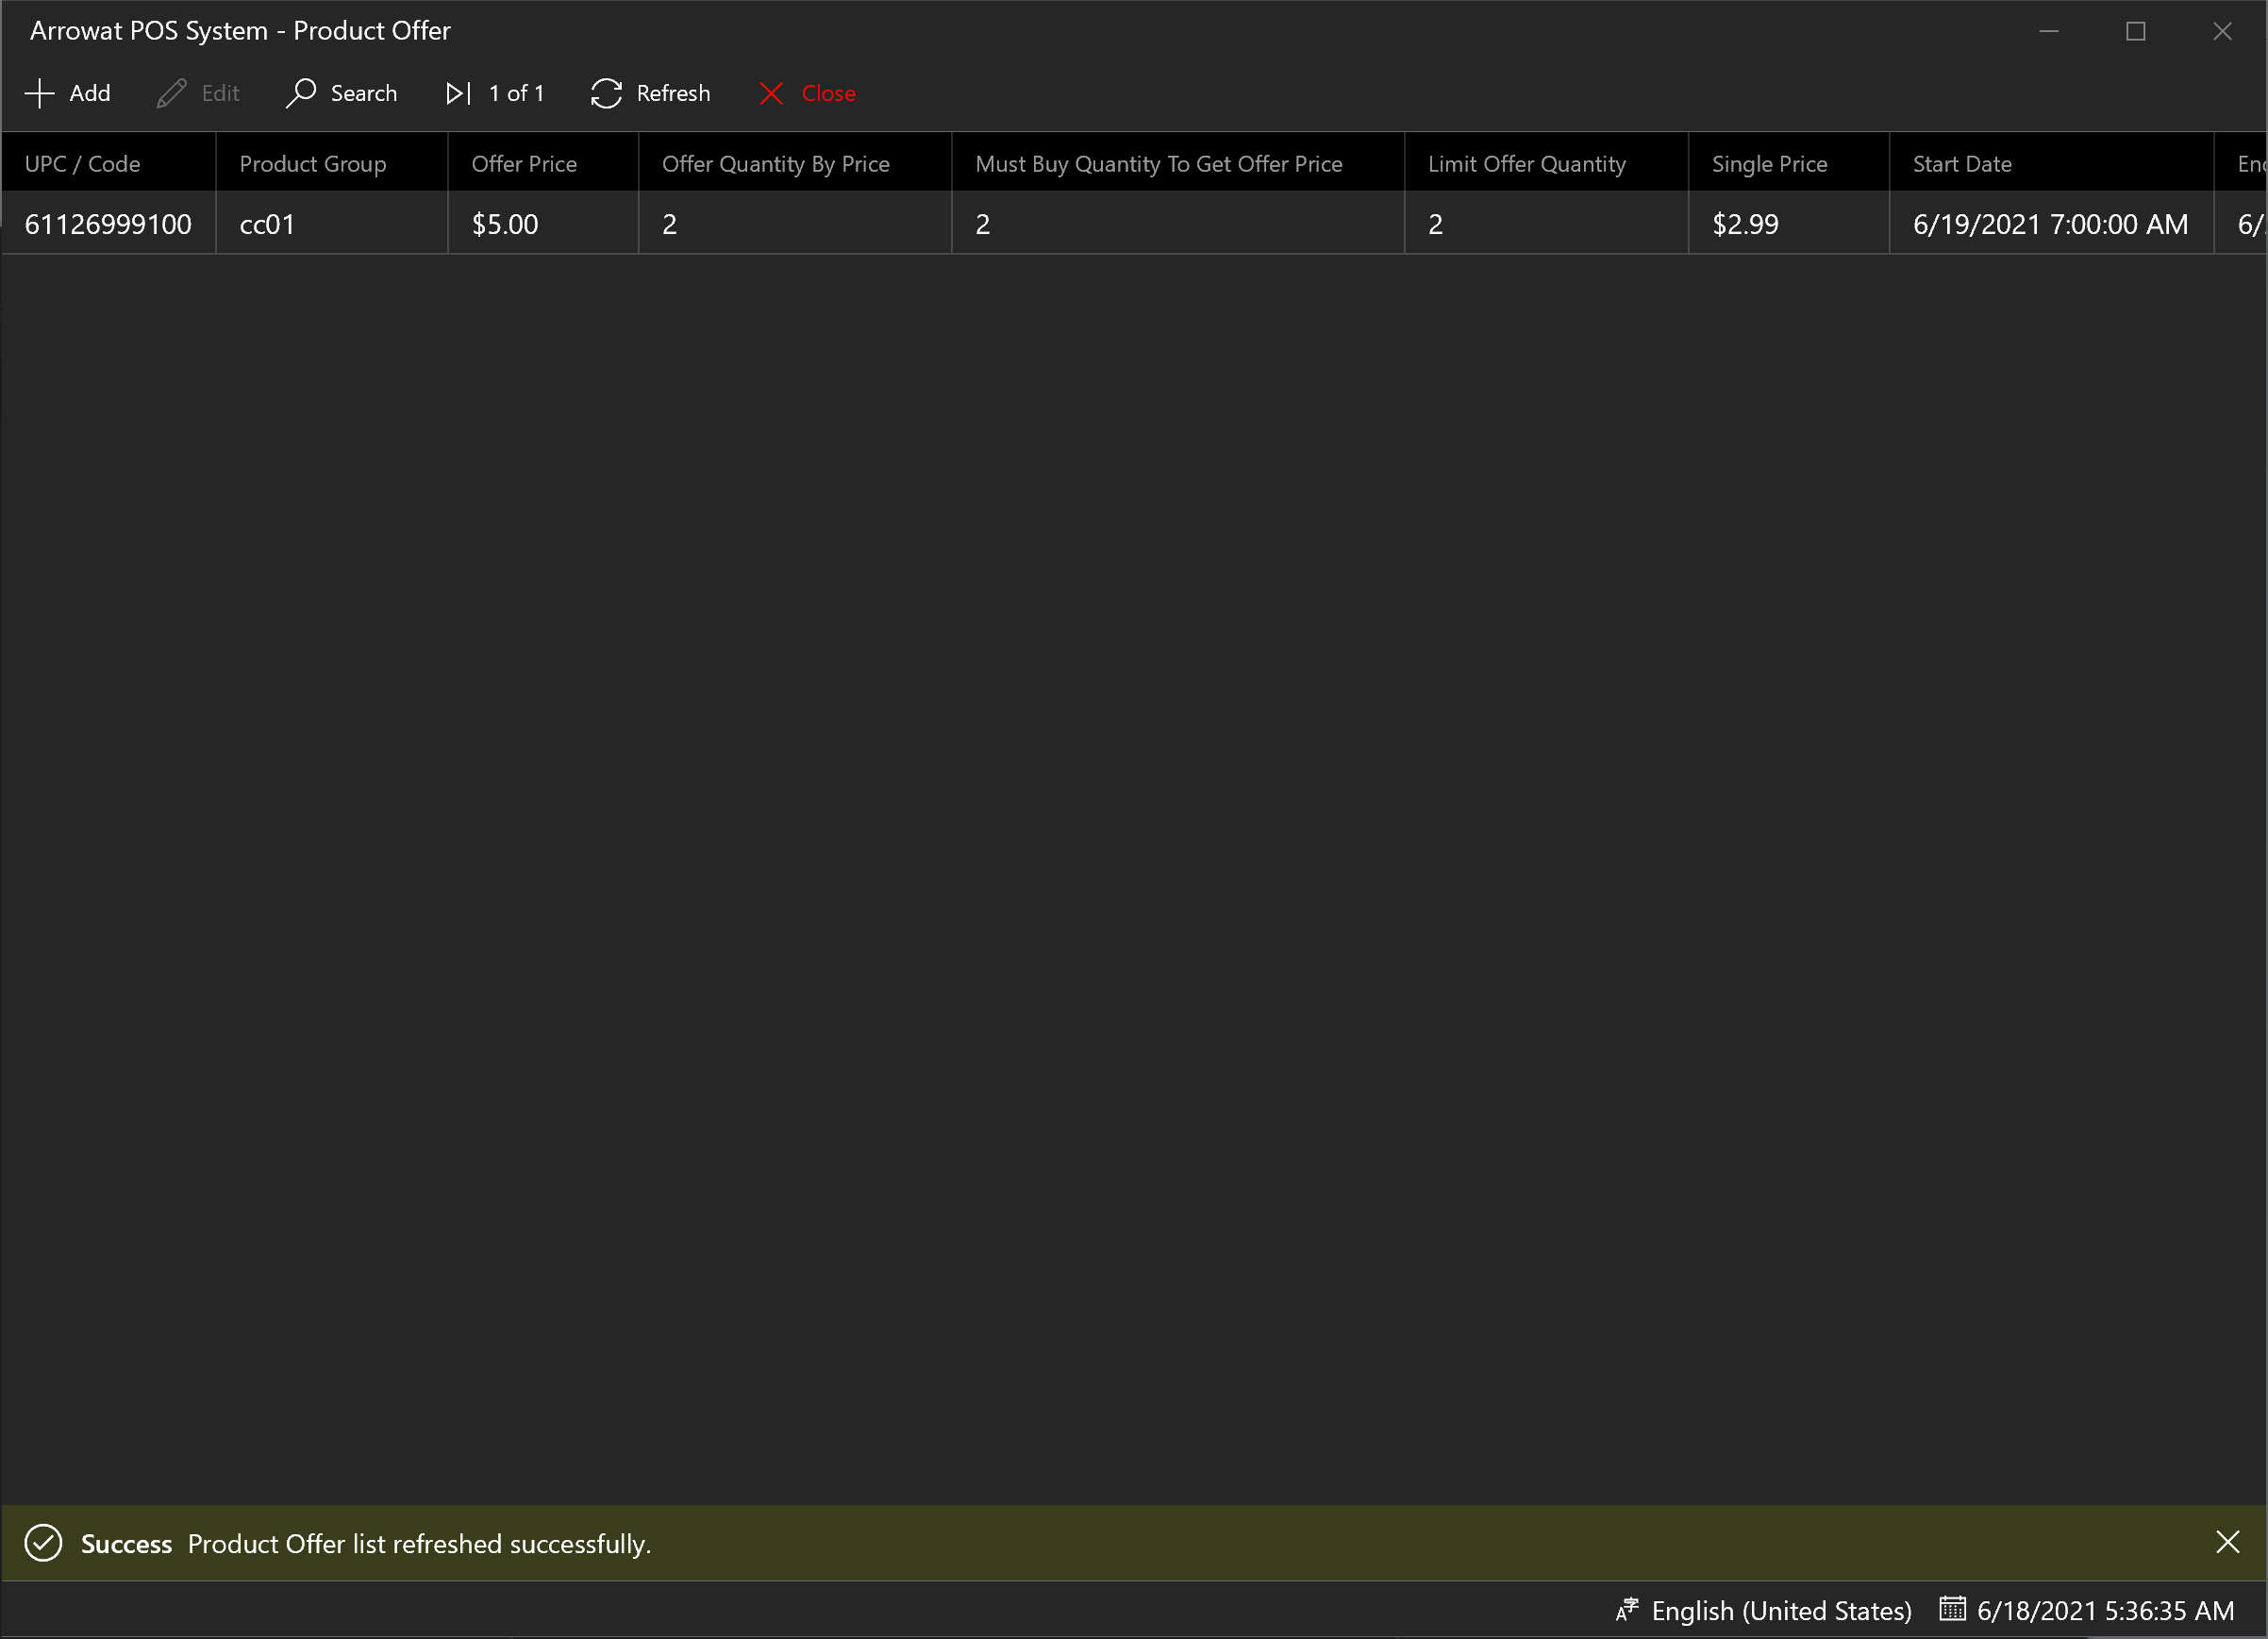
If you want to see the Product iformation Double Click on the UPC/Code a flyout with the product information will be shown

Configuring Store Machine
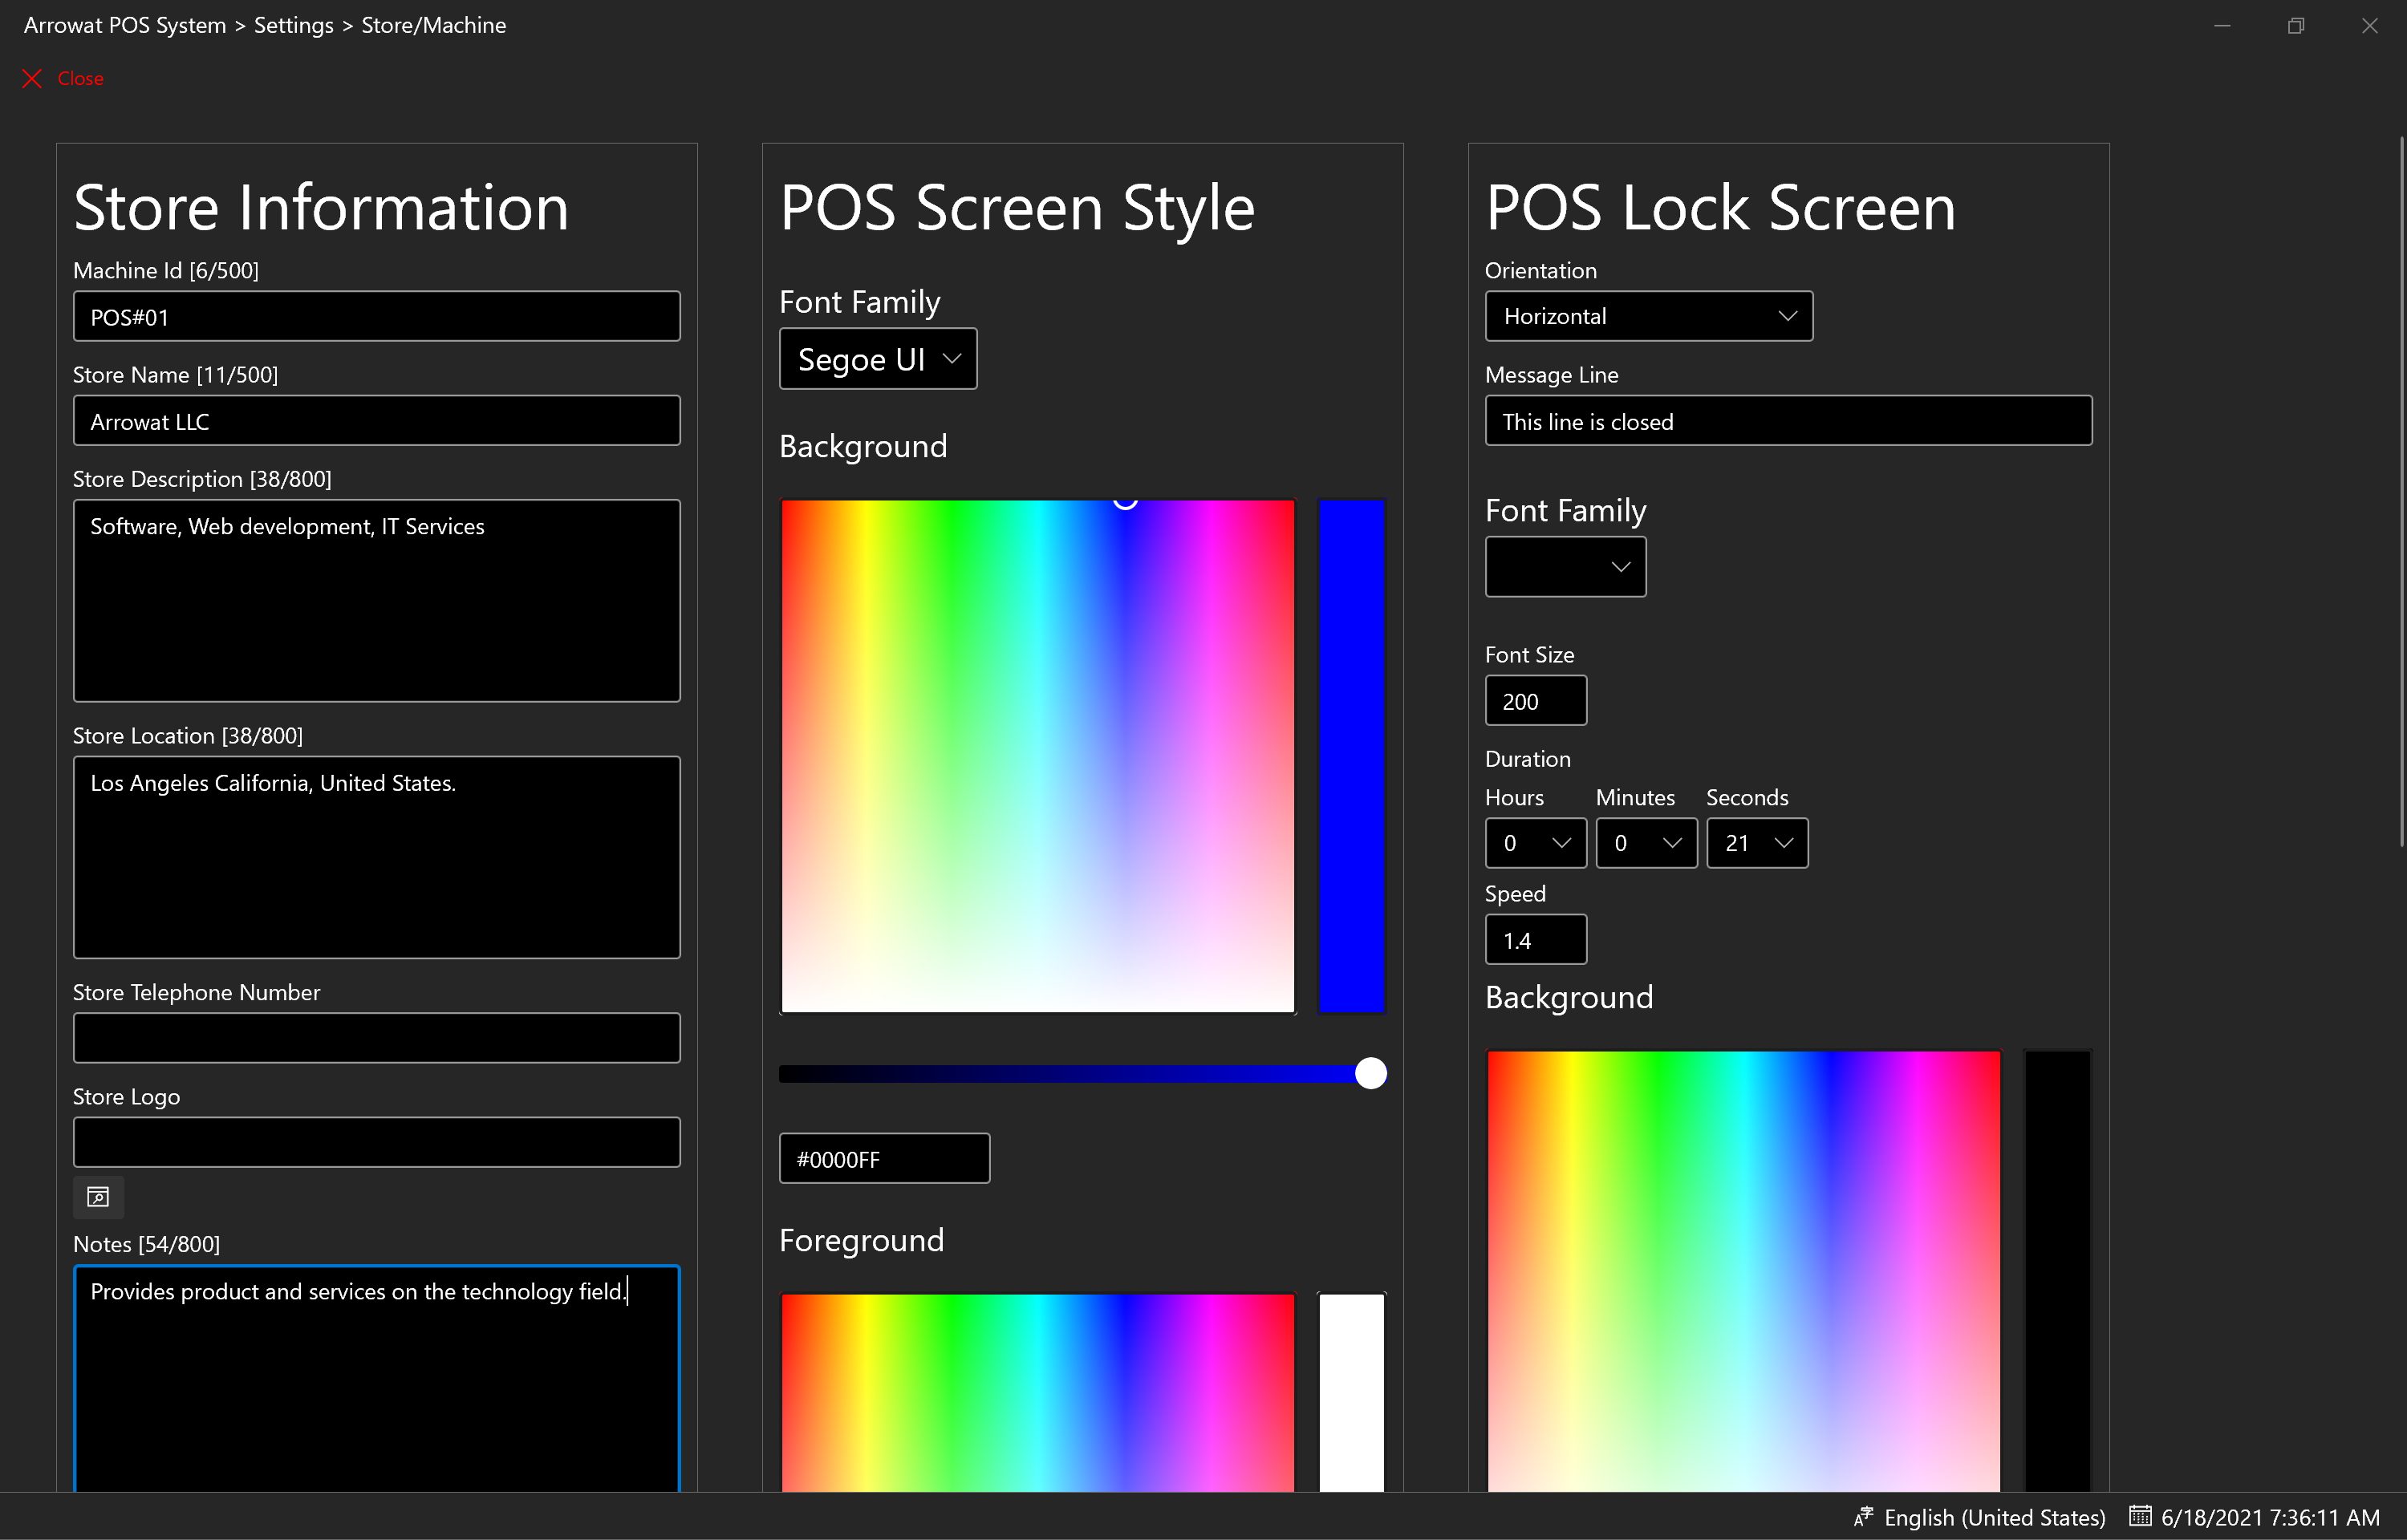
Arrowat POS System lets you configure the information for the machine where the application is installed.
- Store information: has the information of the company or location of your store.
- POS Screen Style: You can customize the style of the POS Screen. Customize the Font-Family, Background-Color, Foreground-Color. Default Background-color is Blue, default Foreground-Color is white and default font-falimy is Consolas
- POS Lock Screen: It display an animated message line on the POS Screen and Second Screen when the the app is locked.
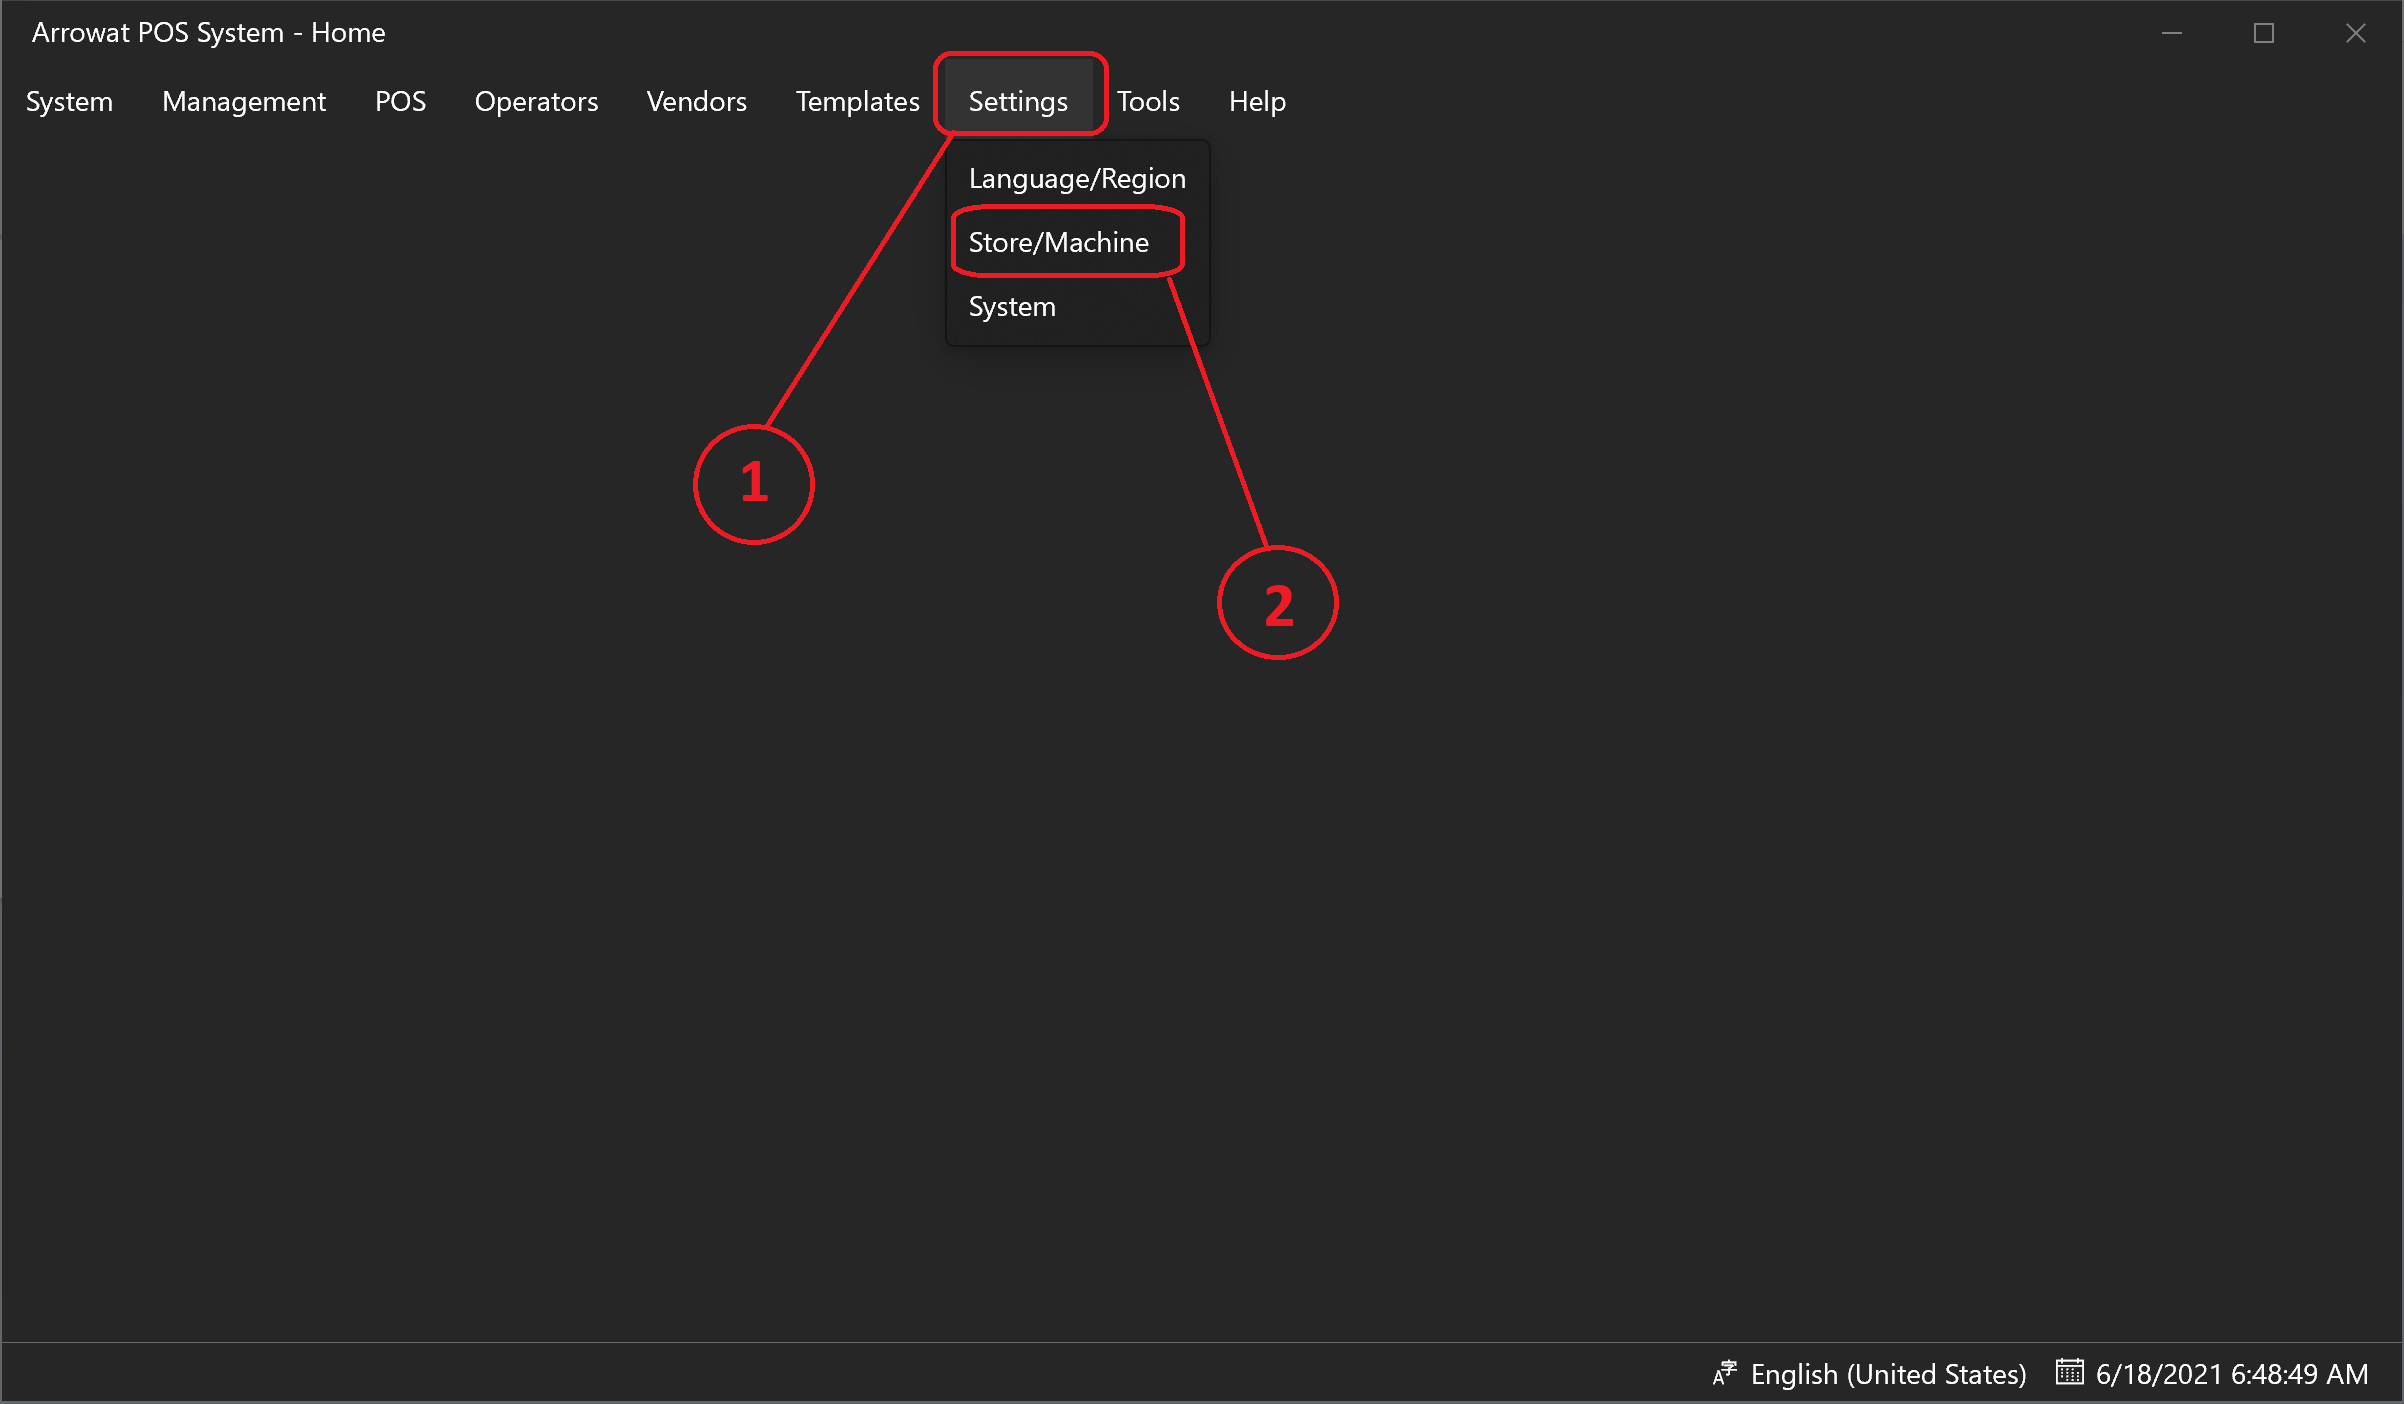
- Open Arrowat POS System
-
Click Setings > Store/Machine
You will navigate to Store/Machine page

-
On The Section Store Information Configure as following
-
Mchine Id: POS#01
Machine id is the id where sales are registered. you will see when you login to the POS as cashier. Note that The Machine Id shown here is an example, you can add your own machine id - Store Name: Name of your store or company name
- Store Description: Describe your store type
- Store LocationIt can be address or information you want to add
- Store Telephone Number: Add Telephone Number or leave it empty
- Store Logo: Seleck the The store logo you want to show on the Login page by Clicking the Browse button, make sure you select a logo from your computer located on Picture Folder.
- Notes: Write a note or leave it empty
Click Save button to save the Store Information data.
-
Mchine Id: POS#01
-
POS Lock Screen Example
Creating POS Receipt
Arrowat POS System lets you crate a POS receipt, using font size, Font family this help you to adapt the receipt to any POS Printer paper size like 58mm, 80mm, 90mm.
- Open Arrowat POS System
-
Click Templates > Receipt Template
You will navigate to Store/Machine page

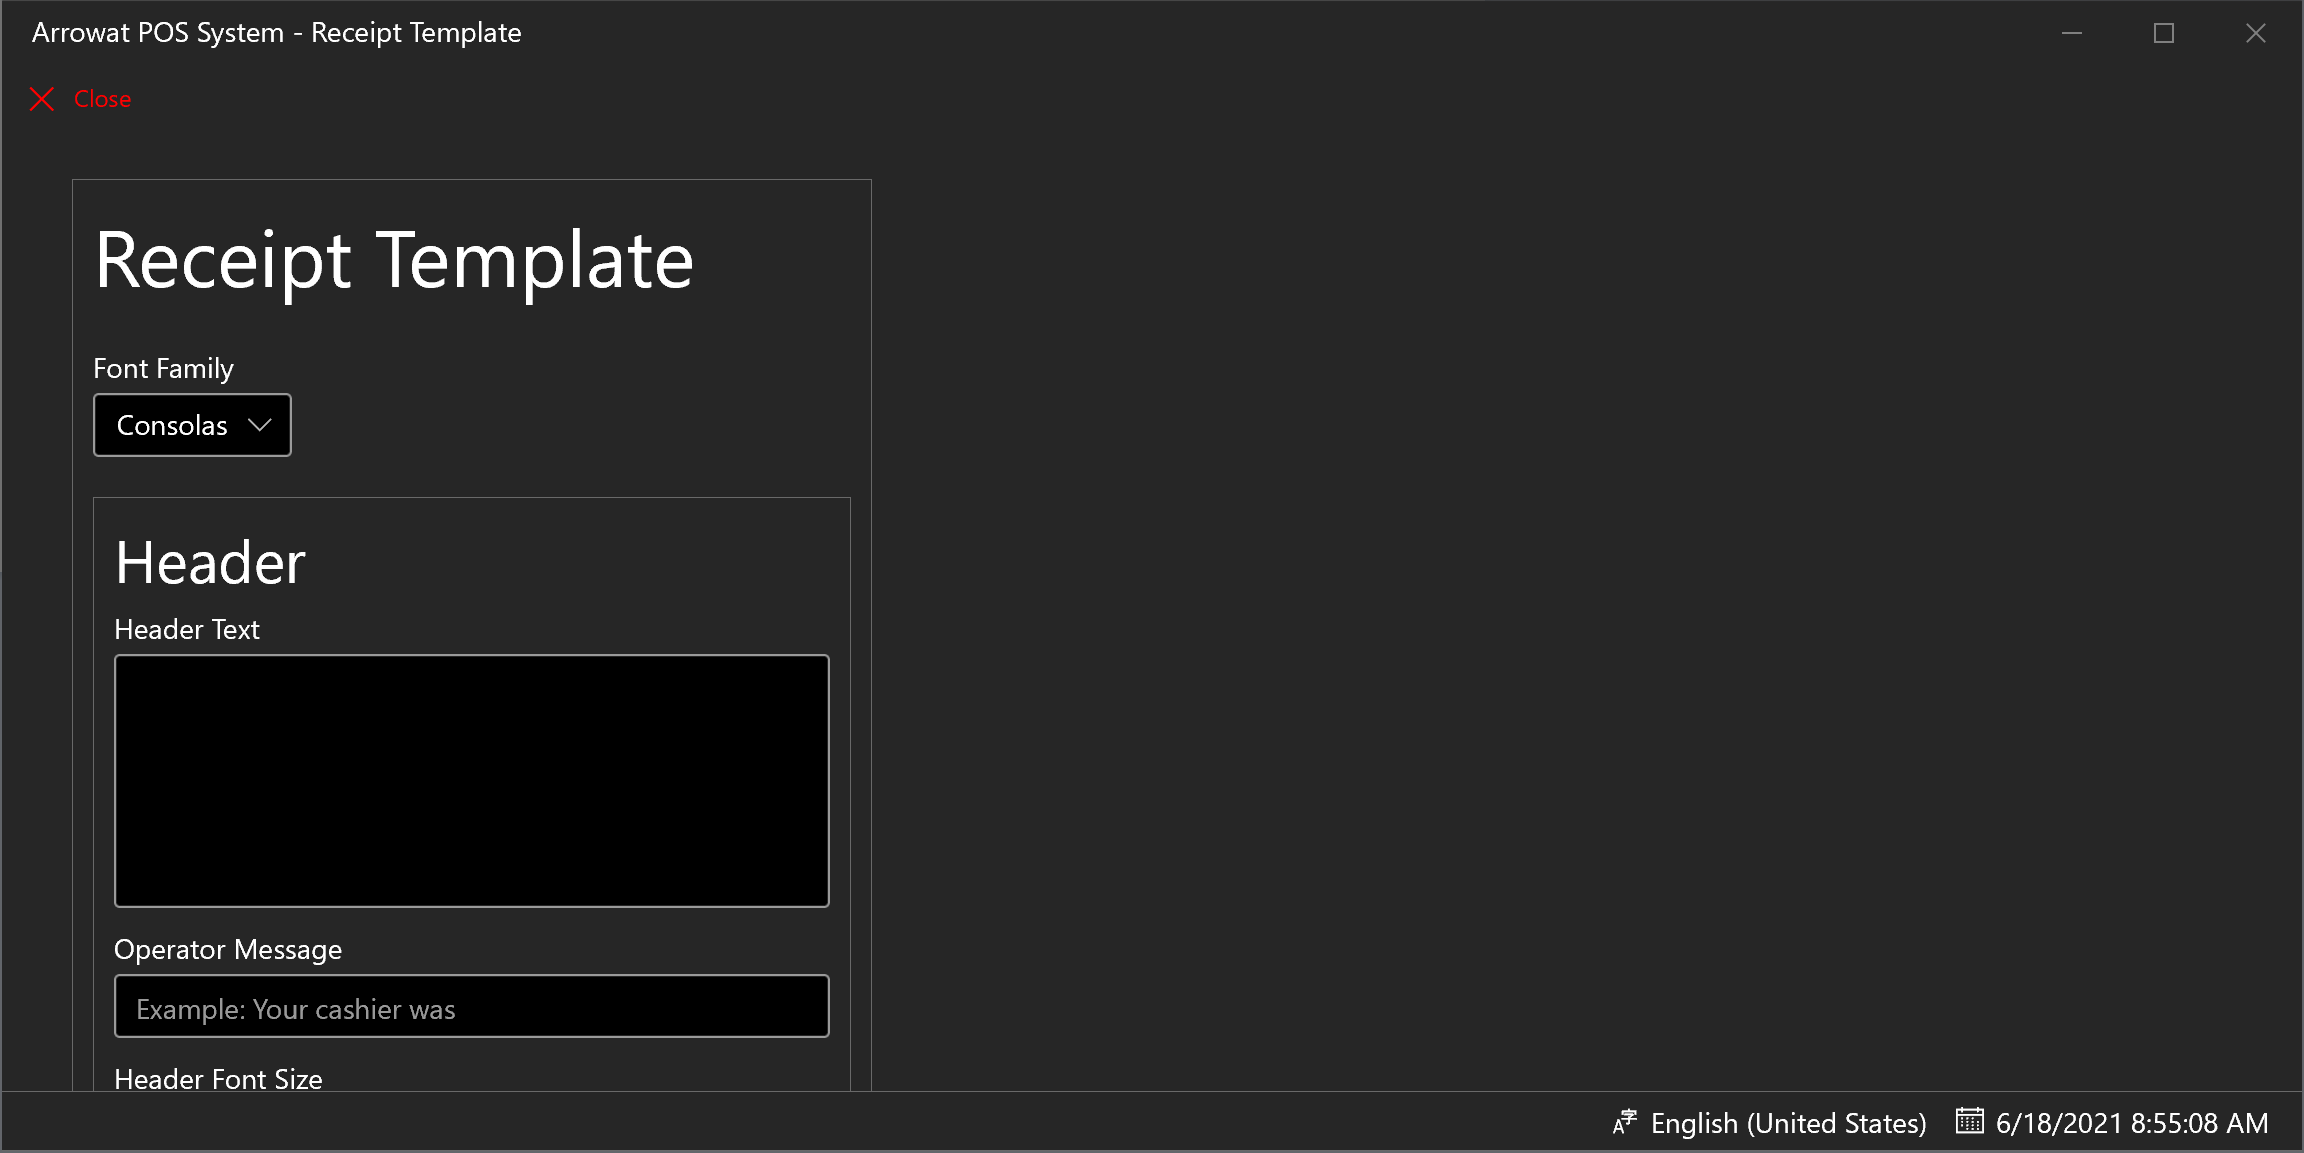
-
On The Receipt Template Configure as following
- Font Family: Select a Font Family You would like to use on the printed receiptl
- Header Text: Write a text that you would like to show to customer on the header receipt at the top.
- Operator Message: In this field you can write a message on any language Like: Le Atendio Con Mucho Gusto:, Your Cashier Was:, etc.
- Header Font Size: The font size. use it as the size you would like to show the header.
- Header Font Weight: Select the font style.
- Header Logo: Select an image from your computer you would like to show at the top of the receipt by clicking the browse button.
- Header Logo Width: The width of the logo.
- Body Font Weight: This are the body font Weight of the receipt, this is the information of the items you sold.
- Body Font Size: This are the body font size of the receipt, this is the information of the items you sold.
- Footer Font Size: The font size. use it as the size you would like to show the Footer.
- Footer Font Weight: Select the font style.
- Footer Logo: Select an image from your computer you would like to show at the bottom of the receipt by clicking the browse button.
- Footer Logo Width: The width of the logo.
- Sub Total Display: This is an option for you how to display Sub Total itsel for example istead of Show Sub Total : $2.99, you can show Total Neto: $2.99.
- Total Display: This is an option for you how to display Total itsel for example istead of Show Total : $2.99, you can show Total Completo: $2.99.
- Total Saved Display: Example: Total Descuento.
- Change Display: Example: Cambio.
- Balance Display: Example: Usted Debe.
- Payment Type Display: Example: Tipo de Pago.
- Items Count Display: Example: cantidad de Productos comprados.
It's upto you how to show the receipt style and information.
Click Save button to save the Receipt Template data.
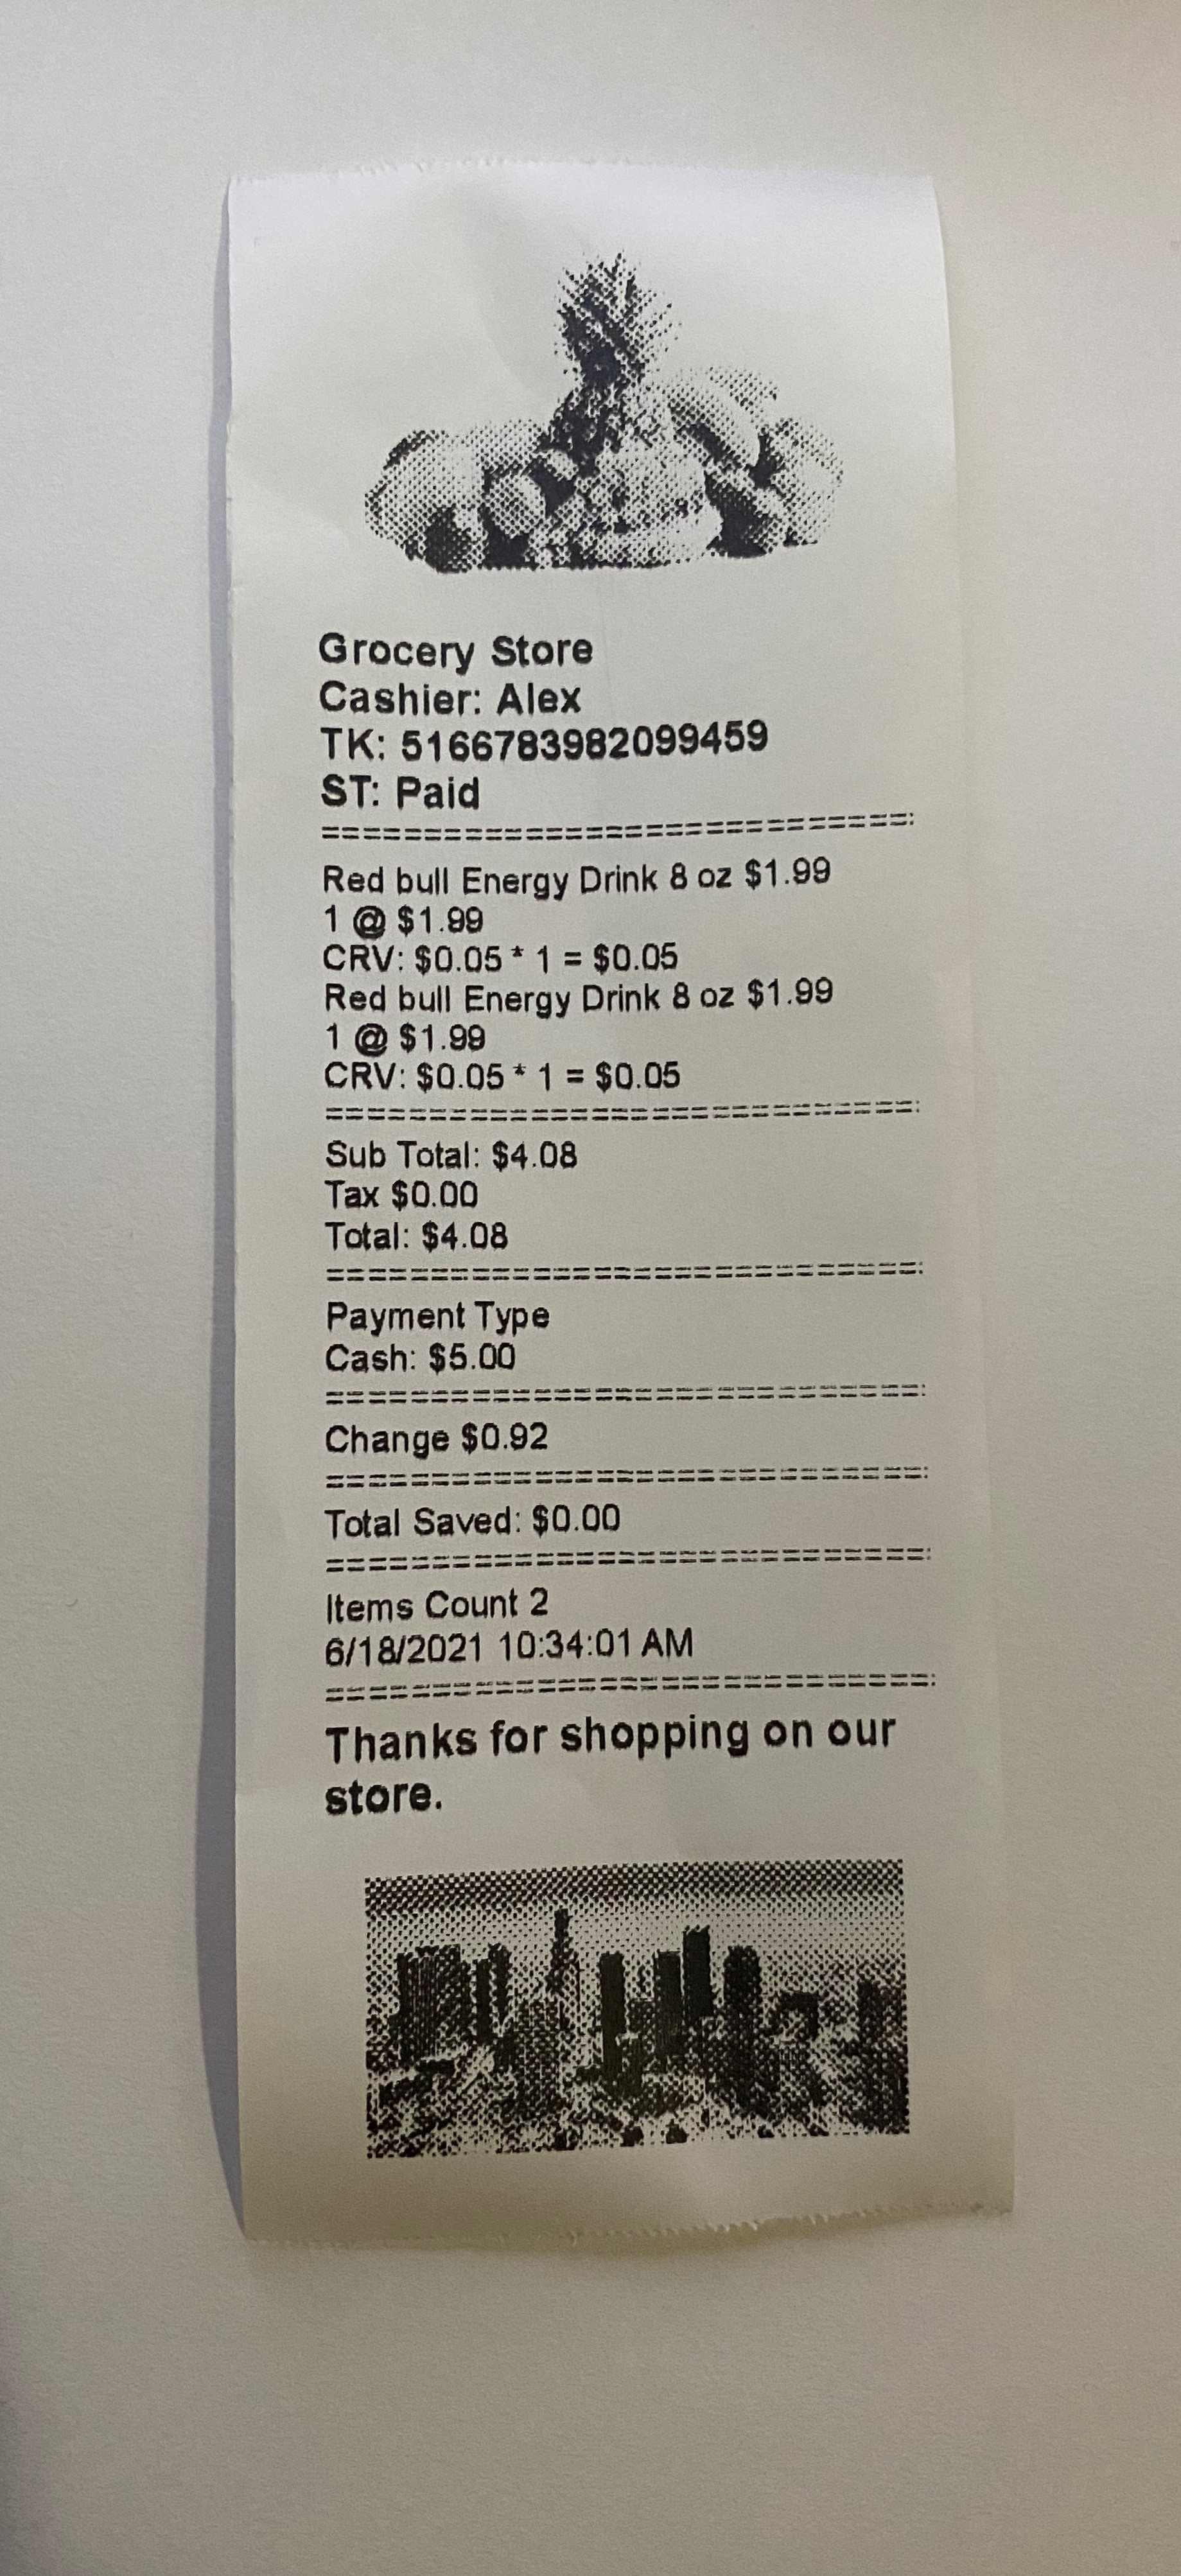
The Following is a receipt example printed from Arrowat POS System. We used a POS Printer paper roll size 58mm.
Arrowat POS System is your POS at your side. the following tutorials will help you how to work with POS and what POS Scanners, POS Printers and Cash Drawer you can use.
About the author
Melvin Dev
This documentation has been written by Melvin Dev, Melvin Dev is a founder and developer of Arrowat LLC.